

meal plan #12: one month family dinner plan
Full month meal plan for the family.
A meal plan for a family using a monthly meal planning template.

Drum-roll please....My meal plan for four weeks.
Yes, four weeks. I know, you're thinking "how does she do that?". But honestly I find it to be easier than having to figure it out every week. I don't do this because I am super mom. I do it because I am lazy, and I don't like having to do the same work over and over again every week.
I figure it out once, and I'm good for a month. And if I don't feel like doing it again, I can just use the exact same one. It's been a month since we've had these meals, so they will all seem fresh again. Seriously I think you could probably use the same four week meal plan all year long, and maybe just make a few seasonal adjustments (like, I'd take out the soup in the summer and maybe do a salad bar instead, and I'd probably swap the roast chicken for grilled chicken).
We are in the middle of this right now, I'm just a little behind on posting. It's working really well so far and making my life a lot easier. For some reason, printing on colored paper just makes it seem more important.
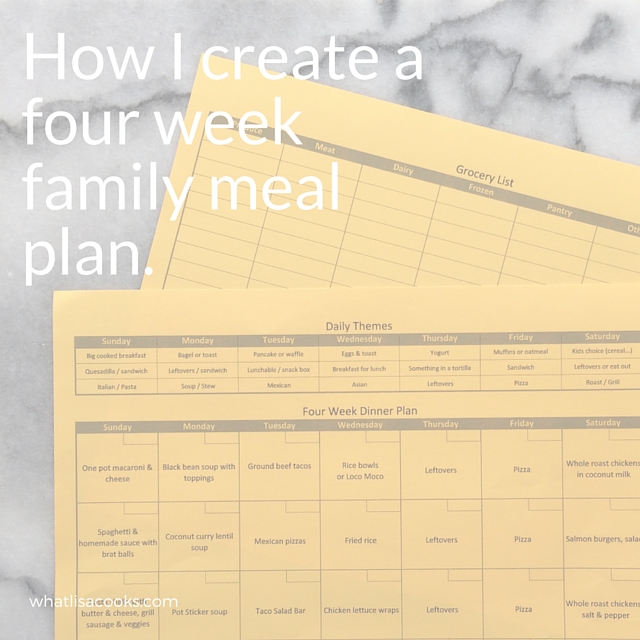
Rather than bore you with all the lengthy explanation in this post, I wrote a whole other post about the why and how of meal planning for four weeks at a time.
You can read all about it here (or click that image over there ==>>)
But for this post, I thought I'd just cut to the chase and get you straight to what's on my plan. This is an easy meal plan for our busy family. Down below I've got a little more detail on some of the dinners, and you'll find my Pinterest board with links to lots of recipe ideas for the things that are on my plan.
And really I didn't mean what I said above about my longer meal planning post being boring. I think it's all pretty useful information and you should totally read it. I don't want you to just copy my meal plan, I want you to feel really good about making your own. So go for it - and be sure to share it with me!
Now, on to this month's plan:
What about the recipes?
Most of my meals are not following recipes. They are just old standards that I know how to cook and I know everybody likes. If you are just getting started with meal planning, or if you just have a super busy life, then I highly recommend that most of the meals you put on your plan be these kinds of meals. Don't make life harder on yourself than necessary. Cook what you know and love.
But when I do need a recipe I consult Pinterest. I think it's the easiest place to look for lots of good options.
I've put together a Pinterest board for you to follow - this is where I will be posting any recipes I am using for the month, as well as a lot of recipes that I will use for just an idea or a guideline, but maybe not follow exactly.
If you want to follow along with my plan, this should give you a good idea of the kinds of things I'm cooking. If you see something on my plan that I haven't pinned a recipe for, please feel free to ask me for one. I'd be happy to help you find one if I can.
A little more detail about some of the meals on this month's plan:
The One Pot Macaroni and Cheese is my own recipe. I haven't done a blog post about it yet, but I'm working on it. I did post it on FB and Instagram though, and I've put a link to that on the Pinterest board. I need to get that recipe actually blogged, I think it might be my masterpiece. ;-)
For ground beef tacos, I actually don't even use taco seasoning most of the time. Just ground beef, browned and seasoned with salt and pepper. Put some meat in a warm corn tortilla and top it with the works. It's simple and wonderful. Also, bonus to keeping it simple - if you brown up a bunch of ground beef and keep the seasoning more generic, then you can use it for another meal. You'll see that I have beef tacos one night, and Asian rice bowls the next night. Simple browned ground beef, reheated with a bit of soy sauce added, makes an awesome addition to a simple rice bowl. But if you really want a taco recipe, I have included a couple of ground beef taco links on my Pinterest board.
Brat balls are my kids favorite. I think we made this name up. Take raw bratwursts, squeeze them out of the casings into small meatball-sized lumps, and simmer in a pot of simple tomato sauce. It couldn't be easier. It only takes about 15 minutes for them to be fully cooked, but if you let it simmer longer than you really get tons of flavor in the sauce. I like to let them simmer for at least an hour if I can. Do this in your slow cooker if you like.
For the enchiladas and Mexican pizzas I make my own sauce. I've just found that even the most mild canned for jarred sauces are too spicy for my kids. With with my homemade sauce they devour it up. I make a big batch and freeze it. I'll share that recipe ASAP, but in the mean time I've posted a similar recipe to my Pinterest board.
The chicken curry I usually make is with a packaged sauce mix. It's one of the very few packaged things I buy. It's an easy weeknight meal. We like a Japanese Golden Curry sauce. You just brown some meat, saute veggies, add the sauce with some broth and coconut milk. It's easy and so good. My secrets: the box says to add water, I use broth and coconut milk instead. And I add a diced up ripe banana. Trust me on this one. It cooks in and dissolves and you'll never know it's there. But it gives a wonderful hint of sweetness and a depth of flavor that you won't be able to identify.
Pot Sticker soup - think of it like Wonton soup, except its a big time shortcut because I'm using store bought pot stickers instead of wontons.
Coconut rice: this is just steamed rice with a can of coconut milk used in place of some of the water. I usually cook a lot of rice - three cups rice and 6 cups liquid. So replace and equal amount of that liquid with a can of coconut milk, and add a little salt.
Salmon burgers are the frozen ones from Costco. Also, a tip: these are great to keep on hand as an easy protein. Crumble one up on your rice bowl, or cut in pieces and put it in your taco or your lettuce wrap.
Let me know if you have any questions!

Meal Planning Template: one month dinner plan template
My template for a four week meal plan and some tips on how I do it.
Easy meal planning template to help you plan a full month of family meals.

I've been meal planning off and on for a long time. As I've gone along, I've tried a lot of different methods and templates and I have really been refining my process as I go. I've got it down pretty well now, to a system that I think is very quick and easy and actually makes meal planning doable for anyone, so I wanted to share with you a little about why and how I do it.
First of all, I'll tell you up front: I'm never going to give you a precise meal plan with 28 recipes you've never tried before, and quantities, and a list of exactly what you should buy. There are lots of sites out there that will be happy to sell you that. But I actually think that isn't really going to work for most people. Every family is so different. Everyone's tastes are different, schedules are different, needs are different. I think that trying to follow a meal plan designed by and for someone else is going to set you up for disappointment. You're not going to keep up with it and you are going to feel like you failed. I don't want you to do that! I want you to feel really good about making meal planning work for you. I want you to feel that sense of accomplishment of knowing that you did it!
The old idea of "Give a man a fish and you feed him for a day; teach a man to fish and you feed him for a lifetime." But my version would be "Give a mom a meal plan and you'll feed her kids for a week. Teach a mom to meal plan and you'll feed her kids for a lifetime". (or at least a whole month!)
But why....
ORGANIZATION IS THE KEY TO BEING ABLE TO ACTUALLY ENJOY THE MOTHERING.

One of the biggest things I've learned as a mother of a lot of kids is that organization and planning are the key to keeping your head above water. I've always been a pretty organized person by nature, but now I see it as critical to my sanity. Sure, you can get by without being organized, but I really believe that life is so much easier and more relaxed when everything is in its place, and you know ahead of time what needs to be happening and when.
I find that I can enjoy my time with my kids so much more when I am not harried and disorganized and always running behind. If I have a plan, and I know it will come together, then I can sit down on the floor and play with trains and fairies and not have to worry about what comes next, because I know I've already got it figured out.
Why meal plan?
This whole idea couldn't be more true than in the area of family meal planning. Personally I find it very stressful to be approaching the end of the day having no idea what I am going to make for dinner, or to go to the store not really knowing what I'm shopping for. When I am out of the habit of meal planning, we don't eat as well and we spend too much. I tend to shop to fill my fridge and pantry, with the goal of just having everything on hand to make whatever I might choose at the last minute.
But when I have a meal plan, shopping is easy and sticking to the budget is actually possible. I work from my list and I don't impulse buy. I can honestly say that in months when I am really on top of my meal planning I have spent almost half as much money on groceries as in the months when I am just buying whatever sounds good.
Planning for a month changes everything.
No matter what 'system' you use, actually sitting down to do the plan can still be a bit of a chore. So why not do this chore just once a month, instead of every week? Think of the time you will save! The real holy grail of meal planning, in my opinion, is to do it a month at a time. When I do that, I LOVE it. I love just looking at my plan and knowing what's for dinner for weeks to come.
This is also the secret to saving money on groceries, and saving time on shopping. If you buy for a month rather than a week, you can buy in bulk and plan multiple uses for larger quantities of foods. When I plan this way I will go to Costco at the beginning of my month and buy all our meat and pantry items, and anything else that can be frozen. (My 'month' starts the week after my husband's mid-month paycheck - it's the check that we actually have some money to spend, because the mortgage and health insurance have been paid from the end of month check.) I freeze meat, bread, tortillas, etc. and pull it out each week as I need it. Then all I need to shop for each week is dairy and fresh produce, and whatever small things I might need for a particular recipe. A big grocery trip and big bill once a month, but then just small grocery bills for several weeks after that.
Give yourself a box to work in.
Whether you plan for a week or a month, one of my biggest keys to success is having a schedule of themes to follow. I assign a theme to each day of the week, according to our family schedule. We have days that are very full (with therapy and dance and soccer), and we have days with no extra plans. I work around those constraints to know which days I have time to cook and which days I don't, and choose my themes based on that.
This is the schedule that's working for us right now:
Sunday: Pasta (or something Italian-ish)
Monday: Soup or stew (something I can make ahead in the slow cooker)
Tuesday: Taco Tuesday! (or something Mexican-ish)
Wednesday: Asian
Thursday: Leftovers
Friday: Pizza
Saturday: Roast or grill some meat.
When you do it this way, the meal planning seems so easy. Now all I have to do is come up with 4 Pasta or Italian ideas, 4 soup or stew recipes, 4 Mexican meal ideas, and 4 Asian ideas... You get the idea. It seems so much more manageable when I break it up that way. I start with pencil and my ideas, and just start filling in boxes until it's all full.
Of course this doesn't mean that you can't stray from your schedule. It's really there just to give you an easy place to start with coming up with ideas. But if you have a recipe you want to try that doesn't fit your themes, then write it in.
I follow a schedule for breakfasts and lunch too. But those basically stay the same each week, so I don't plan individual meals against those. For the kids breakfast I rotate through basically the same 5 things every week, maybe with a some slight variations. I follow a theme for their lunches too. So if you've paid attention you might notice that I always do breakfast-for-lunch on Wednesday, or some kind of sandwich on Friday. That structure gives me a place to start, but the actual lunch is never really the same twice. It works.

Plan even more ahead, and be flexible.
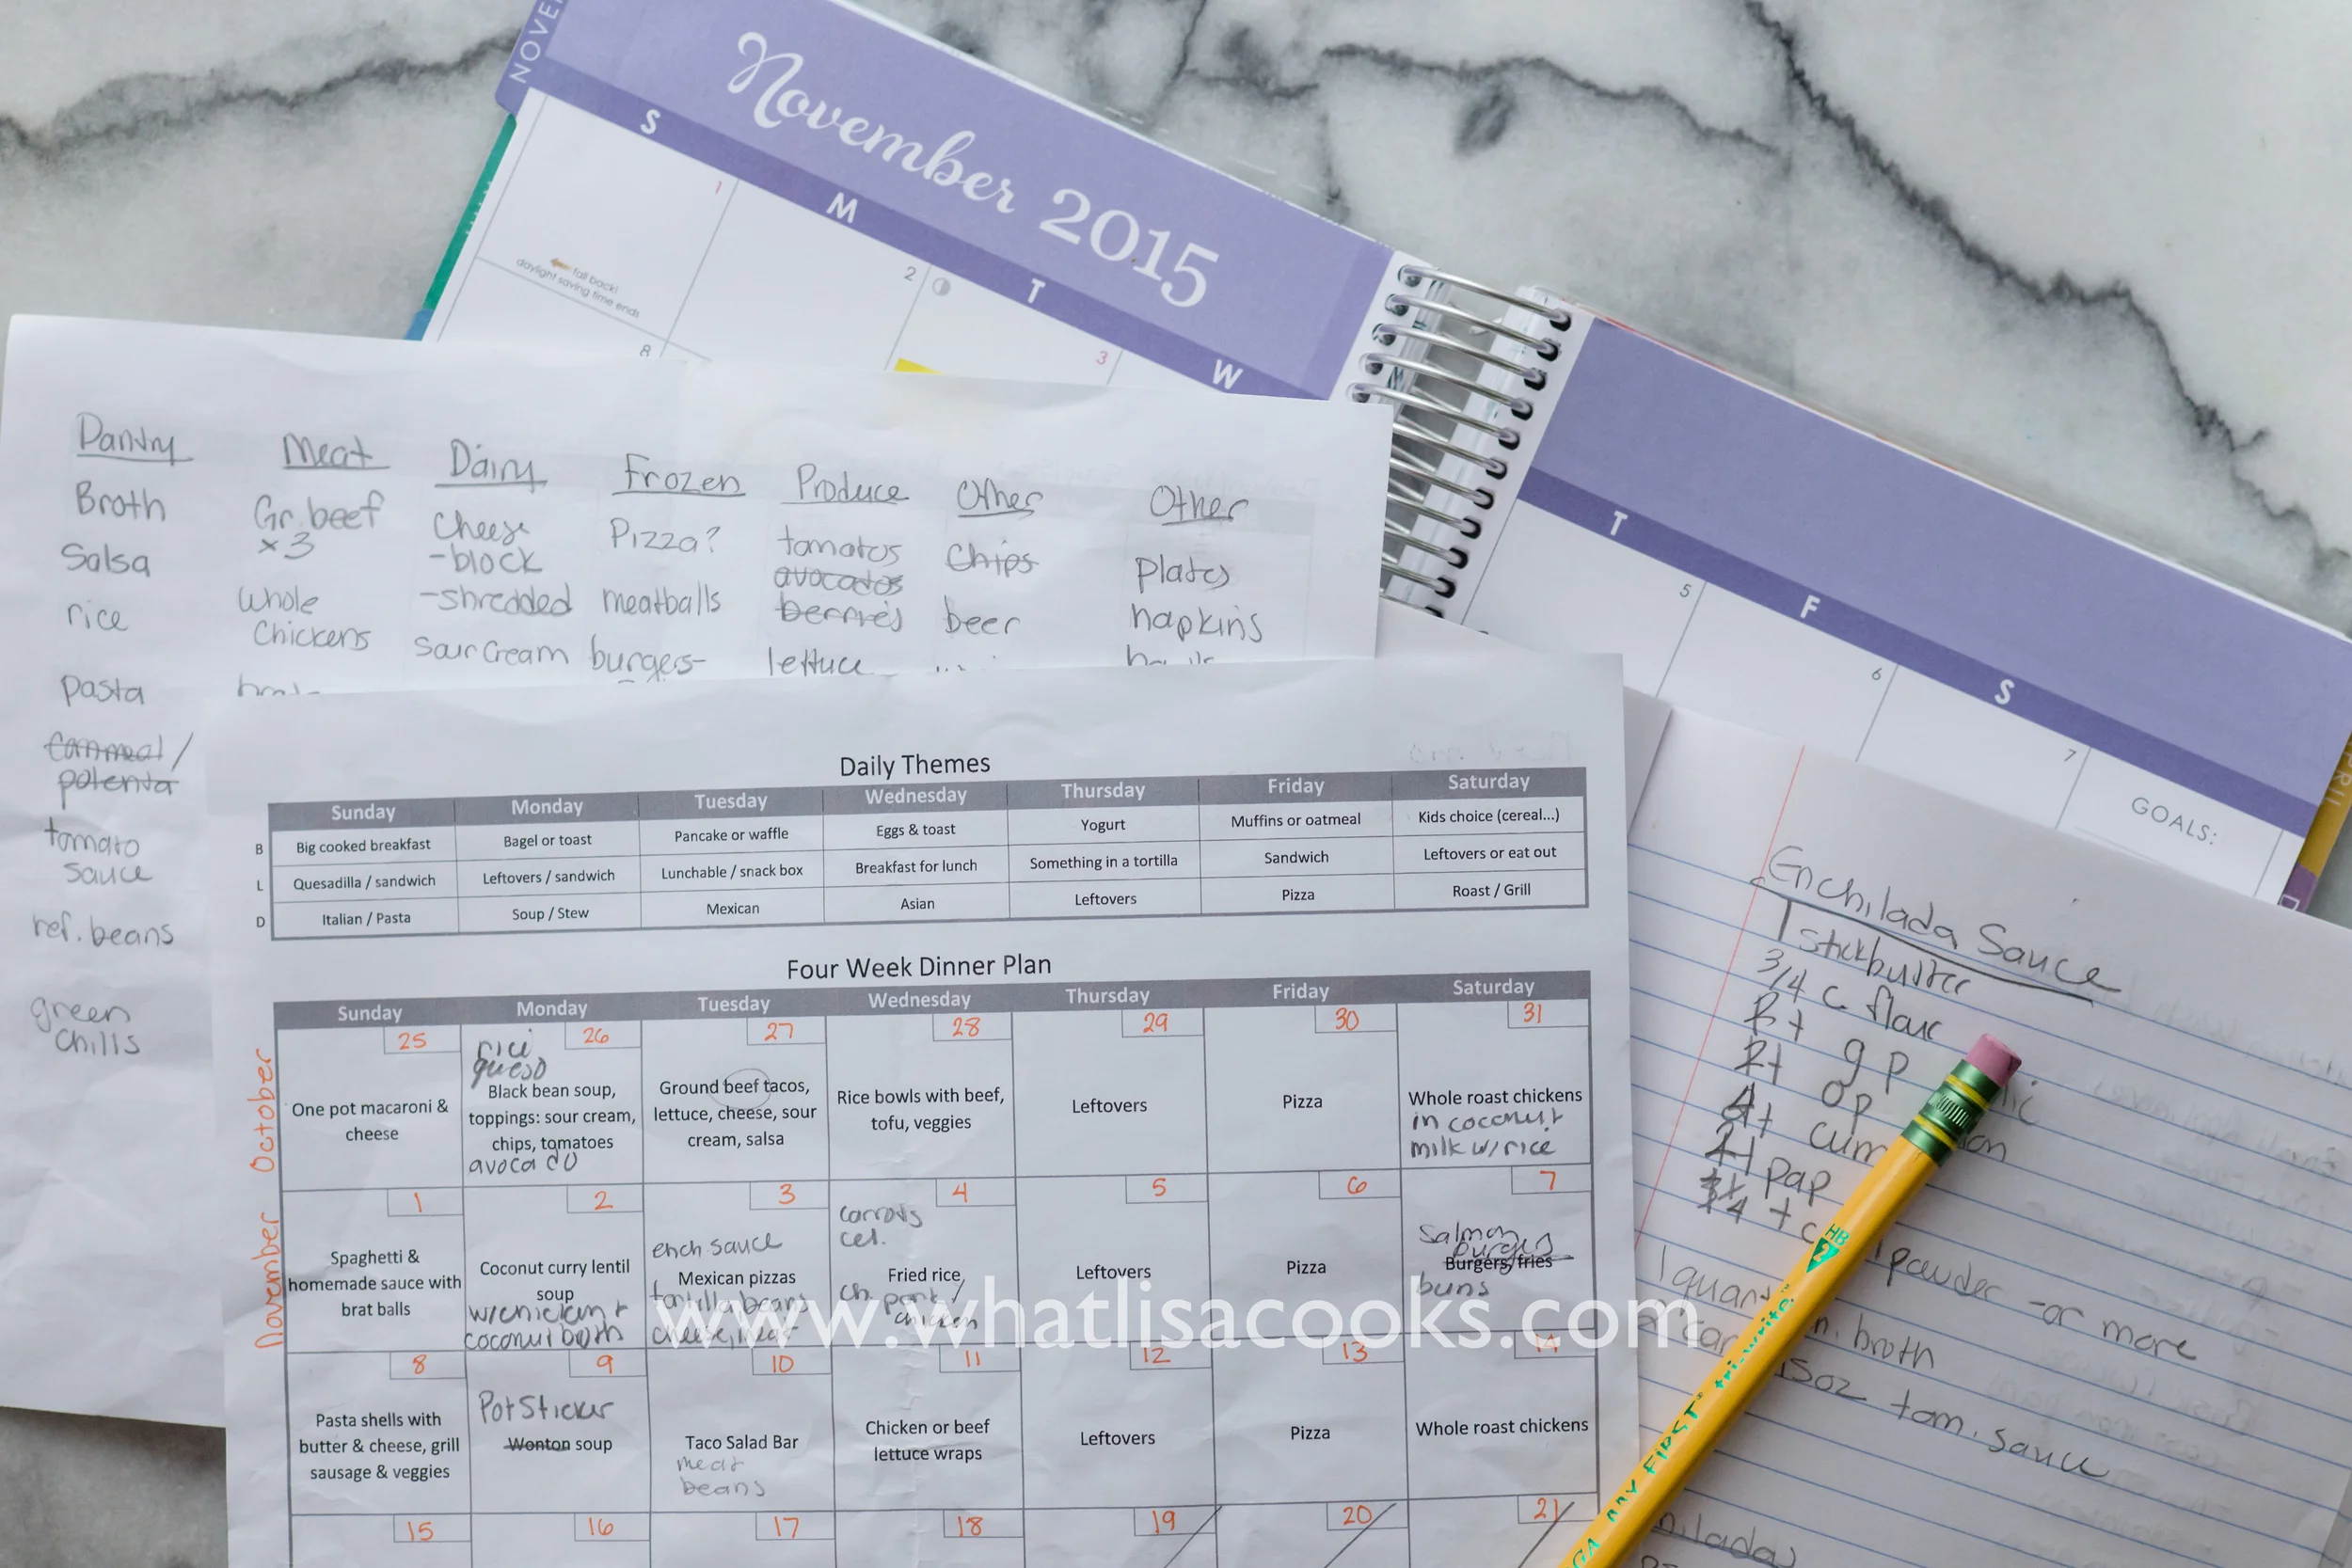
I'm always looking at recipes. It's just what I do. So if I come across an idea for something I want to make, then I want to add it to my plan. On the back of my printed meal plan (which is always close by), I usually have a scribbled list under the heading "Next Month". I'll just jot down ideas as I come across them, and often by the time I get around to doing the next meal plan I've already got most of my ideas already figured out. I also do the same for repeats - if I made something that was just a really big hit with the kids, then I definitely want to make that again. I'll just circle it on my plan, or add it to my "next month" list.
The meal plan is never really totally set in stone. Things get crossed off and rearranged. Plans get changed. But the nice thing about having planned and shopped ahead is that I've already got the food I need, so I can easily adjust to a change in plans. If an appointment comes up, or a late meeting, I'll just push out a more complicated thing I had planned and pull out one of my quicker meal ideas instead. By the end of the month my printed plan is always very well loved and scribbled on.
What about the recipes?
I think a lot of people get stuck at meal planning because they think they have to have a new recipe to write in each box. Don't do that to yourself!
My meal plan consists of mostly old favorites, things I know how to cook without thinking about it, and things that I know my kids are going to eat. Honestly I only try a totally new recipe maybe a couple of times a month. Often I try just a new or different twist on an old favorite - I know how to cook my version, but I will often look it up on Pinterest anyway, and try somebody else's version of an old favorite.
This is where the themes really helps. Once you have a general idea of what you're going to make, you can fill in a few old favorites under each category. And then consult Pinterest for a few new ideas.
I've got a ton of recipe ideas on my Pinterest boards. If you're not already following me, you should be! I also started a new board with links to recipes for the kinds of things that are on my current meal plan. I think I'll add a new one each month, so you'll always have the archive of the recipes that went with each month's plan.
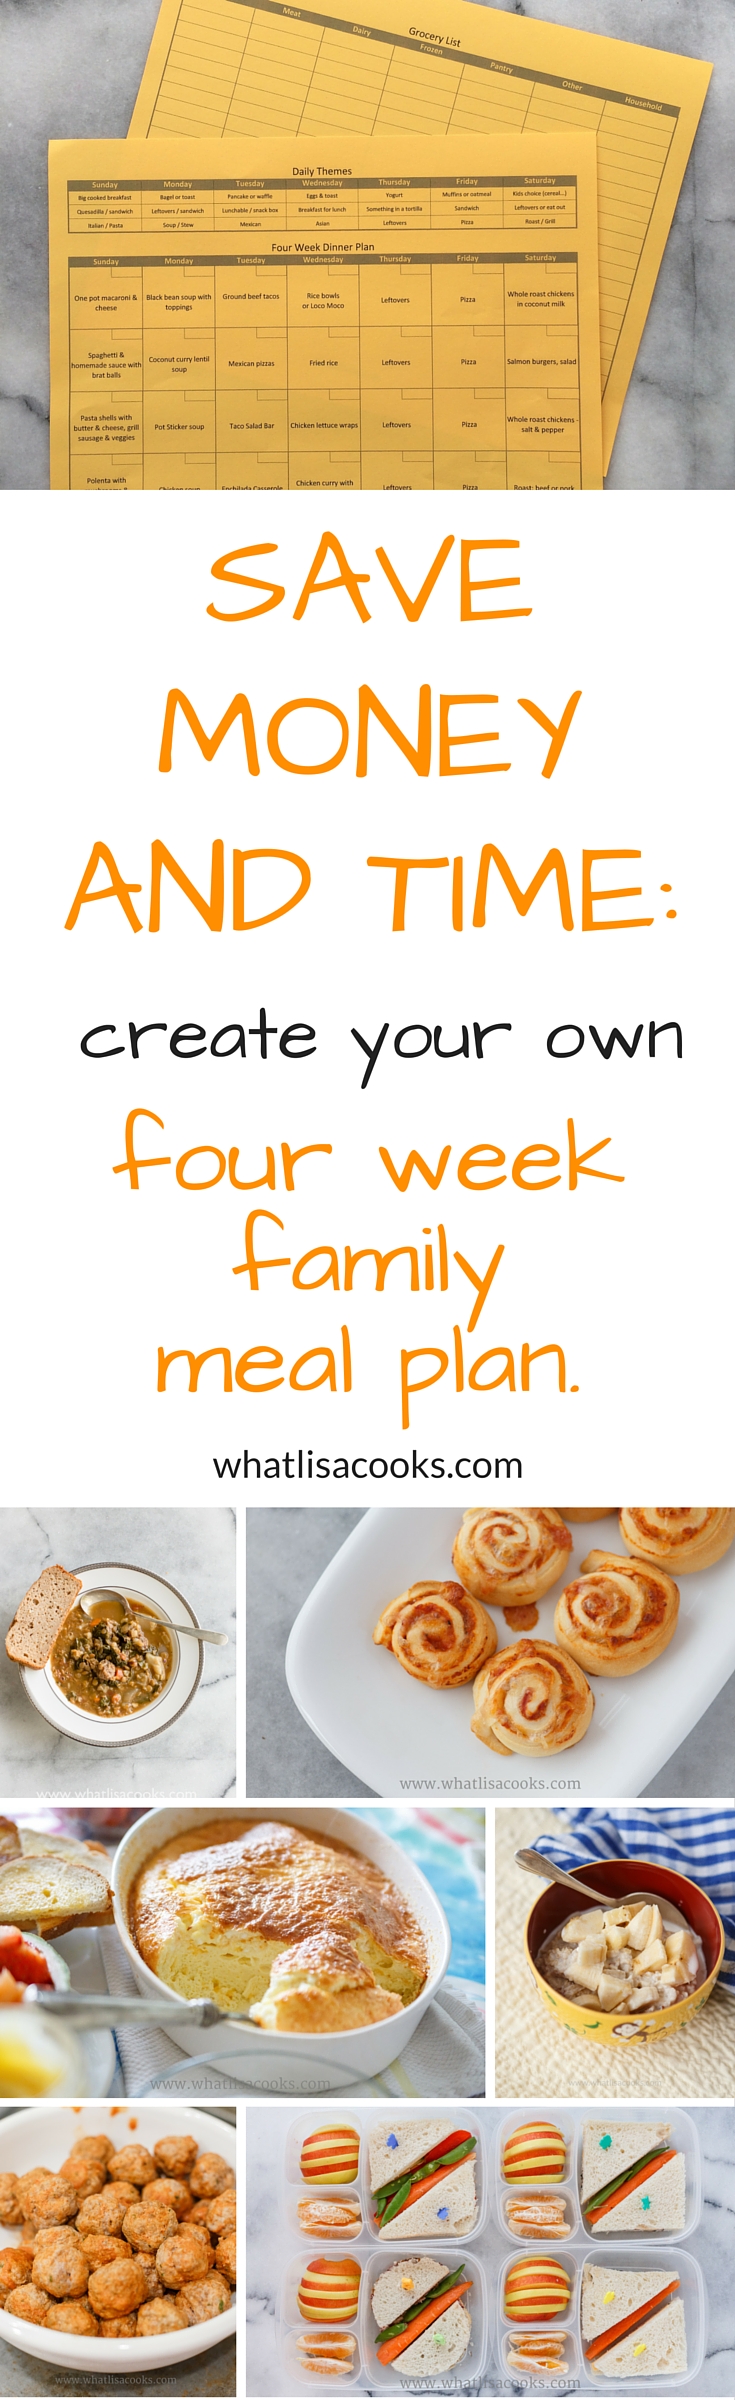
Ok, a lot of talk. Now let's get to it. My templates.

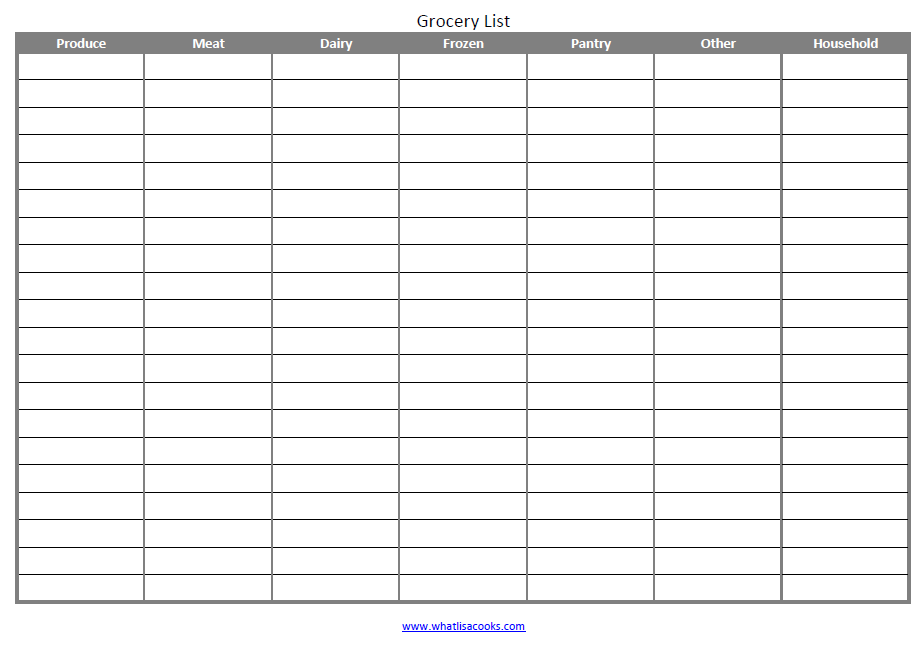
click for the full Excel workbook
You can click each of the images below to get a pdf version if you want to just print it. But if you want to really go for it and edit your own, here is the link to the full excel workbook. The workbook has three tabs - one is the filled out plan you see below, one is the blank template, and one is the blank grocery list template. You'll need Microsoft Excel to open it.
Here is an example filled out four week plan, with daily themes:

Here is the blank template

Lazy mom's fish tacos
Taco night is practically a ritual at our house. We take it seriously. But that doesn't mean it has to be a ton of work - it just means it has to be good!
We also don't want to have the same thing for taco night each week. I like to keep it as an easy meal, but mix up the ingredients a bit so it doesn't get boring. We do tacos with ground beef, or beans, or chicken cooked any number of ways, and one of my favorites is fish tacos.

This is one of my favorite weeknight dinners, and a super easy way to do taco night just a little different. If you like fish tacos, but feel like you can't have them at home - you need to try this.
Basically, you just find some good quality fish sticks and cook them in the oven according to the package directions. (I like to let them get a little crispy.)
We like the fish sticks from Costco, and Trader Joe's has some pretty good ones too. Use any ones you like. I've also done this with other kinds of frozen fish - frozen filets meant for fish & chips, or other kinds of breaded fish. Whatever you like works great - as long as it's quick and easy!

And then, you just do all the usual taco stuff - lettuce or cabbage, sour cream, cheese, tomatoes, avocado, green onion...
For fish tacos I like to add a squeeze of lime, and some fresh cilantro is really nice if you have it. Basically, anything goes!
This is a great meal to have kids help with - small amounts of cutting, picking off cilantro leaves, mashing avocados, filling bowls. They can really feel like they are participating in the meal, even though there is very little actual cooking involved. There are plenty of opportunities for lots of jobs for little hands.

My family loves this kind of meal because they all get to make their own. I have found with my kids that the most successful meals are the "make your own" type of meals - kids love having some control over what goes on their plate. I try to give them a guideline that they have to have some protein and they need to choose at least one vegetable, and beyond that they can control their own.
Let me know if you try it - and what kinds of combinations you come up with!
Lazy Mom's Fish Tacos
Ingredients:
- Good quality fish sticks (or other frozen fish that you like)
- Taco sized tortillas - flour or corn
- shredded lettuce or cabbage
- limes
- sour cream
- guacamole or avocados
- cilantro
- diced tomatoes
- green onions
- salsa
- any other toppings you like!
Optional:
Serve with chips, rice, beans - whatever extras you like.
Directions:
Cook fish according to package directions. Serve fish, tortillas, and all toppings buffet or bar style. For standard sized fish sticks we do 2 fish sticks in one taco sized tortilla. You could also use bigger tortillas and make fish burritos.


Freezing Pasta
One of the keys to success around a house with 4 little kids is being prepared. For meals on busy days that means having things prepared ahead of time. A couple days of the week when we are running around to therapy appointments or classes in the afternoon I try to get dinner made in the morning and have it ready for us when we get home at 5:30. But that just doesn't always happen. So my solution on those kinds of days is to have things in my freezer that are easy to pull out and quickly serve. One of those things is cooked pasta.
A few years back I noticed that Trader Joes was selling bags of frozen cooked pasta - you just pop them in the microwave and serve, with cooked pasta ready in just 3 minutes. I bought those for a while. But as little bodies and appetites grow and grow, buying packaged things like that gets expensive - one bag of pasta doesn't do it for us. So I freeze my own now.
Whenever I am cooking any kind of pasta, I always, always make extra and freeze it. I do this with any kind of pasta. Penne is a favorite, because it's sturdy enough that it can hold up to being tossed around in the freezer a bit. All you do is just toss your cooked pasta with a little oil or butter, let it cool, and then spread it out on a baking sheet to freeze without sticking together. Then dump it onto a ziploc bag. When you want to use it, pull out the amount you want and warm it up. You can do this in the microwave for a couple minutes. Or you can put a little hot water over it and let it sit for just a minute or two - this method works especially well if the pasta got a little dry in the freezer.
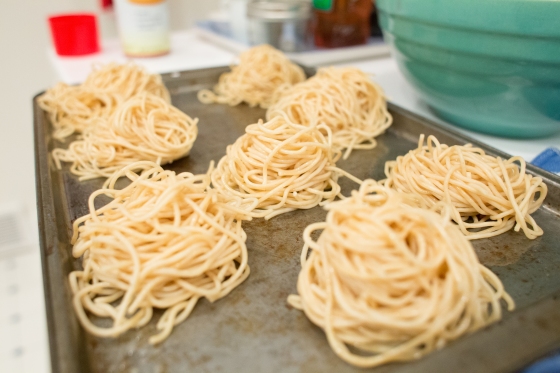
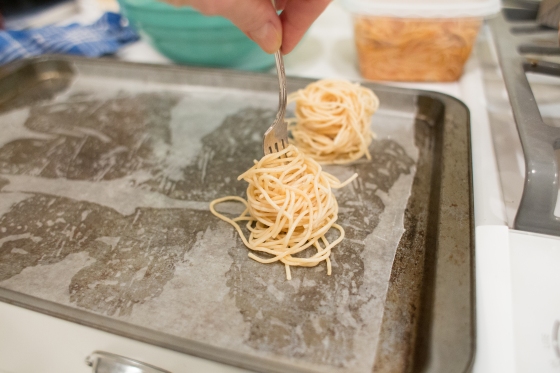
For longer pastas like spaghetti - below you will see what I do. Take a fork and spin individual little servings onto a baking sheet (lined with wax paper helps keep them from sticking). They look like little birds nests. Then freeze these and then bag them when frozen.
Having cooked pasta in the freezer means I can have a meal ready for hungry kids in less than 5 minutes - thaw the pasta, toss it with a little sauce, or some butter & cheese, throw in some frozen peas or chopped broccoli, maybe dice up some ham or salami - a balanced meal in minutes.
These are no ordinary deviled eggs: Soy & Wasabi Deviled Eggs
Never let it be said that I don't love the classics. Deviled eggs are one of my all time favorite things. There is no other preparation of eggs that somehow tricks you into downing a half a dozen eggs without even realizing how much you've eaten. There are reason why some recipes become classics that keep appearing year after year - because they are that good. I love them so much - when I was pregnant a friend used to make a batch of them for me and just hand me the container every time she would see me. When you're pregnant with twins you don't even have to share!

I love the original way to make them - when I am making classic deviled eggs I keep them very simple - a little salt and pepper, a bit of mustard, and my secret ingredient (which also makes amazing potato salad) is a little splash of the juice out of a jar of dill pickles. No pickles in the eggs! Just the juice. Try it, trust me.
But every now and then, I like to shake things up a bit. My deviled eggs made with soy sauce marinated eggs and wasabi mayo definitely fill that bill. I made a batch of these with leftover Easter eggs last year and they were a huge hit, so they are definitely on the menu for this year. This is a great way to use up those eggs in a way that you won't get tired of. They are far from ordinary.
But they are certainly not just for Easter - these are a great way to please a crowd any time of year. They are easy to make and one of those little appetizers that will really impress, but you'll know that they were actually quite simple.
This recipe does require a little bit of advance preparation - marinating the eggs in soy sauce ahead of time. I've got a whole recipe just for that. But don't worry, it's super quick and easy. And you'll also need to either make or acquire some wasabi mayonnaise. Once you have those two pieces - then these come together in no time.
Wasabi + Soy Sauce Deviled Eggs

Ingredients:
1 Dozen soy sauce marinated eggs
1/2 cup wasabi mayonnaise
1/8 teaspoon salt
Hot sauce - to taste (Sriracha, or whatever you like)
You can read my quick version of wasabi mayo here, or you certainly can use a store-bought one.
Directions:
As you would with any other deviled egg recipe - carefully slice your cooked and marinated eggs lengthwise and pop out the yolks. Put the yolks in a bowl and set the halved whites aside.
With a fork, mash the yolks a little and then add in the wasabi mayonnaise and salt and mix well. Then just carefully spoon the mixture back into your halved eggs, distributing evenly across all of them. I always inevitably break at least one the yolks, but that just means that I get a snack.
Top with a dot of your favorite hot sauce - Sriracha or other Asian style hot sauce goes well with the soy and wasabi flavors here.
That's it. Too easy.
Easy Wasabi Mayonnaise
Do you ever get takeout sushi and wonder why the heck they give you SO MUCH wasabi?

Maybe it's just me, I don't know. I personally think a little wasabi in the sushi goes a long way - I like a little heat, but I also like to taste my sushi. So I always end up with extra wasabi.
But I may have mentioned before how I hate to waste food. Especially when it's the good stuff - like when we order sushi from a good place and they give you the real fresh grated wasabi.
So a friend turned me on to this tip and I've been doing it ever since: use the leftover wasabi to make wasabi mayonnaise. It's genius in its simplicity.
Just mix the wasabi into a jar of mayo - I think about a tablespoon of prepared wasabi to about a half a cup of mayo is about right for my taste. But this is really one that you can do however you like. If you like more kick, then you more wasabi. If you want it mild, then use more.
It's awesome on sandwiches, or for dipping veggies in. I love mayo on grilled or roasted veggies, and this is a great way to give it a little extra kick.
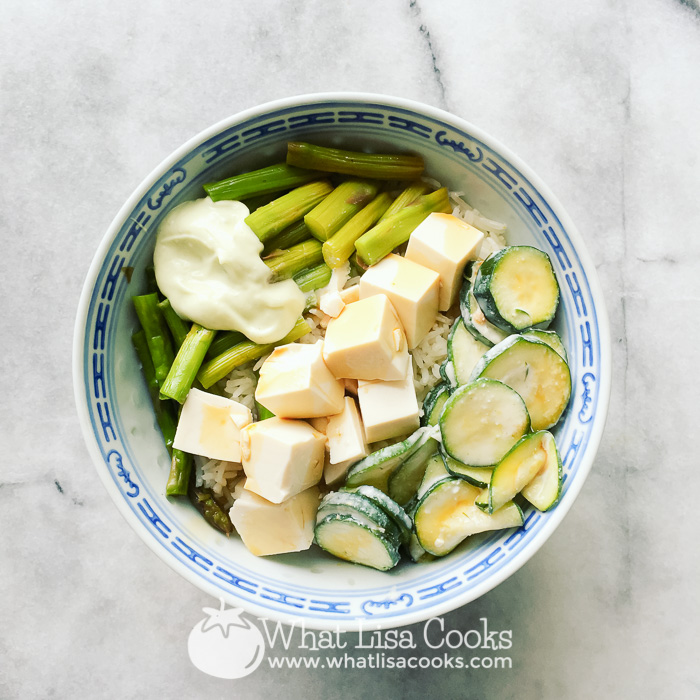
The other day I made myself a rice bowl for lunch, with brown rice, tofu, zucchini and some leftover asparagus. A good dollop of the wasabi mayo on top was the perfect to take it from ordinary leftovers to something really delicious.
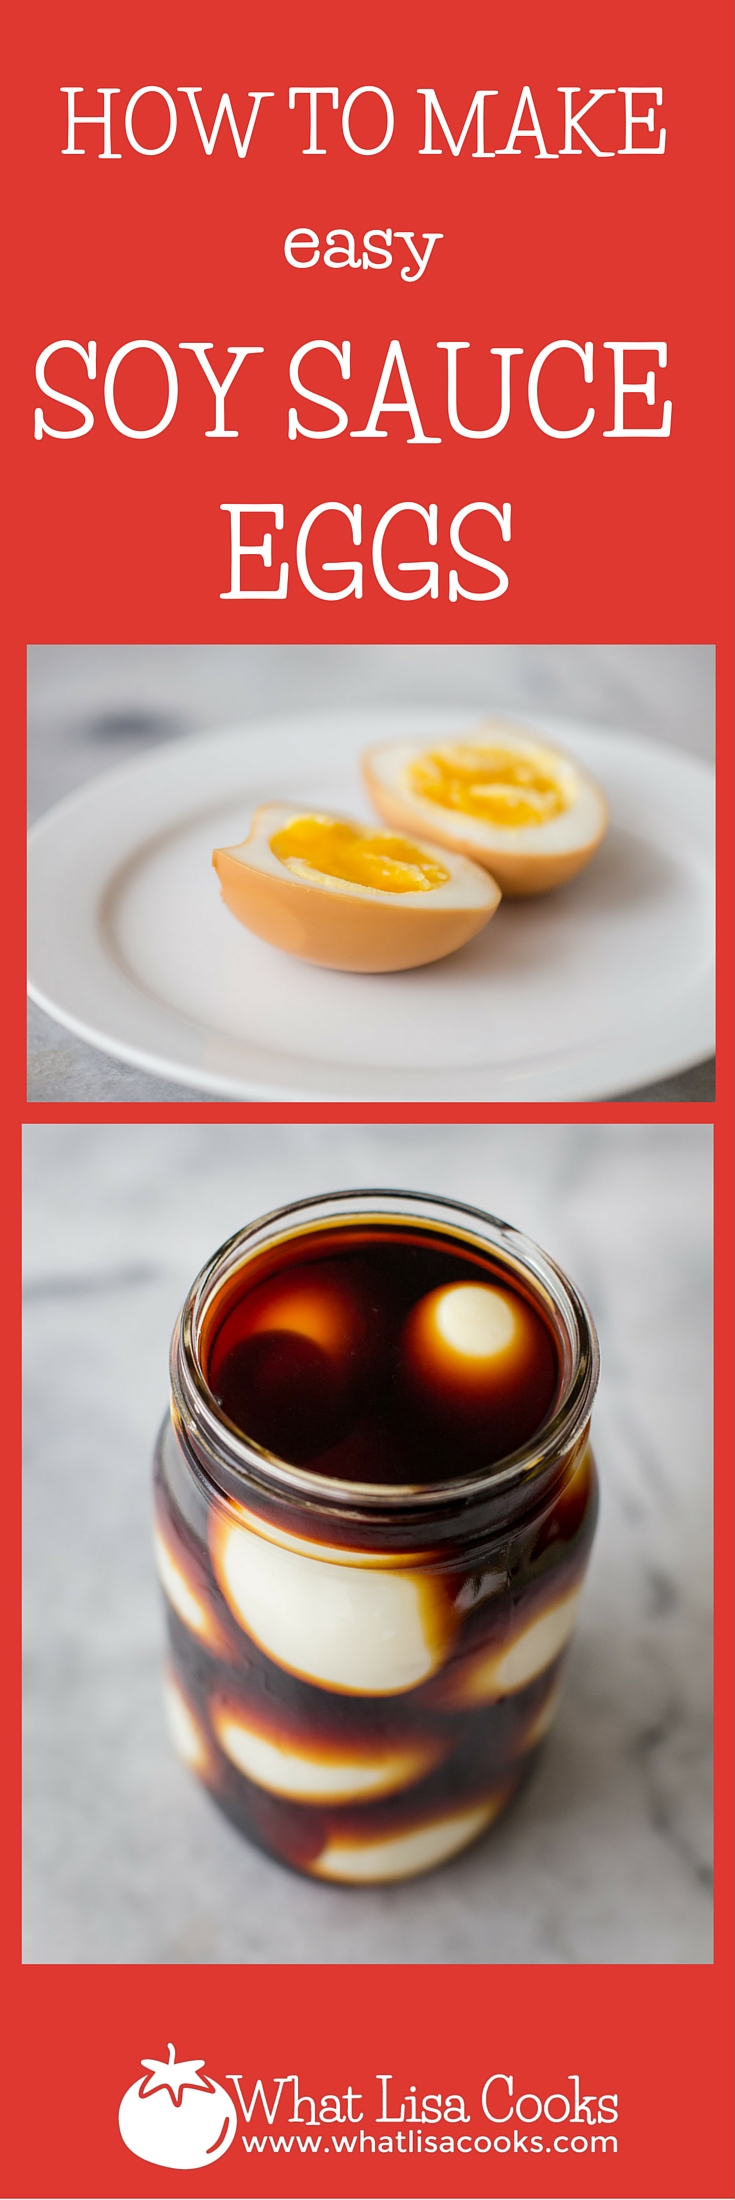
Soy Sauce Eggs

People seem to fall into two very distinct camps when it comes to boiled eggs - you either love them or you hate them.
As for me - I never met an egg I didn't love. I'm somewhat obsessed with them. My husband and I can go to a restaurant and he knows immediately that if there is something on the menu that boasts an egg of any sort on it or in it, that is definitely what I will be ordering. I love them.
One of my very favorite things is when I go to an Asian restaurant and order some kind of ramen or noodle soup dish and they serve it with a perfectly soft cooked and soy sauce marinated egg floating in the bowl. This is seriously top notch comfort food.
Let me just tell you - if you like eggs, and you like soy sauce, but you haven't yet tried combining the two flavors - you are seriously missing out.
This is my version of a soy sauce marinated egg. If you haven't had them before - it's a bit like a pickled egg, but with added flavors from seasoned vinegar and soy sauce. As with everything I do, I took other recipes and methods that involve more ingredients and more preparation and I've distilled it down to what I think is the quickest and simplest way to get the same kind of flavor in as few steps as possible.
This is the quick and easy road to satisfaction.
Soy Sauce Marinated Eggs
You'll need a clean quart sized jar for this, or similar sized container.

Ingredients:
- 1 dozen boiled eggs - cooled and peeled. Go here for my fool proof method of cooking eggs so they peel perfectly every time. I love to do these with soft cooked eggs, but this is a PERFECT use for all those extra dyed Easter eggs that you don't know what to do with!
- 3/4 cup soy sauce
- 1/4 cup water
- 1/4 cup seasoned rice vinegar (you should be able to get this in the Asian section at any big grocery store).
Directions:
If you haven't already cooked your eggs, do that first. If you follow my method, you can have soft cooked eggs peeled and ready in no time. They don't have to be perfectly cool to do this, just cool enough to peel.

Carefully place all your eggs in a quart sized jar, or similar container. One quart sized jar will hold 1 dozen large eggs. Or keep one out if you think you can't get them all in without squishing too much.
Add the vinegar to the jar. Then combine the soy sauce and water together and pour that mixture into the jar until it's filled to the top. Depending on the size of your eggs you might not use quite all of this. If you do use it all and you still have room at the top of your jar, add a bit more water. Or if you want a little extra flavor, you could top if off with more vinegar instead.
Close the jar tightly, give it a few gentle turns to get the soy sauce and vinegar mixed together and distributed around all the eggs.
Refrigerate and marinade for as long as you can stand it. A couple hours is enough to start, but these will keep for weeks too and the longer they sit the more flavorful they get.
These are amazing for snacking on straight out of the jar. I've had one for breakfast every day this week.
Or you can take this to the next level and use these marinated eggs for a whole new twist on the classic deviled eggs.

This is after marinating for only a little over an hour.

This is after a full 24 hours.

A quick and easy way to cook pasta!
We've always been told that pasta had to be cooked in a big pot with lots of water, and we never really questioned it. Until now.
I have seen mentions of this alternative method of cooking pasta here and there, and figured I had better give it a try.
The basic idea is that instead of using a bunch of extra water in a huge pot, you cook your pasta in a smaller pan with just enough water to get it cooked through - no excess. The starchiness in the water is not a problem, because that extra starch is part of what contributes to an extra creamy sauce that will really stick to your noodles. Restaurant chefs have known about that trick for a long time - they always add a ladle of pasta water to their sauce.
Basic cooked pasta:
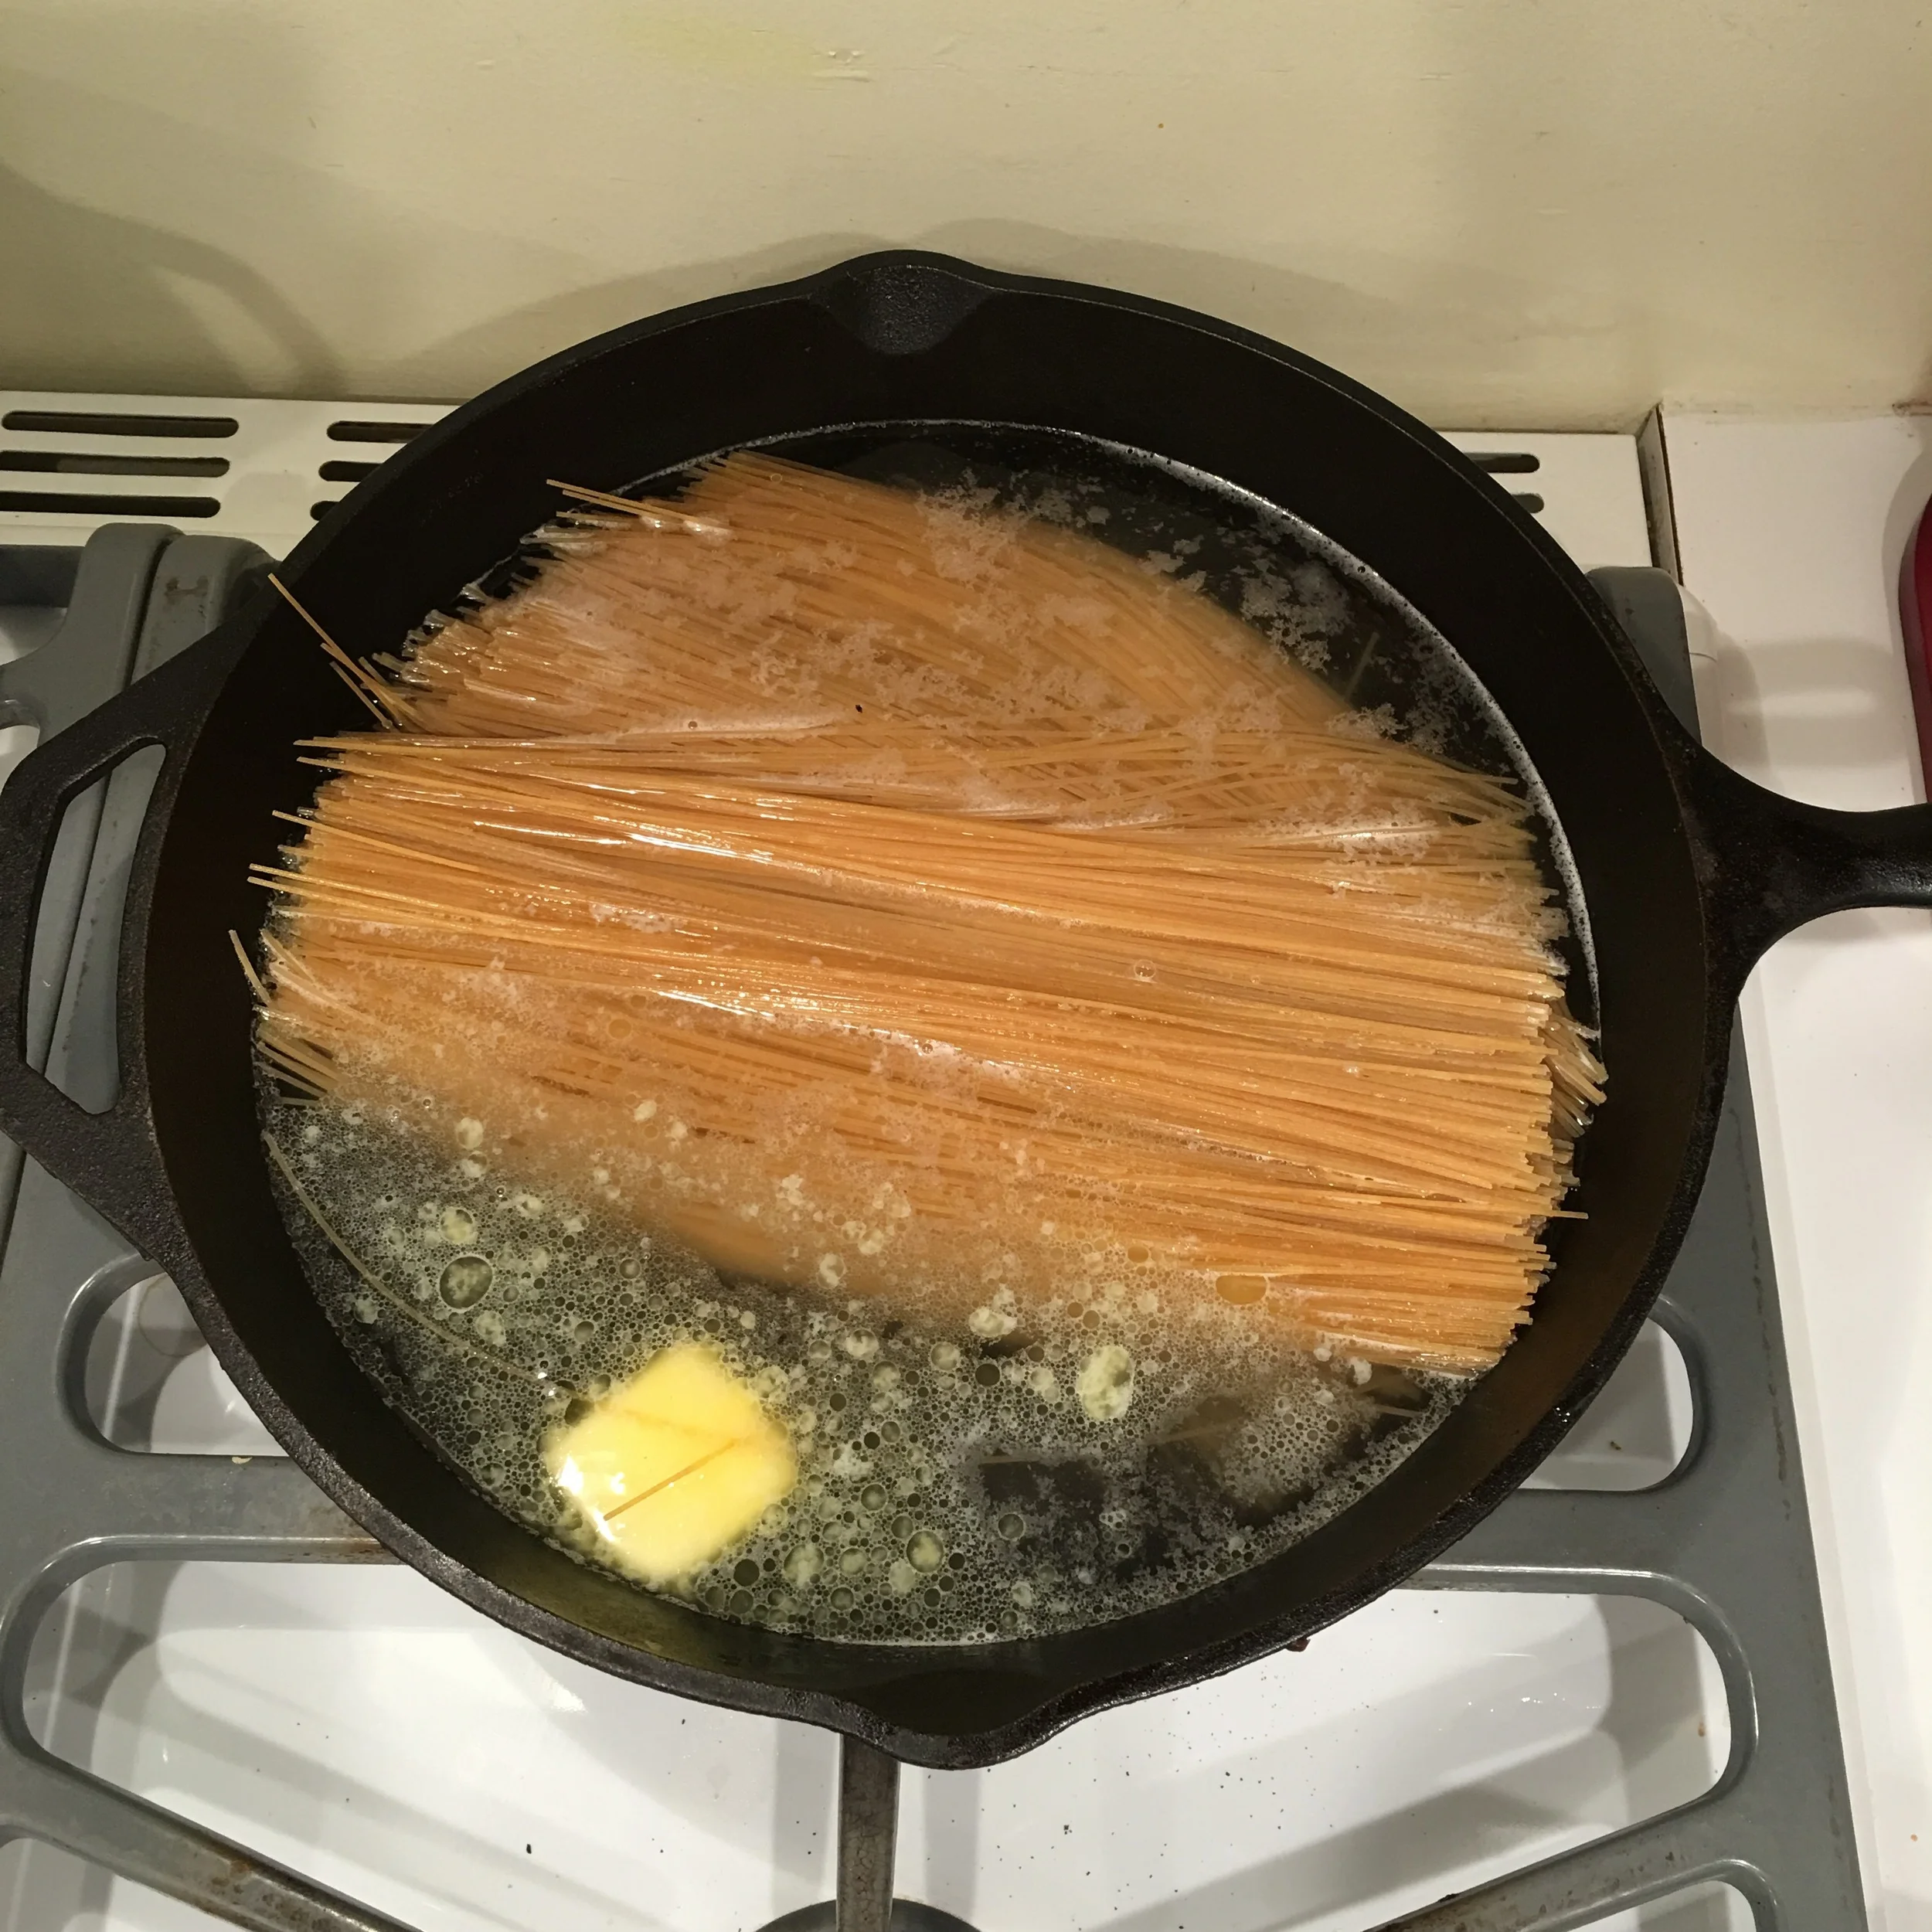
- 1 package (usually about a pound) of pasta
- 1 teaspoon salt
- 1 tablespoon butter
- 4-6 cups cold water (see notes below)
The butter might not be necessary in a non-stick pan, but I am using a cast iron pan so I always like to have a little oil in there.
The quantity of water will vary depending on your type of pasta and your desired end result. Here is used a very thin angel hair pasta and I just was serving it buttered, so I used only 4 cups. But for thicker pasta like penne you will need more water - so go up to 5 cups. If you are making a sauce then you will want to have a little water left in your pan after the pasta is fully cooked, to help blend in the sauce, so go up to 6 cups.
So - 4 cups for thin pasta, no sauce. 6 cups for thick pasta with sauce. Or adjust in between to suit your needs. As with everything, I think it's a bit of trial and error. If your water is all absorbed but your pasta is not yet fully cooked, then add a bit more hot water.
Directions:
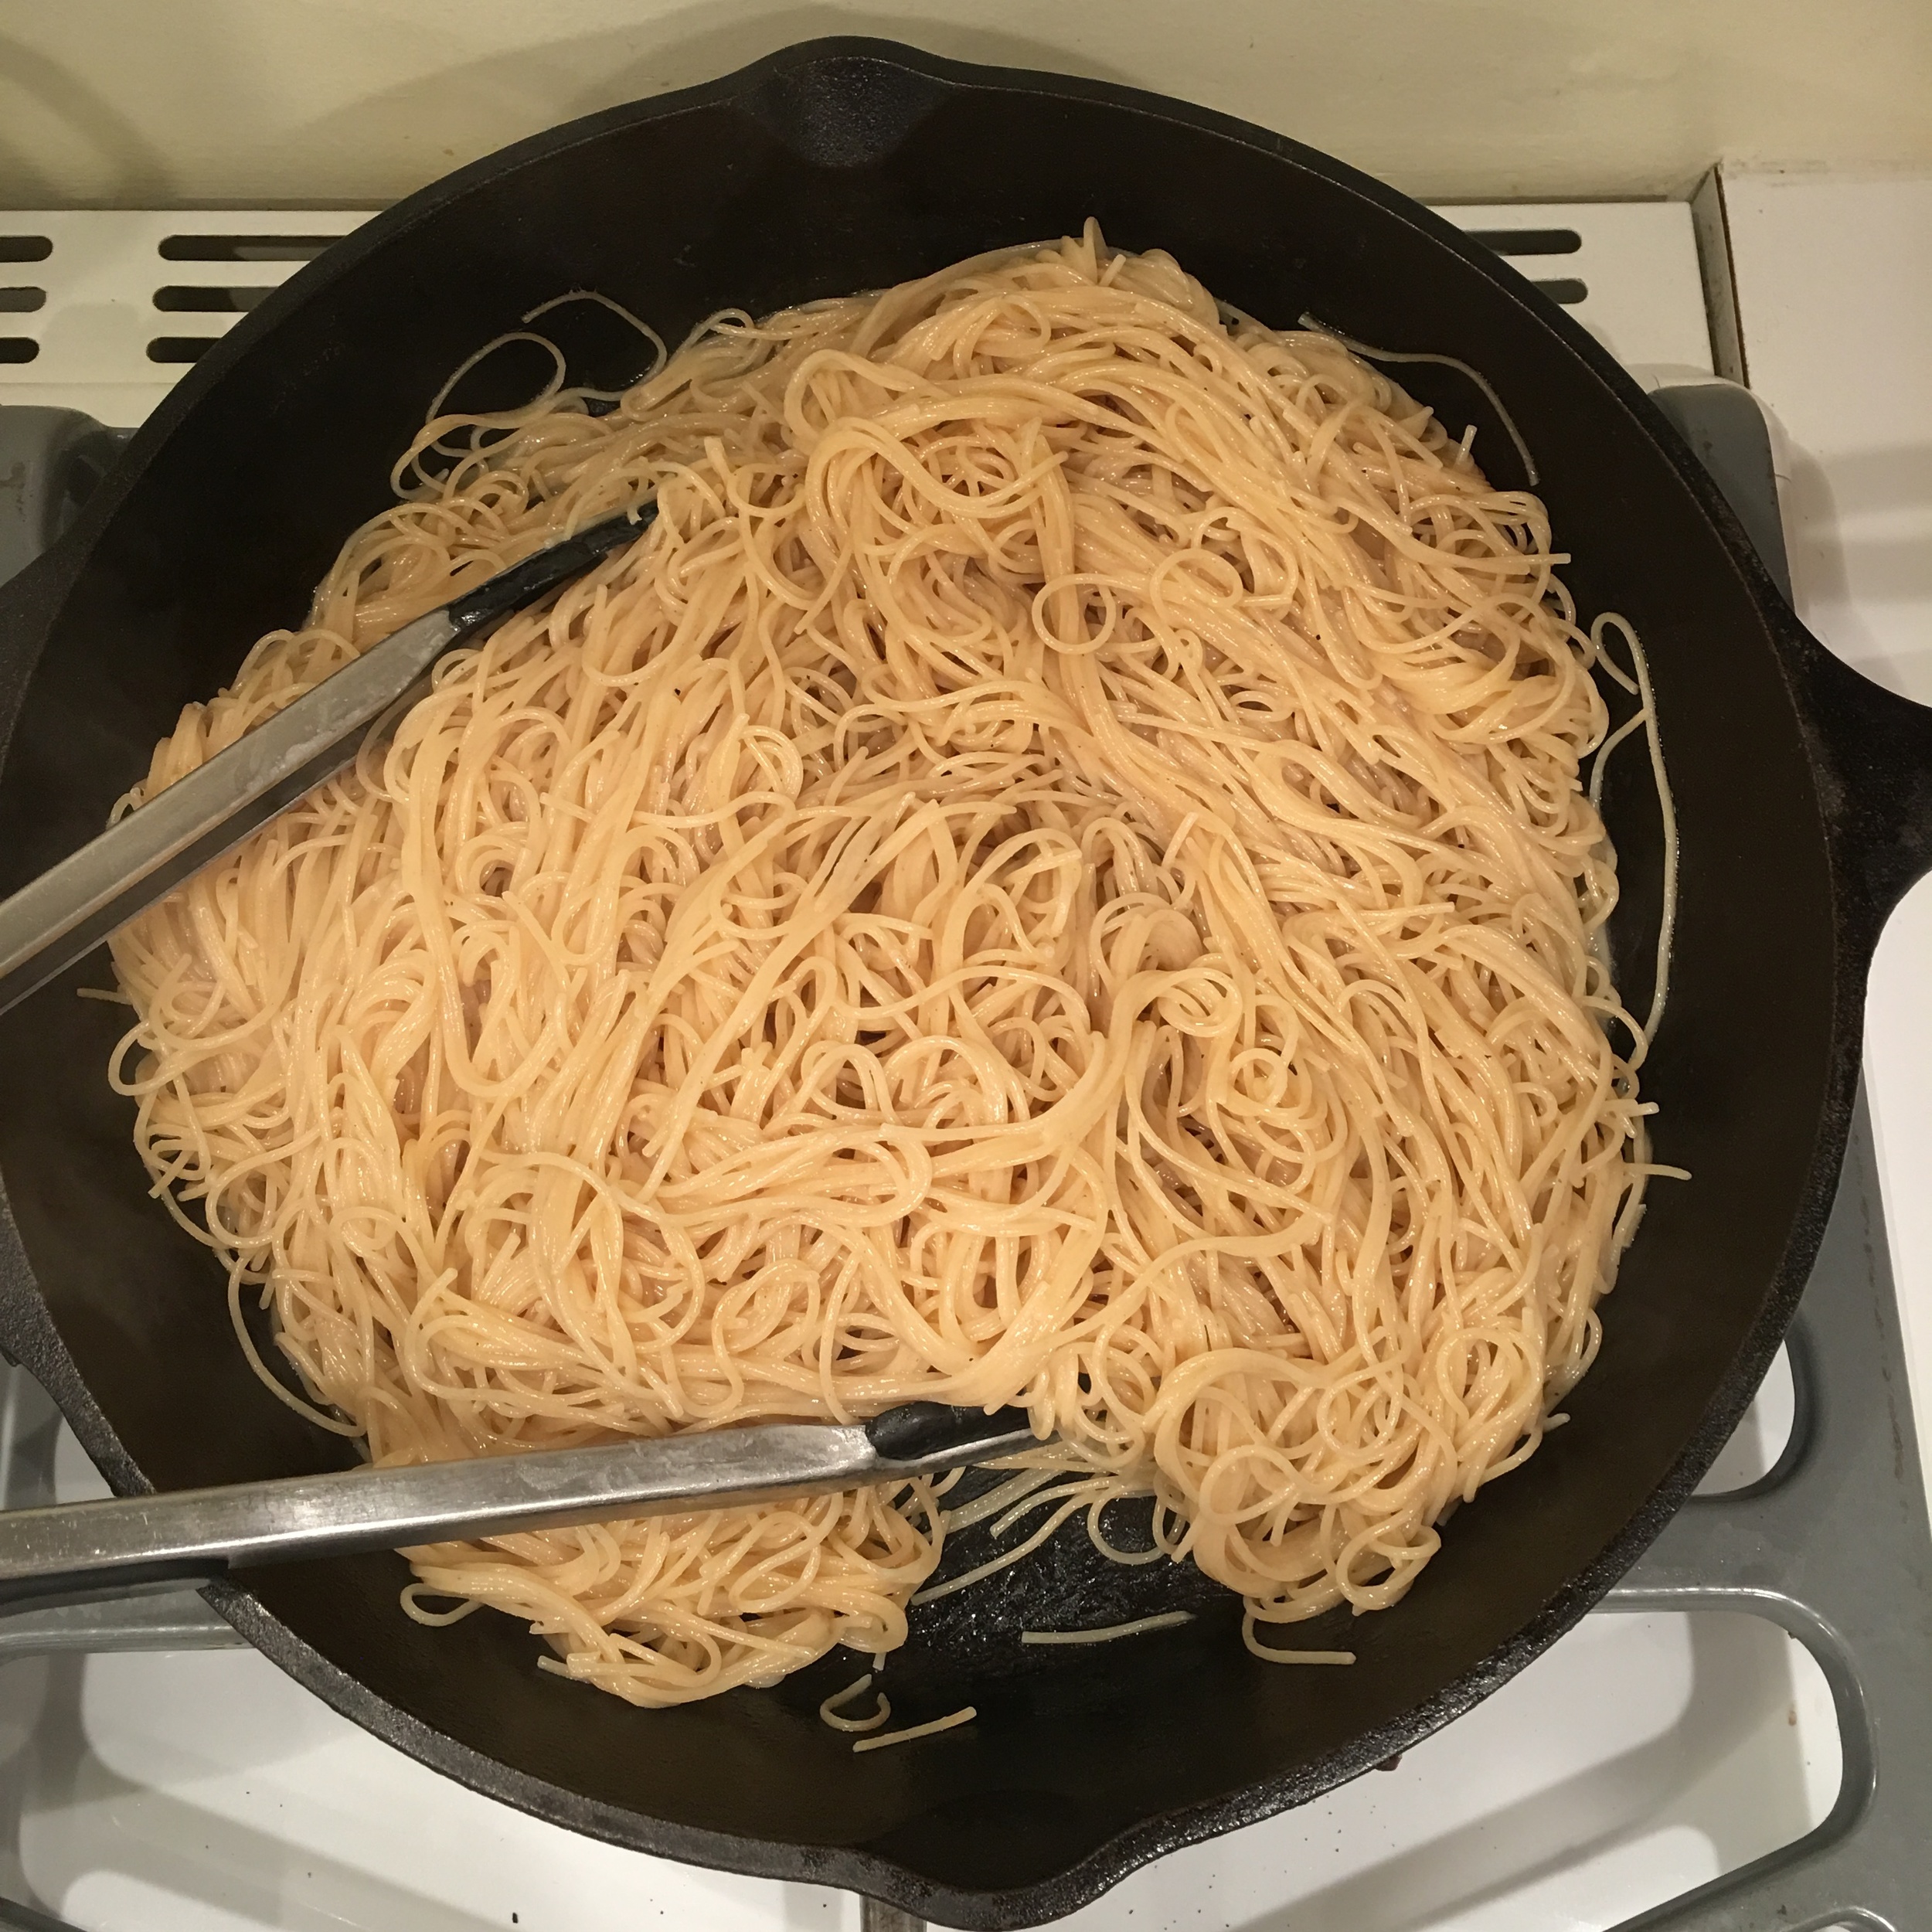
Place everything in a pan just big enough to contain it all and wide enough that the pasta can be fully submerged in the water.
Turn on the heat and bring up to a gentle simmer, stirring occasionally to ensure the pasta doesn't stick together, until the pasta is cooked to your liking.
It will take about 10- 12 minutes, depending on the thickness of the pasta.
And that's it! Perfectly cooked pasta in less time than it would take to even get a pot of water boiling.
Once it's done you can serve as is, or add your sauce. My kids are picky about sauce, some like it and some don't, so I tend to serve the sauce on the side. But you could just add a little cream and some herbs and parmesan cheese to this for a super quick and simple weeknight pasta dish, or toss in a jar of your favorite tomato sauce.
I love a tip that helps me get dinner on the table faster!
Basic recipe: pancakes and waffles
Add to the list of things that I can't for the life of me figure out why I ever bought in a box: pancakes.
Pancakes and waffles are so easy to make from scratch. Call me lazy, but I love a recipe that's versatile and adaptable to a number of uses. I like to think about it once and use it a lot - and this one definitely fits that bill.
Add to the list of things that I can't for the life of me figure out why I ever bought in a box: pancakes.
Pancakes and waffles are so easy to make from scratch.

Call me lazy, but I love a recipe that's versatile and adaptable to a number of uses. I like to think about it once and use it a lot - and this one definitely fits that bill.
I started with the basic pancake recipe from my favorite cookbook Mark Bittman's "How To Cook Everything", and I have adapted slightly from there to suit our needs. I like to use whole wheat flour to make them healthier, and real maple syrup for a more natural sweetener. My pancake recipe is a little sweeter than most, because I personally like for the pancake or waffle to taste really good without the need for syrup. I make a lot extra and keep them in the freezer to pop out for my kids for a weekday breakfast or lunch, and it's just quicker and easier if they already taste great without having to get out the syrup. But if you're going to only eat these with a generous pouring of syrup, then you'll probably want to cut back on the sweetener in the recipe.
Basic Pancake Recipe:
- 4 cups flour (whole wheat, or half whole wheat and half white)
- 2 tablespoons baking powder
- 2 teaspoons cinnamon
- 1 teaspoon salt
- 3 cups milk (I use whole milk)
- 3 or 4 eggs - Enough to make about 4 cups of liquid when added to the milk & syrup, depending on the size of your eggs.
- 1/2 cup pure maple syrup (less if you plan on soaking your pancakes with syrup)
- 1/4 cup butter, melted and cooled. (optional, I often leave it out)
- 2 teaspoons vanilla
- butter for your pan
Directions:
Measure all the dry ingredients into a big mixing bowl and stir to combine.
For the liquid ingredients: I fill my big measuring bowl up to 3 cups with milk, then add the syrup and vanilla, then add eggs until it gets to around 4 cups of total liquid ingredients. Then mix all that together with an egg beater until well combined (or you can use a whisk). Then pour into the dry ingredients and stir gently until combined. Try not to mix more than necessary, this will help keep your pancakes nice and light.
For pancakes you want the batter to be pretty thin, they puff up a lot and stay nice and light.
Waffle batter needs to be just slightly thicker, so I use 1/4 cup less liquid if I'm making waffles - either use one less egg, or cut your milk back a little.
Then cook: Pancakes on a hot buttered griddle, or waffles on a buttered nonstick waffle iron.

I like to cook my pancakes in lots of butter, I think it adds that amazing final layer of flavor. Pour our a ladle full of batter onto a well buttered griddle. I have a big double sized cast iron griddle that heats really evenly and works great. And the extra big size is perfect for making a bunch of pancakes at once. If you are going to add extras I like to add it at this stage, when the top of the pancake is still wet. We love to add blueberries, or slices of banana, and mini chocolate chips are a fun little treat too. Then watch for a little browning around the edges and bubbles in the middle, and then flip. Serve hot with hot maple syrup, and we like to have whipped cream on ours too.

For waffles, a good waffle iron makes all the difference. I worked with a cheap one for years and I was amazed at how much better the waffles were with just a new waffle maker. They are light and fluffy on the inside, and lightly crisp on the outside. For a big family like ours, the kind that makes two at a time is a must-have. If you want flavored waffles then mix your extras into the batter. Finely chopped nuts are really great, or a little grated apple.
Notes:
- This is a double recipe because we like a lot extra, but feel free to cut it in half.
- You can use all white flour, all wheat flour, or a mix of both. Or take out a little of the flour and add in some oats, or ground flax, or wheat germ, or oat bran - whatever you like to make them even more healthy
- I've also made these with gluten free flour and they work great. They key to that is to separate the eggs, mix in the yolks with your batter as usual, and then beat the whites until soft peaks and then fold in. The beaten egg white provides the light and airy texture that you miss without the gluten.
- Use less sweetener if you really are going to soak these with syrup.
- I've done this vegan many times and it works great. Just substitute flax + water for the eggs. 1 T ground flax + 3T water, per egg to be replaced. Mix that together and let sit for a minute, then add it just as you would add the eggs.
- You can use brown sugar instead of syrup in the batter.
- When I want to make this more of a 'complete' meal for my kids, with more protein, I'll add a little less liquid and more eggs, or add some protein powder in with the dry mix.
- Options for extra flavorings are pretty limitless. We love blueberry pancakes. Bananas or apples are great too. Finely chopped nuts and a little orange zest are really good in waffles.
- If you want to take the extra time, separating the eggs and whipping up the egg whites is also a great trick to get really light and airy waffles.
- For pancakes, I pour the batter on the greased griddle and then add stuff - a few blueberries, slices of banana or apple, chocolate chips, then flip them.
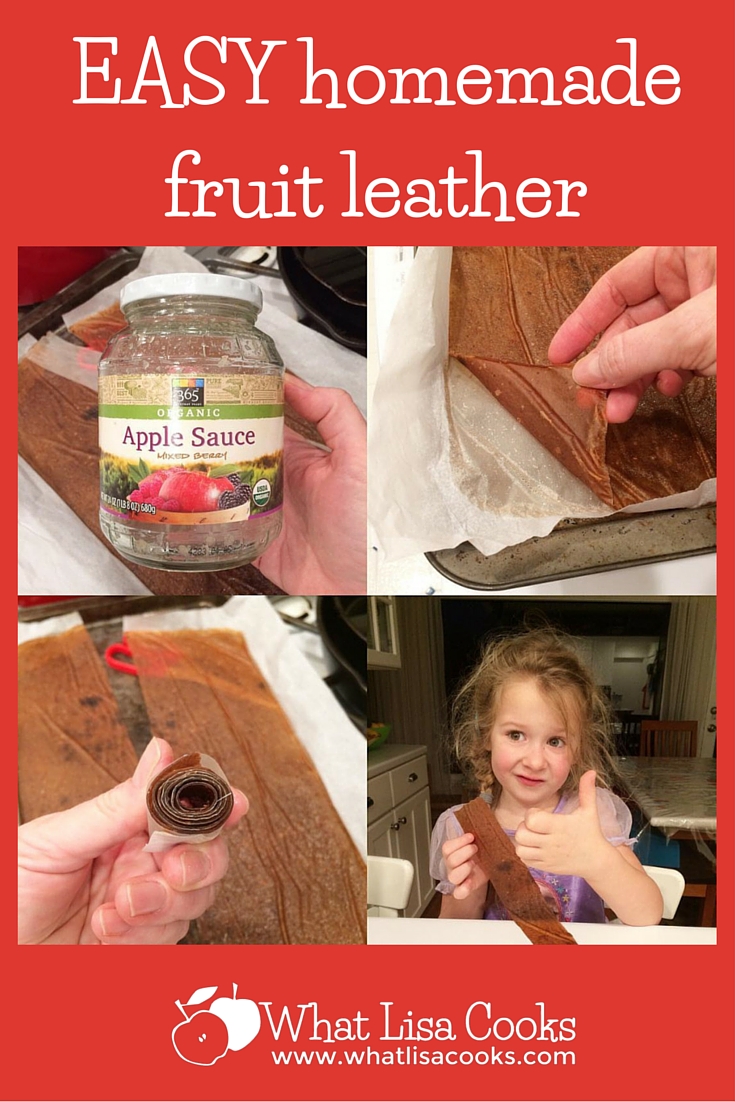
Easy homemade fruit leather
My kids love those little fruit leathers from the store. I refuse to buy the cheap ones that are filled with artificial stuff, but the better quality ones get expensive - especially when they want to eat 2 or 3 at a time! So having a quick and easy way to make my own seemed like a great idea.

Well I was going to wait until I did this again and took some better pictures, but life seems to be getting in the way, so I figured that I shouldn't let the lack of good photos get in the way of me sharing this with you.
My kids love those little fruit leathers from the store. I refuse to buy the cheap ones that are filled with artificial stuff, but the better quality ones get expensive - especially when they want to eat 2 or 3 at a time! So having a quick and easy way to make my own seemed like a great idea.
Yes, I know you can do this totally from scratch - puree your fruit, yada, yada. But that's not quick and easy, therefore, it doesn't get done.
I think this method is a perfect compromise.
It's much less expensive than buying fruit leather, but it's almost no work.
All you need is a jar of applesauce, a cookie sheet, and some parchment paper. You can use whatever flavor of applesauce you like.

All you do is line a cookie sheet with a layer of parchment paper, pour out the applesauce and spread it a little so it's even. Put it in your oven at its lowest setting, and walk away. Leave it in the oven until the top is no longer wet and sticky. My oven has a convection setting, and the lowest temp is 175. It took about 4 hours to dry. If you don't have a convection oven then you will probably need 6-8 hours or more, depending on the temp and how dry your air is and how thick it is.
After it's done, take it out of the oven and let cool. Then use a clean pair of scissors to cut it up. You can cut in small rectangles like some of the store bought ones come in. I cut mine in longer strips which I then rolled up with the parchment - sort of like some of those 'fruit by the foot' things you can buy.
And that's it! My kids loved it!
These are great for snacks or for a little something extra to throw in a lunch box. I can't wait to try it with other flavors of applesauce.


How to Make Homemade Chicken Broth
Once you've had good homemade stock you'll really never want to go back. The store bought stuff tastes so bland, or sometimes tastes like nothing but salt. I love good chicken broth. I love it so much that sometimes it doesn't survive long enough to make it into soup. When someone in the house is sick, I make up a big pot of it and drink as much as I can. I think it's the definition of classic comfort food, and it's so good for you. Just do a quick google on the benefits of bone broth and you'll find pages and pages of info.

Once you've had good homemade stock you'll really never want to go back. The store bought stuff tastes so bland, or sometimes tastes like nothing but salt. I love good chicken broth. I love it so much that sometimes it doesn't survive long enough to make it into soup. When someone in the house is sick, I make up a big pot of it and drink as much as I can. I think it's the definition of classic comfort food, and it's so good for you. Just do a quick google on the benefits of bone broth and you'll find pages and pages of info.
The other great thing about making it yourself is that it's basically free. Free! Something so delicious, and so good for you - that costs you nothing. That's because you're making it out of stuff that you would otherwise be throwing away. I cringe at the thought of anyone throwing out the leftover carcass from their roast chicken or turkey - such a waste when you can turn it into such good broth.
People have asked for my recipe for making my chicken broth. It's not so much of a recipe as it is just a simple method with some guidelines for basic ingredients. You need chicken bones of course, and water, but the other flavorings are totally optional.
Here's what I like to use:
- a couple pounds of leftover chicken or turkey bones
- a few pieces of aromatic vegetables (traditionally onion, carrot, celery, but you can use others too)
- salt
- a couple quarts of water
- pepper and other seasonings as desired
- A quarter cup of some kind of acid - either a couple of sliced lemons, or some vinegar
- a good slow cooker or big stock pot
A few additional notes:
- You can use any kind of bones for this, it doesn't have to be whole roast chickens. If you've cooked up a bunch of thighs, or wings, definitely use the bones for those. Or if you really just need broth and you don't want to have a chicken dinner, then ask your butcher for scraps - wings, necks, whatever. I've heard that chicken feet make amazing stock.
- I keep a ziploc bag in my freezer, and when I trim veggies for cooking I add the clean trimmings to the bag - carrot tops, ends of onions, ends of celery, kale ribs. You can use just about anything, just remember that they are adding flavor so don't use anything that you don't want to taste too much. I wouldn't recommend things like broccoli or cauliflower, I think the flavor would be too strong.
- For seasoning I usually just do salt and pepper, but you could certainly throw in a bay leaf, a few sprigs of rosemary or thyme or sage, really anything you like the flavor of.
- A little acid of some kind somehow helps get all the flavor out of the bones. I usually cut a couple lemons in half and throw them in, they give a great flavor. If I don't have lemons then I do apple cider vinegar.
- Don't be shy with the salt.
- I make mine in a slow cooker so that I can leave it overnight or while I'm out of the house for the day, but you can do this in a pot. You'll just need to keep it on a low simmer and keep an eye on it.
- I generally figure on about a quart of broth per whole chicken. I usually do 2 chickens, so I put in a little more than 2 quarts of water and get about 2 quarts of broth.
After all that being said - I've made wonderful chicken broth with just chicken bones, water and salt. If you don't add other flavoring, then it's called stock. With seasoning and flavoring it's called broth. Technicalities. It's all good.
How to make your broth:
After you've had your lovely roast chicken dinner, take all the remaining meat off the bones and put it away to use later in your soup. Put all the scraps and bones and any leftover drippings in your slow cooker - don't forget the skin, it adds great flavor too. Add in your vegetables, seasoning, acid. Add enough water to completely cover it all (in a big slow cooker with bones from 2 chickens you should be looking at about 8-9 cups of water). Turn your slow cooker on low for as long as it will go (mine has a timer that will go for 10 hours). Go to bed. The next morning you will have a lovely stock. You can call it good at this point, or you can just let it keep going. The longer you let it cook, the better it will taste. You might need to add a bit more water. So give it a stir, and taste it. If you were a little shy with the salt at first then you might want to add some now.

When you are satisfied that it's ready, strain out all the stuff. I put a strainer over a big glass bowl and ladle everything into that, catching the chunks in the strainer. Some people will then strain through cheesecloth or something fine, to get all the little bits of stuff out. I usually don't do this because I don't mind the stuff, I'm making soup anyway so it will be fine. But if you want a really clear broth then a separate straining might be good.
You don't have to cook it for 24 hours. You can make a really good broth just simmering on the stove for a couple hours. The slow cooker is just an easy way to bring out even more flavor.
If you want to be even more frugal - you can actually make two whole batches of broth from one set of bones! Just strain out your first batch of broth after simmering overnight or all day, and fill it up with water again, add a little more salt, and let it got another 8-10 hours. The second batch might not have quite as much flavor as the first, but it will still make an amazing soup.
If your chicken was really fatty, you might want to separate the fat. In the one pictured I didn't bother, and you can see there's just a tiny bit of fat on the top. I'm ok with that. But if that is going to bother you, then you must have one of these handy fat separators. They work great.
And that's it! Now go make your favorite soup recipe. Or just pour some in a mug and drink it. A lot of people freeze theirs, but ours never lasts long enough to bother with that.
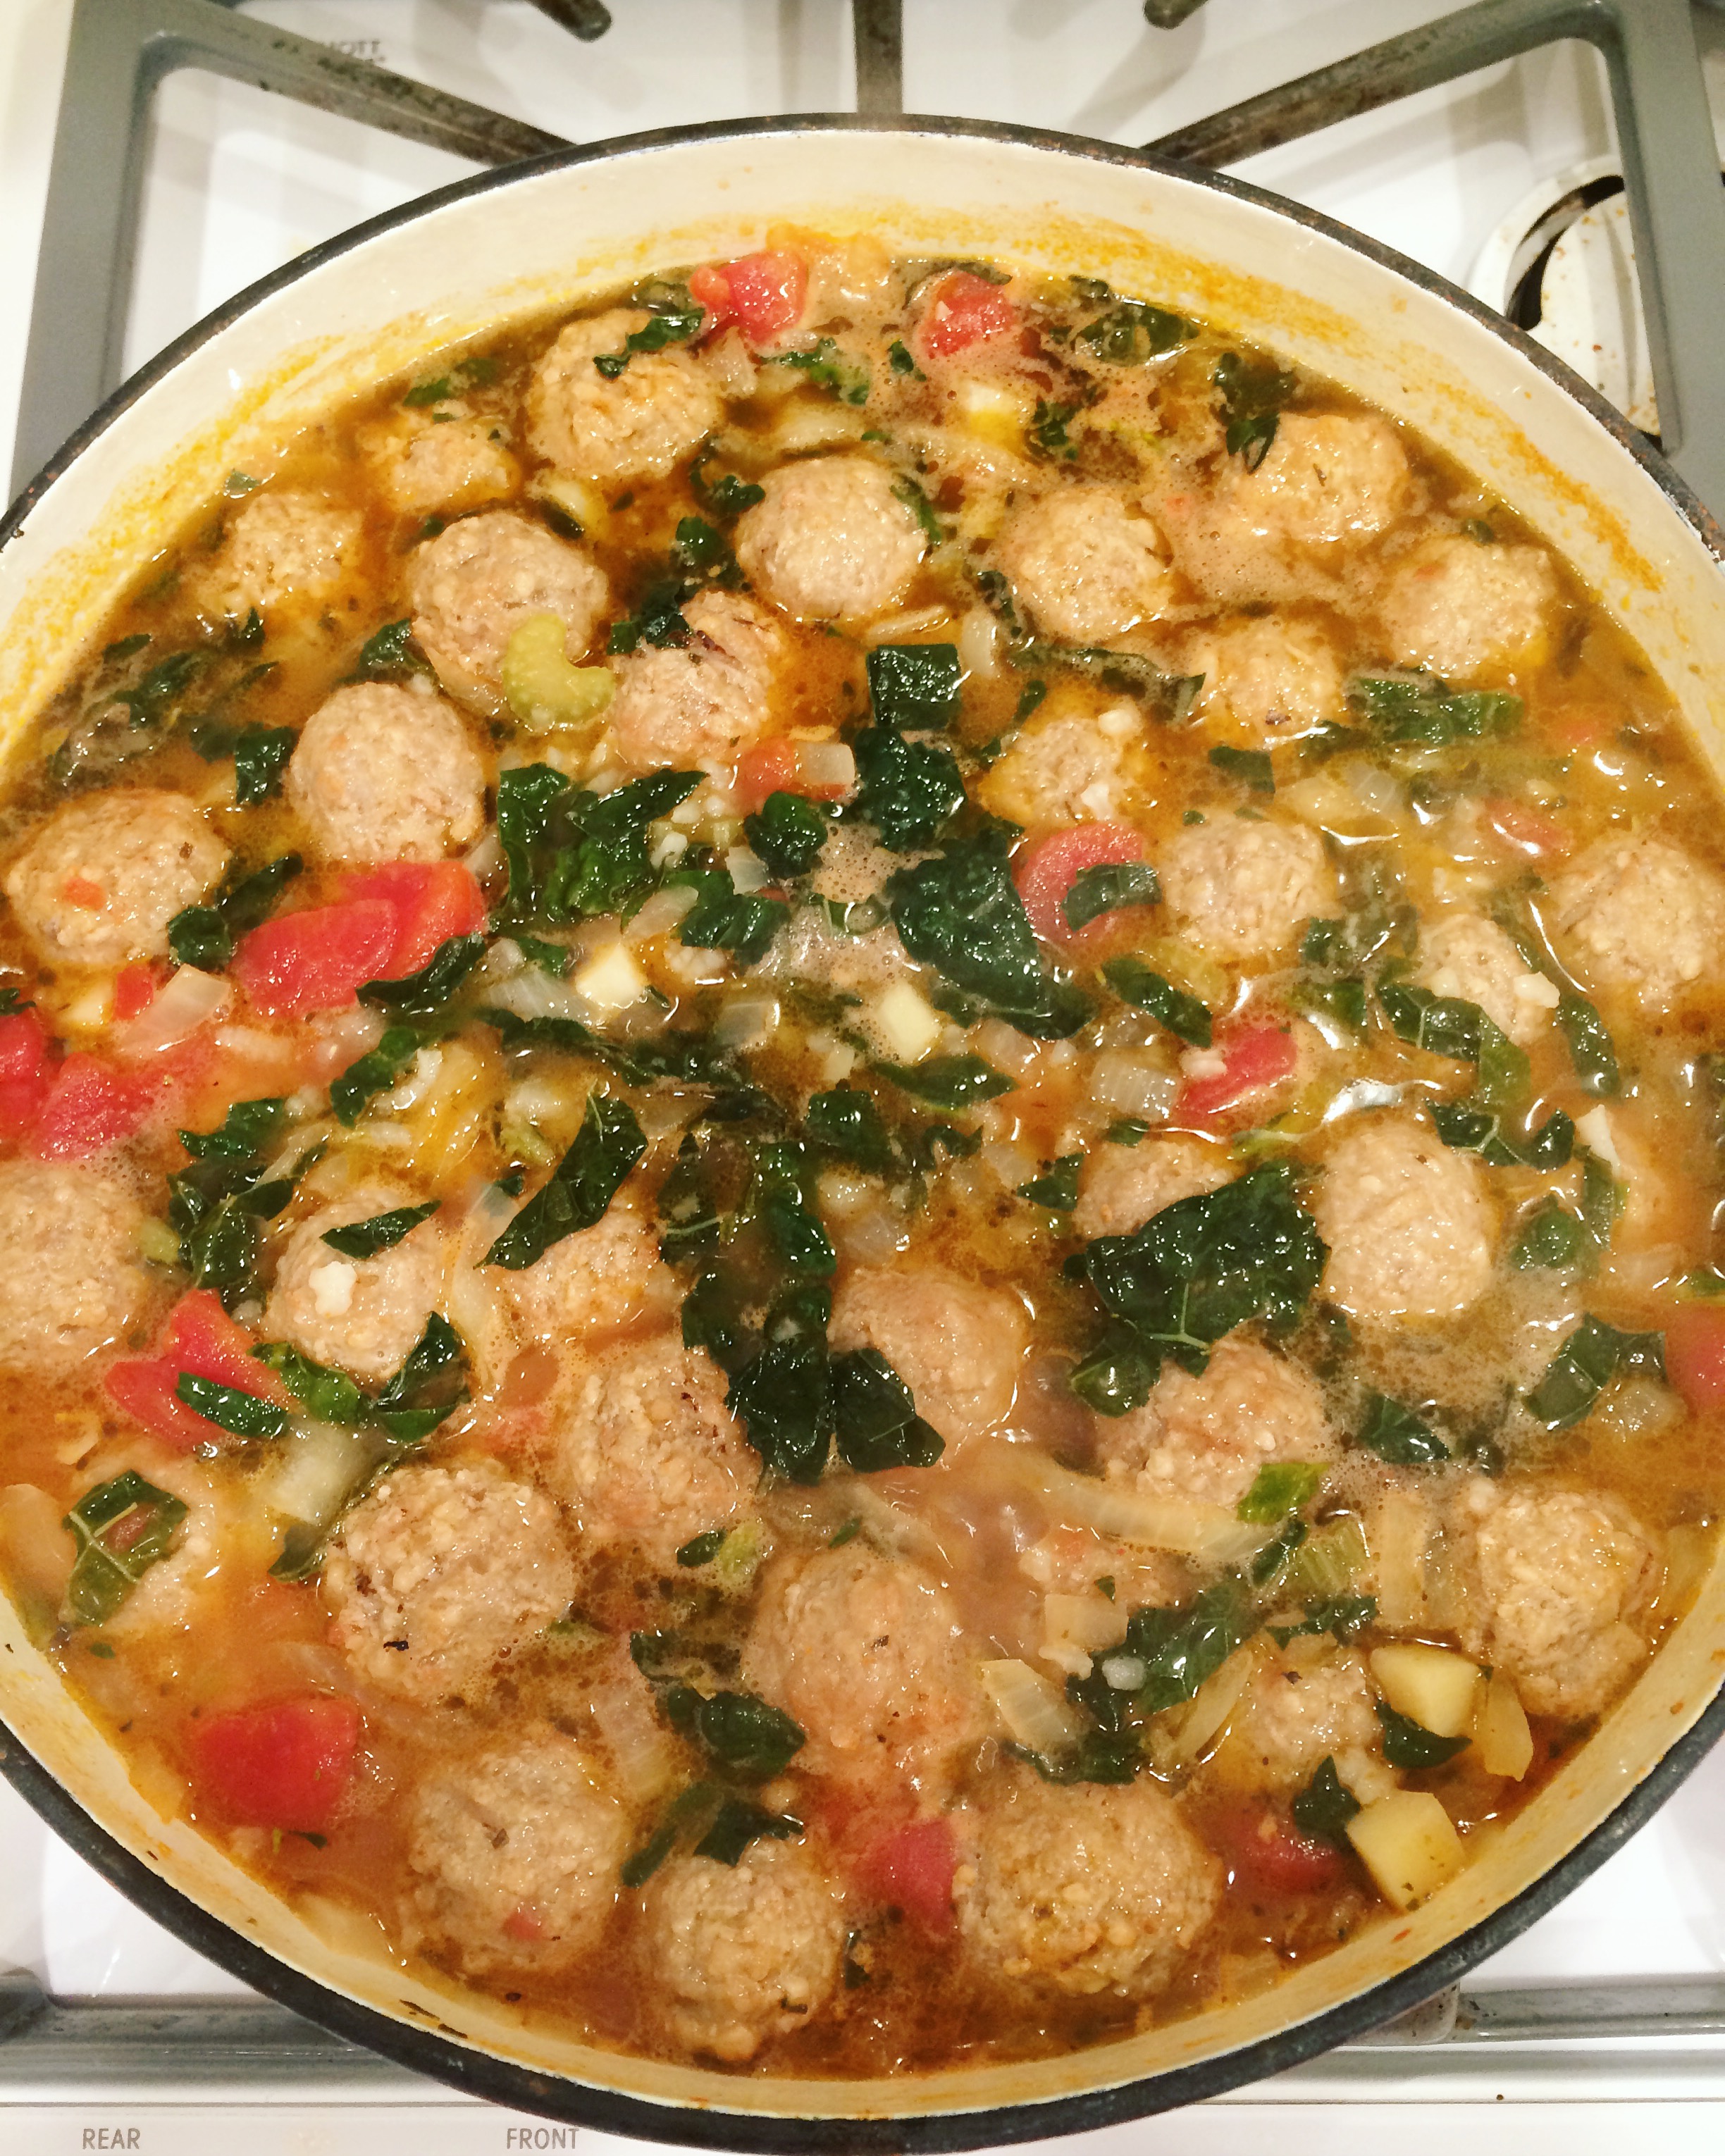
Easy weeknight meatball soup
This is a super quick and easy one that I made for dinner last week. It turned out so yummy that I figured I'd better share the recipe. This is the kind of soup I love to make, it's fast, it's healthy, and it's a big crowd pleaser.

This is a super quick and easy one that I made for dinner last week. It turned out so yummy that I figured I'd better share the recipe. This is the kind of soup I love to make, it's fast, it's healthy, and it's a big crowd pleaser.
I made a big pot. Because, soup. Why wouldn't you want a big pot? Leftover soup is even better than fresh soup, and it's a really easy and cost effective way to feed a crowd. But of course you could cut this recipe and make less.
As with all of my recipes - this is really flexible! My quantities are just a guideline for you to start with, but I very much encourage you to customize this with whatever you've got on hand, or whatever sounds good. Add more veggies, less veggies, leave out the tomatoes, swap the beef broth for chicken or turkey broth and use turkey meatballs - this is just a good basic technique that you can apply to any kind of soup.
Ingredients:
- 1/2 onion
- 2 stalks of celery
- 1 parsnip
- 1 bunch of kale
- a couple cloves of garlic
- oil for sautéing
- 2 quarts beef broth
- 1 can diced tomatoes
- 1 can tomato sauce
- 2 small bags frozen mini meatballs (mine were from Trader Joes)
- 1 tablespoon Italian seasoning
- 2 cups cooked rice or pasta (optional)
- salt to taste
Directions:
Chop or dice all of your veggies. Size doesn't really matter, it's just personal preference. If you like chunky soups, then cut them in bigger chunks. If you think your littles (like mine) are more likely to eat it with small bites of veggies, then cut them as small as you can.
Heat a good size soup pot, and then pour in just enough oil to cover the bottom. Saute all the veggies in the oil until beginning to soften. You can season with a pinch or two of salt to help them along. Once your veggies are cooked a little, add everything else except the salt. I hold off on the salt for a while because the saltiness of broths and meatballs can really very, so you want to let your soup simmer for a while and let all the flavors start to combine before you add more salt.

The rice or pasta is optional. I love this kind of soup with rice, I just think it makes it even more comforting. But it's really delicious without, so if you're trying to cut carbs go ahead and leave it out. Or sometimes when I make something like this I will serve it with a bowl of cooked rice or pasta on the side, so that I can have mine without the extra carbs and my kids can add carbs to theirs. You can also start with uncooked rice, but you'll want to add an extra 2 cups of broth for each 1 cup of dry rice.
This is so easy to make that it's a great one to have the kids help with. I chopped and sautéed the veggies, and one of my five-year-old girls did everything else.
Once everything is combine in the pot, then just let it simmer. You'll want to simmer it for at least long enough to get your meatballs all heated and cooked through, probably 20 minutes. But really the longer the better. This is totally the kind of things that you could put in your slow cooker and let it just simmer on low for several hours, or put it on a back burner of your stove. I like to let this kind of soup simmer for at least an hour if I have time, it all just tastes better that way, but even after 20 minutes it will be delicious. That's what makes this the perfect weeknight meal. After it has simmered for a while, and your meatballs have cooked and released some of their flavor in to the broth, give it a taste. It's at this point that you can add more salt or other seasoning if you think it needs it.
enjoy!
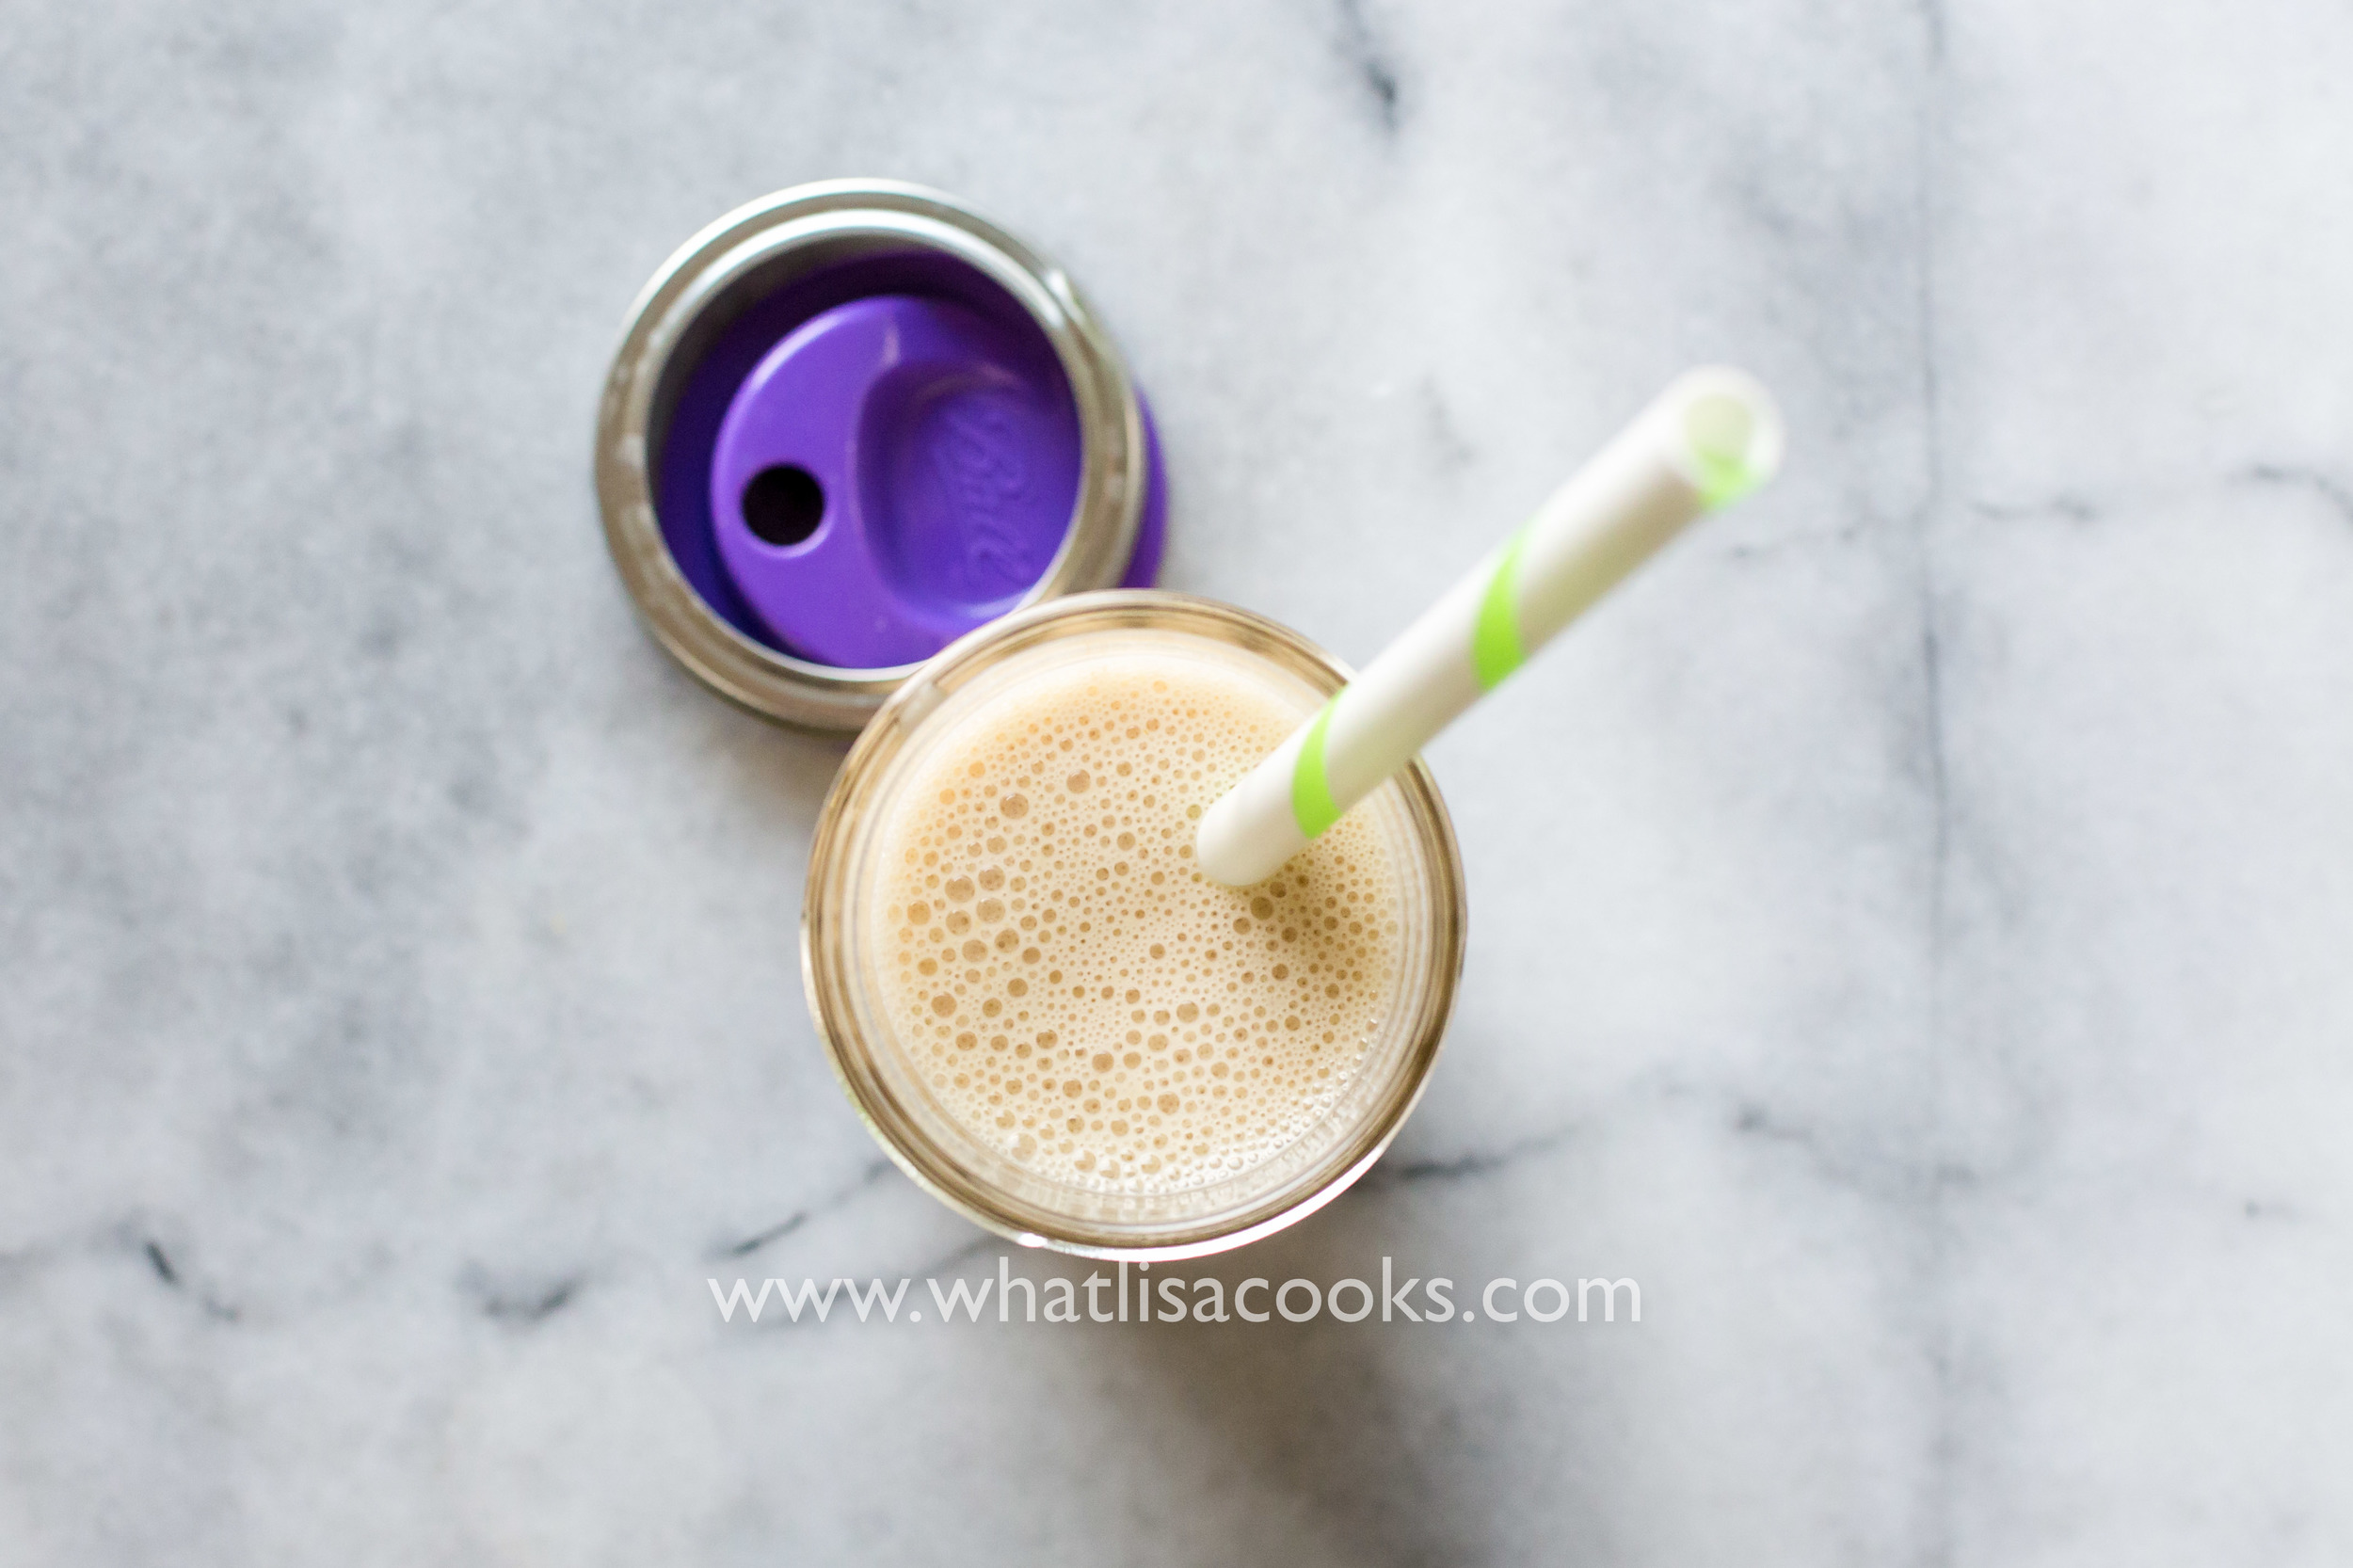
Tummy Soothing Smoothie
I've got a couple of kids home sick today, and one of them asked for a smoothie. I was hesitant to oblige him, because the last thing I need right now is somebody losing their berry smoothie all over my white couch. But he did need to get a little something in his stomach. So I thought for a moment about what are some of the classic things we are taught are good for upset tummies, and realized that I could make a smoothie out of those. So here is a very simple tummy soothing smoothie. It's not the tastiest smoothie I've ever made, but really it's not bad, and hopefully is just the thing that a little tummy needs.

I've got a couple of kids home sick today, and one of them asked for a smoothie. I was hesitant to oblige him, because the last thing I need right now is somebody losing their berry smoothie all over my white couch. But he did need to get a little something in his stomach.
So I thought for a moment about what are some of the classic things we are taught are good for upset tummies, and realized that I could make a smoothie out of those. Here is a very simple tummy soothing smoothie. It's not the tastiest smoothie I've ever made, but really it's not bad, and hopefully is just the thing that a little tummy needs.
Tummy Soothing Smoothie
- 1 cup organic apple juice
- 1 banana
- 1/2 cup quick oats
- a handful of ice cubes
Put everything in a high powered blender and process until the oats are all blended in. If you let it sit for a few minutes the oats will absorb a little of the liquid and thicken up the smoothie a bit.


25 Days of Christmas Activity Calendar
A fun one from the archives - a simple 25 days of christmas activity calendar for the kids.

I'm all about keeping things fun but simple at the holidays. I want them to be special and memorable and fun for my kids, but also for me to. If I'm working so hard at over the top decorating and crafts the whole time, then I'm not actually getting to pause and enjoy it. So there needs to be balance.. For Christmas, I decorate a little, we do a few projects, we do a tree, and a wreath. Sometimes we get the lights up on the house, but not every year. There is holiday baking, and cards, Santa visits, and gifts of course.
I'm not going all out decorating my house with garlands and centerpieces and changing out all my table decor and putting up 5 trees and wreaths on every door and car. It's just not me. I'm somewhat of a minimalist, and I enjoy the holidays more when I'm not working my butt off the whole time. But when you have little kids who get excited about such things, it's impossible to avoid adding on a little extra holiday festivity and activity. And really the best thing about Christmas is enjoying it through the eyes of a child.
So what could I do that's easy for me, and exciting for them? A few years ago I think I came up with the perfect thing. I took the basics of several different ideas I saw, and made it my own. And I kinda loved it. We've been doing this for a few years now and it never gets old. It fits all my requirements - it's exciting and fun for the kids, but it's easy for me.
Our 25 Days of Christmas Activity Calendar!
Basically - it's like an advent calendar and a whole plan of fun holiday activities, all rolled into one. It's homemade and personal, and the activities can be whatever you want.

This was so easy to put together - some things I already had around the house, one quick trip to the craft store, and some printables. Really not much money spent at all. Basically - a ribbon, with little envelopes clothespinned to it, with a paper in each envelope containing a holiday themed activity for each day.

What you'll need:
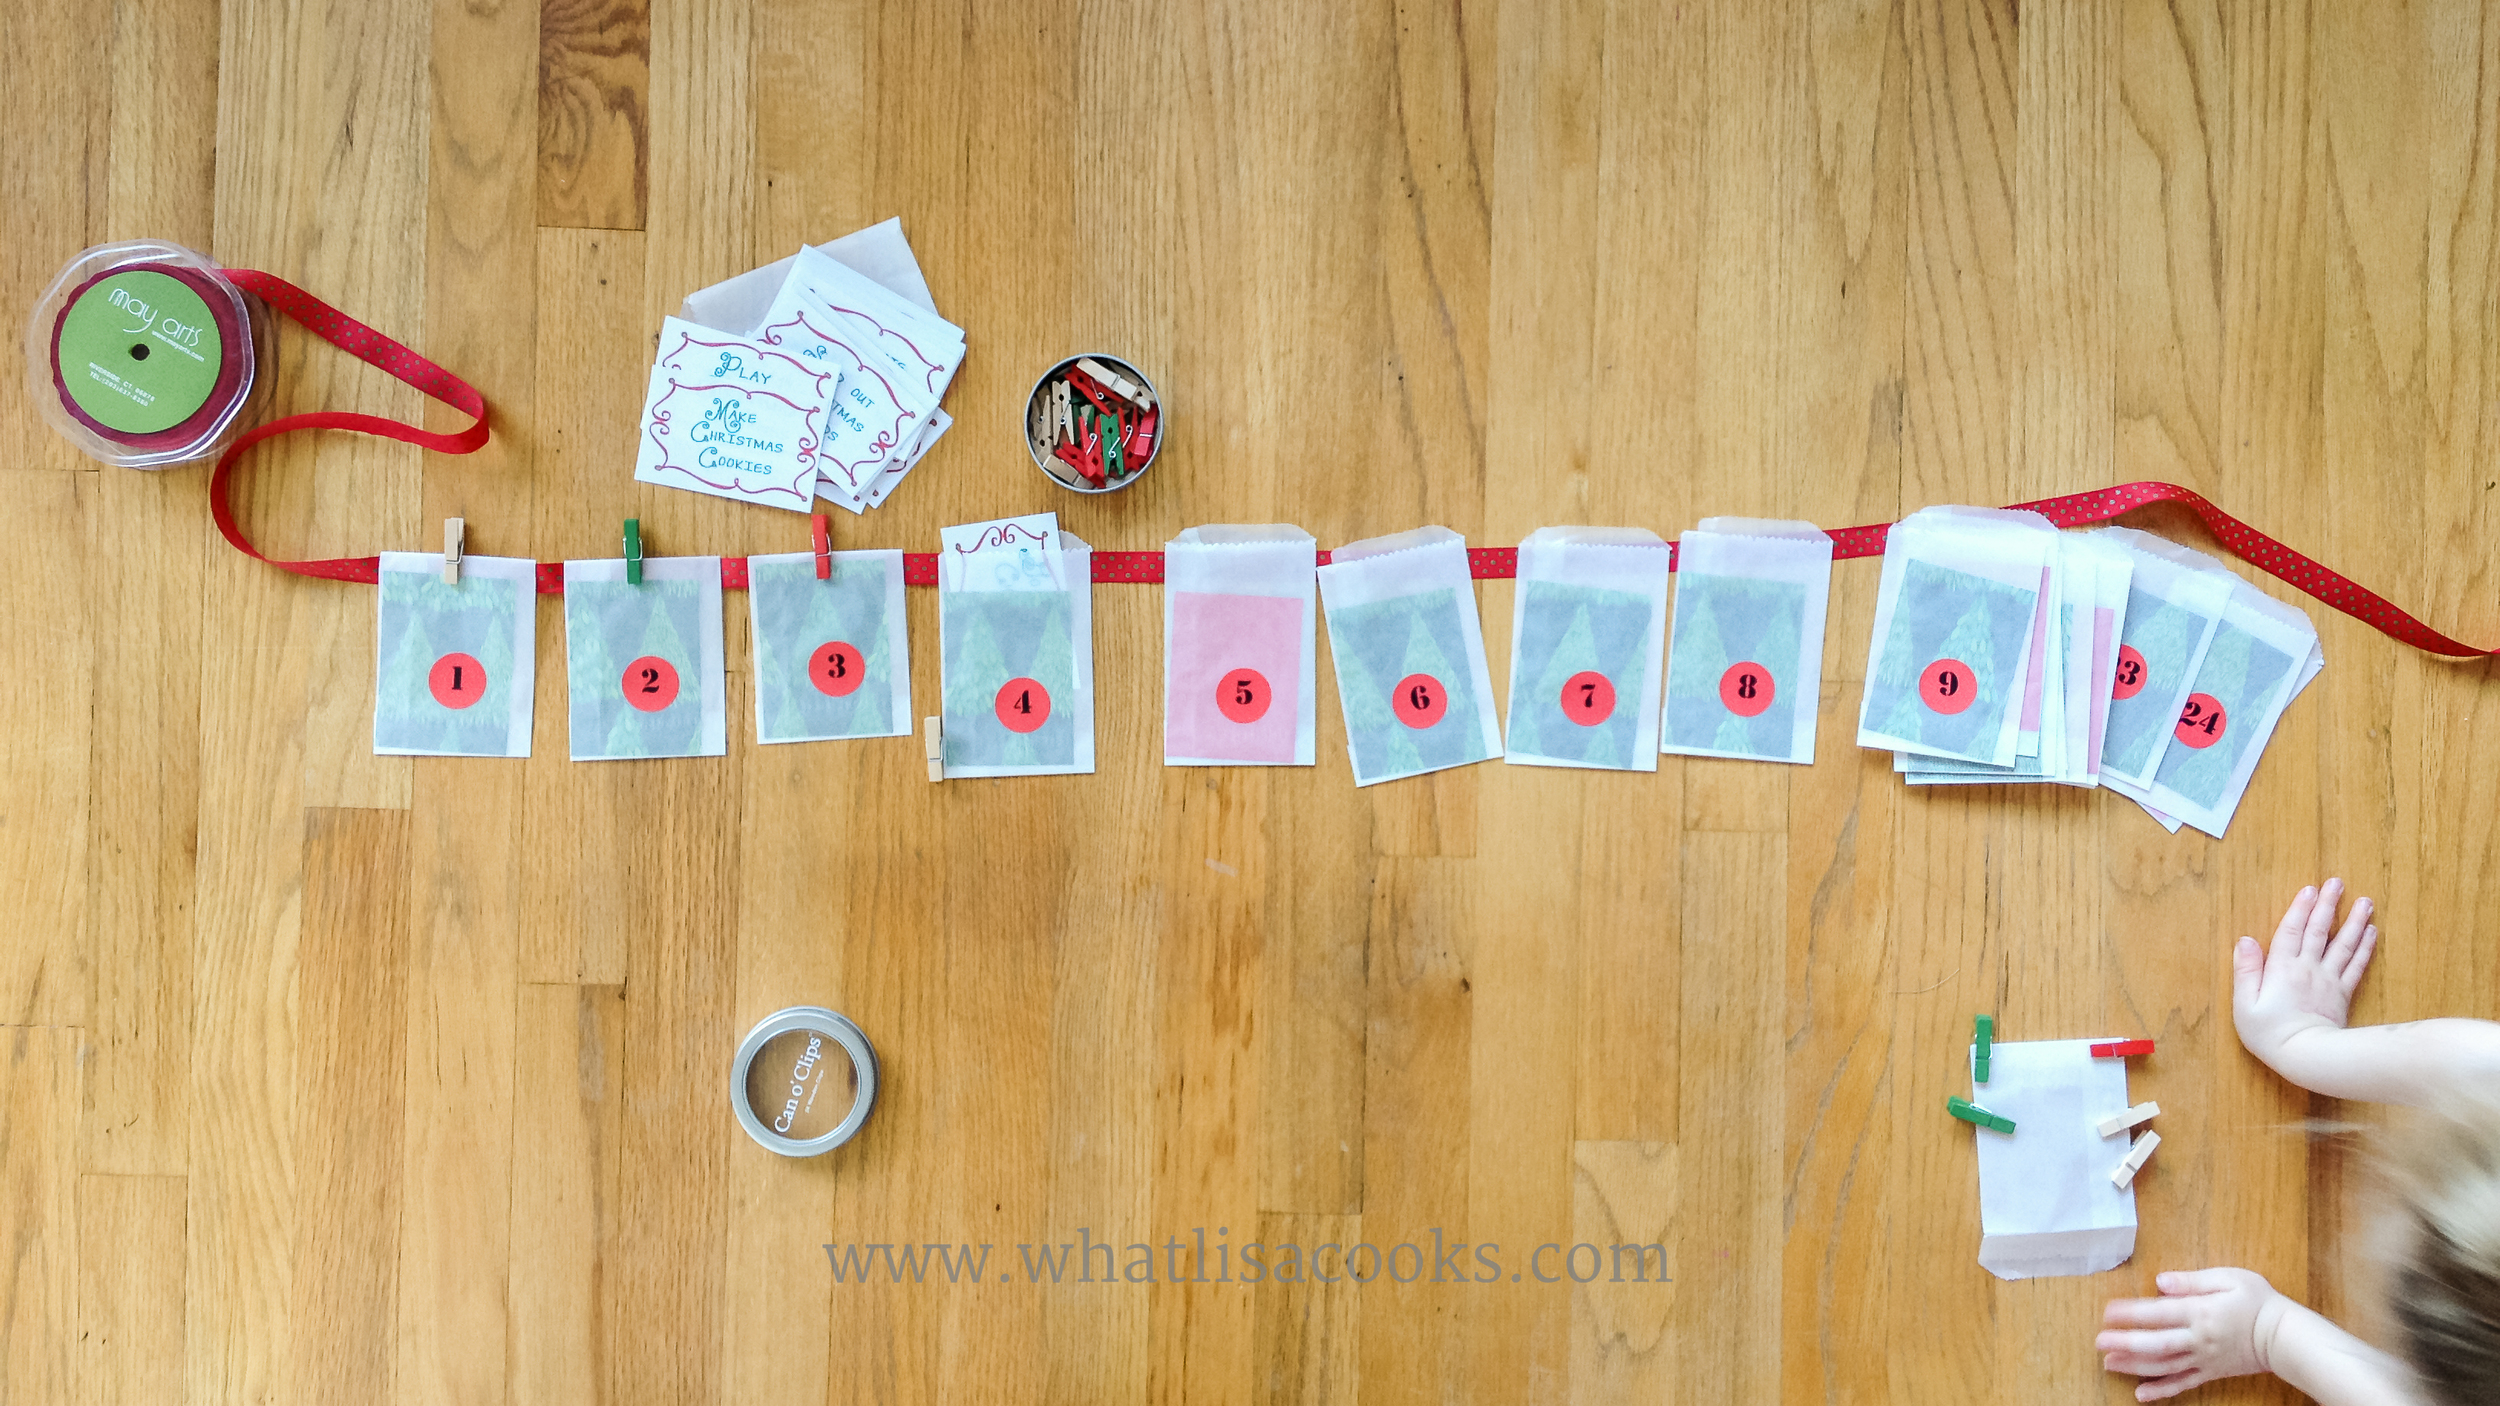
- a length of ribbon - the size will depend on where you're going to put it.
- little envelopes - I used glassine envelopes, but you could use any kind, even those small coin envelopes.
- colorful paper - I used leftover wrapping paper
- round labels or stickers - that you can either print or write on. I got my labels at a craft store, but I think these are the same size. This is the template I used to print my numbers.
- clothespins - I used red ones and some extra festive holiday ones.
- your printed activity cards
- hooks - or something to hang it from (or you can see in the picture above that I just tied it to a curtain rod)
- a blank December calendar page (optional, just for planning your activities)
How I made it:
Figure out your list of all the things you'd like to do with your kids this holiday season. I suggest you come up with a list of at least 30, so that if something isn't going to work out you have a few backups that you can easily switch out when nobody is looking. Try to have a good mix of very small things and bigger 'events'.
Arrange your activities by day. I printed a December calendar page to use, just to have something for a worksheet as I was planning out my days, so I could pencil in what I was thinking for each day. Here's a page with a nice printable calendar. I spent a little time with our family calendar and my activity calendar and penciled in what I thought would work for each day. We have very small activities (like reading a Christmas story, have hot cocoa, pop popcorn, etc.) on school days, and we have bigger things on weekends and once the kids were out of school for holiday break. I included things that we would already be doing anyway - like getting our Christmas tree, putting up lights, and visiting Santa - so a lot of it isn't even new stuff. And I tried to include some extra fun activities like make a gingerbread house, drive around to look at Christmas lights, etc.
You can just write each activity on a little piece of paper that will fit in your envelope, or you can get as fancy as you like with it and decorate cards, or print them out. I got super lazy and just used a free printable for my activity cards. I've posted links to several different advent activity printables on my Christmas Pinterest board. Even if you do make your own, it's fun to look at some of the links to just get ideas.
After you have your list of activities and your supplies, figure out where you're going to put it, and measure your ribbon to fit that space, leaving a little extra for a bit of swag. I originally had planned to put mine across the fireplace (you can see in the corner of one picture above that I had even already put some hooks up), but then I realized that our cats would be too interested in the ribbons, so I put it across a window instead.

Cut out your activity cards and your colored paper to the same size, so they'll fit in your envelopes. Since I was using clear envelopes I needed to cover the activity cards so my kids wouldn't peek. And since it would show through the envelopes, I wanted something pretty. I used some old Christmas wrapping paper that I didn't really have enough of to wrap with anyway.
Label each envelope with a number 1 - 25. I did this with red stickers, I got a sheet of stickers at my craft store and printed the numbers on them. But you could totally just use a red sharpie and your best writing (but I'm a lefty and my handwriting is terrible!).
Now you've got everything together - just assemble. Put a colored paper and an activity card in each envelope, fold them over slightly to hang in the ribbon, clip on with a clothes pin. I used a different color paper for every 5 days, so we had a little way to mark time with littler kids. And I alternated a few Santa clothespins in with my less expensive pins.
And that's it! My super simple 25 days of Christmas. My kids loved it, and it was the perfect amount of festivity for me! I hope you enjoy!

I even made an extra set to give to a friend as a gift - I packed it all up with some extra ribbon and a festive bag and it make a great little early holiday gift for the family.
I couldn't find online sources for all the things I used, but here are most of them.


Slow Cooker Lentil & Sausage Soup Recipe
This lentil soup is hearty and comforting and great for those nights when you need something to warm your tummy. It's super easy to make and it has a great balance of veggies and the delicious taste you can only get from sausage. My kids, like most, are not big veggie eaters. But they eat this soup! They are suckers for anything with sausage in it. When I serve it to the kids I put a big dollop of sour cream on top - they seem to like it better with the creaminess, and it's a great way to cool it off quickly. One of my kids actually loves this so much that she requested the leftovers for breakfast the next day, and for snack when she got home from school.

This lentil soup is hearty and comforting and great for those nights when you need something to warm your tummy. It's super easy to make and it has a great balance of veggies and the delicious taste you can only get from sausage. My kids, like most, are not big veggie eaters. But they eat this soup! They are suckers for anything with sausage in it. When I serve it to the kids I put a big dollop of sour cream on top - they seem to like it better with the creaminess, and it's a great way to cool it off quickly. One of my kids actually loves this so much that she requested the leftovers for breakfast the next day, and for snack when she got home from school.
The beauty of this type of recipe is in its flexibility. You can make this however you want, so please use this recipe as a guideline, not as a strict rule. If you like more or less or something, go for it. Change the type of sausage (or use meatballs or chicken), try different veggies, and different spices. That's the great thing about soup - you can personalize it and never make it the same twice!

Ingredients:
- 1 package of sausage - usually a little over a pound.
- 1 onion
- 1 carrot
- 1 stalk of celery
- 2 cloves of garlic (or 2 teaspoons crushed)
- 3 quarts chicken broth
- 1 can diced tomatoes
- 1 1/2 cups dry lentils
- 1 head of cauliflower
- 1 bunch of kale, or other greens.
- salt & pepper to taste
- Other herbs or seasoning to taste.
This works with basically any kind of sausage you like. I usually use brats or Italian sausage because I like the flavor. But if you want a little spice you could use a spicy sausage. Or if you want to keep it a little lighter you could use a chicken sausage.
You can also use any kind of lentils. Different kinds will have different textures when cooked, and take different cooking times, so just experiment and use ones you like. Red and orange lentils cook faster and have a softer texture when cooked. Green and black ones tend to hold their shape better. The one pictured was a very generic package of green lentils, I often have those on hand because they are usually the cheapest.
If you have homemade broth (here's how I make it), then that will kick this up into the ultra amazing category - it just adds so much flavor. But this is still great with store bought broth, and obviously that makes it very easy.
You could totally leave out the tomatoes if you're not a tomato person. I like to add them because I think the slight acidity goes well with the lentils and sausage. It's not enough that it seems like a very tomato-ey soup, but it's just enough to add a depth of flavor.
I like to hold off on the salt until I've got it all put together and simmering, because depending on the type of sausage and broth you use, it salt level is really going to vary. Some are very salty, some are not. Get it all assembled and then give the broth a taste, and then season as you think it needs. And here's where you can get creative: add other spices to give it a totally different flavor. If you want an Indian type flavor, add some curry powder. Or add cumin and extra garlic. Or for a more Italian flavor add some basil and oregano, or just an Italian seasoning blend. Or add a little cumin and chili powder for more of a southwest flavor. The possibilities are endless. Or keep it simple with just salt and pepper and you will still love it!

Directions:
- If you are starting with uncooked sausage, squeeze them out of the casings into little lumps, the size of small meatballs. Heat a heavy bottom pot (or the insert for your stove-top slow cooker), and add sausage balls. You don't need oil because the sausage is going to release plenty of fat. Brown all over.
- Chop onion, carrot, celery, and garlic, and add to the pot with the browned sausage. Saute until onions are getting soft.
- Add chicken broth and can of tomatoes (with juice!). Bring to a simmer, and then add dry lentils.
- Chop cauliflower and greens and add to the pot.
- Cover and simmer for at least an hour.
I like to make this in my slow cooker. I have a slow cooker with a metal insert, so I can do all the browning and sauteing on the stove right in the slow cooker pot, and then move it to the cooker to simmer. (This is the slow cooker I have, and I love it!) I will throw this together in the afternoon, and then let it simmer on low for 3 hours or so while I go to the after school run around, and we come home to dinner ready to eat. But you can just as easily do this all on the stove.
Shortcut:
If you want to make this really fast, use pre-cooked lentils and cooked sausage. You can get a package of pre-cooked lentils at Trader Joes or most grocery stores. Use the whole package. Saute all your veggies, cut your sausage into chunks, and then add all the other ingredients. Cut the broth to just 1 1/2 or 2 quarts, depending on how brothy you like it. Simmer for 20-30 minutes, just until the veggies are cooked to your liking. It's an easy way to make a super quick weeknight meal.


Easy Lemonade Lemon Cookie Recipe
I first came across a couple different versions of this recipe over the summer and made some with the kids. We loved them! They taste like summer, they are light and tangy and just the right amount of sweet. I think it's a little bit genius to make a lemon cookie using concentrated lemonade (the frozen kind) - you get all that great lemon flavor, but it's so quick and easy! I use an organic lemonade concentrate, so it does not contain high fructose corn syrup.

I first came across a couple different versions of this recipe over the summer and made some with the kids. We loved them! They taste like summer, they are light and tangy and just the right amount of sweet. I think it's a little bit genius to make a lemon cookie using concentrated lemonade (the frozen kind) - you get all that great lemon flavor, but it's so quick and easy! I use an organic lemonade concentrate, so it does not contain high fructose corn syrup.
I of course had to tinker with the recipe a bit to suit our taste, so here is my version.
Lemonade Cookies
Ingredients:
3 cups all purpose flour
1 cup (2 sticks) butter
2 eggs
3/4 cup lemonade concentrate (the frozen kind)
1/2 cup honey
1 teaspoon vanilla
1 teaspoon baking powder
1/4 teaspoon salt
Directions:
Thaw your lemonade concentrate. I do this by setting the can in a bowl of hot water while I get the rest of the ingredients ready. Preheat oven to 350 (or 300 convection).
The usual cookie method: cream butter & sugar (in this case, honey). Then add eggs, vanilla, and lemonade concentrate. Mix together dry ingredients. Then fold wet into dry. Stir gently, just enough to moisten all the flour. This keeps the cookies very light and soft.
I do all the wet part in my Vitamix. This lets you make it with cold butter. I hate having to wait for butter to soften. Put the honey and cold butter in the blender. Pulse on and off, and push down with a spatula, until they are creamed together. Have patience, this takes a few minutes. But it's a heck of a lot quicker than waiting for butter to soften. Once blended with the rest of the wet ingredients you end up with something very light which, when folded gently into the flour, makes for a very light and soft cookie.
Drop spoonfuls (or I use a small cookie scoop) on baking sheet. Bake at 350 for 12-15 minutes, depending on size. This will make at least 2 dozen, but probably more depending on how big you make them.
If you want them extra lemony, use a cup of the lemonade concentrate. Or you can brush the tops with a bit of it before baking. To make them look a little extra fancy you could dust them with powdered sugar.
Meal Plan #10
Meal plan for a very busy week.
We are still in the thick of kids' soccer season. Only two weeks left! Yes, I'm counting down. But with soccer practices three days a week after school, dinners need to be things that I can either make ahead and reheat, or have simmering in the slow cooker - either way it needs to be ready to put on the table when we get home late. It's the only way to avoid having takeout 3 nights a week. Having a meal plan is critical during weeks like this. I need to know ahead of time what I'm cooking, because I have a limited amount of time to get it put together and ready before I have to run out again.
If you saw my plan from last week, you might notice a few repeats here. One (the enchilada casserole) is because everybody loved it so much that they begged to have it again right away. The other two repeats are because we ended up changing plans and not having those dinners, so I just copied them over to this week.
The kids breakfasts and lunches are a lot of repeats too. I have a short list of breakfasts that I just rotate though. There is no need to reinvent the wheel each week for breakfast. For lunches I rotate through a short list of themes (like breakfast for lunch, lunchable, sandwich, etc.), but the actual execution looks a little different each time.
So here you go...
My plan for the coming week includes easy meals that can mostly be made ahead and just reheated at dinner time. Subject to change on a whim.
MONDAY: (MORNING THERAPY APPOINTMENTS, DANCE CLASSES AND SOCCER PRACTICE AFTER SCHOOL.)
Kids Breakfast: bagels, apples, cheese
Kids Lunch: Leftover pizza, banana muffins, carrots, fruit.
Dinner: Lentil Soup. Broth, lentils, canned tomatoes, garlic, greens, carrots, sausage. All simmered for a while in the slow cooker. Served with some savory quick bread (recipe coming soon).
TUESDAY:
Kids Breakfast: pancakes, cheese.
Kids Lunch: Lunchable: ham, cheese, crackers. Veggies and berries on the side. Maybe a cookie.
Dinner: Enchilada casserole. Also knows as: Lazy mom's enchiladas - it's much easier to just layer stuff in a casserole dish than it is to carefully roll each enchilada. I did this in the slow cooker last week and it turned out great. I make my own enchilada sauce because store bought ones are too spicy for my kids. It's basically just a tomato gravy (butter, flour - make a roux. Add chicken broth. Then add tomato sauce.) - seasoned with garlic, onion, cumin, and a tiny bit of chili powder. Here is an actual recipe if you like. I make the sauce, then put the chicken in and simmer until the chicken is falling apart. Mix together a can of cream of mushroom soup, some sour cream, and diced green chilis. In a casserole dish, layer: enchilada sauce with chicken, corn tortillas, soup & sour cream mixture, shredded cheese. Just keep layering until your dish is full or you've used up everything. It doesn't have to be pretty and exact quantities don't matter. Top with a bit more cheese, bake at 350 until bubbly. Serve with sour cream and shredded lettuce.
WEDNESDAY: (SOCCER PRACTICE AFTER SCHOOL)
Kids Breakfast: Scrambled eggs, toast.
Kids Lunch: Breakfast for lunch: leftover pancakes, yogurt, cheese, fruit.
Dinner: Chicken curry with coconut rice. I buy a packaged curry sauce and I'm not ashamed to admit it. It's easy, and I really like it. This one is a Japanese style golden curry, it comes in little blocks. You just brown your meat, add your chopped veggies, add the cube of sauce, some water or broth, and I always add coconut milk - and then simmer. I use whatever veggies I've got available. For the rice - just white rice cooked in my rice cooker, but I substitute a can of coconut milk for some of the water, and add a little salt.
THURSDAY: (SOCCER PRACTICE AFTER SCHOOL)
Kids Breakfast: Yogurt with oats, honey, jam, fruit
Kids Lunch: Bean and cheese burritos, maybe with some leftover chicken from the enchiladas. A little salad on the side.
Dinner: leftovers
FRIDAY: (SCHOOL HARVEST DANCE)
Kids Breakfast: Cheerios, fruit, milk.
Kids Lunch: grilled sandwiches.
Dinner: Pizza, probably takeout.
SATURDAY: (2 SOCCER GAMES)
Breakfast: Kids' choice (cereal, toast, etc.)
Lunch: Quesadillas
Dinner: Black bean soup - homemade broth, black beans, corn, rice, tomatoes, garlic, cumin. Served with toppings: chips, cheese, sour cream, diced avocado.
SUNDAY:
Brunch: Pancakes and sausage, eggs, fruit, OJ
Dinner: One Pot Homemade Macaroni and Cheese. You can find the recipe here on my instagram page. It's soooo good, and ridiculously easy.

Meal Plan #11
One week meal plan during a busy kids soccer season.

I've been terrible about sharing meal plans. And, well, I've been terrible about doing them. I'm not totally winging it, I usually scribble down plans for a few days at a time. Which is totally better than nothing, because at least I'm not standing in the kitchen at 5:00 with no idea what I'm putting on the table for dinner. But still, it's better when I plan more ahead.
I feel like I'm still not in the swing of things with this school year. I think it's this soccer schedule that's throwing me off. Practices three days a week and games on the weekends is just messing up my ability to plan. But I'm trying to get back on the wagon of doing the plan for at least the whole week, so here goes. I'm not even taking the time to drop it into a template of any kind - I'm just typing it out and I'm going to print this post and we are going to go with it.
One of the keys to meal planning that works is having a sense of your schedule. Have your calendar next to you as you are making plans and choosing meal for the week - so you know which days you are getting home late, or need something made ahead. And look at this - we don't have a single day this week without some kind of afternoon or evening commitment. yay. (not.)
My plan for the coming week includes easy meals that can mostly be made ahead and just reheated at dinner time. Subject to change on a whim.
Monday: (Morning therapy appointments, dance classes and soccer practice after school.)
Kids Breakfast: bagels, apples, cheese
Kids Lunch: pizza rolls, apple bread (still working on that recipe - the kids get all my test loaves), carrots, cheese.
Dinner: Chicken soup. Also known as "leftover soup" - take all of the leftover things out of the fridge and put them in broth, and call it soup. It's got a bit of veggies, a bit of brown rice, some diced chicken, all in homemade chicken broth. If I have time I'll make some biscuits or soda bread to go with it.
Tuesday: (IEP meeting after school)
Kids Breakfast: Apple bread, cheese.
Kids Lunch: Tuna salad and crackers. Veggies and berries on the side.
Dinner: Enchilada casserole. Also knows as: Lazy mom's enchiladas - it's much easier to just layer stuff in a casserole dish than it is to carefully roll each enchilada. Or I might try a version in the slow cooker that I've been meaning to try for a while. I make my own enchilada sauce because store bought ones are too spicy for my kids. It's basically just a tomato gravy (butter, flour - make a roux. Add chicken broth. Then add tomato sauce.) - seasoned with garlic, onion, cumin, and a tiny bit of chili powder. Here is an actual recipe if you like. In a casserole dish, layer: sauce, corn tortillas, diced chicken, shredded cheese, diced green chilis, diced onions. A layer of a cream of mushroom soup is really nice. Or some sour cream. It doesn't have to be pretty. Top with a bit more cheese, bake at 350 until bubbly. Serve with sour cream and shredded lettuce.
Wednesday: (Soccer practice after school)
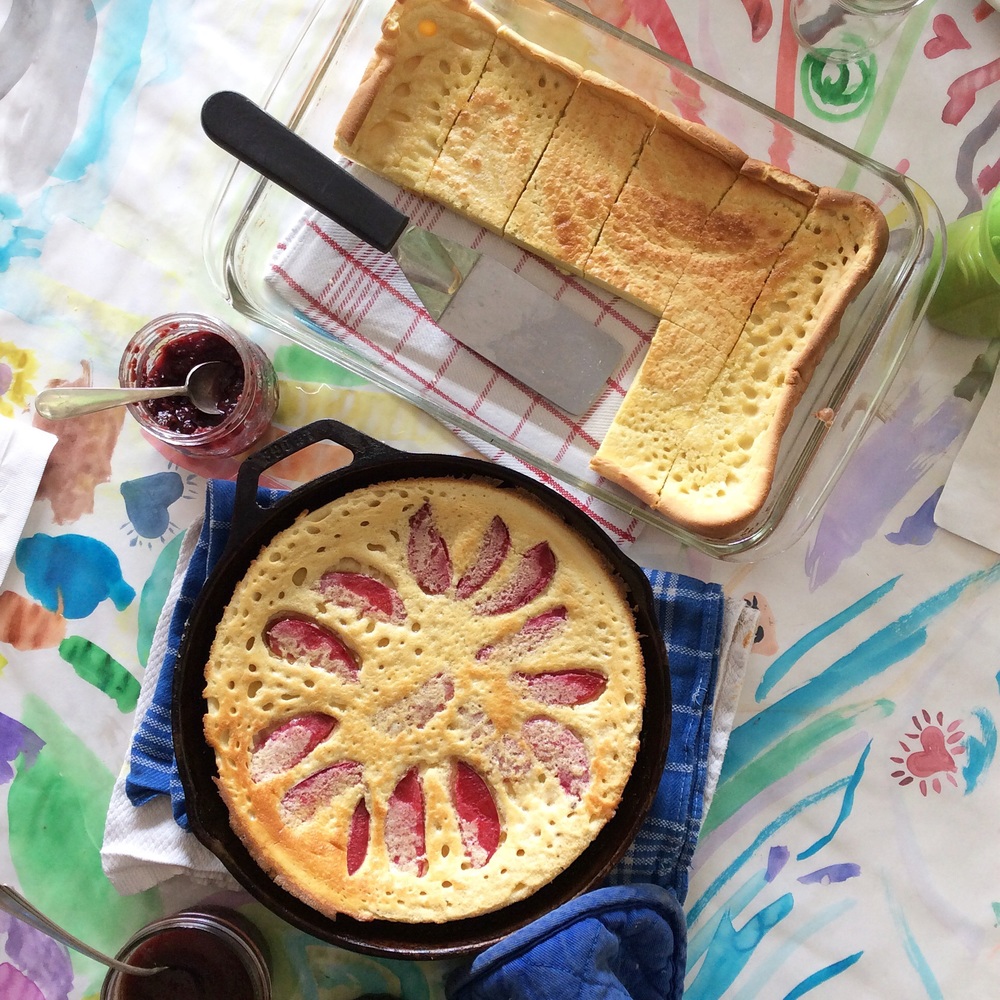
Kids Breakfast: Dutch Baby
Kids Lunch: Breakfast for lunch: Banana bread, yogurt, cheese, fruit.
Dinner: Chicken curry with coconut rice. I buy a packaged curry sauce and I'm not ashamed to admit it. It's easy, and I really like it. This one is a Japanese style golden curry, it comes in little blocks. You just brown your meat, add your chopped veggies, add the cube of sauce, some water or broth, and I always add coconut milk - and then simmer. I use whatever veggies I've got available. For the rice - just white rice cooked in my rice cooker, but I substitute a can of coconut milk for some of the water, and add a little salt.

Thursday: (3 kids dentist appointments after school)
Kids Breakfast: Yogurt with oats, honey, jam, fruit
Kids Lunch: Wraps: Tortillas rolled up with meat, cheese, lettuce. Fruit on the side, maybe a few cookies.
Dinner: leftovers
Friday: (school run-a-thon, and a birthday)
Kids Breakfast: Cheerios, fruit, milk.
Kids Lunch: Sandwiches, not sure what kind yet.
Dinner: the kids are having a sleepover at Grandma's and we're going out. It's my birthday!
Saturday: (2 soccer games)
Breakfast: Out. Kids at Grandma's
Lunch: Quesadillas
Dinner: Black bean soup - homemade broth, black beans, corn, rice, tomatoes, garlic, cumin. Served with toppings: chips, cheese, sour cream, diced avocado.
Sunday: (Hubby has band practice)
Brunch: Pancakes and sausage, eggs, fruit, OJ
Dinner: Tuna melts

Meal Plan #9: a Full Month menu
A meal plan from the archives - a full month plan with breakfast, lunch, and dinner. Plus notes for how and why, and the template.
Are you struggling with meal planning and figuring out how to manage your meals?
I have a system for meal planning that works great!
It involves a bit of up front work, but once it's done I am always so happy.
Why meal planning?
For me, what inevitably happens when I am not as disciplined about planning is that I spend way too much money on food and end up buying too much stuff that we don't really need.

Some people like to shop for shoes, I like to shop for food!
I really do enjoy going to the grocery store and just browsing. But if I don't have a complete planned out menu, with a grocery list to go with it, then I find myself at the store and just buying what looks good, or buying more than I need just to have stuff on hand.
When you are on a tight budget, you know that just browsing the store and buying what looks good is not a good idea!
So what's the system?
I don't just do a meal plan for one week - I do it for an entire month at a time!
I know it sounds like a lot of work, and the first time you do it is.
But once you have a four week plan, then you can just re-use and make little changes each month - you don't have to come up with the whole thing from scratch over and over again. You can even just repeat the whole thing - it's been a full four weeks since you had one of those meals, so it won't feel like you are repeating!
Scroll to the bottom to get a copy of my four week meal plan template.
Once it's done, I feel a huge sense of relief in knowing that I've got a whole month of meals all figured out.
I design our plan to fit our current weekly schedule, knowing which days I have time to cook and which days I don't.
I work in a few of our regular theme nights that my kids have learned to expect - like Taco Tuesday, and Pizza Friday.
I try to have several nights of the month where I cook a large piece of meat or roast chicken, with the purpose of having lots of leftovers to use in other easy meals. You'll see in my plan that I've got several dinners that are based on the assumption that I've already got cooked chicken or other meat available to use.
In this version I also plan out breakfast and lunch. You totally don't have to do that, but with four kids getting ready for school, and packing four lunches every day, also having an idea of what to do for those meals just makes my life easier. For breakfast and lunch I follow a plan that's pretty much the same each week, with just minor variations in a few of the items. I don't need to reinvent the wheel each week and as long as I don't repeat something twice in one week, my kids are ok to eat the same lunch somewhat frequently.
I should also note that I'm not actually making things like pancakes and French toast on weekday mornings - those are leftovers from the previous Sunday's breakfast. I always make extra of all of those kinds of things and stash them in the freezer, they make super easy weekday breakfasts. The breakfasts and lunches that I've included here are mostly just for the kids (except Sunday breakfast).
As for shopping - planning for four weeks really helps with controlling the spending! I list out everything I need for the four weeks of meals, and I do a big Costco trip once a month for all of the non-perishable foods, as well as all of my meats that can go in the freezer. I do this big trip right after my husband's mid month paycheck - the one that doesn't have to cover the mortgage and health insurance. After that then all I need to buy each week are fresh items like dairy, fruit, and veggies.

In order to maintain a somewhat reasonable grocery budget, I'm trying to really prioritize what I buy organic, and right now my top priorities for organics are our milk, eggs, and most of our produce. Basically the stuff that we consume a lot of (and so our pesticide/hormone/antibiotic exposure would be the highest), and the things on the 'dirty dozen' produce list. I will keep an eye out for sales on organic meats, and if, for example, I see that Whole Foods has organic whole chickens on sale for the same price as the regular ones at Trader Joe's, then I'll try to run over and pick up several and stick them in the freezer. I get a weekly organic produce delivery which is a really good value for what we get, and we are getting our milk delivered weekly from a local dairy. So after those two deliveries each week, my grocery shopping for the rest of the month will be very minimal, which is going to save me a lot of time!
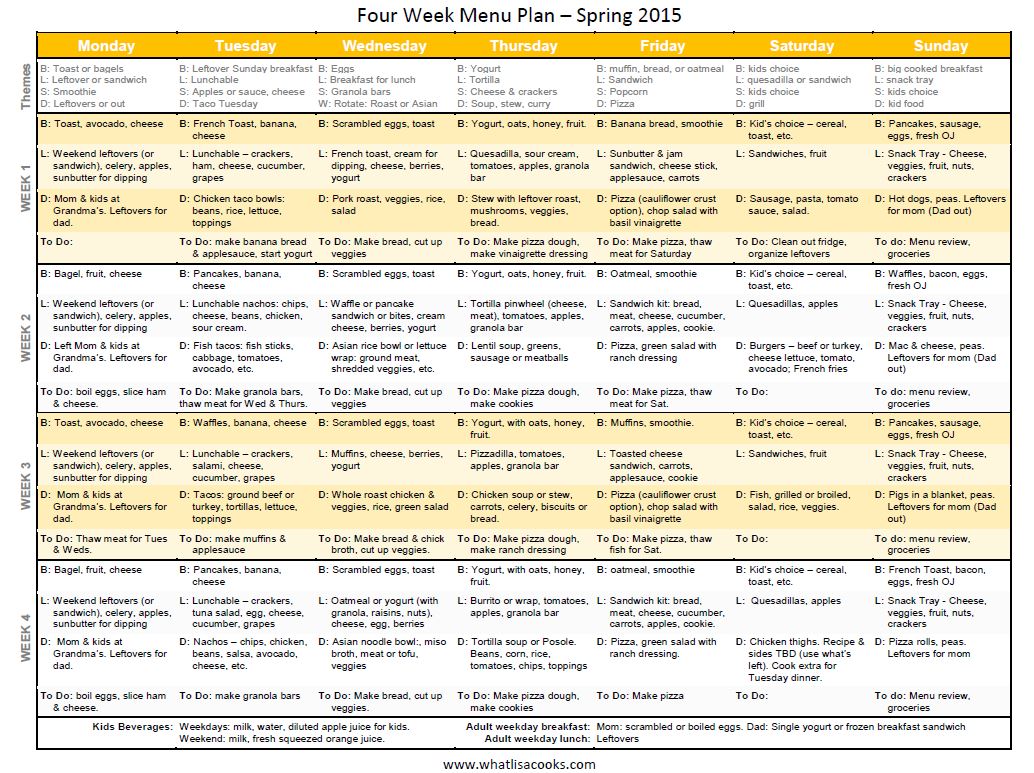
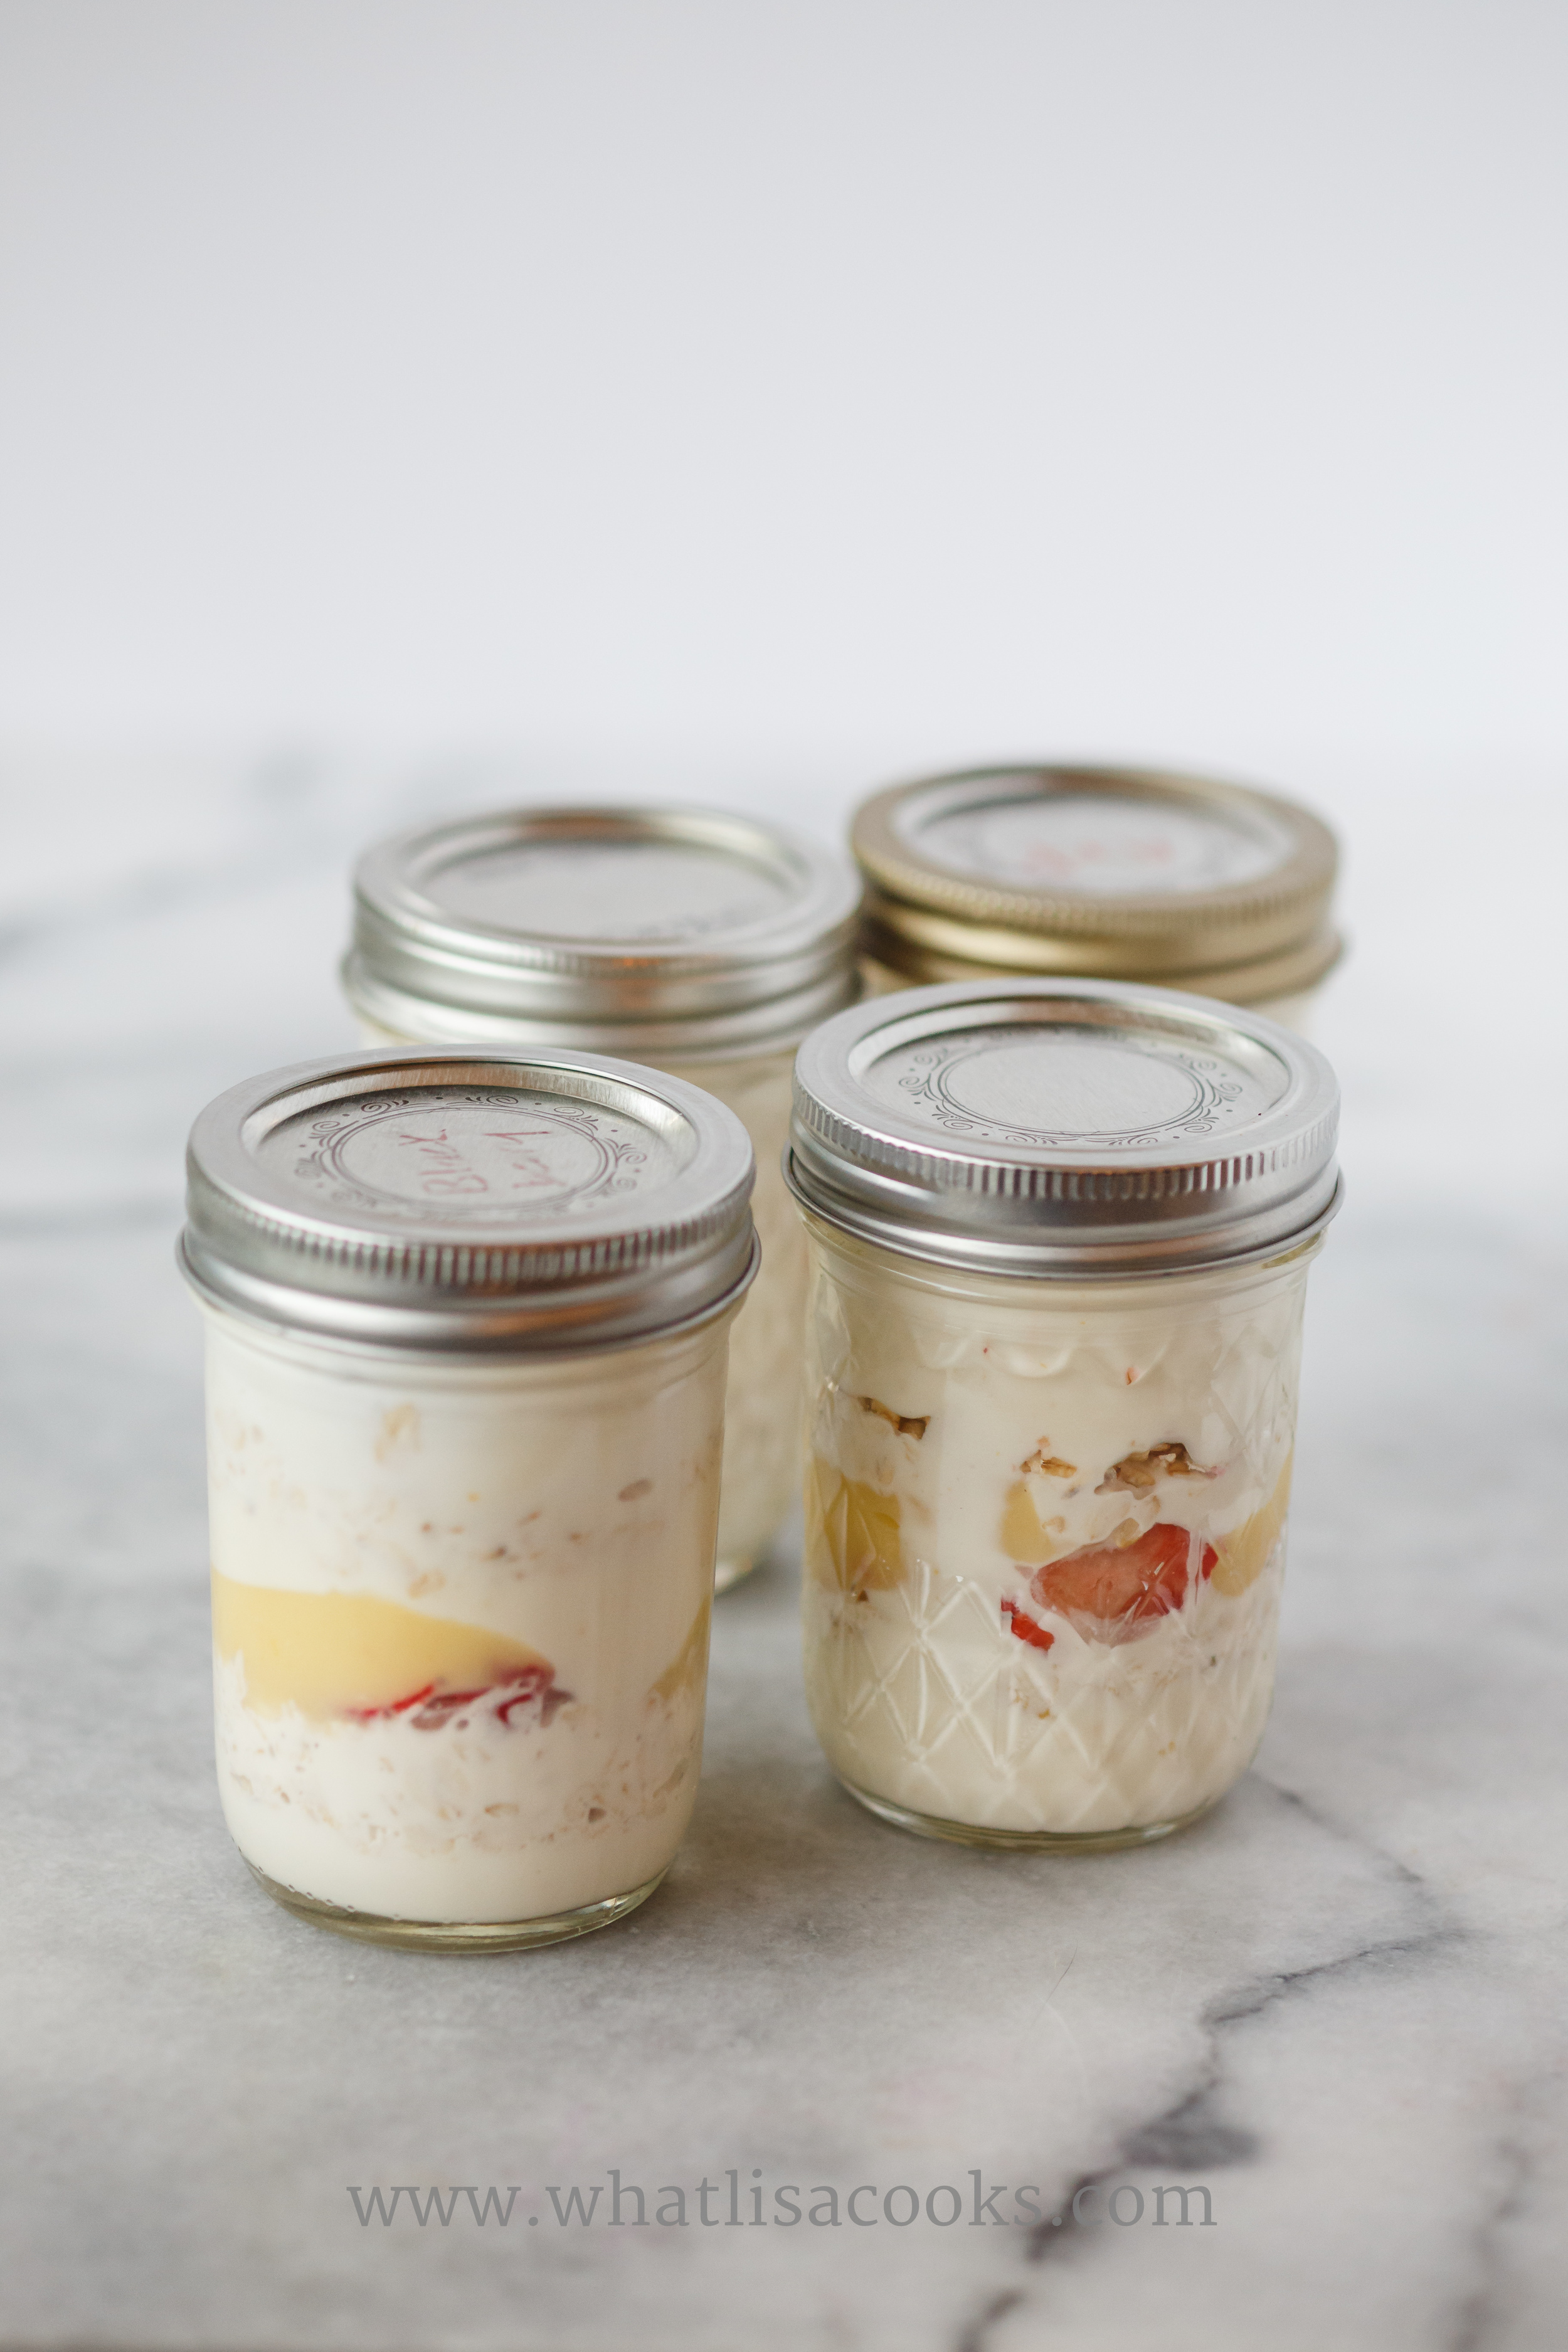
Yogurt Parfaits
I recently wrote about my super picky child, and how she is finally starting to try new foods, now that I have completely given up on pushing her. But we are still in the baby steps phase with that, she certainly has a ways to go before she is eating everything the rest of us eat. So for now, a very large part of her diet is still yogurt. I'm thankful at least that she really loves something that is so healthy, and I can load it up with fruit and oats to really make it an even more complete meal for her.

I recently wrote about my super picky child, and how she is finally starting to try new foods, now that I have completely given up on pushing her. But we are still in the baby steps phase with that, she certainly has a ways to go before she is eating everything the rest of us eat. So for now, a very large part of her diet is still yogurt. I'm thankful at least that she really loves something that is so healthy, and I can load it up with fruit and oats to really make it an even more complete meal for her.
I make plain yogurt, or if I haven't had time, I buy it. She likes her yogurt all dressed up with oats and honey and sometimes some jam or fruit. I recently made lemon curd, so lately that has been her topping of choice, along with a little whipped cream.
It's a fantastic meal for her, but it can be a bit of a mess to get all these things out, so to save myself some time I decided to make her some yogurt parfait's in jam jars, so that she can help herself to one in the fridge whenever she needs a snack. Or they are great for an easy week day breakfast.
These are kind of like a combination of a flavored yogurt + an overnight oats idea.

There's no real recipe here - that's the beauty of it. You just take whatever you would normally put in yogurt or an overnight oats, and layer it. Things like:
- honey
- oats or granola (it will get soft)
- berries
- bananas
- jam
- cream
- dried fruit
- nuts or seeds
For this batch I layered plain yogurt, honey, oats, cream, lemon curd, and strawberries. Just a little bit of each, and then repeat, until the jar is mostly full. Its a good idea to leave a little room for stirring.
Leftover jam jars seem to make the perfect size for a good serving, and I've got tons of them around. But I'm sure you could get creative with other kinds of containers.
Once you've layered everything, just put a lid on and put in the fridge. I think they'll be good for several days, and it will probably very depending on whether you used fresh fruit.
Enjoy!