
How I keep my House Clean
So my house is pretty much always clean, or at least it’s cleaner and tidier than most. People always ask me how I do it, or I think people assume that I spend a ton of time cleaning and never relax, or maybe someone else does it for me.
Well that is definitely not the case!
I value my chill time and the last thing I want to do is spend hours a day cleaning my house. But I also think it’s a waste of money for a healthy person who doesn’t work full time to pay someone else to clean. And I am also a person who gets overwhelmed with visual chaos and clutter, so I need to live in a clean and tidy environment. I can’t relax in the middle of a mess, therefore it’s important to me to have easy tricks for keeping the house clean.
With two sets of twins less than three years apart and living in a relatively small house for a family of 6, I had to figure out a lot of tricks and routines for keeping up with everyone and everything. We have a bigger house now and these strategies really help me keep on top of keeping a bigger space clean.
I’ve picked up a lot of ideas over the years and come up with some of my own, so read on for my top suggestions for how to keep your house clean with minimal work every day. Some of these are about organizing and general strategies for keeping it all under control, and some are about actual cleaning.
The real secret here is two big ideas:
1) There is no one single thing that is going to transform your house - it’s a lot of tiny habits that add up to making a big difference.
2) The keyword is “keeping” your house clean. If you are starting out with a big mess then you are going to have to put in some work to get it sorted out. You don’t have to do it all at once though, and some of my tips can help you chip away at it a little at a time. You may need to bring in outside help to get yourself to a manageable place. But once you’ve got it cleaned up is when you can really make a difference in your life - by doing all the little things to keep it clean and never let it get that messy again. I promise you this is doable, even with a house full of little kids. There’s nothing special about me, if I can do it so can you.
You don’t have to do all these things every day, but if you pick a few to do regularly I can guarantee you that your house will be in much better shape and you will be much happier for it.
So here we go, my favorite tips for keeping your house clean:
First here’s the quick list. Read on for more detail about each of these strategies.
Small messes are easier to clean than big ones
A place for everything
Put away one thing before getting out another
The speed clean
A quick reset
Make the bed
The laundry basket trick
Robot vacuums
Daily sweeper vacuum
Wipes
Supplies in many places
Vacuuming is for more than just the floor
Air cleaners (or a fan with a filter), and furnace filters
Laundry every day
Get up a few minutes before the kids
Clean your cleaning supplies
Now for the details.
Small messes are easier to clean than big ones.
I tell my kids this basically every day: the real secret to never having a big mess to clean is to never let the mess get big.
Sounds pretty simple right? Honestly I think it is. You can tidy a room for 5 minutes every day, or it will take you an hour if you wait and only do it every couple of weeks and everything has gotten piled up and feels totally overwhelming. I’d rather spend 5 minutes every day just resetting and putting things in their place so that it never turns into a big mess.
Declutter and minimize.
And then declutter and minimize some more.
Don’t keep stuff you don’t need! And you’d be surprised at how little you actually need. It is so much easier to keep a space clean and keep the stuff tidy and organized when there just isn’t too much stuff. I’ve been in so many houses where my first reaction is “there is just WAY too much stuff here”.
Clean out and clean out and clean out. Marie Kondo the shit out of that stuff. You don’t need 20 sweaters or 6 of the same size baking pan or multiple sets of dishes you never use or a dozen sets of sheets for each bed.
I give a long hard look at even so-called sentimental things. Because things are not memories. The memories live inside you, not inside the stuff. Don’t keep stuff that you have no use for, that just takes up space and collects dust and makes it harder to put other things away. You’re not going to forget a person or an experience just because you get rid of the thing.
There are dozens and dozens of websites and blogs and Instagram accounts dedicated to teaching you how to minimize your stuff so I won’t go on too much about this. But get rid of that stuff.
A place for everything.
One of my top favorite quotes ever is from Alton Brown, he said “Organization will set you free” and I 100% believe and agree with that. When everything has a place that’s easy to fit and makes sense, cleaning up is so much easier. It really does feel freeing.
My kids toys all had a bin, box, or cubby they went in. Bins and tubs make it easy for kids to get out a set of something and put it away. Our homeschool and office supplies are all in simple plastic bins. I have dividers and containers in my kitchen drawers and cabinets. We have our clothes drawers organized with dividers and containers.
But you don’t have to buy expensive containers! Shoeboxes work just as well. In fact, when my kids were little, I always saved the boxes their shoes came in because little kid sized shoe boxes are a perfect size for organizing little kid sized clothes in their drawers.
If you make it easy to put things away, then they are much more likely to get put away.
There are also loads of people out there who can help you with organization. But I'll also refer back to the previous tip - there are no amount of organization hacks in the world that will solve the problem for you if you are just trying to put too much stuff into a space.
Make those kids help!
I know it’s often faster to just clean something up yourself than it is to take the time to coach little ones through it.
But the sooner you start teaching them to clean up after themselves, and actually expecting and requiring them to do it, the easier it will be. They need to have learned those habits by repetition, day after day, year after year.
If they leave a mess and walk away, don’t let them off the hook. Call them back and tell them to clean up, immediately. They will pitch a fit, or at least roll their eyes, and you and they both know you could have just as easily picked up the thing yourself. But if you do that they don’t learn. It’s a pain in the ass to have to come back to a room to do a job once you’ve moved on, so if they know that you are going to make them come back every time, they’ll think twice before leaving a mess. But this takes consistency - every time.
The speed clean
Think you don’t have time to clean? Here’s my trick for cleaning with a limited amount of time.
Set a timer for however much time you think you can dedicate every day. Maybe it’s 20 or 30 minutes, maybe it’s an hour. Or maybe you can manage 15 minutes on weekdays and an hour on weekend days.
Whatever it is. Get ready, set your timer, and go.
Clean as much as you can in that amount of time. Stop when the timer goes off. If you do this consistently, every day, you will be amazed at how much you get done and your house will feel pulled together and clean in no time. Even if all you have is 5-10 minutes for one room, you’ll be shocked at how much you can get done when you are racing against the clock. And the more you do it, the cleaner the room gets, and the more you will get done in less time.
A quick reset
Whether you do it first thing in the morning or last thing at night, a quick pass through the house to just reset the main rooms makes a big difference.
I do the living room in the morning when I get up, I just go through and tidy up the books, straighten the sofa and blankets, pick up any dog toys and toss them in the basket, etc. It takes just a few moments and then we start the day with our main room clean. And people are less likely to leave a mess in a clean room. If the room is messy then they think nothing of leaving just a bit more mess, but if it’s clean then their new mess is more obvious.
Make the bed
This is another small one that I think makes a huge difference in how a room feels.
Get your bed set up in a way that is quick and easy to straighten - we like the European style duvet covers, you basically just give them a shake and straighten, fluff the pillows, and the bed is made. My king size bed takes less than a minute to make in the morning. When you get up in the morning, take a minute to straighten the bed. You’ll be surprised at how nice it feels to walk back into a room with the bed made
Put away one thing before getting out another
This is the most important thing I think you need to teach your kids, but it applies to us adults as well.
Clean up from one project or activity before you move on to another. Kids need reminders about this, you can’t expect them to just do it. You need to be on them to pick up after themselves, all day every day, for many years, for this to become a habit. But if you’ve done some of the other things I suggest, if each toy or art supply has an obvious and easy place it goes, then this becomes very easy. And as I said above - if they walk away without doing it, make them come back and clean it up, every time.
The laundry basket trick
This is one of my favorites and it works especially great in a house where you’ve got kids who tend to leave a trail.
When you go into a room to clean it, take an empty laundry basket (or it could be a box or a bin or some kind of larger container, it really doesn’t matter what). Pick up every single thing that doesn’t belong in that room and put it in the laundry basket. Don’t distract yourself with putting those things away, just focus on the one room you are in. Set the basket by the door, fill it up as you go around that one room. This allows you to really clean one room without getting distracted. When you are finished in that room, walk around the house and deposit all the things into the rooms they go in. Then repeat with another room.
Daily vacuuming
The number one thing you can do to cut down on the amount of dust in your house is to vacuum every day. I have a sweeper vac that I love that lives in my laundry room. I run this thing around my house for 10-15 minutes every day and I am litterally never not shocked at how much dust and pet hair gets picked up.
Robot vacuums
The daily vacuuming is even easier if you can invest in a robot vacuum. You just turn it on and it does the work for you. It really feels like a little housekeeper running around my house cleaning for me.
This requires that your floors be picked up, but that’s easy if you’re taking all the rest of my advice and doing a quick pickup in each room every day and never letting the floor get cluttered. Also it’s a great motivator to get kids to pick up their little bits off the floor - tell them that if it’s not picked up the robot vacuum is going to eat it.
Use wipes
Whether they are sanitizing cleaning wipes or just plain baby wipes, using some kind of disposable wipes around your house is a great shortcut.
I just grab a couple wipes and quickly go over any surfaces around the house. I keep cleaning wipes and baby wipes in every bathroom. A quick (we’re talking a minute or less) bathroom wipe down with a sanitizing wipe will make your weekly bathroom cleaning so much easier.
Again, if you never let it get really dirty, then it’s never a big cleaning job. Also dusting and wiping with baby wipes is a great first chore for little kids. I will never stop buying baby wipes, they are great for so many things, I keep them in practically every room of my house and in my car. Yes we all want to reduce the amount of single use disposable things in our lives, but we also have to make compromises to keep our sanity. This is one that I think is worthwhile.
Supplies in many places
Like with wipes, if you keep basic cleaning supplies stocked in a few places around your house, then it makes just grabbing a bottle of cleaning spray or a few wipes even quicker. I especially like to do this when I have kids and teenagers doing some of these cleaning chores, anything to make the job a little easier for them means it is more likely they will do it. A container of wipes on the bathroom counter means it’s much more likely they will wipe down their sink and toilet every day.
Vacuuming is for more than just floors
My vacuums are my secret weapons.
I use a vacuum to dust and clean all kinds of surfaces in my house, not just my floors. Baseboards, crown moulding, louvered closet doors, corners, ceiling fans, windowsills, curtains, even walls get dusty. A first pass with the vacuum gets the first layer of dust actually removed and locked away, rather than just moved around and letting it settle somewhere else, and then when you go back with a damp wipe or dusting cloth there is much less to be picked up.
Don’t leave kitchen messes
Empty that dishwasher as soon as it finishes so that any dishes that are used throughout the day can go straight in the dishwasher and don’t pile up in the sink. And you’re going to have to remind your family constantly. I can’t tell you how many times a day I say “put that in the dishwasher”, and call kids back to the kitchen to do it.
I know a lot of folks leave dinner dishes for the morning, because after dinner you are just done. But getting that kitchen cleaned up before you go to bed really does get your day off to a better start. If you can manage to just get it cleaned up as soon as the meal is finished, I promise you will be happier in the morning.
In our house the dinner dishes are done by the husband and teenagers because I do the cooking. My husband and I agreed at the beginning of our marriage that this was a fair deal - whoever cooks the dinner does not have to do the dishes.
Empty that dishwasher as soon as it finishes! It is SO MUCH easier to keep your kitchen clean if you are able to put a dish right into the dishwasher as soon as you’re finished using it.
Air cleaners and filters
Air cleaners are another of my secret weapons for minimizing dust in a house.
These can be expensive air cleaners with high end filters, but when it comes to picking up dust I’ve found that a cheap box fan and a square furnace filter works just as good. It’s amazing how much dust is on that filter after just a short time. I have these all around my house. If you have a forced air system in your home you also need to make sure you are cleaning or swapping out those filters regularly. They collect so much dust.
Get up a few minutes before your kids
Ok if we’re being honest this is my least favorite thing to do.
I love sleeping in, and I hate getting out of my bed. But I still did get up before my kids for many years because I figured out that it really was a key to success. If I could get up even 15-20 minutes before them, I had time to get myself a cup of coffee, get the laundry cycled and empty the dishwasher. Getting those two chores done made a huge difference in my day.
Laundry every day
Laundry is my least favorite chore.
I would honestly actually rather clean a toilet than fold laundry. As much as I hate laundry though, I still do it every day. Because if it piles up it becomes totally overwhelming and then I avoid it even more, and then it piles up even more and it’s just a bad deal. The only way laundry works for me is if I keep up with it every day. With six of us in the house, this usually means two loads a day. So, per my previous tip - start a load first thing in the morning before the kids are up, switch one to the dryer, take one out of the dryer and fold it. It’s the folding that’s most important for me. When my kids were little if I didn’t fold that load as soon as I took it out of the dryer, then it was basically never getting done. This is just another one of those things that is so much easier to manage when it’s a small job, so don’t let it get big.
Clean your cleaning supplies!
You can’t expect to get clean results if you are “cleaning” with a dirty tool.
Does it seem like your vacuum isn’t picking up stuff as well as it used to? When was the last time you cleaned it? All of these things have removable air filters and usually the rollers and brushes are removable too. They get all clogged up with dust and hair and they need to be cleaned. And I don’t care if you have one of those fancy kinds that claims to never lose suction. They all lose suction and they all can get clogged up. I take apart and clean my vacuums regularly, clean my mops, wash my rags and sponges.
Clean your dishwasher regularly and it will get your dishes much cleaner - run vinegar through it and take out and scrub the filter. Clean your sink and scrub your disposal if you have one. Clean your washing machine - run empty loads with vinegar, or oxi-clean, or bleach - most newer machines have a self clean cycle. I also spray down around the insides with vinegar, spray and wipe the outside. If you have a front loader you need to get in around that rubber gasket and clean, it gets really gross.
That’s it for now!
Ok, that’s a lot. But it’s all really small stuff, and if you do even a few of these things they add up to make a big difference. I’ll add to this post as I think of more tips for you, so check back!
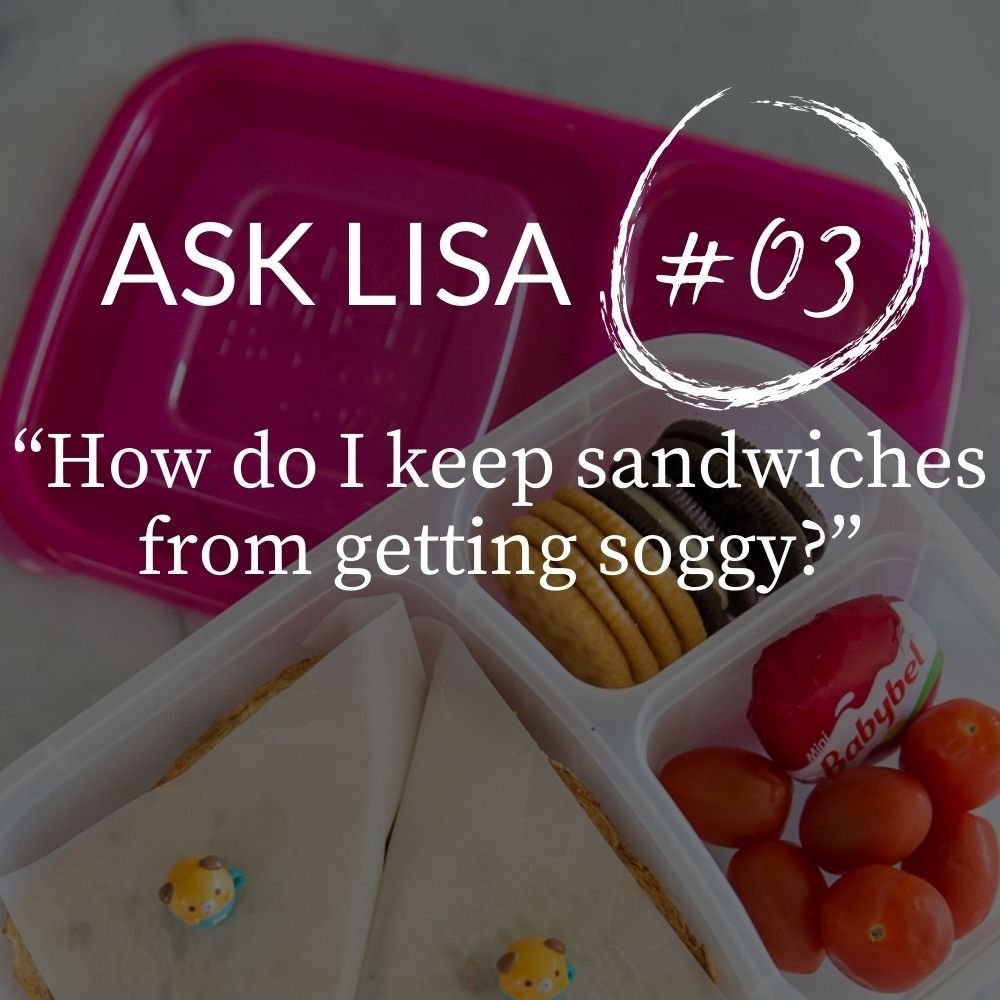
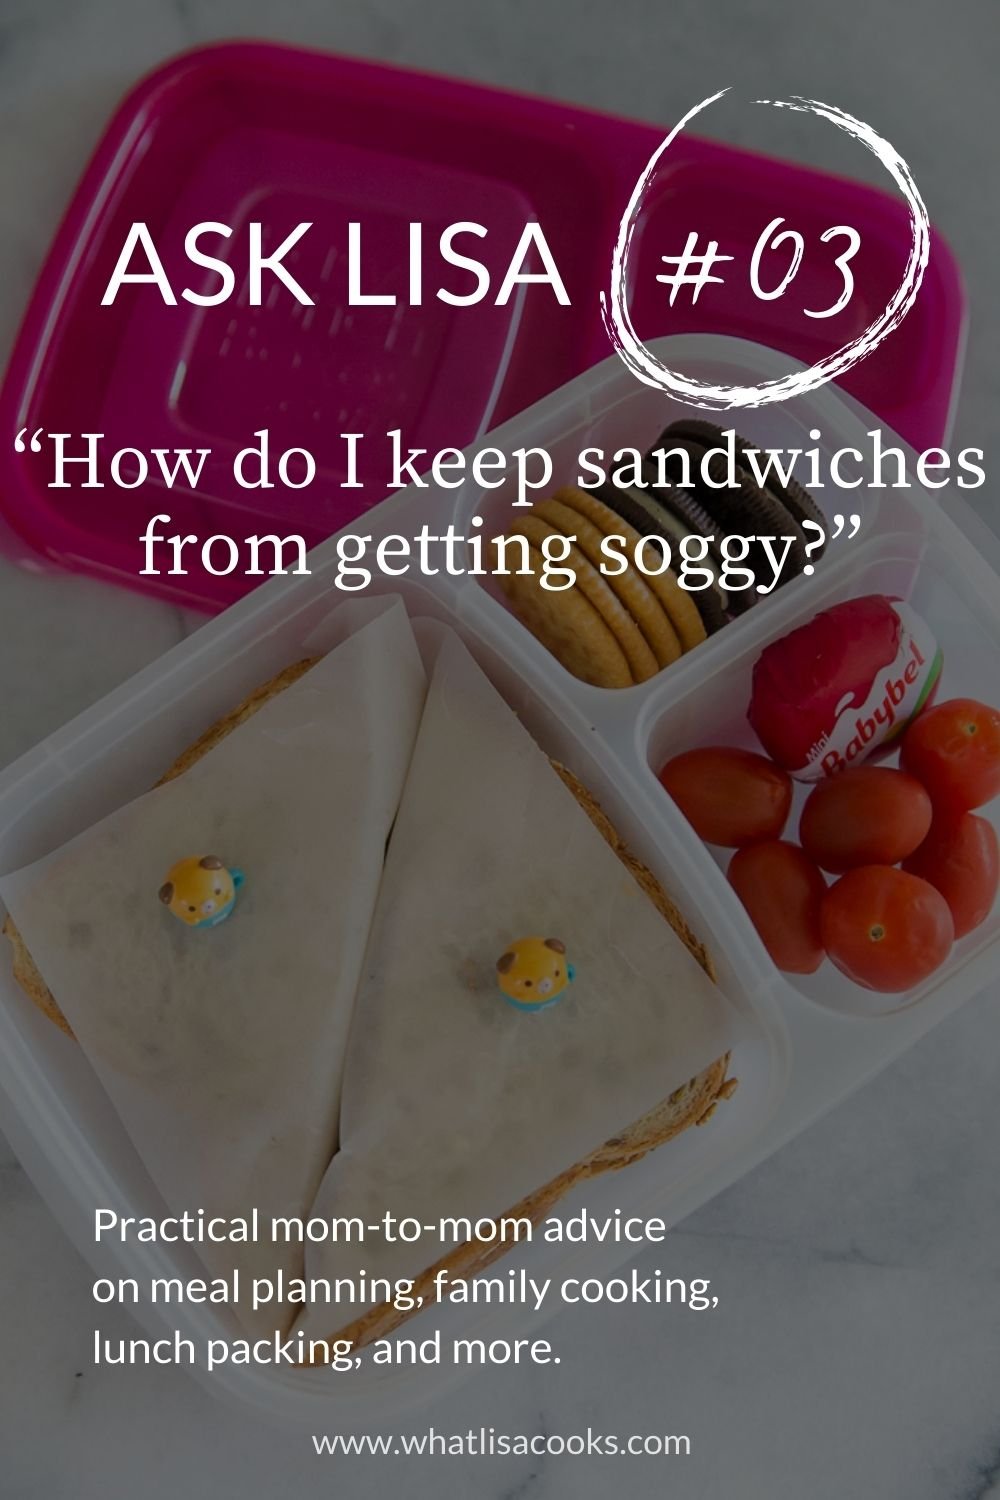
Ask Lisa #03
Answers to a really common question about how to pack sandwiches for lunch and keep them from getting soggy.
Reader Q&A
Here’s where I answer your questions! I get questions all the time from readers about all kinds of things I share - lunch packing, cooking, meal planning, organization, and more. Each week I am sharing my answers to one of your questions. Make sure you’re signed up for my newsletter so you never miss my weekly reader Q&A.
Have a question for me? Comment below or drop me a message on social media.
This week’s question:
Q: How do I keep sandwiches from getting soggy when I pack them ahead of time?
A: This is another one of the questions I get the most when I talk about packing lunches ahead, so I guess it must be a common problem for a lot of you. If you struggle with how to pack lunches ahead of time I am so here for you. This is my thing!
I pack sandwiches days in advance all the time, I definitely have some tricks that can help! They mostly come down to putting just a little more thought into the construction of your sandwich, and what ingredients and methods are causing it to be soggy. I’ve put all my best tips for packing sandwiches ahead of time in a whole new blog post for you. I promise you that you will definitely want to try these tips because packing lunch ahead of time is one of the best things you can do to make school day mornings easier and less stressful. ➡️ Click here to read that post now.
If you want more tips about packing all kinds of lunches ahead of time, you’ll definitely want to hop over and read this post with all of my tips, because packing lunches ahead is such a time saver and a massive school day morning stress reliever that it’s worth figuring out a few little tweaks to your lunch packing to make this work for you. ➡️ Click here to read that post now.
Have a Question?
Ask me anything. Do you need lunch packing advice or meal planning suggestions? Or do you have other food or family management related questions? My goal is to be your resource for tips and advice - from a mom who has been there, and done that.
Reply to this email, post a comment, or hit me up on social media, and your question could be featured in next week’s newsletter.
Don’t forget to follow along on Instagram, Facebook, and Threads for daily tips and inspiration.
➡️ Follow Me on Instagram | ➡️ Follow Me on Facebook | ➡️ Follow Me on Threads
Wishing you an easy week ahead!
– Lisa
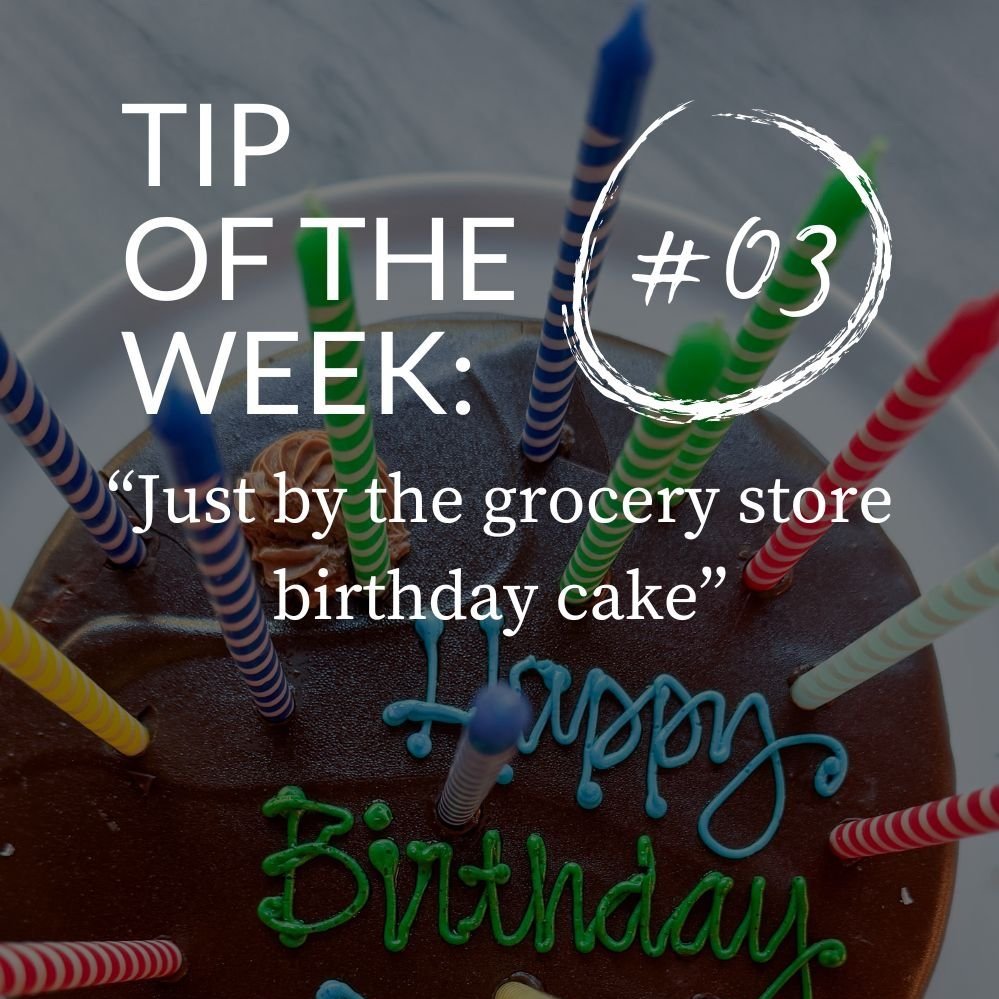
Tip of the Week #03
This week's tip is all about making birthdays easier for busy parents.
Tip of the Week
Here’s where I tell you some of my best tips, hacks, and shortcuts for making feeding your busy family easier and less stressful. I’ll share tips about cooking, lunch packing, cleaning, and more. Sometimes these are longer and more in-depth, sometimes they are just quick little time saving tips and shortcuts. I hope you enjoy!
Make sure you’re signed up for my newsletter so you never miss my weekly tips.
This week’s tip:
This week I thought I’d talk about birthday cake, and how as busy moms haven’t we got enough going on without pressuring ourselves to feel like we have to make a homemade cake? Not everything has to be homemade perfect.
Just buy the grocery store cake.
I promise you the kids will love it just as much.
I have been a fan of grocery store bakery cakes for years. We’ve been lucky to have a few great grocery stores near where we’ve lived and they always have great bakeries. The secret is to not order the sheet cakes out of the book with the cute kid designs and that awful greasy frosting - but to special order their fancier cakes. You know the ones they have in the case that always look amazing, with whipped cream or fruit fillings, or chocolate ganache frostings. I think most people don’t realize that you can special order and customize these fancy ones and not just the sheet cakes. Ordering a fancier cake from the grocery store gets you a really good freshly made cake for a lot less than a specialty bakery.

One of my all time favorite grocery store bakery birthday cakes. Isn't is gorgeous?

This is our current favorite grocery store cake - our local store calls this Chocolate Decadence and it is a dark chocolate cake with a chocolate mousse filling and a hard chocolate shell. It's amazing.
But what about homemade cake?
If you want to bake a homemade cake, I’ll tell you my favorite recipe, and it’s not from a cookbook or a food blog.
My favorite recipe for the best homemade chocolate cake and icing I’ve ever made is the recipe straight off the Hershey’s Special Dark cocoa powder container. This cake is amazing I am telling you. I follow it pretty closely except I like to substitute a cup of coffee for the water (decaf for kids). Even if you don’t like coffee, just trust me on this one. Coffee amplifies chocolate flavor, but it’s not enough that you will taste coffee at all. I always keep some instant coffee in my pantry for just this reason. Here is a link to my favorite espresso powder, or you can try this one if you need decaf.
Have a Question?
Ask me anything. Do you need lunch packing advice or meal planning suggestions? Or do you have other food or family management related questions? My goal is to be your resource for tips and advice - from a mom who has been there, and done that.
Reply to this email, post a comment, or hit me up on social media, and your question could be featured in next week’s newsletter.
Don’t forget to follow along on Instagram, Facebook, and Threads for daily tips and inspiration.
➡️ Follow Me on Instagram | ➡️ Follow Me on Facebook | ➡️ Follow Me on Threads
Wishing you an easy week ahead!
– Lisa
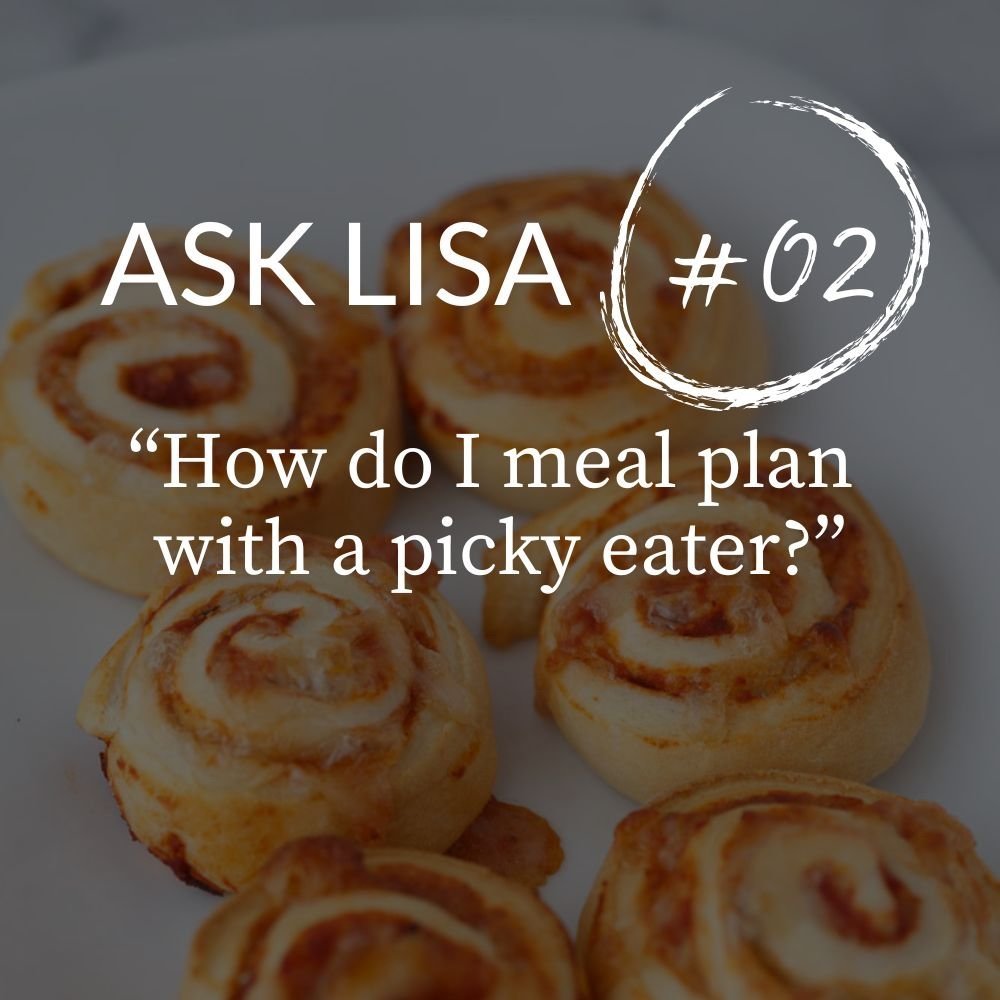
Ask Lisa: #02
This week's reader question is about how to manage family meal planning with a picky eater.
Real answers to your questions, from one busy mom to another.

This week’s question:
Q: How do I plan family meals when one of my kids is such a picky eater?
A: I see this question so much in social media and parenting groups.
It can be really hard to manage family meal planning when some of you like a wide variety of foods and some of you have a very limited list of what feels safe to eat, but I have figured out several ways to navigate this that work for my diverse family.
Here are my top suggestions:
1) Make deconstructed meals.
Plan to make the foods you like to eat and cook, but figure out how to deconstruct the components of that meal and serve it as a make-your-own bar style of dinner.
The easiest example of this is instead of a loaded one pot pasta with the noodles and sauce and meatballs and veggies all mixed together and topped with cheese, serve all of those components separate. If someone just wants pasta with cheese, they can do that. If someone wants just meatballs and sauce and veggies but no pasta they can do that. But if the meal you wanted was all of it together, then you still get to have that.
Everyone is happy.
Other ideas for this type of meal include taco bar, baked potato bar, ramen soup bar, rice bowl bar. Make a list of all the meals you like and see how many you can figure out how to separate into a deconstructed bar. You’ll probably be surprised at how many you come up with.
Cooking this way is also awesome for meal prep, because if you’ve made extra of the separate components each night, then you can easily combine those things in new ways for probably several more different meals. You can even incorporate this strategy into your meal planning, so that you are planning ahead to cook extra of some basic components.
2) Have an available safe food for the picky eater.
I always try to make sure there is something available for the meal that my pickiest eater will eat.
If I really wanted to make that one pot pasta or a loaded casserole or spicy gumbo, then I will always have something available that is separate. This brings us back to my tip above about making extra.
Did you know that plain pasta and rice freeze really well?
Make extra when you’re cooking and freeze some in single serving portions. Then you can always pull out a bag of cooked pasta for that one kid who is going through their “nothing but buttered noodles” phase. I also recently discovered these pouches of single serving pre-cooked pasta and I always make sure I have some in my pantry. My picky eater makes this for herself often, just a minute in the microwave and a little butter and she has a dinner she is happy with.
3) Let them eat cereal.
There. I said it. Maybe an unpopular opinion? But I don’t care what your mother-in-law says, a bowl of Cheerios is not an unhealthy dinner. I don’t buy cereal that I’m not ok with my kids eating, so super sugared cereals aren’t an option here, but a healthier whole grain cereal is always an available meal choice.
Teach them how to slice a banana, or have some cut fruit or a container of blueberries available. Have them set their place and bring their cereal bowl and a pitcher of milk and their fruit to the dinner table and eat it with the rest of the family. They are getting a balanced meal, and they are still learning about healthy eating by seeing what you serve and what the family is eating. Nobody is feeling shamed for their food choices, and you’re not feeling guilty about them not getting a healthy meal.
I can almost guarantee you that eventually they will feel brave enough to try what the family is eating because you are leading by example and without pressure or shaming.
Have a Question?
Ask me anything. Do you need lunch packing advice or meal planning suggestions? Or do you have other food or family management related questions? My goal is to be your resource for tips and advice - from a mom who has been there, and done that.
Reply to this email, post a comment, or hit me up on social media, and your question could be featured in next week’s newsletter.
Don’t forget to follow along on Instagram, Facebook, and Threads for daily tips and inspiration.
➡️ Follow Me on Instagram | ➡️ Follow Me on Facebook | ➡️ Follow Me on Threads
Wishing you a delicious and stress-free week ahead!
– Lisa

Ask Lisa: #01
A super simple tip to keep apples from turning brown.
Real answers to your questions, from one busy mom to another.

Since I've started sharing the lunches I pack for my kids, I get a lot of questions about how I do things. One of these days I will write a post with all of the frequently asked questions. There is one question that I get more often than any other, by far...
What do you do to keep the apples from turning brown?
It's a funny thing, it's not something I ever thought about until people starting asking. Brown apples was something I had never had a problem with. But it seems to be a pretty common problem, so I wanted to try to figure out why.
My first answer was: I do nothing.
I assumed it was maybe the type of apples I was buying.
I buy only organic apples, and I tend to go for the more tart varieties, like Fuji or Gala. But then I heard from folks that they purchase those kinds too, and they turn brown.
I can literally cut apples and store them in the fridge for days without them turning brown.

Why do my apples not turn brown?
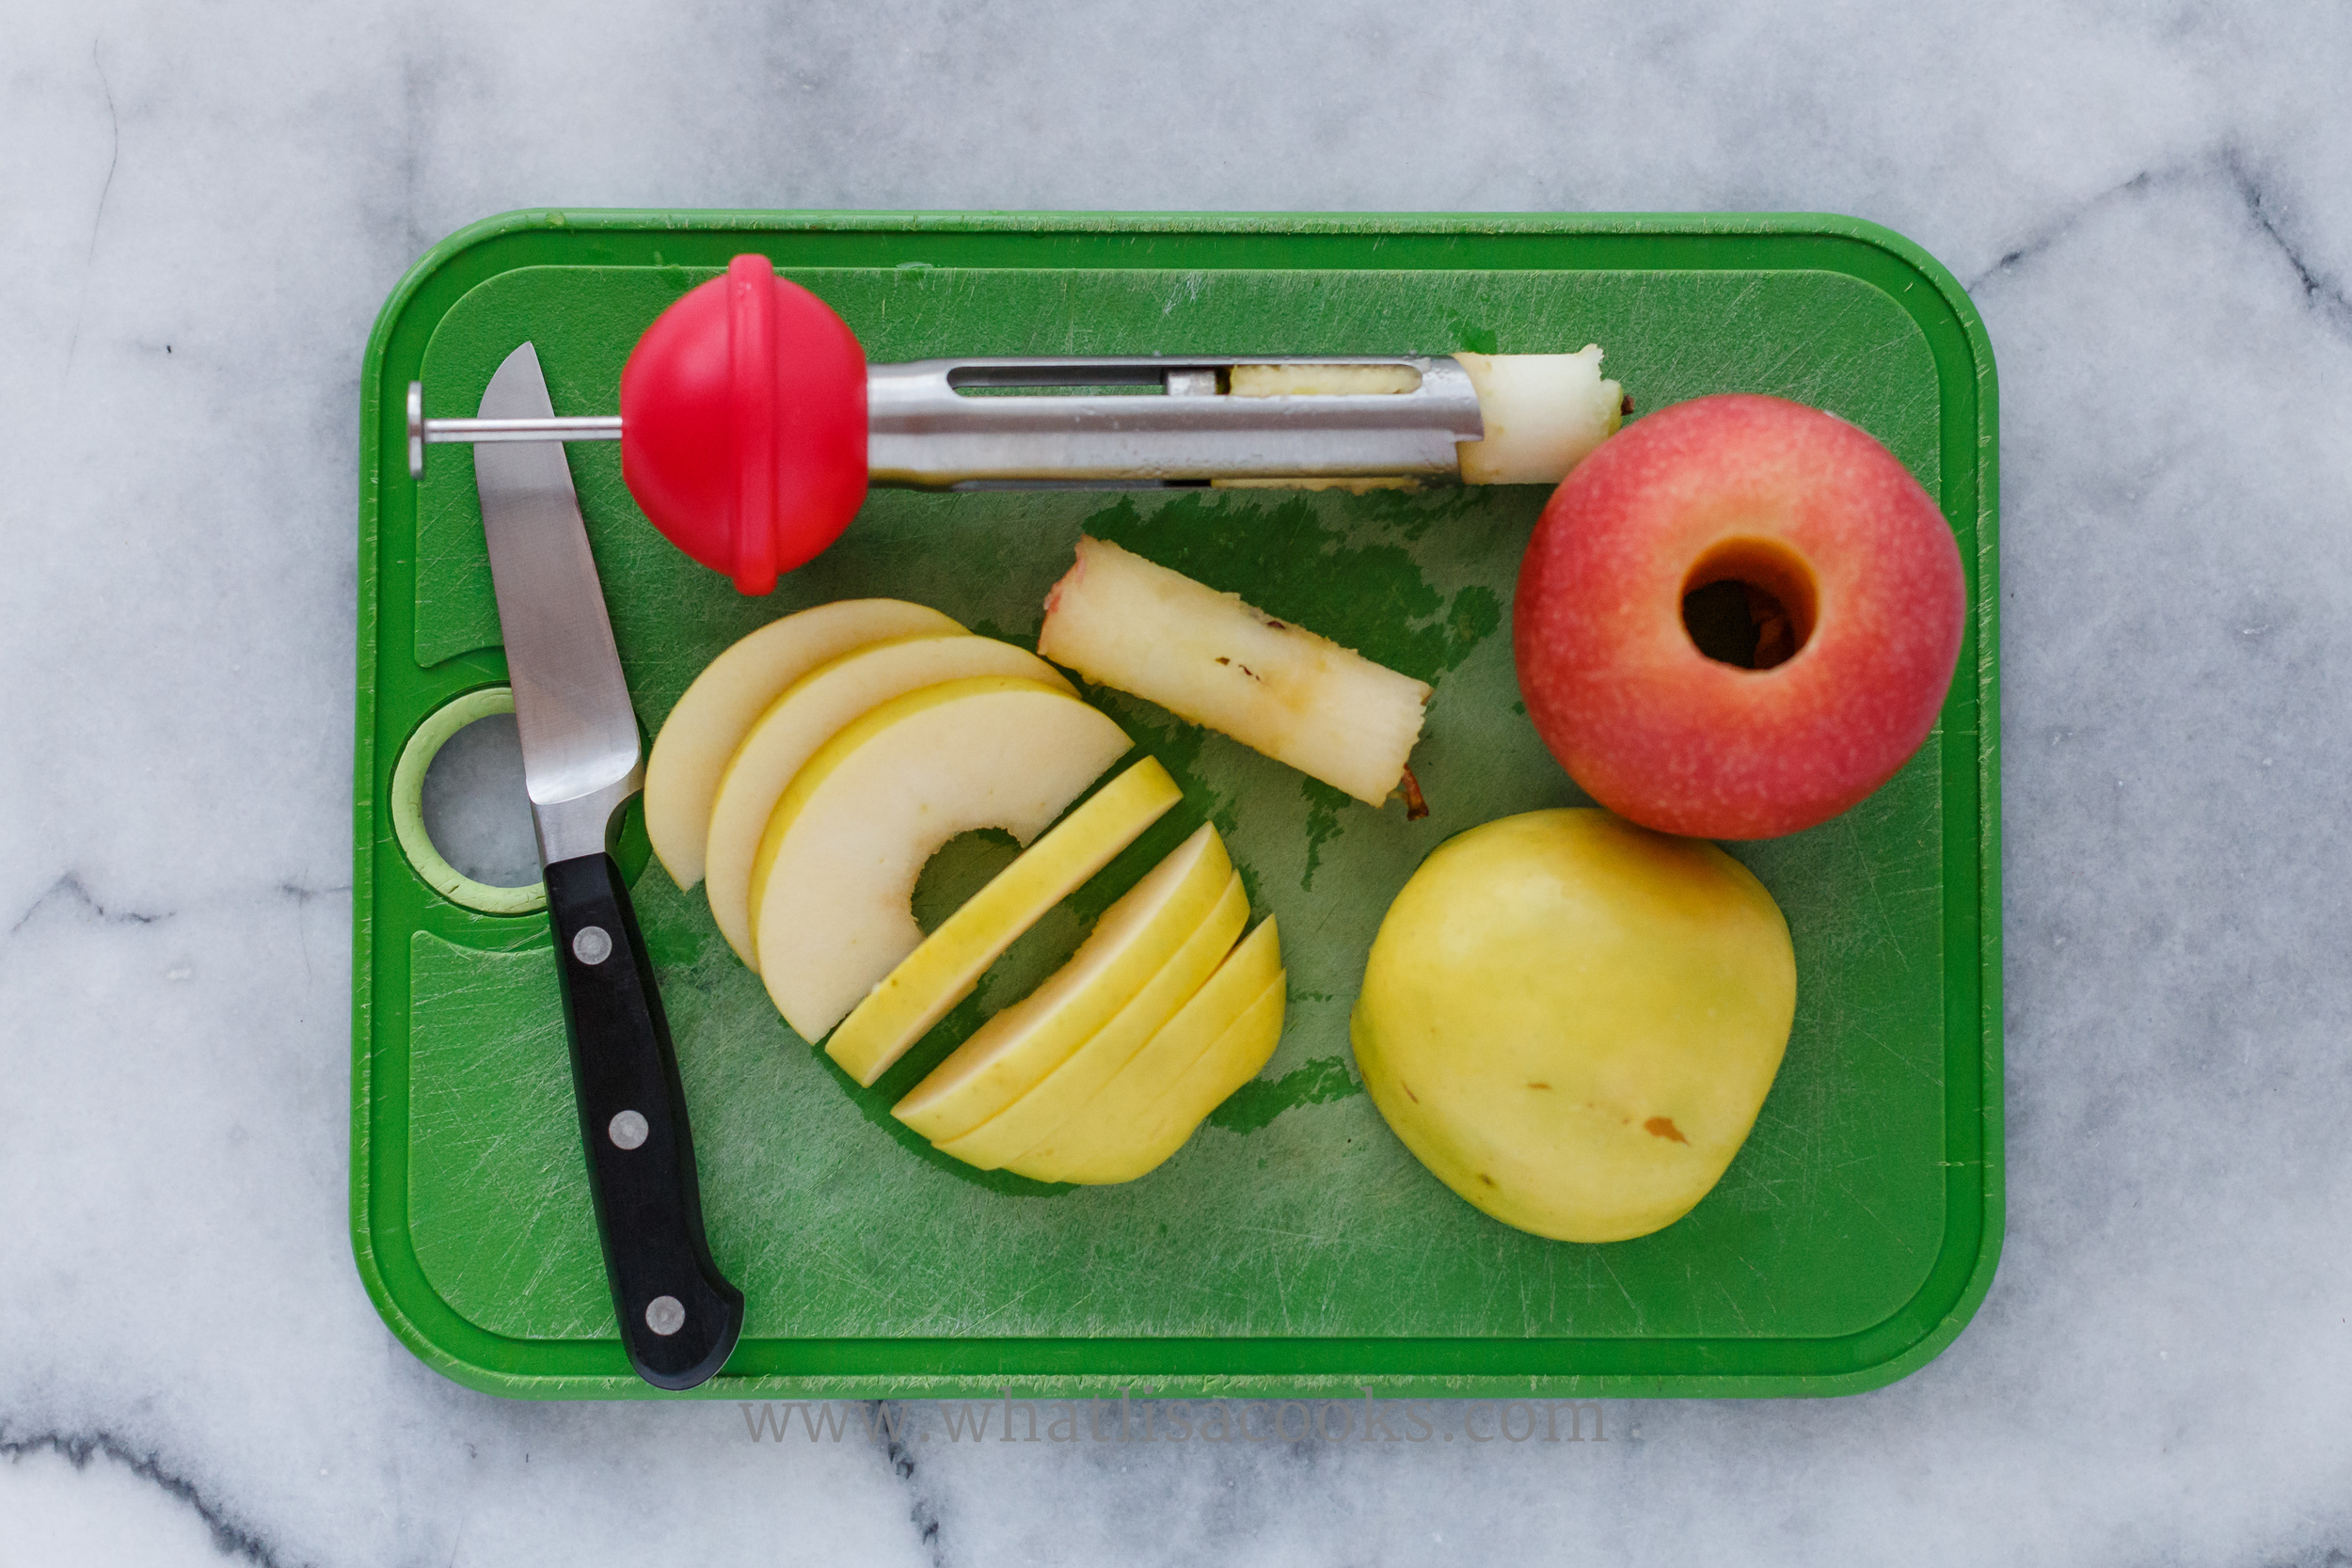
Then one day I quickly cut up an apple with a regular table knife. And the apple turned brown very quickly. It occurred to me, maybe the knife had something to do with it. I almost always cut them with a very sharp knife, but that day I hadn't.
So I did a little experiment.
These two apples were both cut 24 hours before the picture was taken.

The one on the left was cut with the table knife. The one on the right was cut with a very sharp chef's knife. I think it's a pretty big difference between the two.
So there you have it - maybe the knife is the difference.
Because really, there is nothing else I do to them other than cut with a good sharp knife.

The apple on the left was cut three days before, the one on the right was cut just before the picture was taken. Not much difference.
Get yourself a good knife and a good sharpener, and maybe you'll never have to hassle with brown apples again.

Grazing Table For Kids
Grazing Table Ideas for Kids

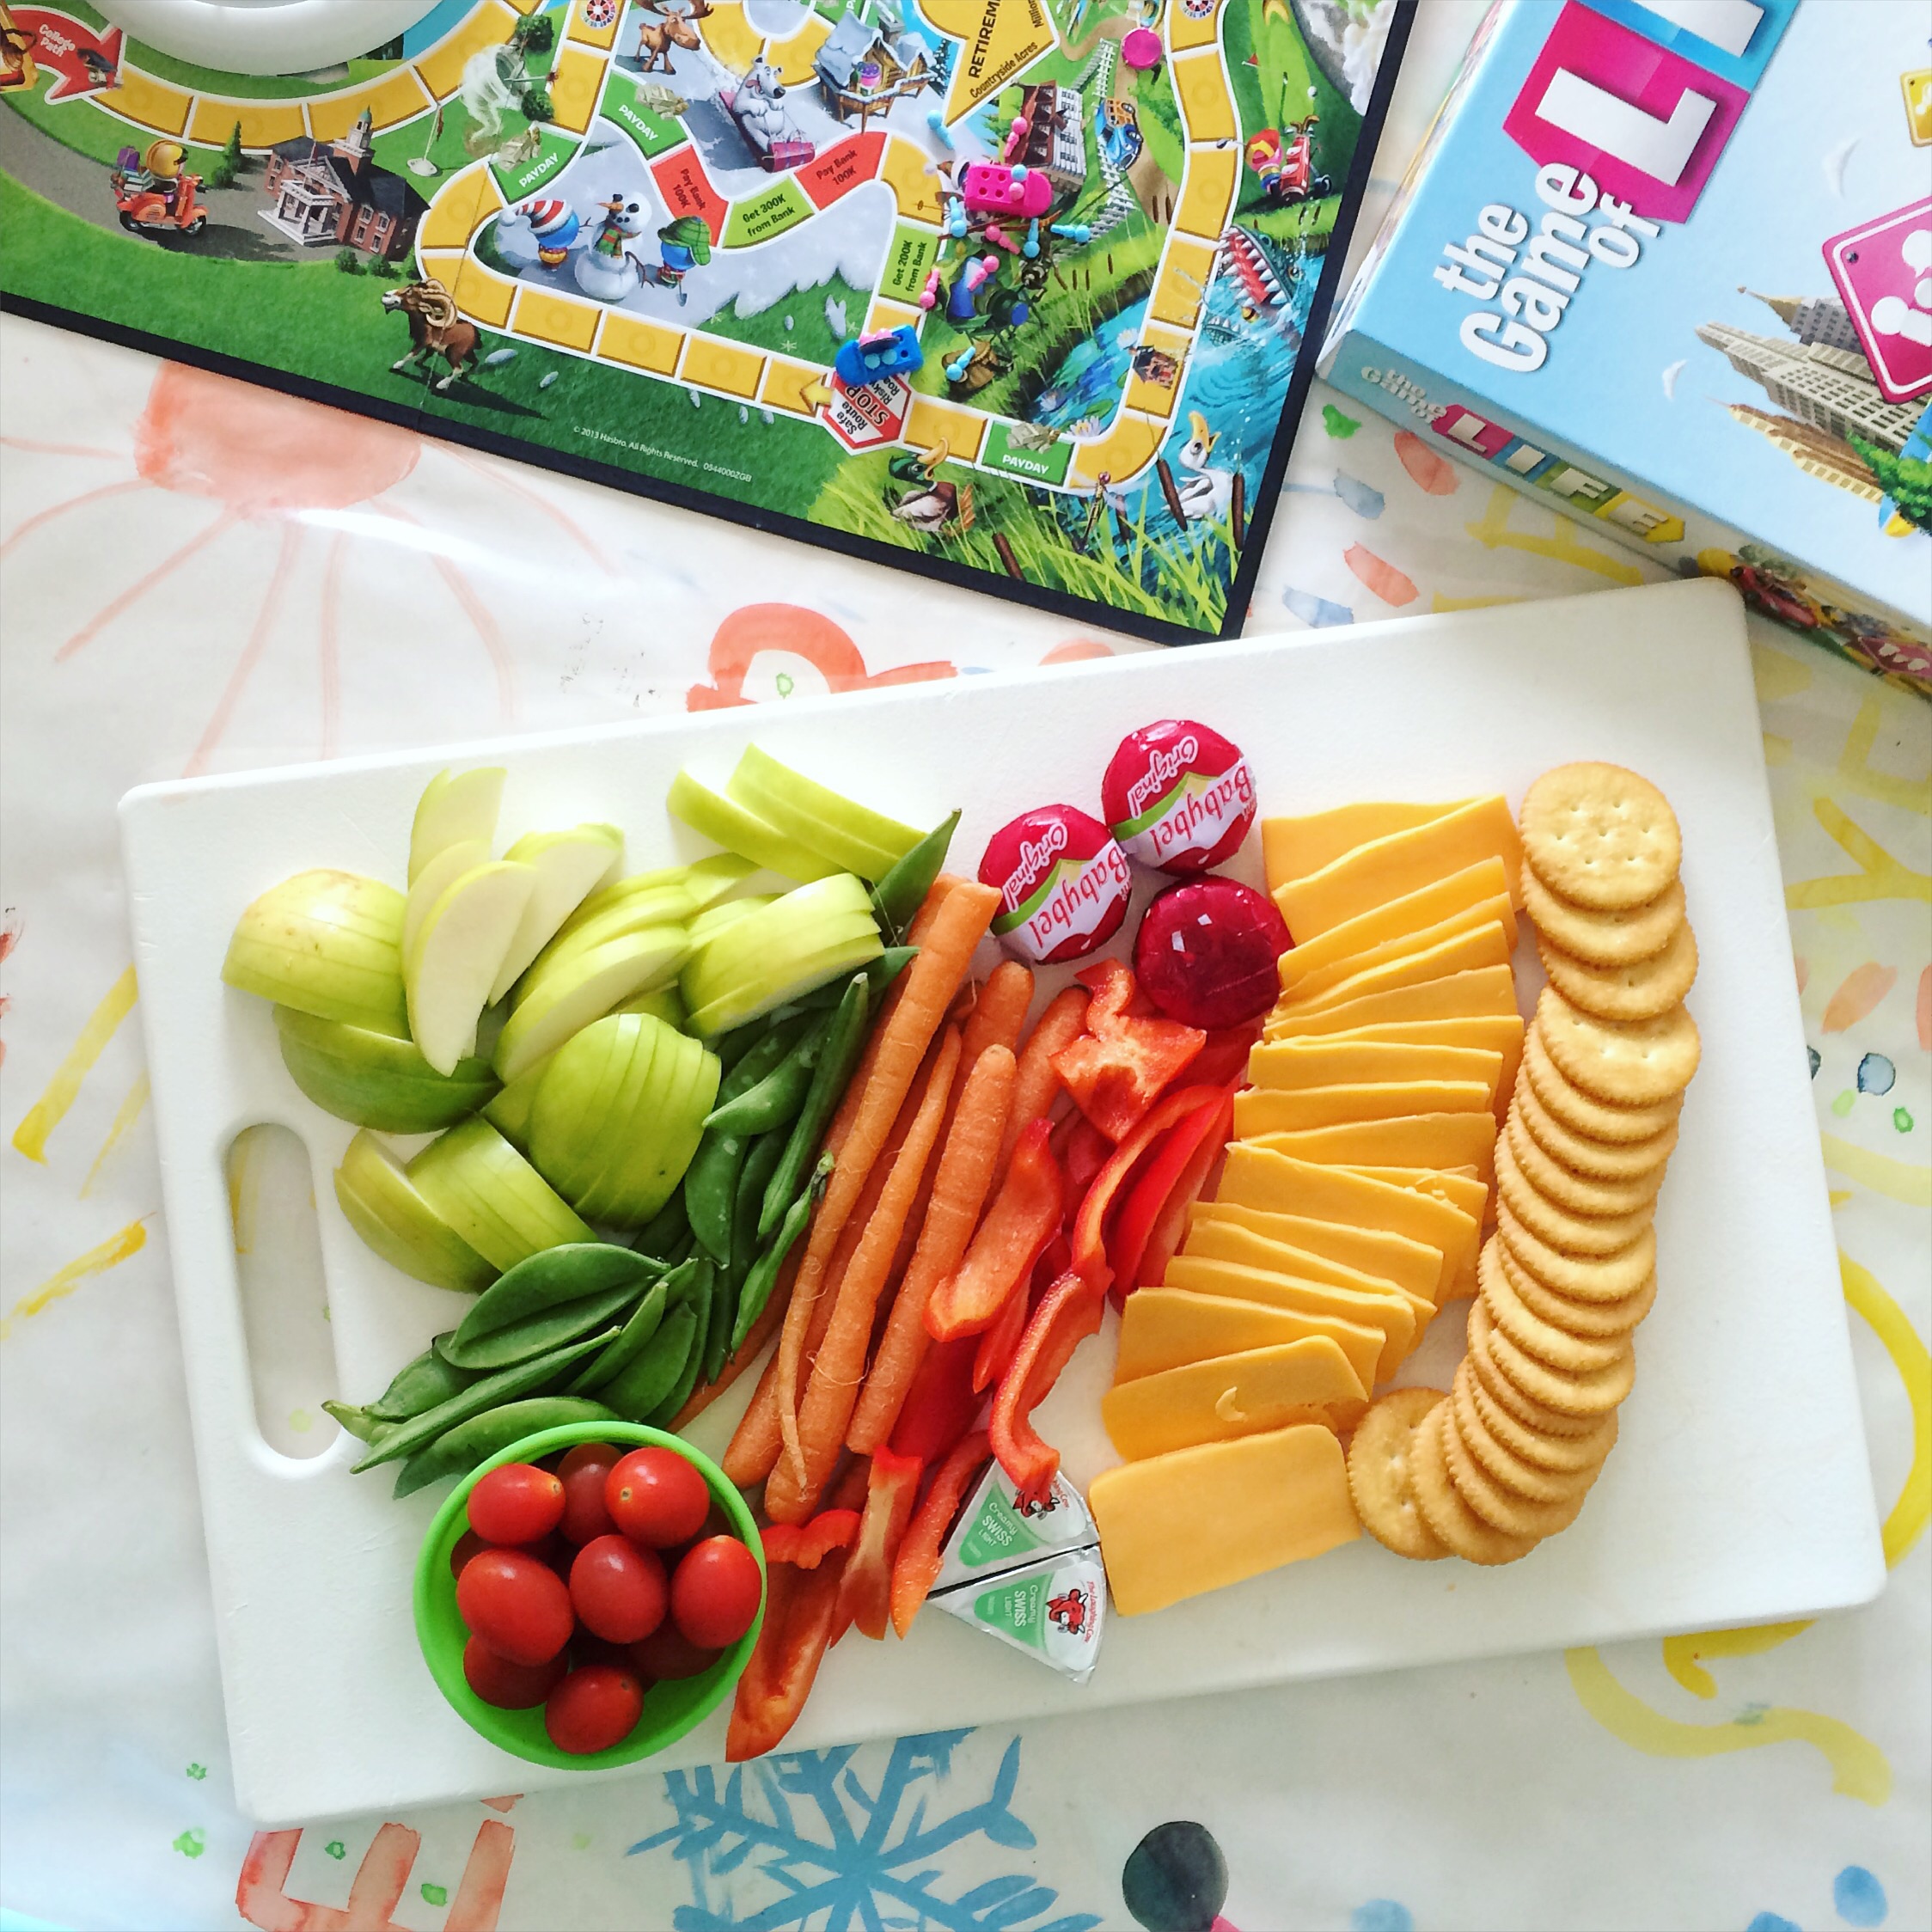
Grazing Tables and Charcuterie boards are all the rage these days and I am totally here for it. I have been feeding kids like this for years and it is the easiest way to get them to eat a good meal.
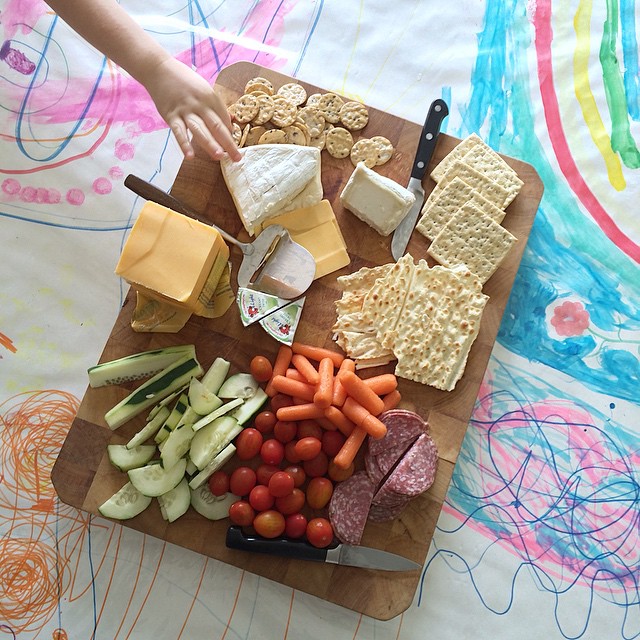
I am a huge believer in giving kids control over their food - they really will eat better if they feel like they are in control of it.

This doesn’t mean it’s a junk food free for all. It means you give them a variety of easy, healthy choices, and a few guidelines, and let them build their own plate. I do this regularly and it works really well.
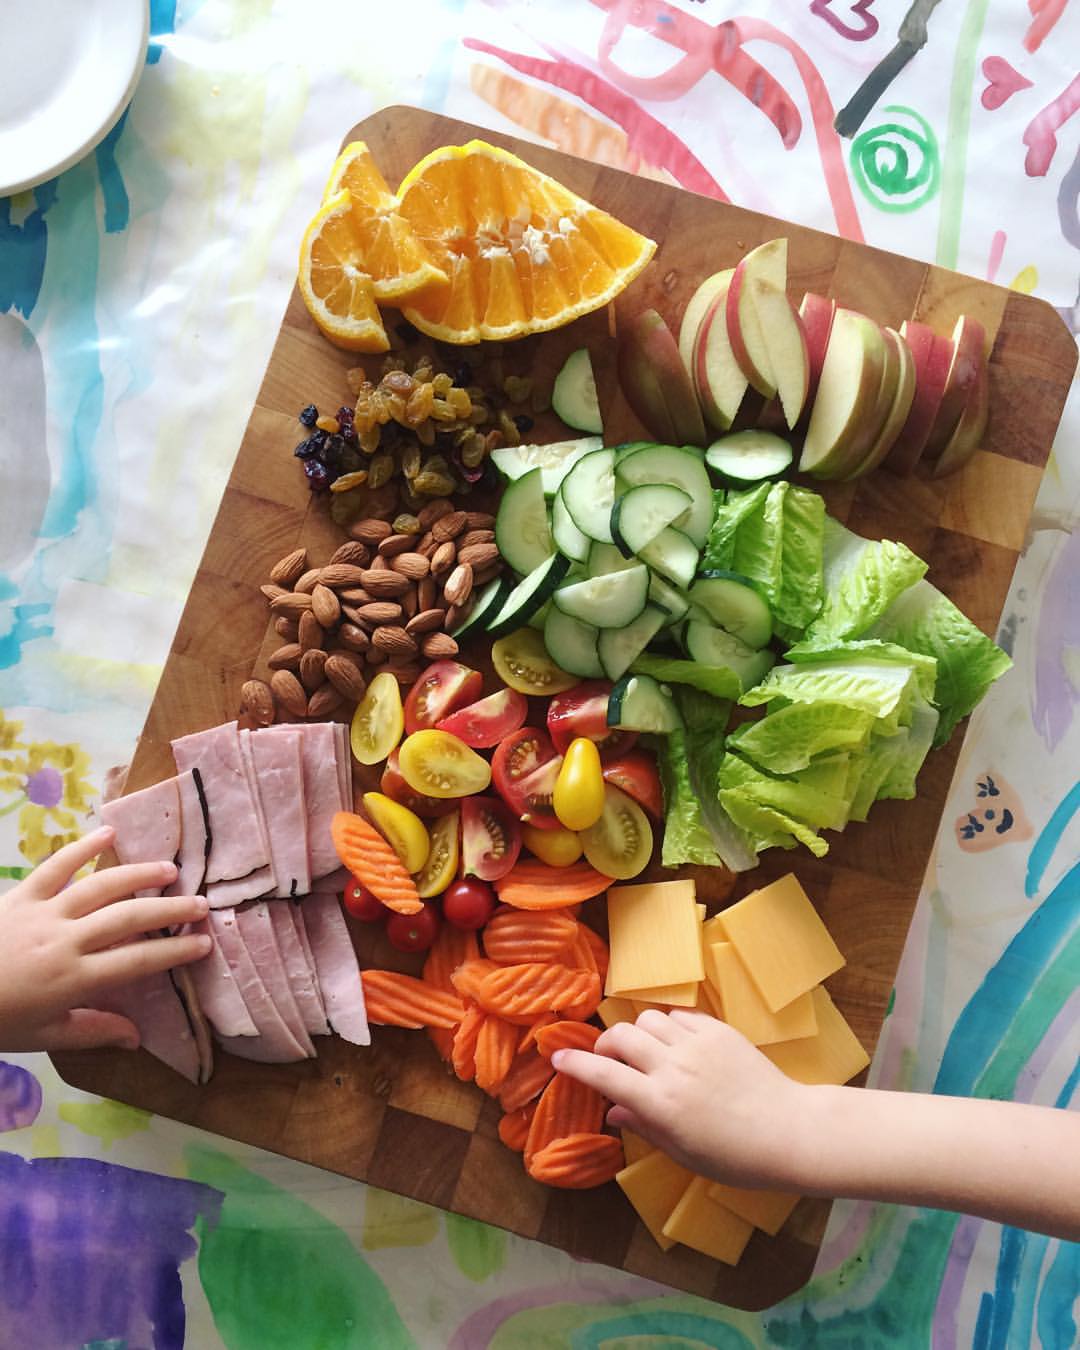
A big mixed platter of protein, fruits, veggies, and a little carbs. I give them a guideline that they have to choose at least one protein, one veggie, and one fruit. The carbs are optional, and honestly if I leave them off the kids don’t even miss it and eat more of the other stuff.
This is basically a guaranteed way to get kids to eat. Seriously.
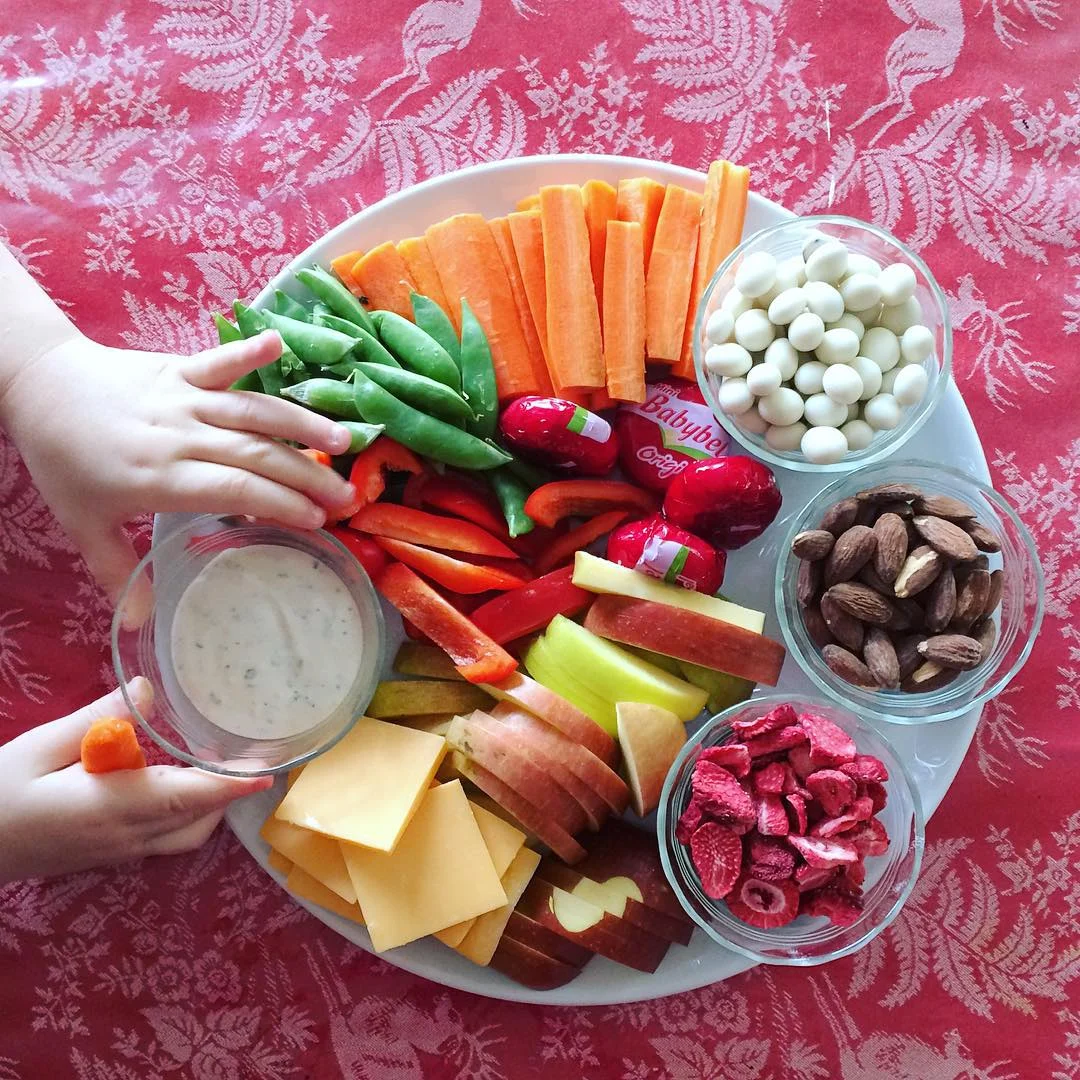
It's a win-win for everyone. You get to know that your kids are eating food you want them to eat - healthy food! And the kids get to feel like they have control over their own meal.
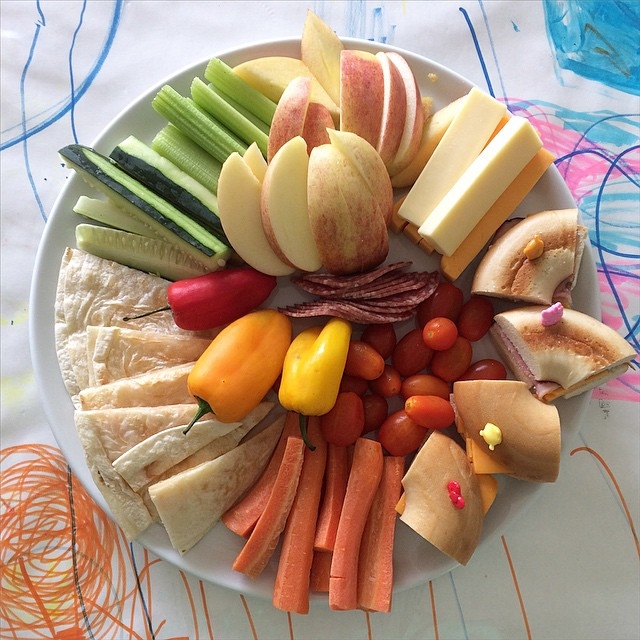
Every time I make a lunch like this my kids attack it like they haven't eaten for days. And a bonus tip for you - grown ups love to eat this way too. You don’t have to make a charcuterie or grazing table of fancy expensive stuff, fill it full of “kid food” and it will get devoured.

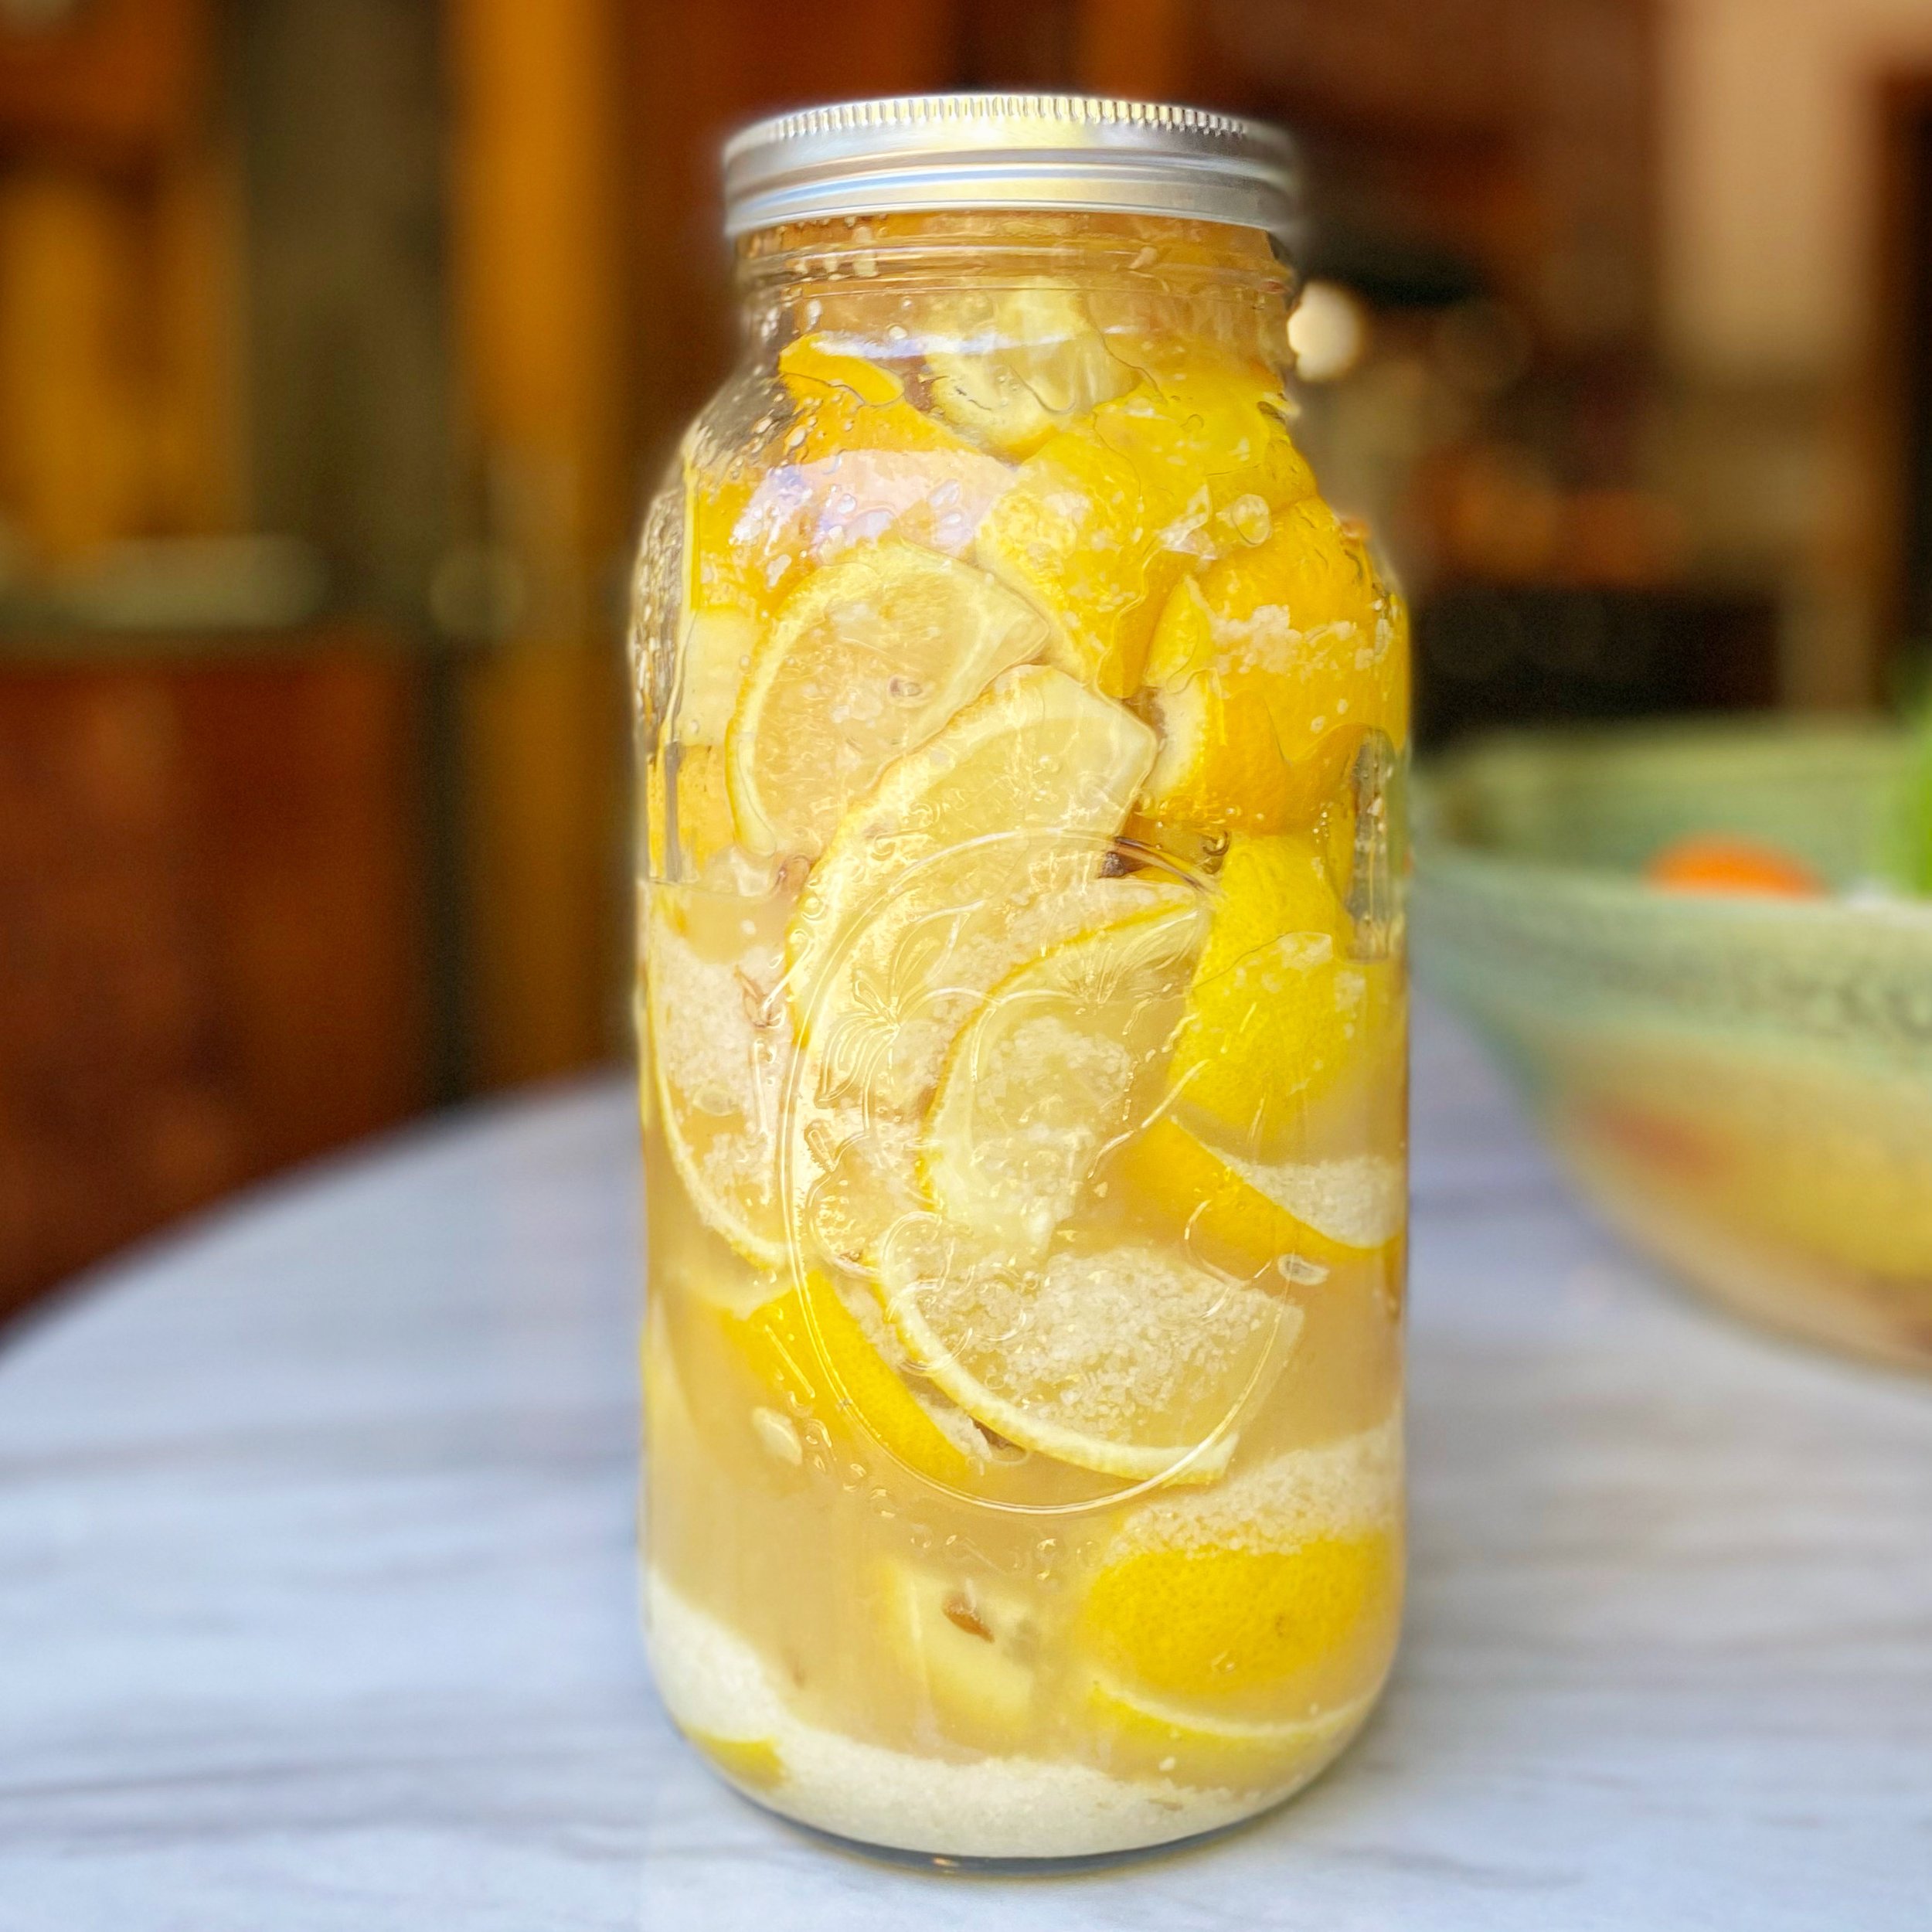
Preserved lemons
Quick and easy preserved lemons that add tons of flavor to your recipes.
I’ve just made a batch of my preserved lemons, so I thought I’d show you how I do it.
I’m a bit obsessed with the flavor. I love to use them in salad dressings, in a cucumber yogurt sauce, with pork or chicken.

My method is simple - cut off the ends and quarter the lemons, and layer them in a jar with kosher salt. I use about a tablespoon of salt per lemon.
Squish the lemons down to get the juices going, put on a tight lid, and then agitate or rotate the jar regularly for several days until the salt is all dissolved.
My kids call it my snow globe.
If your lemons aren’t super juicy then you might need to juice a few extra to add more juice to the jar, you want to end up with liquid pretty much covering all the lemons.
Sometimes I open it up after a day or two and squish the lemons down once they’ve gotten a bit soft, and add more lemons if there is room. Sometimes people add a bit of boiling water to top it off to make sure all the lemons are submerged.
And then that’s it.
Leave them alone for a few weeks, roll the jar around once a week or so.
And then dice them up in any dish that needs a savory kick. They keep for a long time and just get better.
Some recipes tell you to remove and discard the pulp and just use the skin, but I actually love the flavor of the pulp too so I usually add that in as well.
Enjoy!
~ Lisa

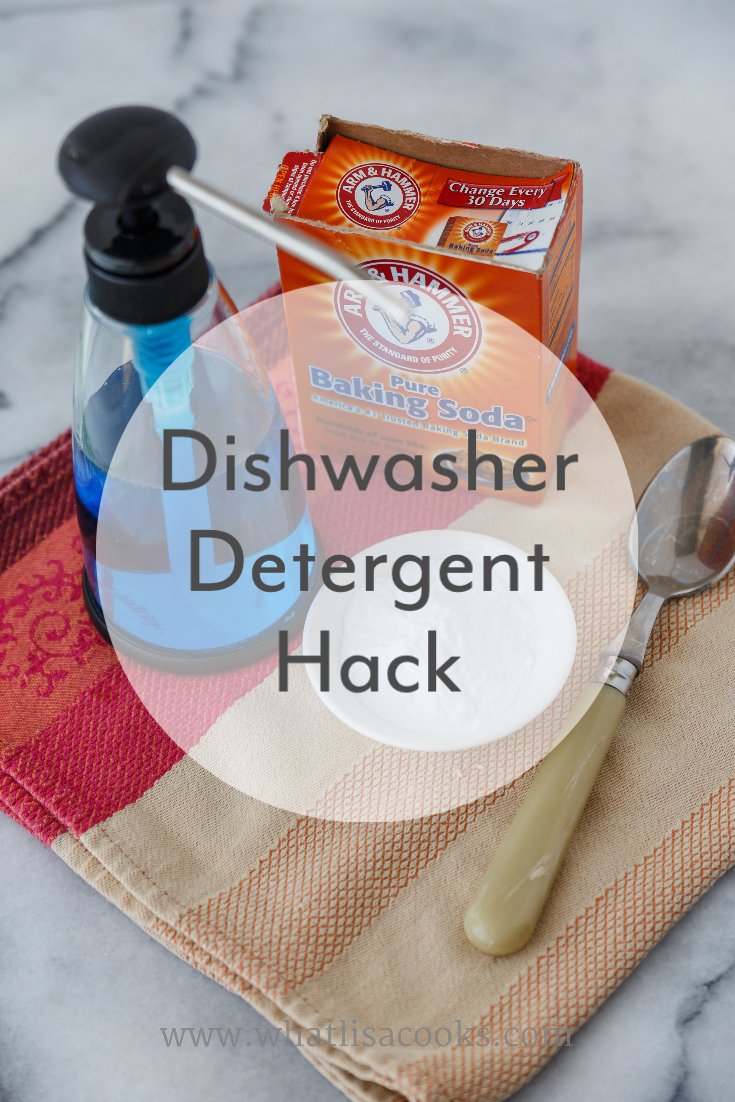
Homemade Dishwasher Detergent
Run out of dishwasher detergent - here is my two ingredient dishwasher detergent hack that will get your dishes clean until you can restock.
Read on to find out how I use this DIY dishwasher detergent when I run out of the real stuff. This is a simple dishwasher hack for a baking soda dishwasher detergent.
I don't know about you, but running out of dishwasher detergent and not being able to do the dishes is just not an option around here. Getting behind on the dishes might be worse than getting behind on the laundry (which happens too often).
But what to do when it's late at night and you go to the cabinet and realize you're out of dishwasher detergent? A late night grocery store run sounds like about the last thing I want to do, and waking up to a mountain of dirty dishes sounds even worse.
There has to be a solution.
Have you seen any of these recipes online for making your own dishwasher detergent? They sound interesting, but a lot of them call for stuff that I just don't normally keep around my house, or stuff that I'm not sure I'm comfortable putting on my dishes (Borax, Oxy-Clean, etc.), or they require you mixing up some big recipe of stuff, which I'm not doing late at night.
But I saw one recently that called for just dish soap and baking soda. Things I always have.
So of course I had to try it.
We run our dishwasher at least twice a day here, and often three times on weekends. With 6-8 people at every meal, everything homemade, we go through a lot of dishes!
And so we also go through a LOT of dishwasher detergent. I try to buy a more natural brand, because when I open the dishwasher and I am hit in the face with a strong chemical smell, I just don't think that sounds like a good idea. If there's that much strong chemical odor left in the steam that comes out of the dishwasher, then I'm pretty sure that it's on my dishes too, and I just don't like the idea of that. So I try to go for a dishwasher detergent that is a little lighter on the chemicals. But those kinds are expensive, and for some reason they come in very small packages. I buy like 4 or 5 packages at a time, just to make sure we don't run out.
But what if we do run out? That would be an emergency! So when I came across this idea for running the dishwasher with just regular other household stuff, I had to know if it worked!
I had to.
And you know what? IT WORKS!!
I've been doing this every day this week. I run the dishwasher twice a day usually during the week, so I've been doing one load with our regular detergent and one load with this homemade combo. I've stuck with the regular detergent for the load that we run after dinner, since it's running at night and I'm not keeping an eye on it, and I've tried this new method for the load I run while I am home during the day - just in case I had any kind of over-sudsing incident.
And I can honestly tell you the results are identical. I haven't noticed any difference in the dishes between the two methods.
The loads with the homemade detergent are just as clean as the loads with the packaged detergent. I haven't added up the costs yet, but I can pretty much assure you that a bottle of dish soap and a big package of baking soda are going to be a heck of a lot cheaper than the expensive detergent tablets that I've been buying.
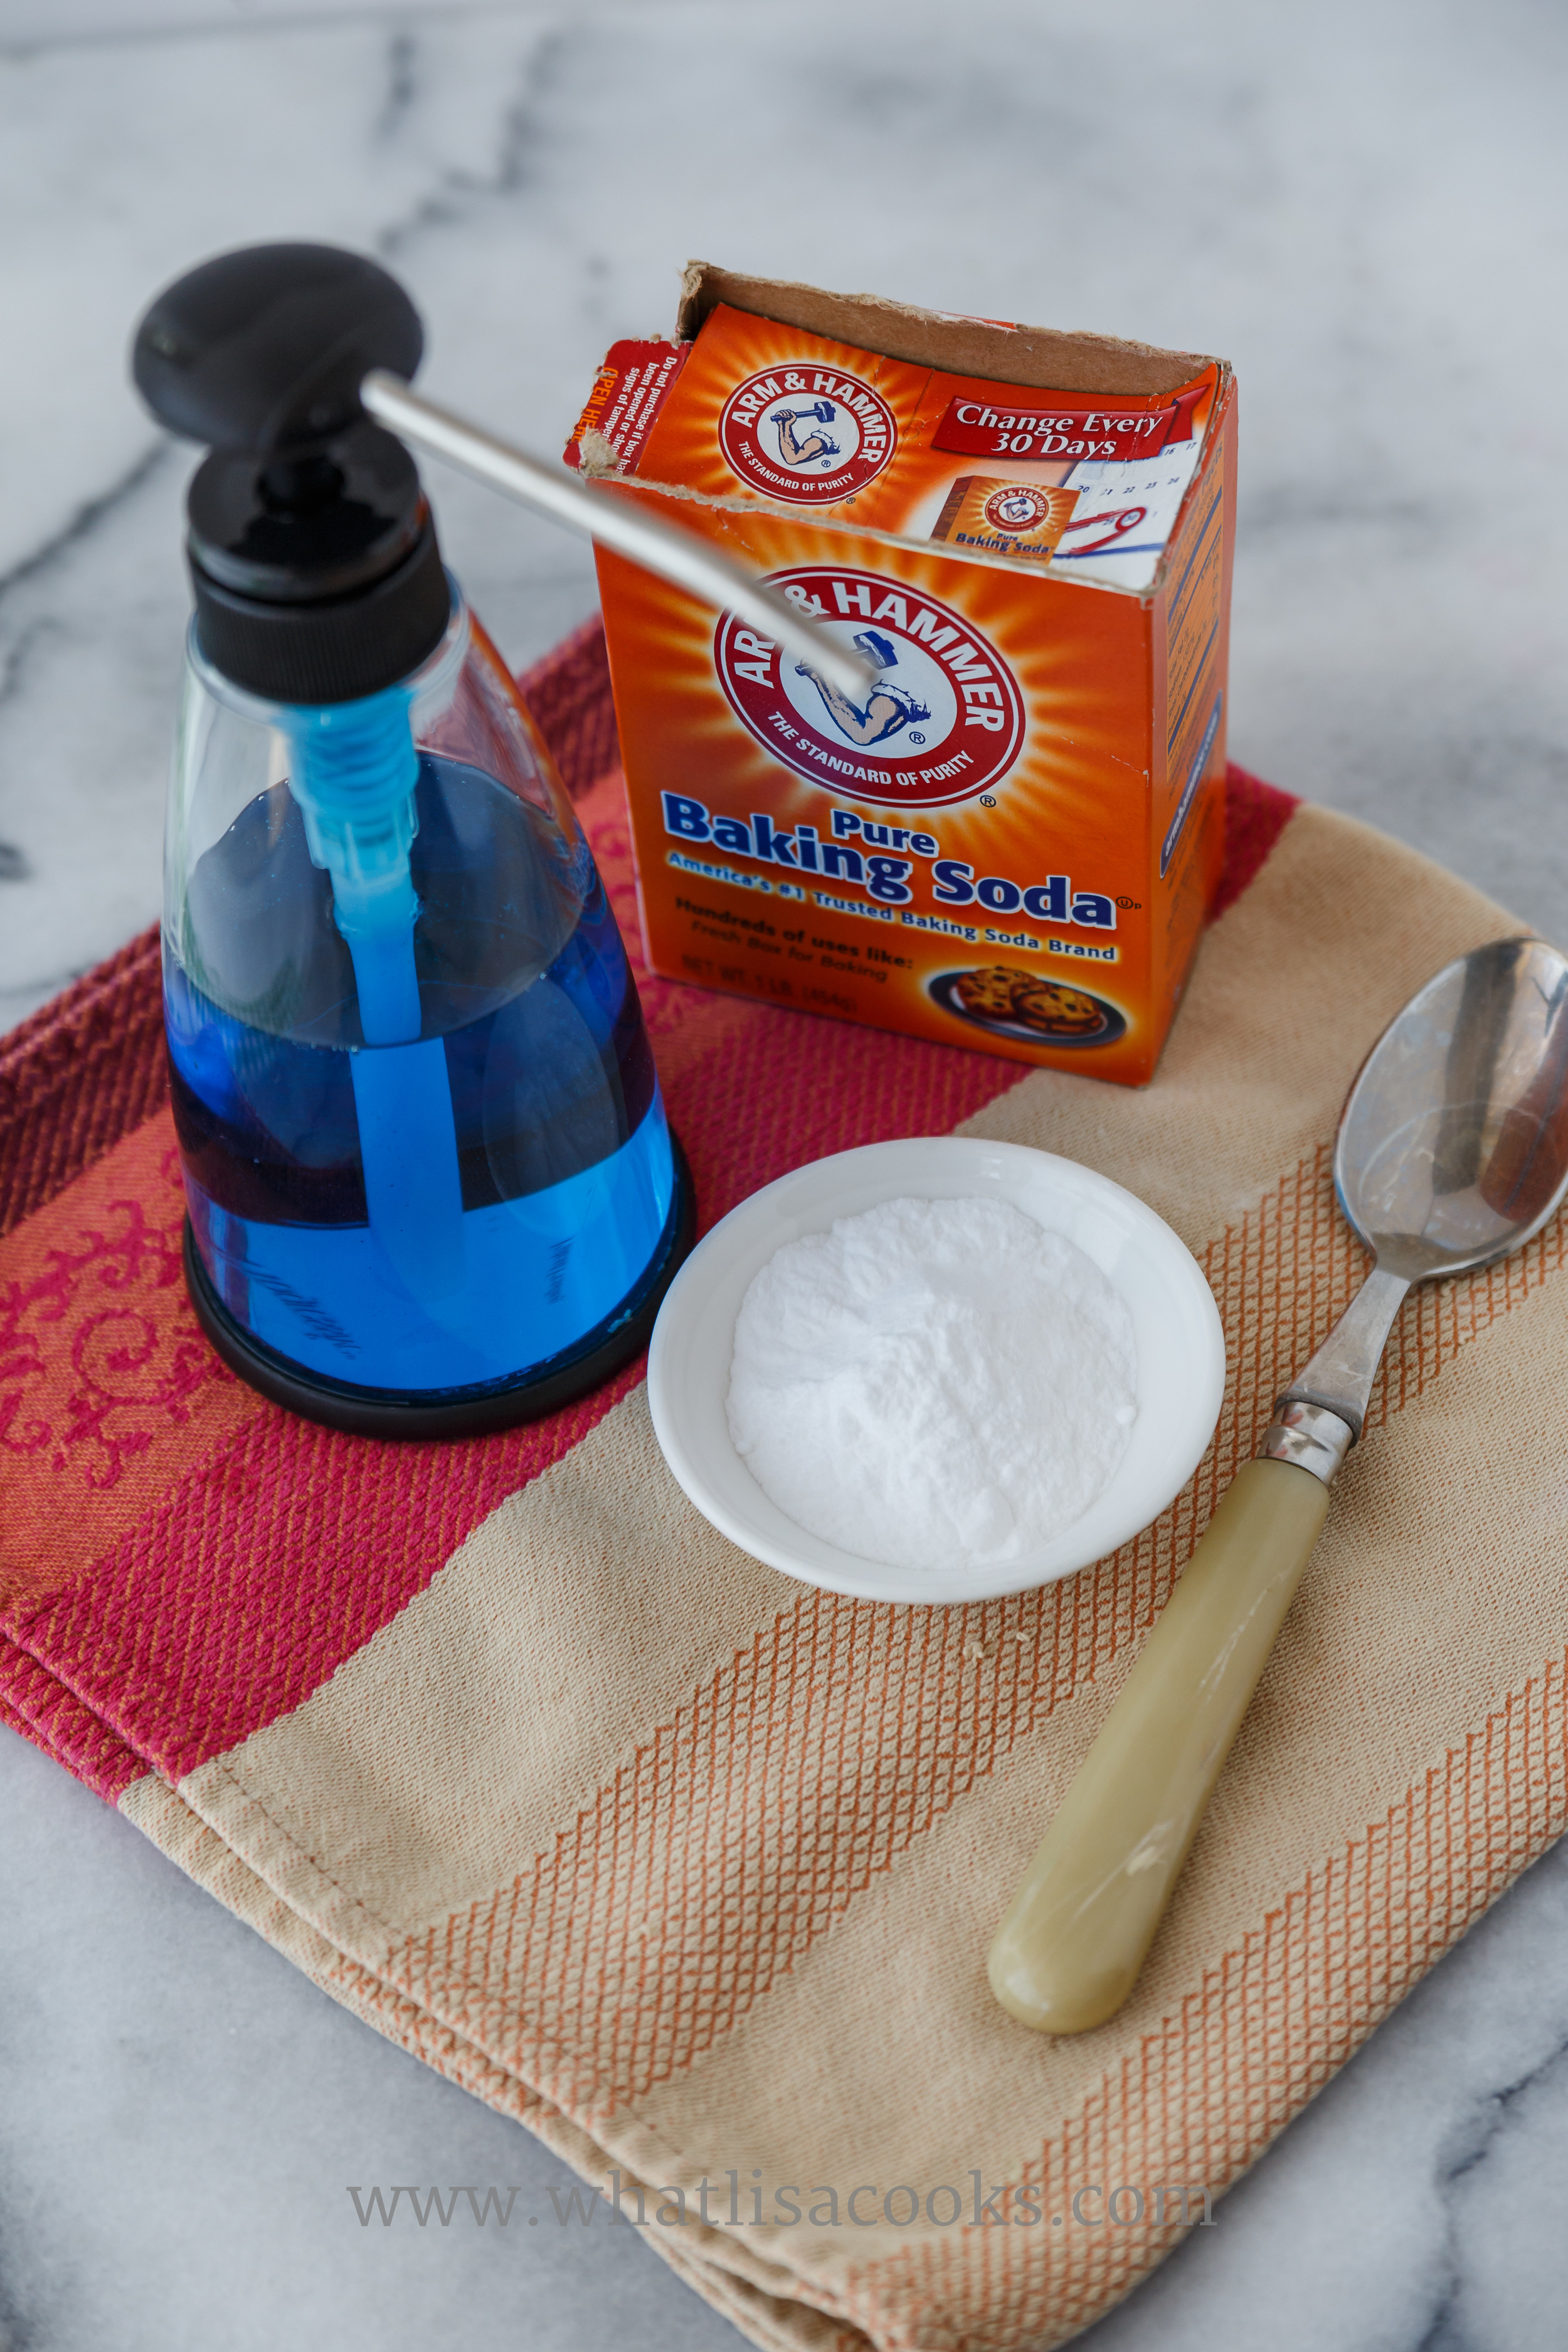
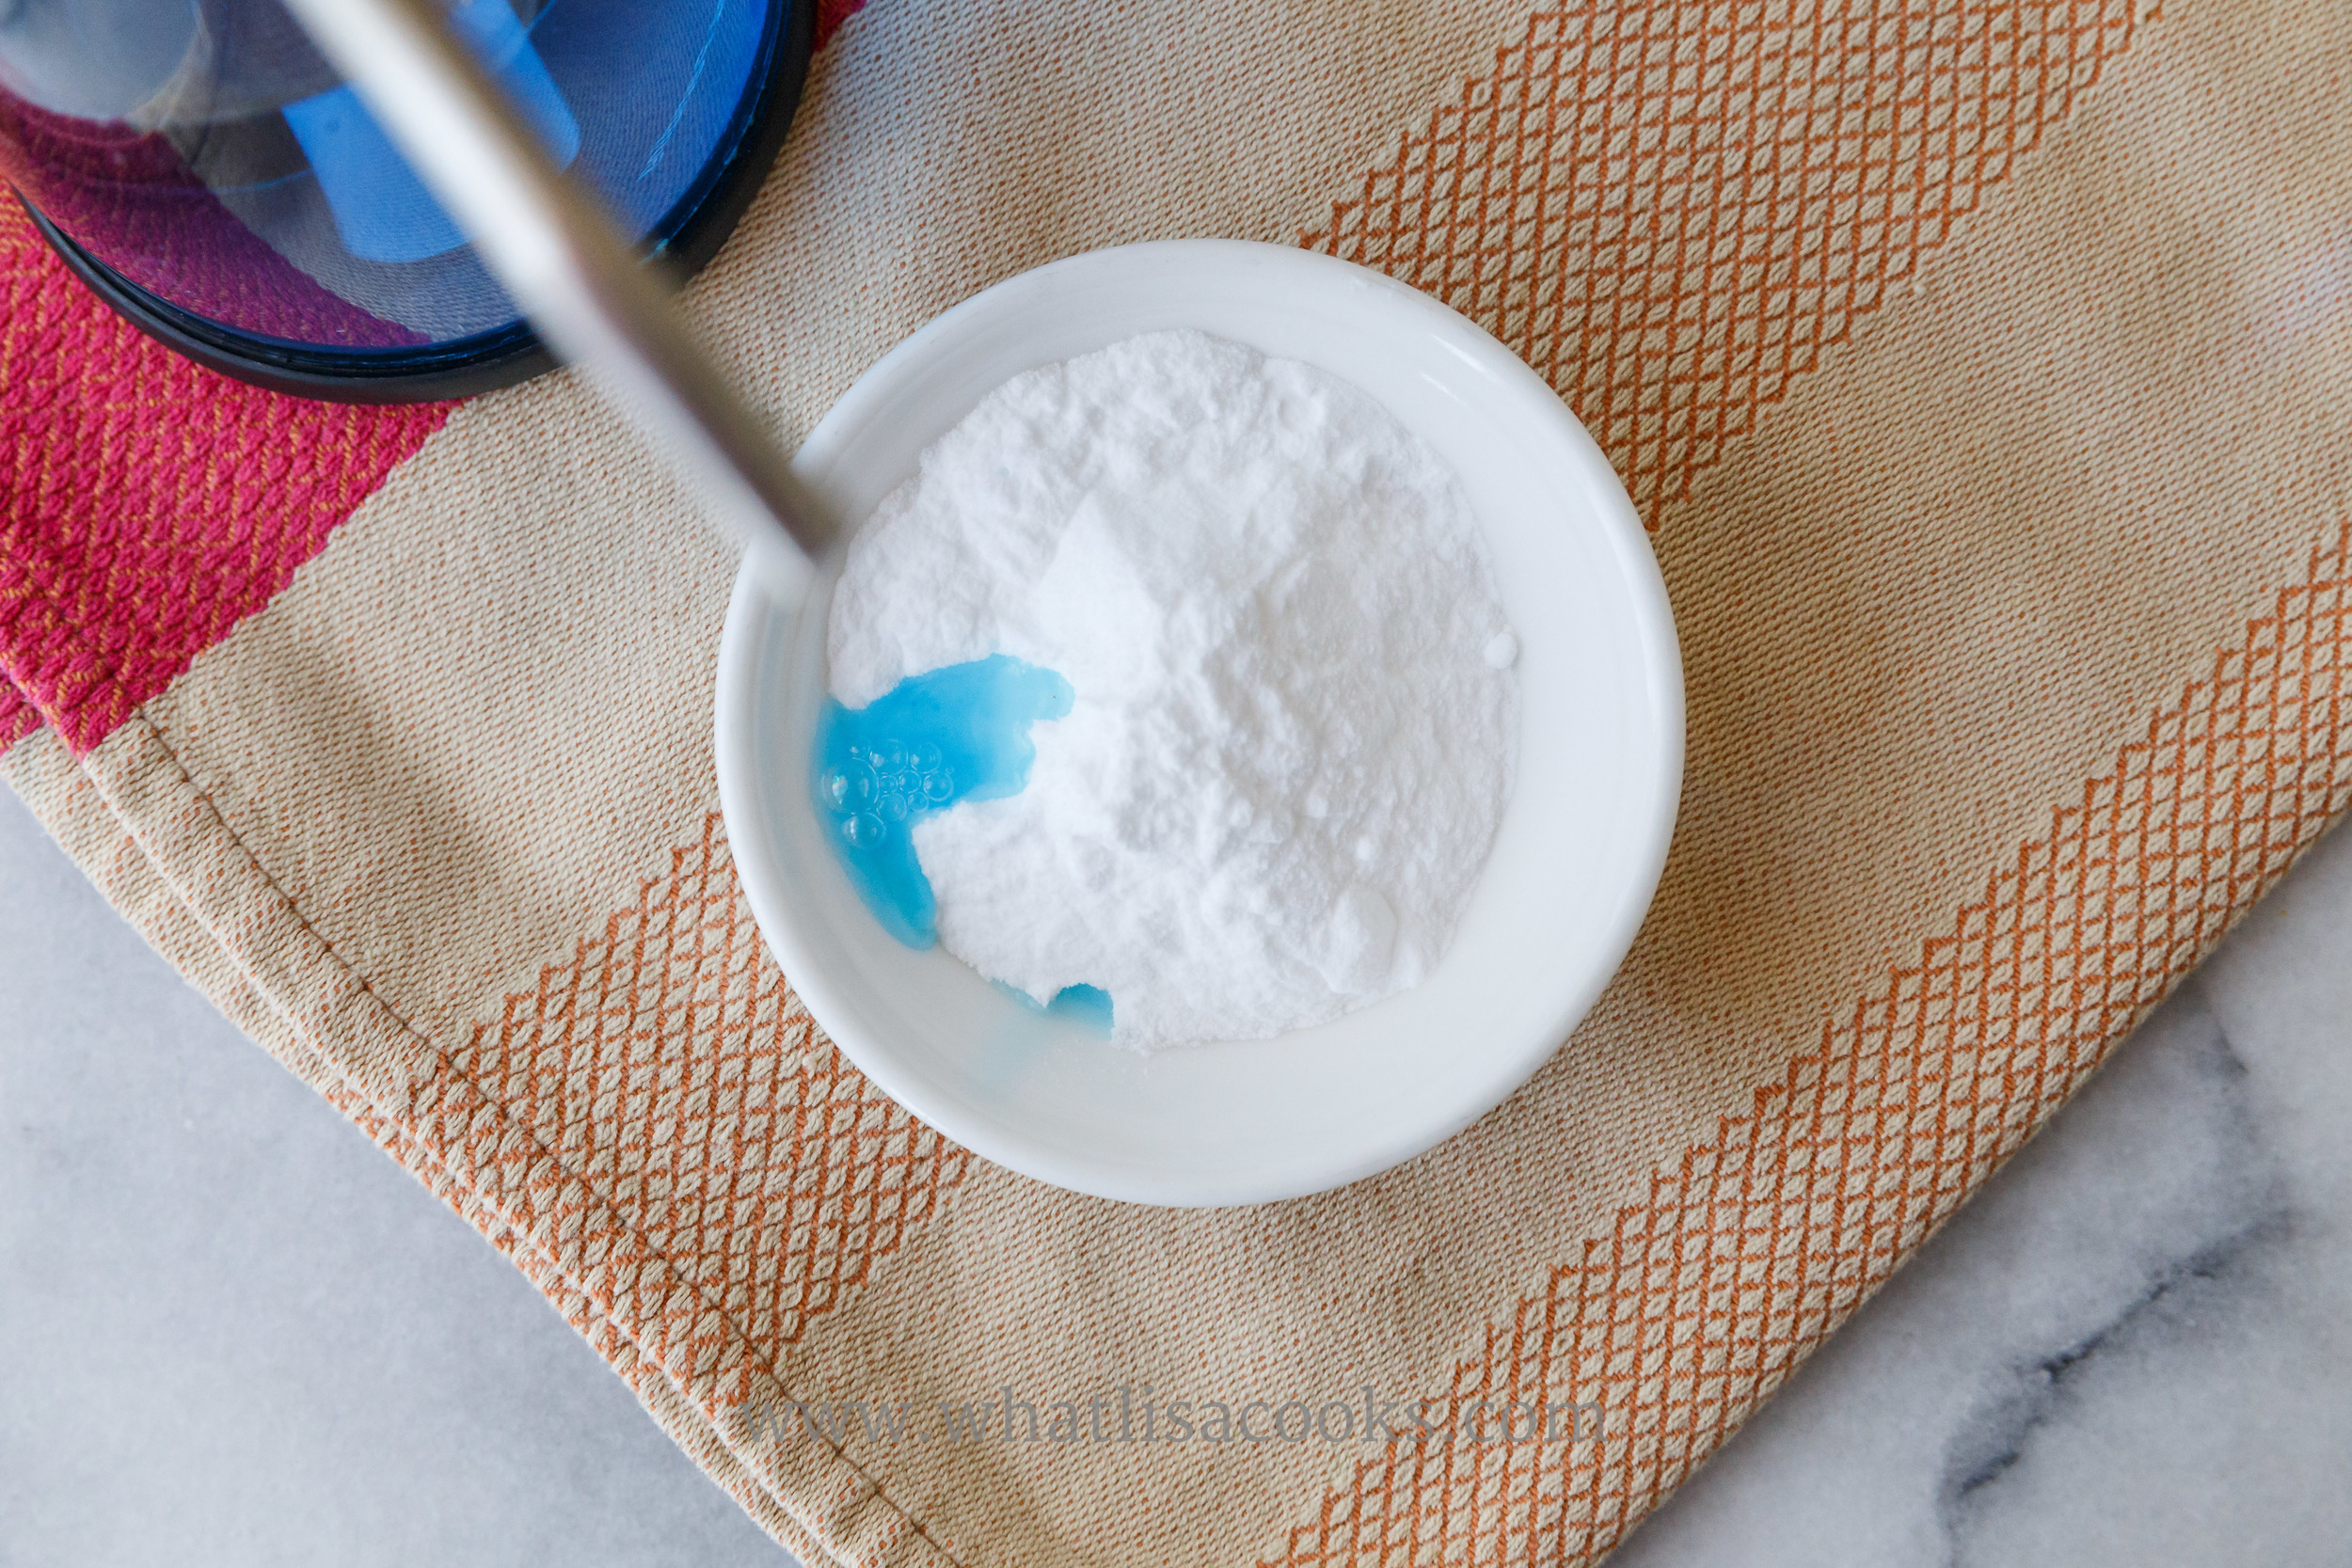
The recipe:
A couple tablespoons of baking soda
A few drops, or a small squirt, of Dawn dish soap.
Directions:
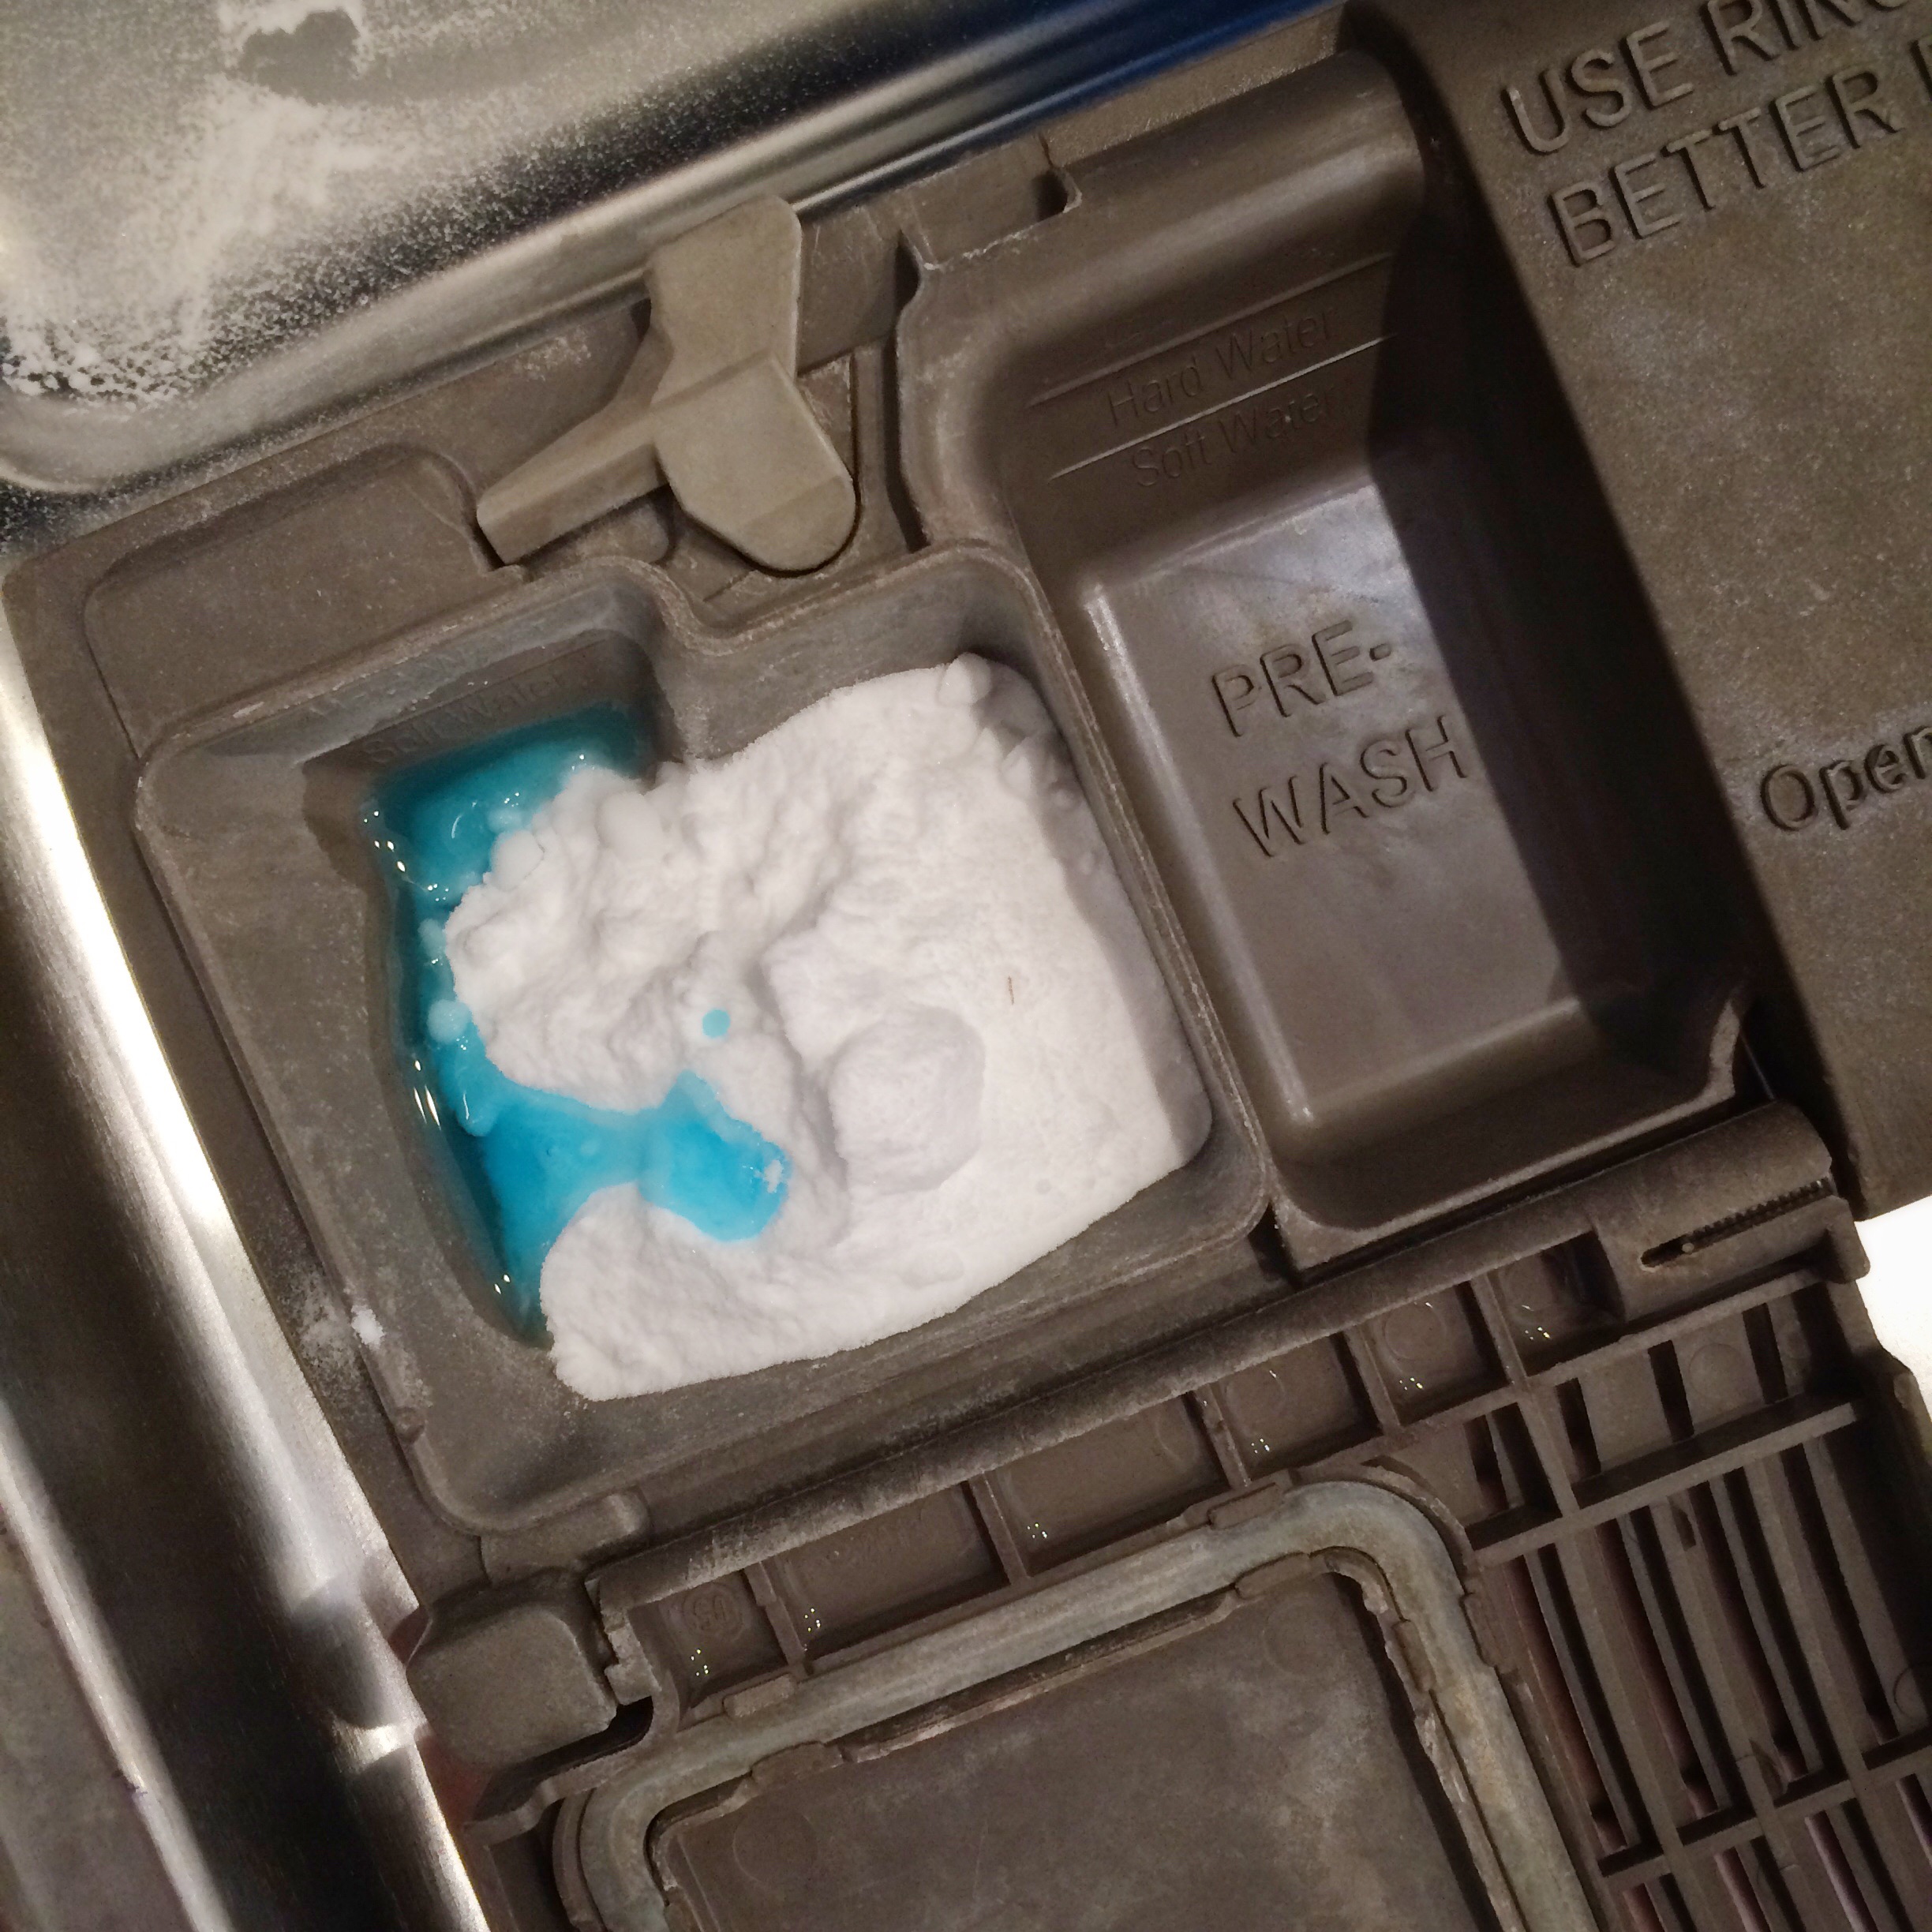
Fill your detergent cup with baking soda, you don't have to be precise, but with mine this ends up being a couple of heaping tablespoons. Then add a few drops of dish soap. I have a pump dispenser for my dish soap, so I just put about half a squirt in there. Close the cover, and run dishwasher as usual. That's all.
I experimented with quantity of dish soap. The first few recipes I read said just 2 drops, but that just didn't feel like enough to me, to really get a very full load clean. So I gradually added a little more until I felt comfortable. I haven't yet found an upper limit, but I haven't pushed it too far.
The baking soda is VERY important here. Don't try this without it! It keeps the soap from forming suds. The reason they tell you never to use liquid dish soap in your dishwasher is because of the suds - you'll have bubbles all over your floor. But the baking soda apparently prevents that, so it allows the soap to do the grease cutting and cleaning, without making all those bubbles. I've opened my dishwasher at various points in the cycles to see what's going on in there, and there are no bubbles. I'm not scientist, so I'm not going to try to figure out why any of this happens. All I know is, my dishes are getting clean and I don't have soap all over my floor and I didn't have to buy dishwasher detergent.
I have not tried this with other brands of dish soap. I've tried lots of other brands of liquid dish soap for hand washing, and I keep coming back to Dawn, so that is what I used for this. The more natural and/or less expensive brands just don't work as well. I found that I was having to use so much more soap to just wash a sink full of dishes, that it just wasn't worth it.
I pour my dish soap into a pump dispenser that I keep next to my sink. I like this one because the spout extends out far enough that you can just pump it right into the sink.
So that's it. Dish soap & baking soda! Let me know if you try it!

No drain pasta - One pot Pasta!
The quick and easy way to cook pasta - one pot, no draining, ready in about 10 minutes.

I’m about to completely change the way you cook pasta.
Once you cook pasta with this no-drain one pot pasta method, you’ll wonder why you ever did it any other way. This is the only way I cook pasta any more - the no draining method.
All those years spent thinking pasta had to be cooked in gallons of water - I’m here to tell you that you don’t have to do that.
This way is so much faster, and it works perfectly every time.
Here is the basic formula for one pot no drain pasta:
1 package of pasta + 4 cups cold water.
In a shallow pot, one pound of pasta, any shape, needs about 4 cups of cold water. A standard sized package of most kinds of pasta in the US is usually one pound.

You can play around with this ratio and figure out what works for you, if you like your pasta softer or more firm, but I’ve found these quantities to be pretty spot on for us.
I add a bit of salt and butter, bring it up to a simmer, stir occasionally until the water is absorbed and pasta is cooked, maybe 10 minutes. If you want to add sauce of any kind, do that when most of the water is absorbed.
My kids favorite - which I recently found out that most children in Italy eat and they call it Pasta Blanco - White Pasta:
When the pasta is almost finished, add a little more butter and a few tablespoons of cream. Mix well until the butter is all melted. Taste and see if it needs a bit more salt. Serve with parmesan cheese on top.
This is so quick and easy. No waiting for water to boil! No rinsing. No draining. You are going to wonder why you ever did it any other way.
Pressure Cooker "Boiled" Eggs
The easiest way to make boiled eggs is to not boil them at all.
I've tried every trick out there for cooking easy to peel eggs. EVERY. TRICK. And I don't think there was a single one that worked consistently. Some methods would work one time, and then not the next time.


Then I discovered cooking eggs in my pressure cooker.
I'm telling you - perfect eggs every time, and the shells practically fall off.
If you have a pressure cooker and haven't hard cooked eggs in it yet, you must try. And if you like hard or soft boiled eggs but you don't have a pressure cooker - you must get one!
If you don't yet have an electric pressure cooker - let me just take a moment and tell you about mine. Don't be scared - they are not the dangerous things they used to be. They are electric and easy to program and super safe.
I have two! The first one I've had for several years and it is my favorite - is the Cuisinart Pressure cooker. It's a workhorse. The second one I had to try because everyone was raving about it is the Instant Pot. They are both great, and they both have their advantages. The Instant Pot is a multi cooker - it can be a slow cooker and a pressure cooker and a rice cooker and a yogurt maker, and I guess it does even more than that because they call it a 7-in-1 cooker. If you really think that you will use all those other features, then it is a great choice. But as for just pressuring cooking, I like the Cuisinart best. It has more options for adjusting your pressure cooking settings, and more options for timing, simmering, and sauteeing your ingredients before you start the cooking cycle. Those things are also possible with the Instant Pot, but I just find the Cuisinart to be more intuitive and easier to program and use. Also, it's less expensive. Either way though, you can't go wrong.
Anyway, back to the eggs. Here are the instructions.
Pressure Cooker Eggs:

Place a rack or trivet in the bottom of your cooker pot
Add about a cup of water - I like to use hot water just to get it going faster. You want the water to be under the rack, not touching the eggs. (be sure to read the directions on your cooker for the minimum amount of liquid you can use - I think it's about a cup for most.)
Carefully place eggs on the rack. A lot of recipes you read for this have you putting them in separate little cups or making little foil nests for them. I have never found this to be necessary and it just takes more time. Yes, occasionally one or two will crack, but I've found that this happens regardless of whether you "nest" them, so I really don't see the point. You can cook just one or two at a time if you prefer to eat them warm (best for soft cooked eggs), or I can fit about 10 at a time in my cooker without crowding them too much.
Close your cooker and set it to low pressure.
Cook according to the times below.
When your time is up - use the quick release method and get the eggs in an ice bath to quickly stop the cooking. I sometimes just dump a bunch of ice and cold water right in the pressure cooker pot on top of the eggs. This is quicker than lifting them out one at a time.
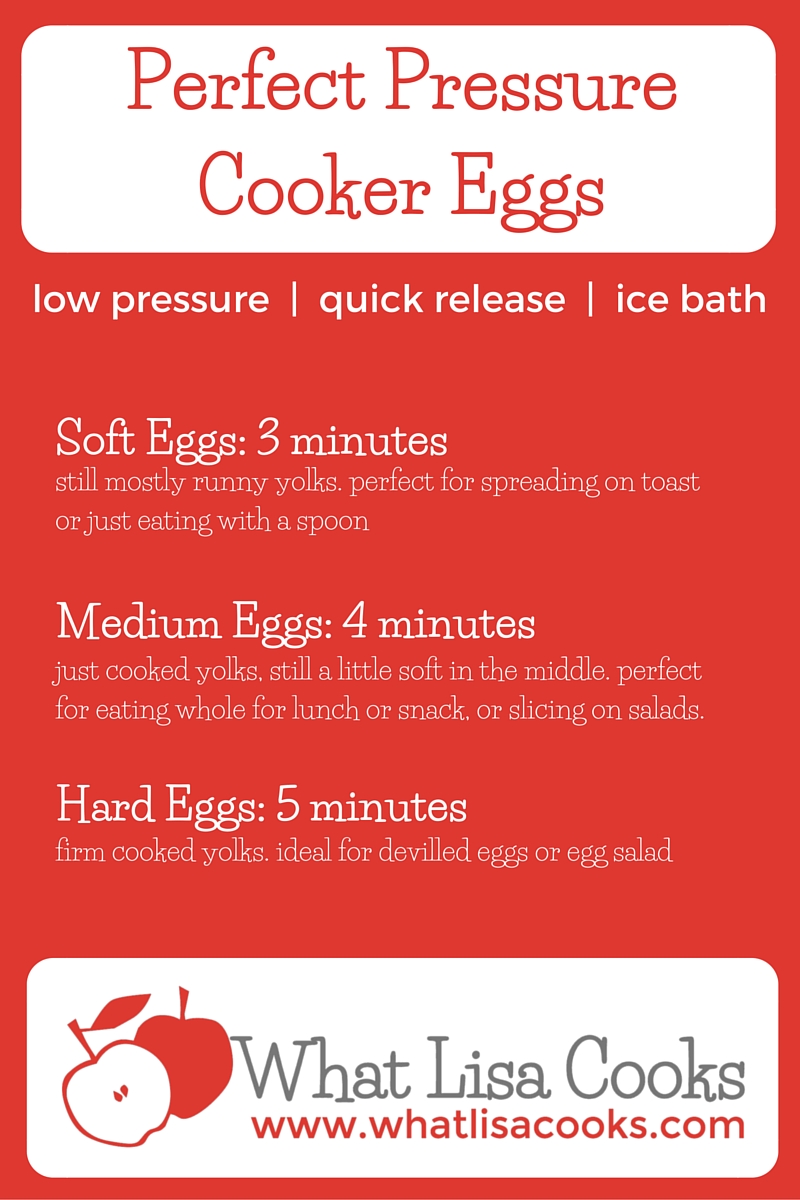
Cook times for pressure cooker eggs:
Soft Cooked: 3 minutes on low pressure, quick release, ice bath. These will have still slightly runny yolks. I LOVE these for breakfast - either mashed up on toast or just lop of the top of the shell and eat them with a spoon.
Medium Cooked: 4 minutes for on low pressure ,quick release, ice bath. These will have just solidified yolks, maybe sometimes with a small dot of wet still in the very center. This is my favorite if I'm making eggs to peel and eat whole for lunch or snack. I personally love to dip them in salt. I think this is also perfect for slicing on a salad.
Hard Cooked: 5 minutes on low pressure, quick release, ice bath. These will have fully solid yolks. This is best for making deviled eggs or egg salad.
But seeing is believing! You have to see how easy this is, so I made video. If you don't want to watch the whole cooking process, just skip forward to about the 4 minute mark, to see how they peel so easily that I can do it with one hand!
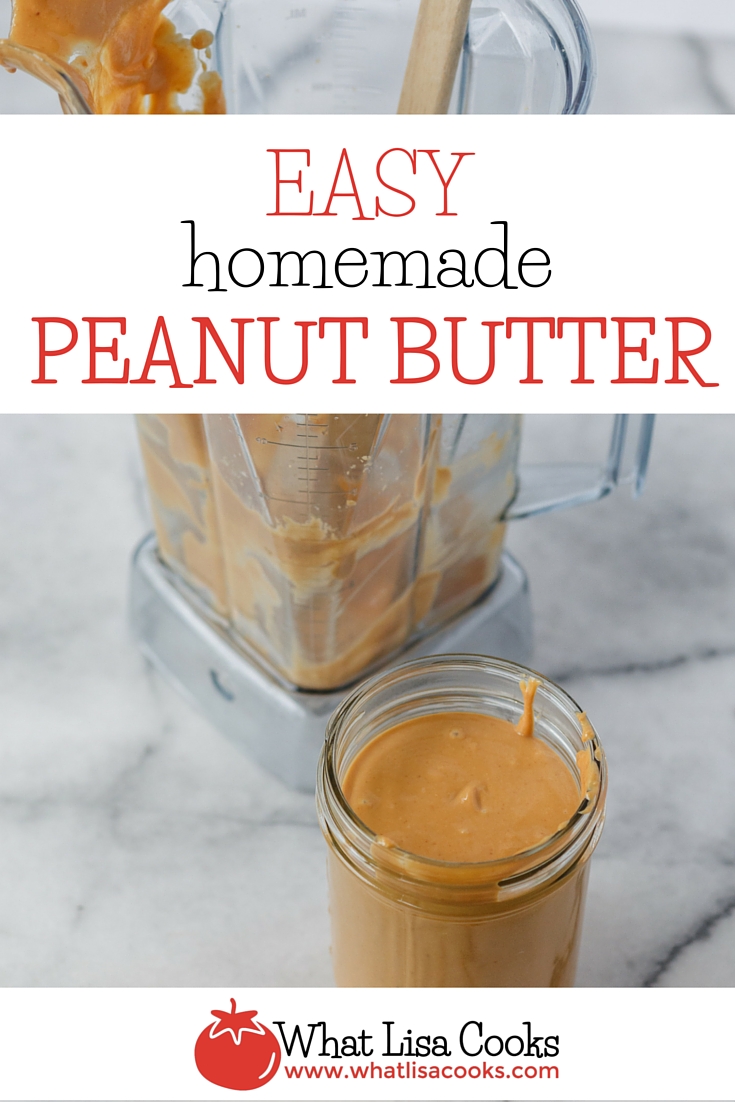
Quick and Easy Homemade Peanut Butter
I really had no intention to make peanut butter. Don't get me wrong, I love the idea of homemade nut butters. I've done sunbutter before, and it was great. But I try to prioritize my time and making all my nut butters at home has never really made it to the top of my list of things I should be doing.
But I love peanuts. I mean, I love roasted, salted peanuts. A quick handful or two is an awesome snack - it satisfies my need for crunchy and salty, and gives me a little protein. I bought some peanuts a couple weeks ago, thinking I was buying roasted and salted peanuts. Only to get home and realize that what I had grabbed was roasted and NOT salted. (That's what happens when you're trying to squeeze in a quick grocery trip in between pickups and dropoffs.) As far as I'm concerned, there is no place in my life for snacking on nuts that aren't salted. I know you raw nut lovers can disagree, but I love my salt.

With four kids, we go through a lot of peanut butter in this house. I buy lots of it, but sometimes it's fun to figure out how to make some of our everyday things from scratch.
And I can definitely tell you - once you've had fresh homemade peanut butter, you will not want to go back. Especially if you can make it with fresh peanuts. I recommend buying them from the bulk bins at someplace that goes through a lot of bulk food, so you know they haven't been sitting around for very long.
Not only does it taste amazing, but it's so easy!

Basically, I took a pile of peanuts and dumped the whole thing into my Vitamix, added a dash of salt, and voila! Peanut Butter.
Ok, it wasn't quite that magical.
But it was close. I had to coax it along at first - pulsing off and on, pushing it down several times. But once it got going and all that oil was released, it very quickly turned into a super smooth and almost liquid consistency. Amazing how something that seems so dry can turn into liquid! And the whole process took less than 5 minutes.
Ingredients:
1 pound roasted shelled peanuts.
1/2 teaspoon (or so) kosher salt.
A drizzle of honey to taste (optional)
Directions:
Put peanuts and salt in blender. Pulse and push down until the peanuts start to release their oil. This is the only slightly labor intensive part. It takes a bit of coaxing to get it going. But once they start to release their oil then you can move faster, and blend to the consistency you prefer. We like creamy peanut butter here, so I really let it go until there were no chunks left. Once you think it looks good, taste it. At this stage you can add a little honey if you like your peanut butter lightly sweetened (most popular commercial peanut butters have sugar in them), and you can also add a little more salt if you like, and then just blend long enough to get that well mixed in.
Pour in a jar, let it rest to firm up just a bit, and then get out the bread and jam, because you're going to want to make a sandwich.
Also note - you can follow this same technique with basically any kind of nuts or seeds. I've also made sunflower seed butter this way, and it tastes great. If the seeds or nuts you buy aren't already roasted, then you'll want to either roast them in the oven or toast lightly in a pan first, to really bring out the flavor.

Free Christmas Printables
A couple of quick printables I made for my kids for holiday fun - one is a wish list and the other is a sort of holiday bingo.
Free Christmas Printables For Kids
I made up a couple of quick printables for my kids for this December & holiday season, so I thought I’d share them here with you.
Click the image to download and print
Christmas wish list printable
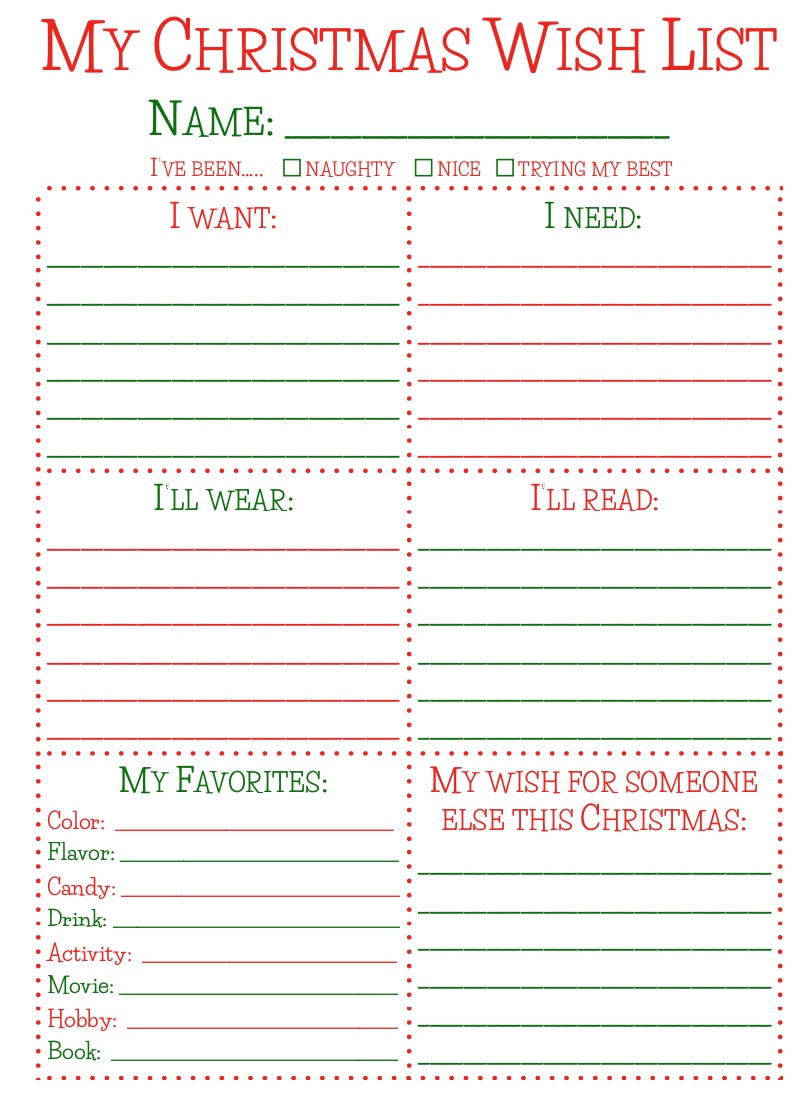
The first thing here is a free Christmas wish list printable.
I like the ideas I’ve seen folks talk about that focus on four gift ideas - something they want, something they need, something to wear, and something to read - so I went with that structure.
I also wanted to encourage them to think about someone else this Christmas, so I added a section for add their thoughts about a wish for someone else.
You can click on the image to get to a downloadable and printable pdf.

click the image to download and print
December Kindness Bingo
The second one is a fun little Kindness Bingo activity for the month.
I wanted something to help get us in the spirit of kindness and giving this year, without spending a lot of money. looked at a bunch of “random acts of kindness” things for kids online, but frankly they all looked like a whole bunch of work for me.
I wanted to come up with something that would get my kids thinking of and being kind to others, without just straight up creating a lot of extra work for myself. I’m exhausted enough as it is.
So I came up with this. They are mostly things the kids can do at home, independently, with supplies we already have. The younger ones might need a little help with a few these, but I mostly tried to add things that I knew my kids were capable of doing on their own. I wanted this for two reasons - one, because it’s less work for a lazy/tired mom; and two, because I think the act of kindness means a lot more when it’s really their own work.
I hope you have a wonderful holiday season and have some fun with these!
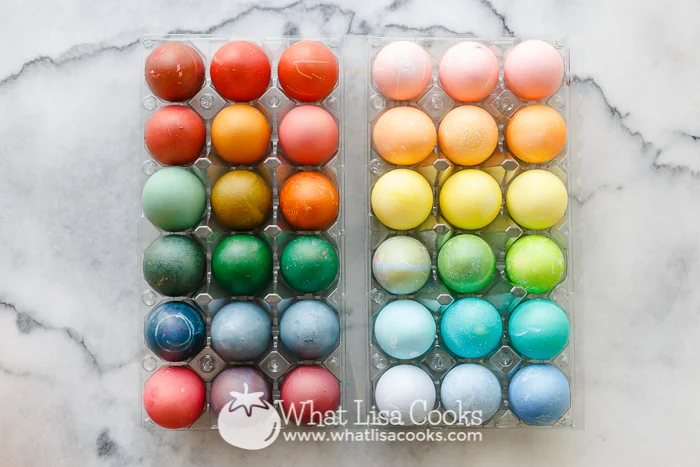
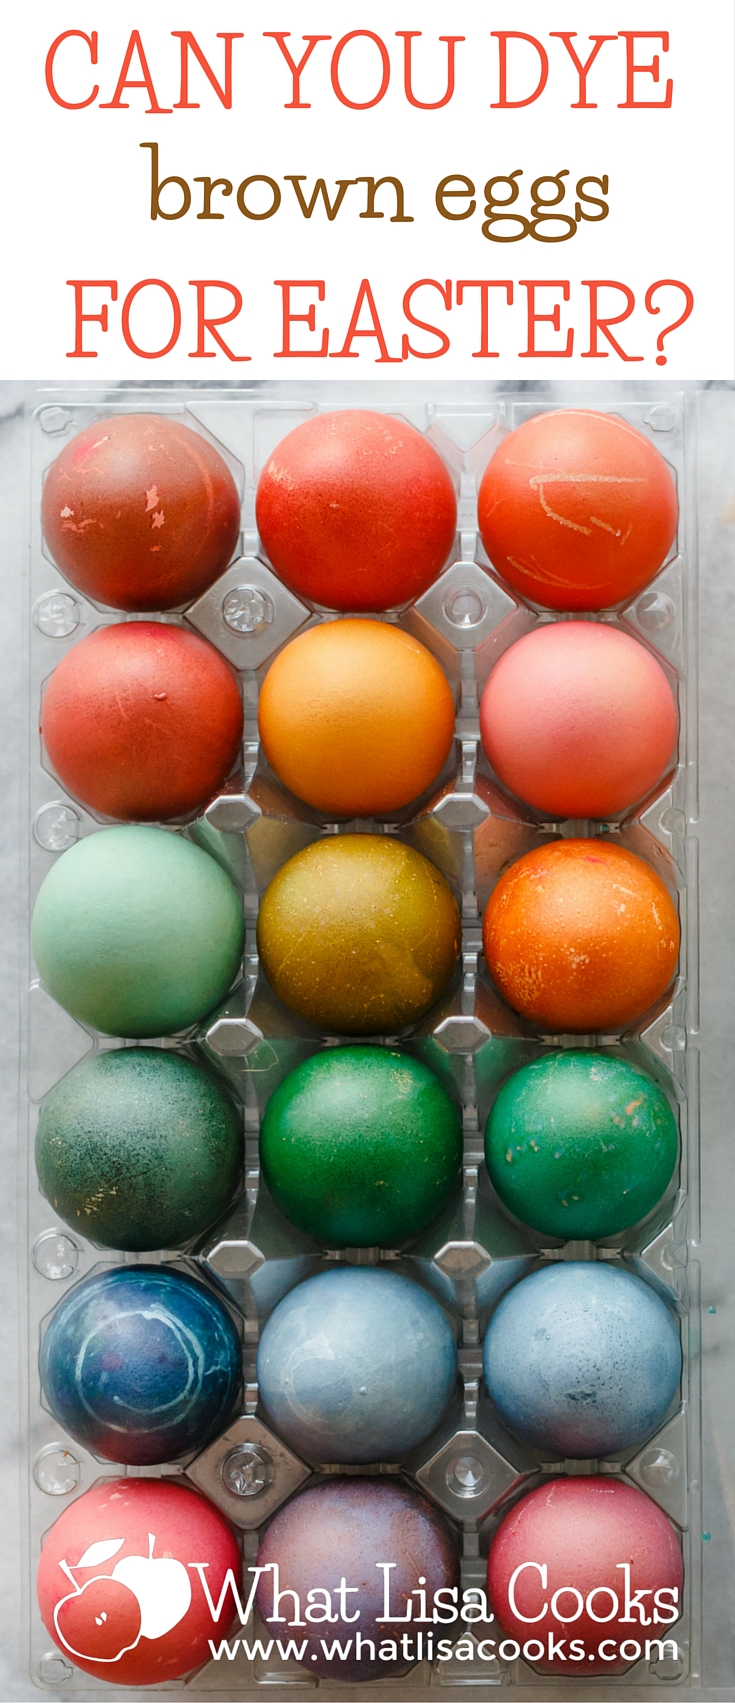
Can you color brown eggs?
Yes! You totally can!
I think we all got in such a habit of dying white eggs that we've just been convinced that brown eggs won't work. But they definitely do, and I think they make some of the prettiest colors. You have to let them sit in the dye a little longer to get the color to really soak in, but the wait is worth it. You end up with beautifully rich colors that I think look more "earthy" than the same store bought egg dye applied to white eggs.
We did a little comparison - these eggs were all dyed with the standard old store bought egg dye, mixed with vinegar according to the package instructions for vibrant colors. The group on the left are brown eggs (except the blue row), the group on the right are white eggs. (and all the little white marks are just where my kids drew on the eggs with the wax crayon).
Brown eggs are usually more expensive, so I don't know that I would go out and buy them just for Easter egg dying. But if you have them and weren't sure if you could use them - go for it! I absolutely love how they turned out.
Homemade "instant" oatmeal
It totally kills me that my kids prefer those instant oatmeal packets over real cooked oats. But lately I'm really trying to focus on choosing my battles, and trying to force people to learn to like oatmeal with some texture over the creamy, mushy stuff, just seems like a fight that's not worth fighting at this stage, especially on an already manic school day morning. But instant oatmeal packets have all kinds of strikes against them, and I just can't bring myself to buy them any more. The artificial flavorings in so many of the mainstream brands, the amount of sugar, and the cost - with 4 kids eating two packets each, we would use whole box at one meal. I have bought some organic ones before, which are a little better, but they still have so much sugar and are even more expensive. I had seen several mentions on various food blogs and pinterest boards about making your own, so I thought I'd give it a try.
It totally kills me that my kids prefer those instant oatmeal packets over real cooked oats. But lately I'm really trying to focus on choosing my battles, and trying to force people to learn to like oatmeal with some texture over the creamy, mushy stuff, just seems like a fight that's not worth fighting at this stage, especially on an already manic school day morning. But instant oatmeal packets have all kinds of strikes against them, and I just can't bring myself to buy them any more. The artificial flavorings in so many of the mainstream brands, the amount of sugar, and the cost - with 4 kids eating two packets each, we would use whole box at one meal. I have bought some organic ones before, which are a little better, but they still have so much sugar and are even more expensive. I had seen several mentions on various food blogs and pinterest boards about making your own, so I thought I'd give it a try.
There are lots of different versions of recipes out there, some of which are no healthier than the store-bought ones, calling for things like non-dairy creamer and way too much sugar. But I did find a few that I liked. I can't seem to find the exact page that I got the final recipe from that I ended up using, I'll certainly link back to it when I come across it again. But I don't think it was a totally original recipe anyway, as so many of them have the same basic proportions in common.
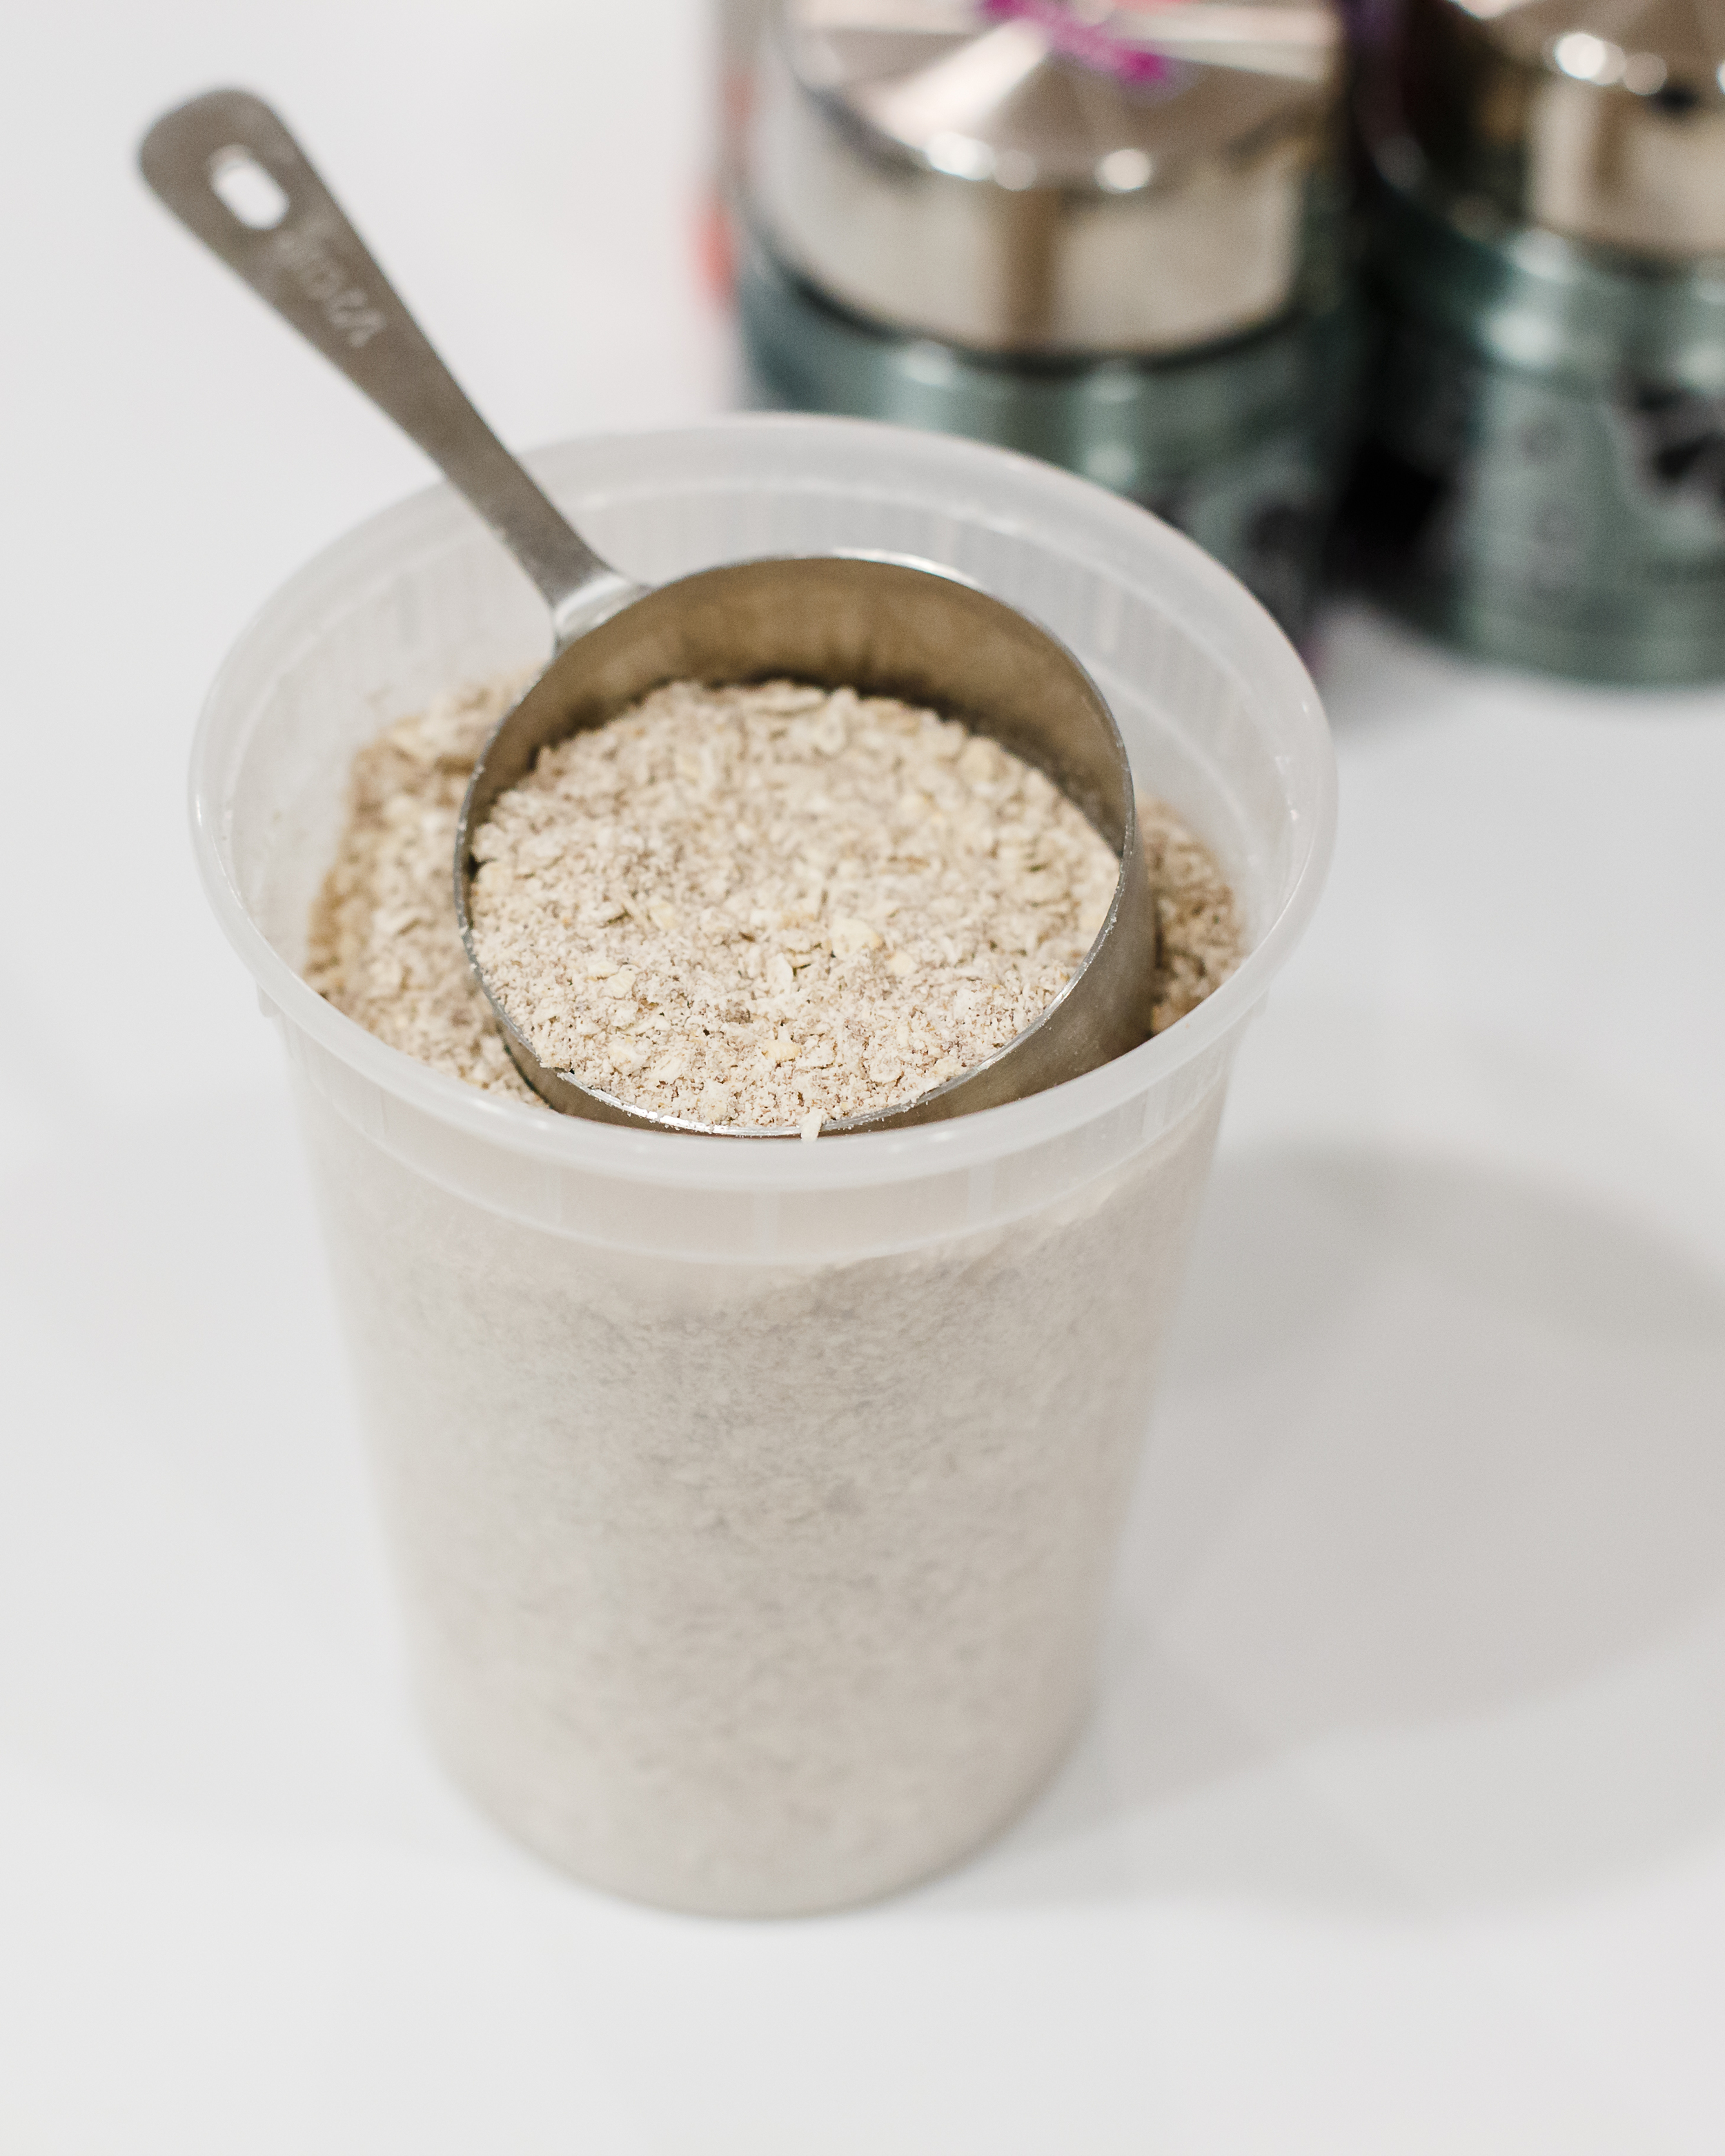
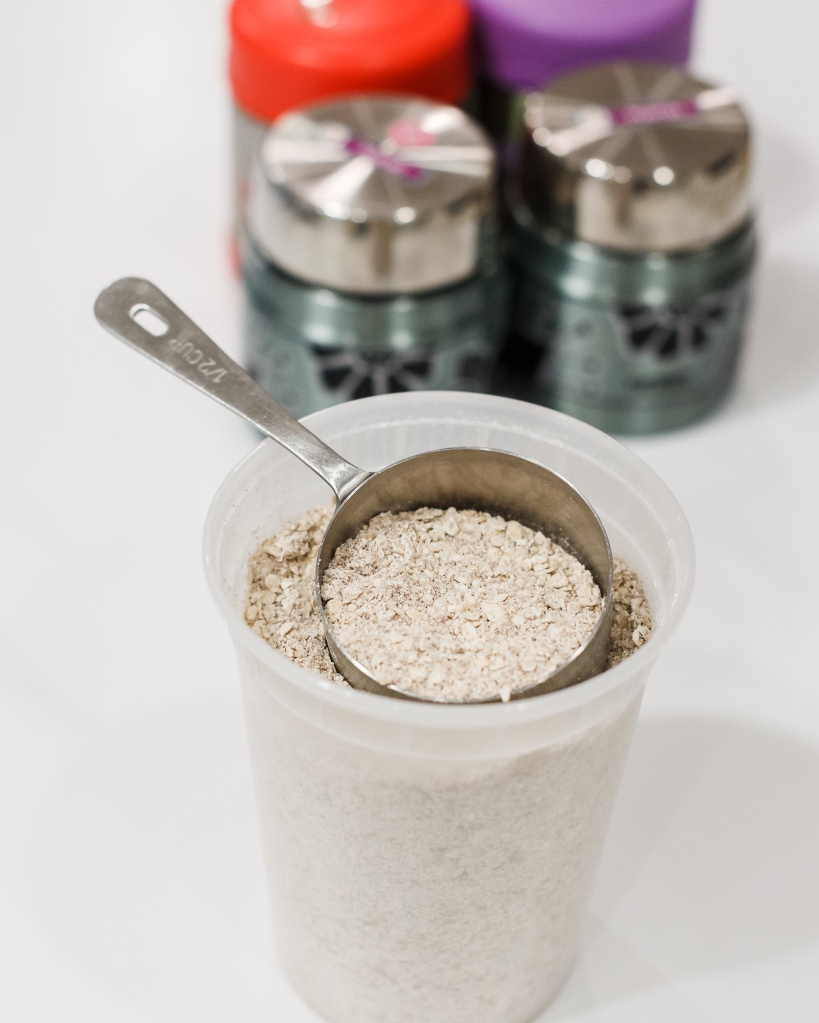
Homemade Instant Oatmeal
- 10 cups of quick cooking oats (I use this brand - 10 cups was almost the whole bag, so I think you could use the whole bag and be just fine)
- 1 teaspoon salt
- 1 cup brown sugar (I actually substituted coconut sugar because that was what I had, and I really like the flavor). Use more sugar if you know you want it sweeter, but I like the idea of keeping it less sweet to start, and then I can add a little maple syrup if someone really wants sweeter.
- 2 teaspoons cinnamon
- 1 cup powdered milk (I use this organic one).
Here's the key that all the good recipes seem to have in common: some of the oats need to be blended and broken down - that is what gives the softer consistency. So, put 4 cups of the oats in your blender or food processor and blend until almost like flour. Then just mix all the ingredients together. That's all.
I think you could easily go ahead and add in some chopped up dried apples or apricots, or nuts, at this stage as well. Given how fast I think we'll go through it, I think it would keep just fine. Maple sugar would probably be really good in this, or vanilla sugar too.
Most of the other recipes out there have you portion it out in 1/2 cup servings in individual snack bags. But I thought that seemed like way too much waste, so I just put it all in a couple of big containers and I measure it out when I am ready to serve it. I also thought for home use you could just as easily measure out your portions into pint sized jam jars, and then just add your water and serve right out the jars. For eating right away, using equal parts water to the dry mix seems about right, which I think would be the same as the packets. But I've noticed that instant oatmeal tends to get thicker as it sits, so if making ahead for lunch I would add a little extra water, so it's not too thick by lunch time. Maybe 3/4 water to 1/2 cup dry mix. I also like to add just a little cream or half & half to the finished oatmeal.
I made this last week and my kids ate it up for breakfast. And today I used it for breakfast for lunch (which my kids love). I measured the mixture out the night before, and just added hot water this morning when I was ready to pack up the lunches.

Enjoy!
Lazy mom's fish tacos
Taco night is practically a ritual at our house. We take it seriously. But that doesn't mean it has to be a ton of work - it just means it has to be good!
We also don't want to have the same thing for taco night each week. I like to keep it as an easy meal, but mix up the ingredients a bit so it doesn't get boring. We do tacos with ground beef, or beans, or chicken cooked any number of ways, and one of my favorites is fish tacos.

This is one of my favorite weeknight dinners, and a super easy way to do taco night just a little different. If you like fish tacos, but feel like you can't have them at home - you need to try this.
Basically, you just find some good quality fish sticks and cook them in the oven according to the package directions. (I like to let them get a little crispy.)
We like the fish sticks from Costco, and Trader Joe's has some pretty good ones too. Use any ones you like. I've also done this with other kinds of frozen fish - frozen filets meant for fish & chips, or other kinds of breaded fish. Whatever you like works great - as long as it's quick and easy!

And then, you just do all the usual taco stuff - lettuce or cabbage, sour cream, cheese, tomatoes, avocado, green onion...
For fish tacos I like to add a squeeze of lime, and some fresh cilantro is really nice if you have it. Basically, anything goes!
This is a great meal to have kids help with - small amounts of cutting, picking off cilantro leaves, mashing avocados, filling bowls. They can really feel like they are participating in the meal, even though there is very little actual cooking involved. There are plenty of opportunities for lots of jobs for little hands.

My family loves this kind of meal because they all get to make their own. I have found with my kids that the most successful meals are the "make your own" type of meals - kids love having some control over what goes on their plate. I try to give them a guideline that they have to have some protein and they need to choose at least one vegetable, and beyond that they can control their own.
Let me know if you try it - and what kinds of combinations you come up with!
Lazy Mom's Fish Tacos
Ingredients:
- Good quality fish sticks (or other frozen fish that you like)
- Taco sized tortillas - flour or corn
- shredded lettuce or cabbage
- limes
- sour cream
- guacamole or avocados
- cilantro
- diced tomatoes
- green onions
- salsa
- any other toppings you like!
Optional:
Serve with chips, rice, beans - whatever extras you like.
Directions:
Cook fish according to package directions. Serve fish, tortillas, and all toppings buffet or bar style. For standard sized fish sticks we do 2 fish sticks in one taco sized tortilla. You could also use bigger tortillas and make fish burritos.


Freezing Pasta
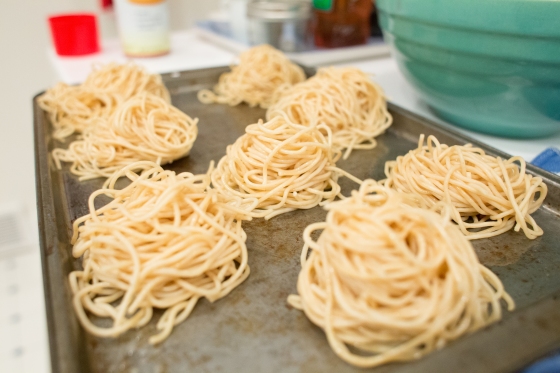
One of the keys to success around a house with 4 little kids is being prepared. For meals on busy days that means having things prepared ahead of time. A couple days of the week when we are running around to therapy appointments or classes in the afternoon I try to get dinner made in the morning and have it ready for us when we get home at 5:30. But that just doesn't always happen. So my solution on those kinds of days is to have things in my freezer that are easy to pull out and quickly serve. One of those things is cooked pasta.
A few years back I noticed that Trader Joes was selling bags of frozen cooked pasta - you just pop them in the microwave and serve, with cooked pasta ready in just 3 minutes. I bought those for a while. But as little bodies and appetites grow and grow, buying packaged things like that gets expensive - one bag of pasta doesn't do it for us. So I freeze my own now.
Whenever I am cooking any kind of pasta, I always, always make extra and freeze it. I do this with any kind of pasta. Penne is a favorite, because it's sturdy enough that it can hold up to being tossed around in the freezer a bit. All you do is just toss your cooked pasta with a little oil or butter, let it cool, and then spread it out on a baking sheet to freeze without sticking together. Then dump it onto a ziploc bag. When you want to use it, pull out the amount you want and warm it up. You can do this in the microwave for a couple minutes. Or you can put a little hot water over it and let it sit for just a minute or two - this method works especially well if the pasta got a little dry in the freezer.
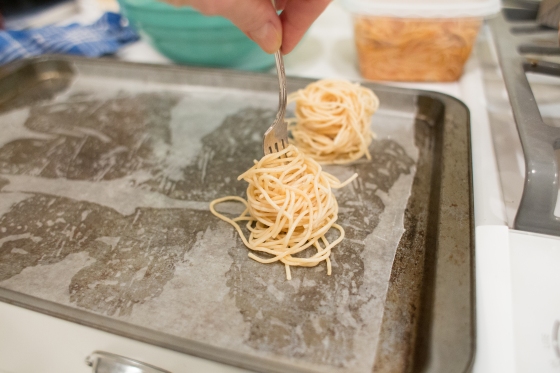
For longer pastas like spaghetti - below you will see what I do. Take a fork and spin individual little servings onto a baking sheet (lined with wax paper helps keep them from sticking). They look like little birds nests. Then freeze these and then bag them when frozen.
Having cooked pasta in the freezer means I can have a meal ready for hungry kids in less than 5 minutes - thaw the pasta, toss it with a little sauce, or some butter & cheese, throw in some frozen peas or chopped broccoli, maybe dice up some ham or salami - a balanced meal in minutes.
Easy Wasabi Mayonnaise
Do you ever get takeout sushi and wonder why the heck they give you SO MUCH wasabi?

Maybe it's just me, I don't know. I personally think a little wasabi in the sushi goes a long way - I like a little heat, but I also like to taste my sushi. So I always end up with extra wasabi.
But I may have mentioned before how I hate to waste food. Especially when it's the good stuff - like when we order sushi from a good place and they give you the real fresh grated wasabi.
So a friend turned me on to this tip and I've been doing it ever since: use the leftover wasabi to make wasabi mayonnaise. It's genius in its simplicity.
Just mix the wasabi into a jar of mayo - I think about a tablespoon of prepared wasabi to about a half a cup of mayo is about right for my taste. But this is really one that you can do however you like. If you like more kick, then you more wasabi. If you want it mild, then use more.
It's awesome on sandwiches, or for dipping veggies in. I love mayo on grilled or roasted veggies, and this is a great way to give it a little extra kick.
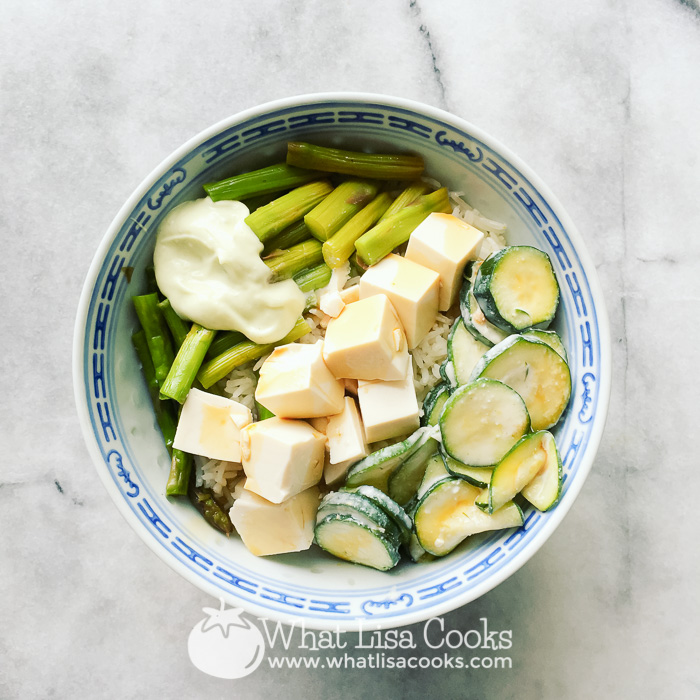
The other day I made myself a rice bowl for lunch, with brown rice, tofu, zucchini and some leftover asparagus. A good dollop of the wasabi mayo on top was the perfect to take it from ordinary leftovers to something really delicious.
A quick and easy way to cook pasta!
We've always been told that pasta had to be cooked in a big pot with lots of water, and we never really questioned it. Until now.
I have seen mentions of this alternative method of cooking pasta here and there, and figured I had better give it a try.
The basic idea is that instead of using a bunch of extra water in a huge pot, you cook your pasta in a smaller pan with just enough water to get it cooked through - no excess. The starchiness in the water is not a problem, because that extra starch is part of what contributes to an extra creamy sauce that will really stick to your noodles. Restaurant chefs have known about that trick for a long time - they always add a ladle of pasta water to their sauce.
Basic cooked pasta:
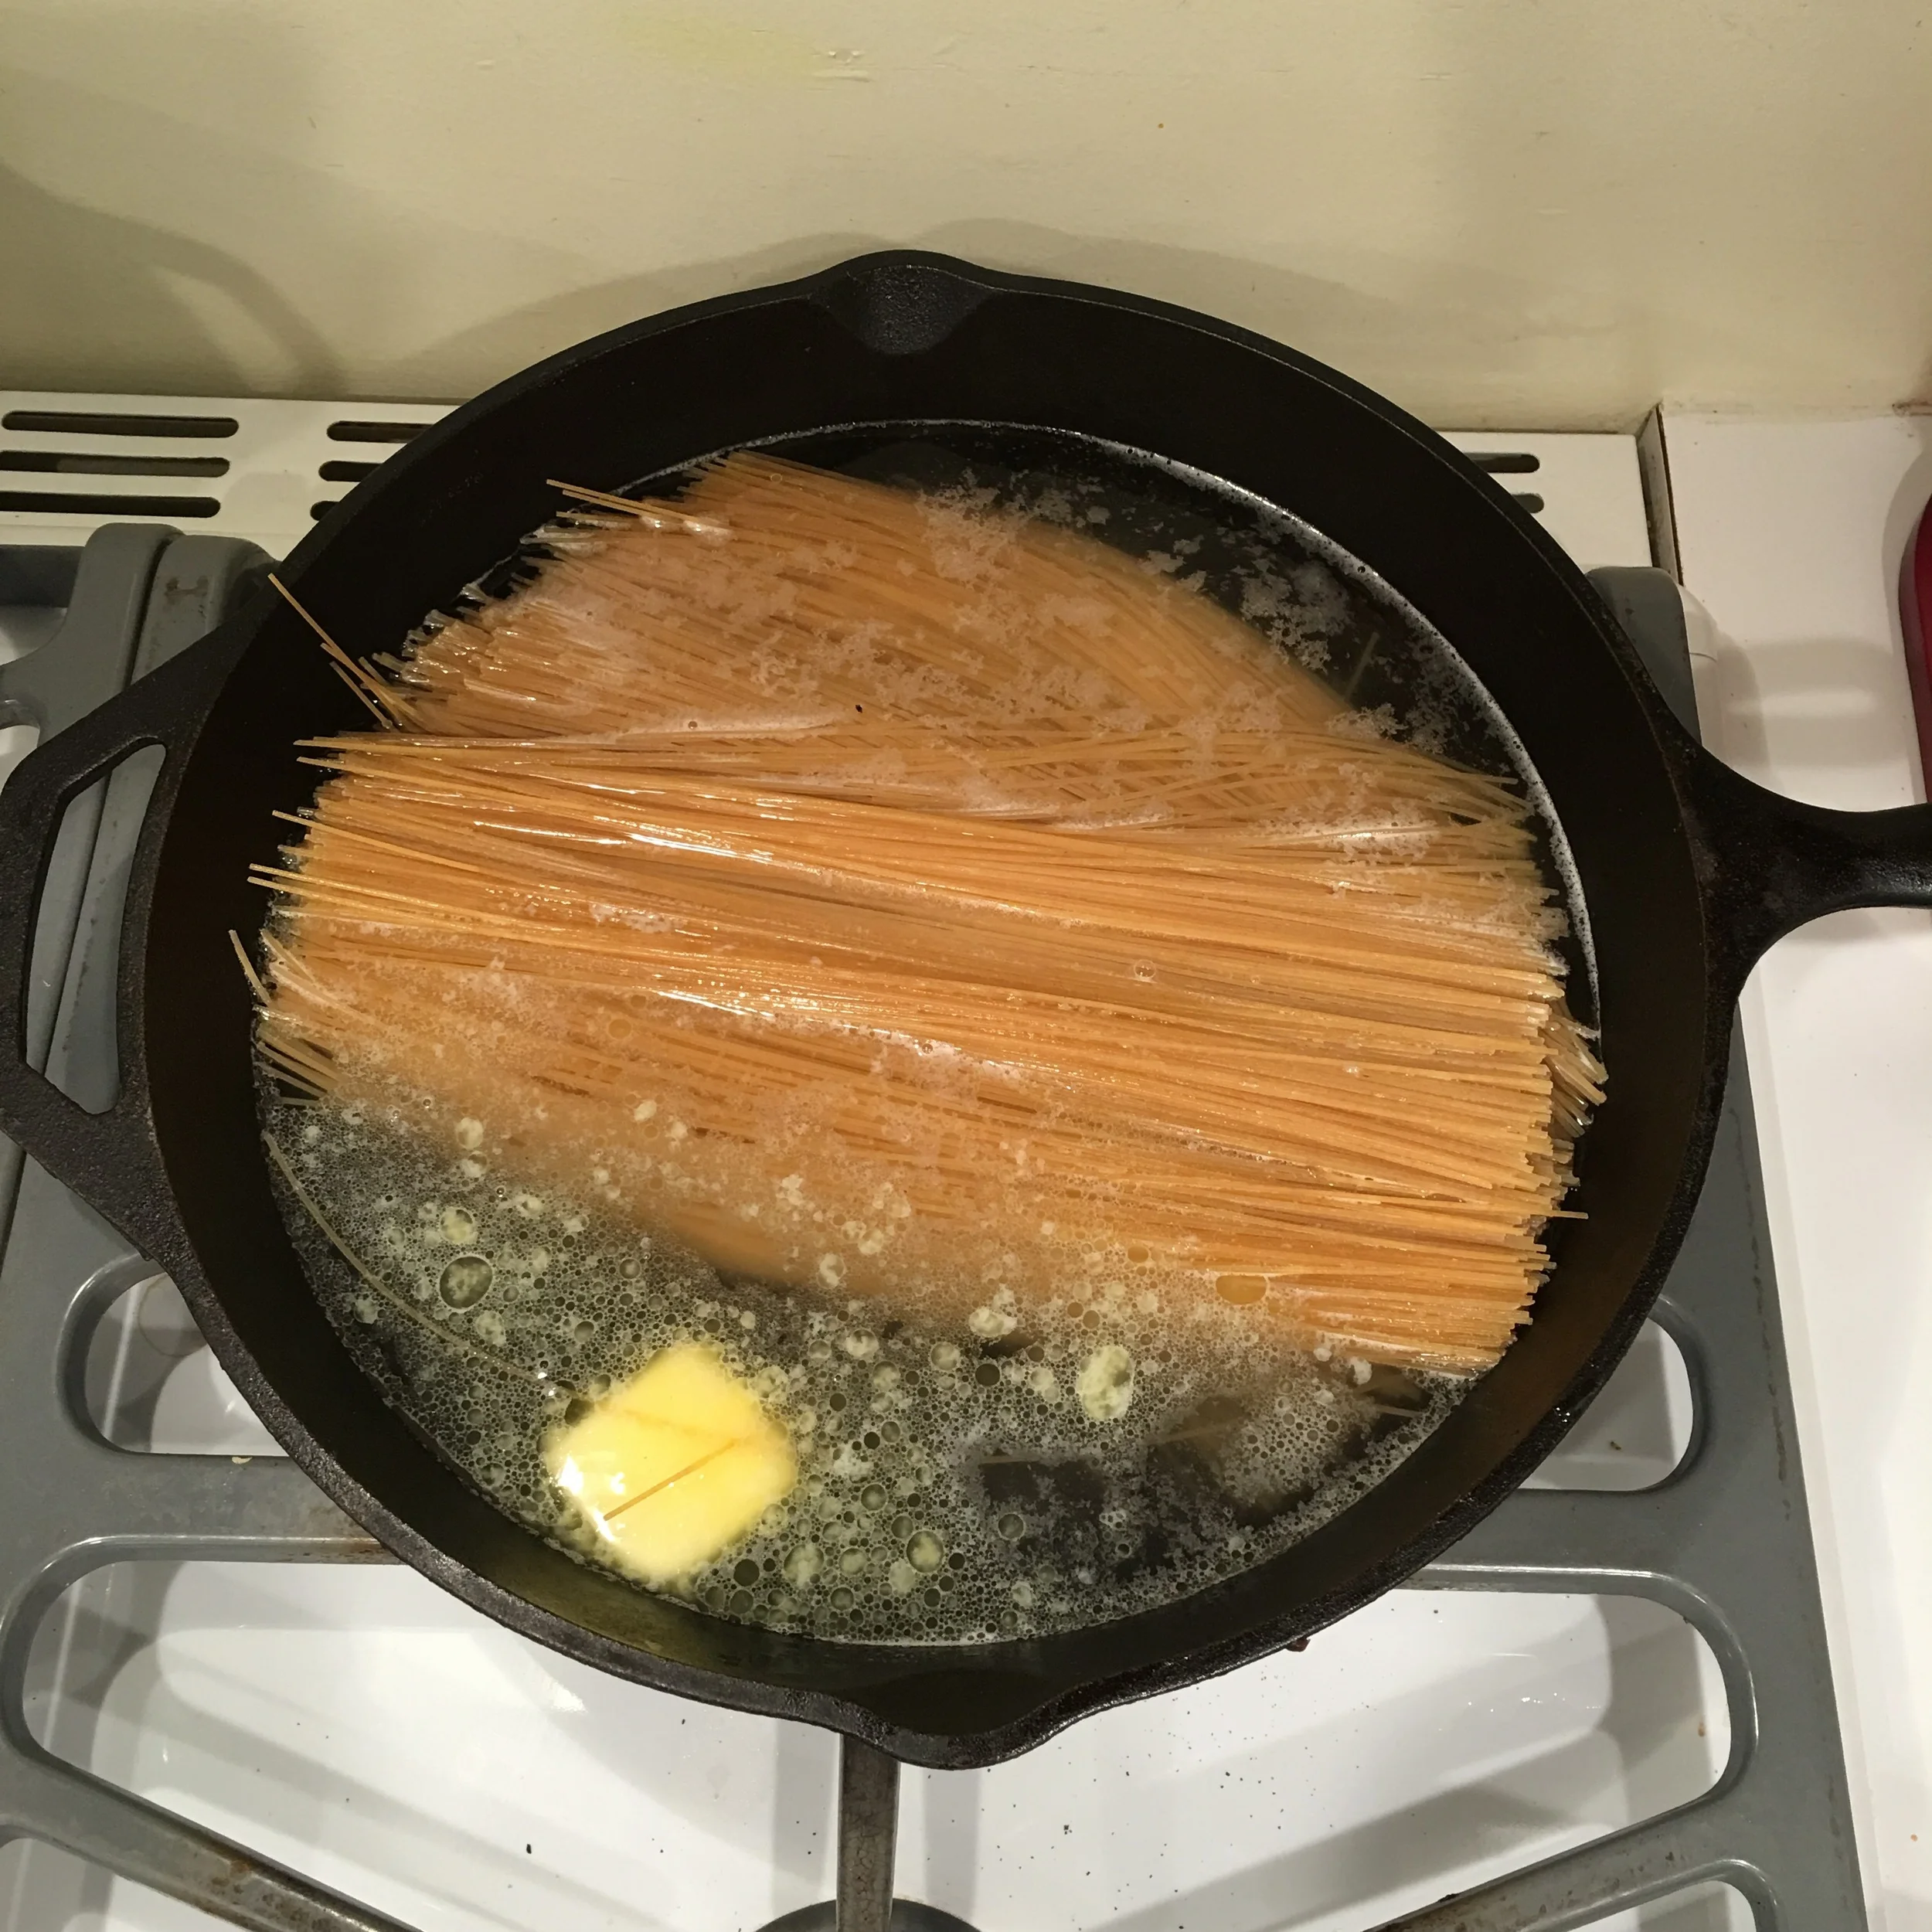
- 1 package (usually about a pound) of pasta
- 1 teaspoon salt
- 1 tablespoon butter
- 4-6 cups cold water (see notes below)
The butter might not be necessary in a non-stick pan, but I am using a cast iron pan so I always like to have a little oil in there.
The quantity of water will vary depending on your type of pasta and your desired end result. Here is used a very thin angel hair pasta and I just was serving it buttered, so I used only 4 cups. But for thicker pasta like penne you will need more water - so go up to 5 cups. If you are making a sauce then you will want to have a little water left in your pan after the pasta is fully cooked, to help blend in the sauce, so go up to 6 cups.
So - 4 cups for thin pasta, no sauce. 6 cups for thick pasta with sauce. Or adjust in between to suit your needs. As with everything, I think it's a bit of trial and error. If your water is all absorbed but your pasta is not yet fully cooked, then add a bit more hot water.
Directions:
Place everything in a pan just big enough to contain it all and wide enough that the pasta can be fully submerged in the water.
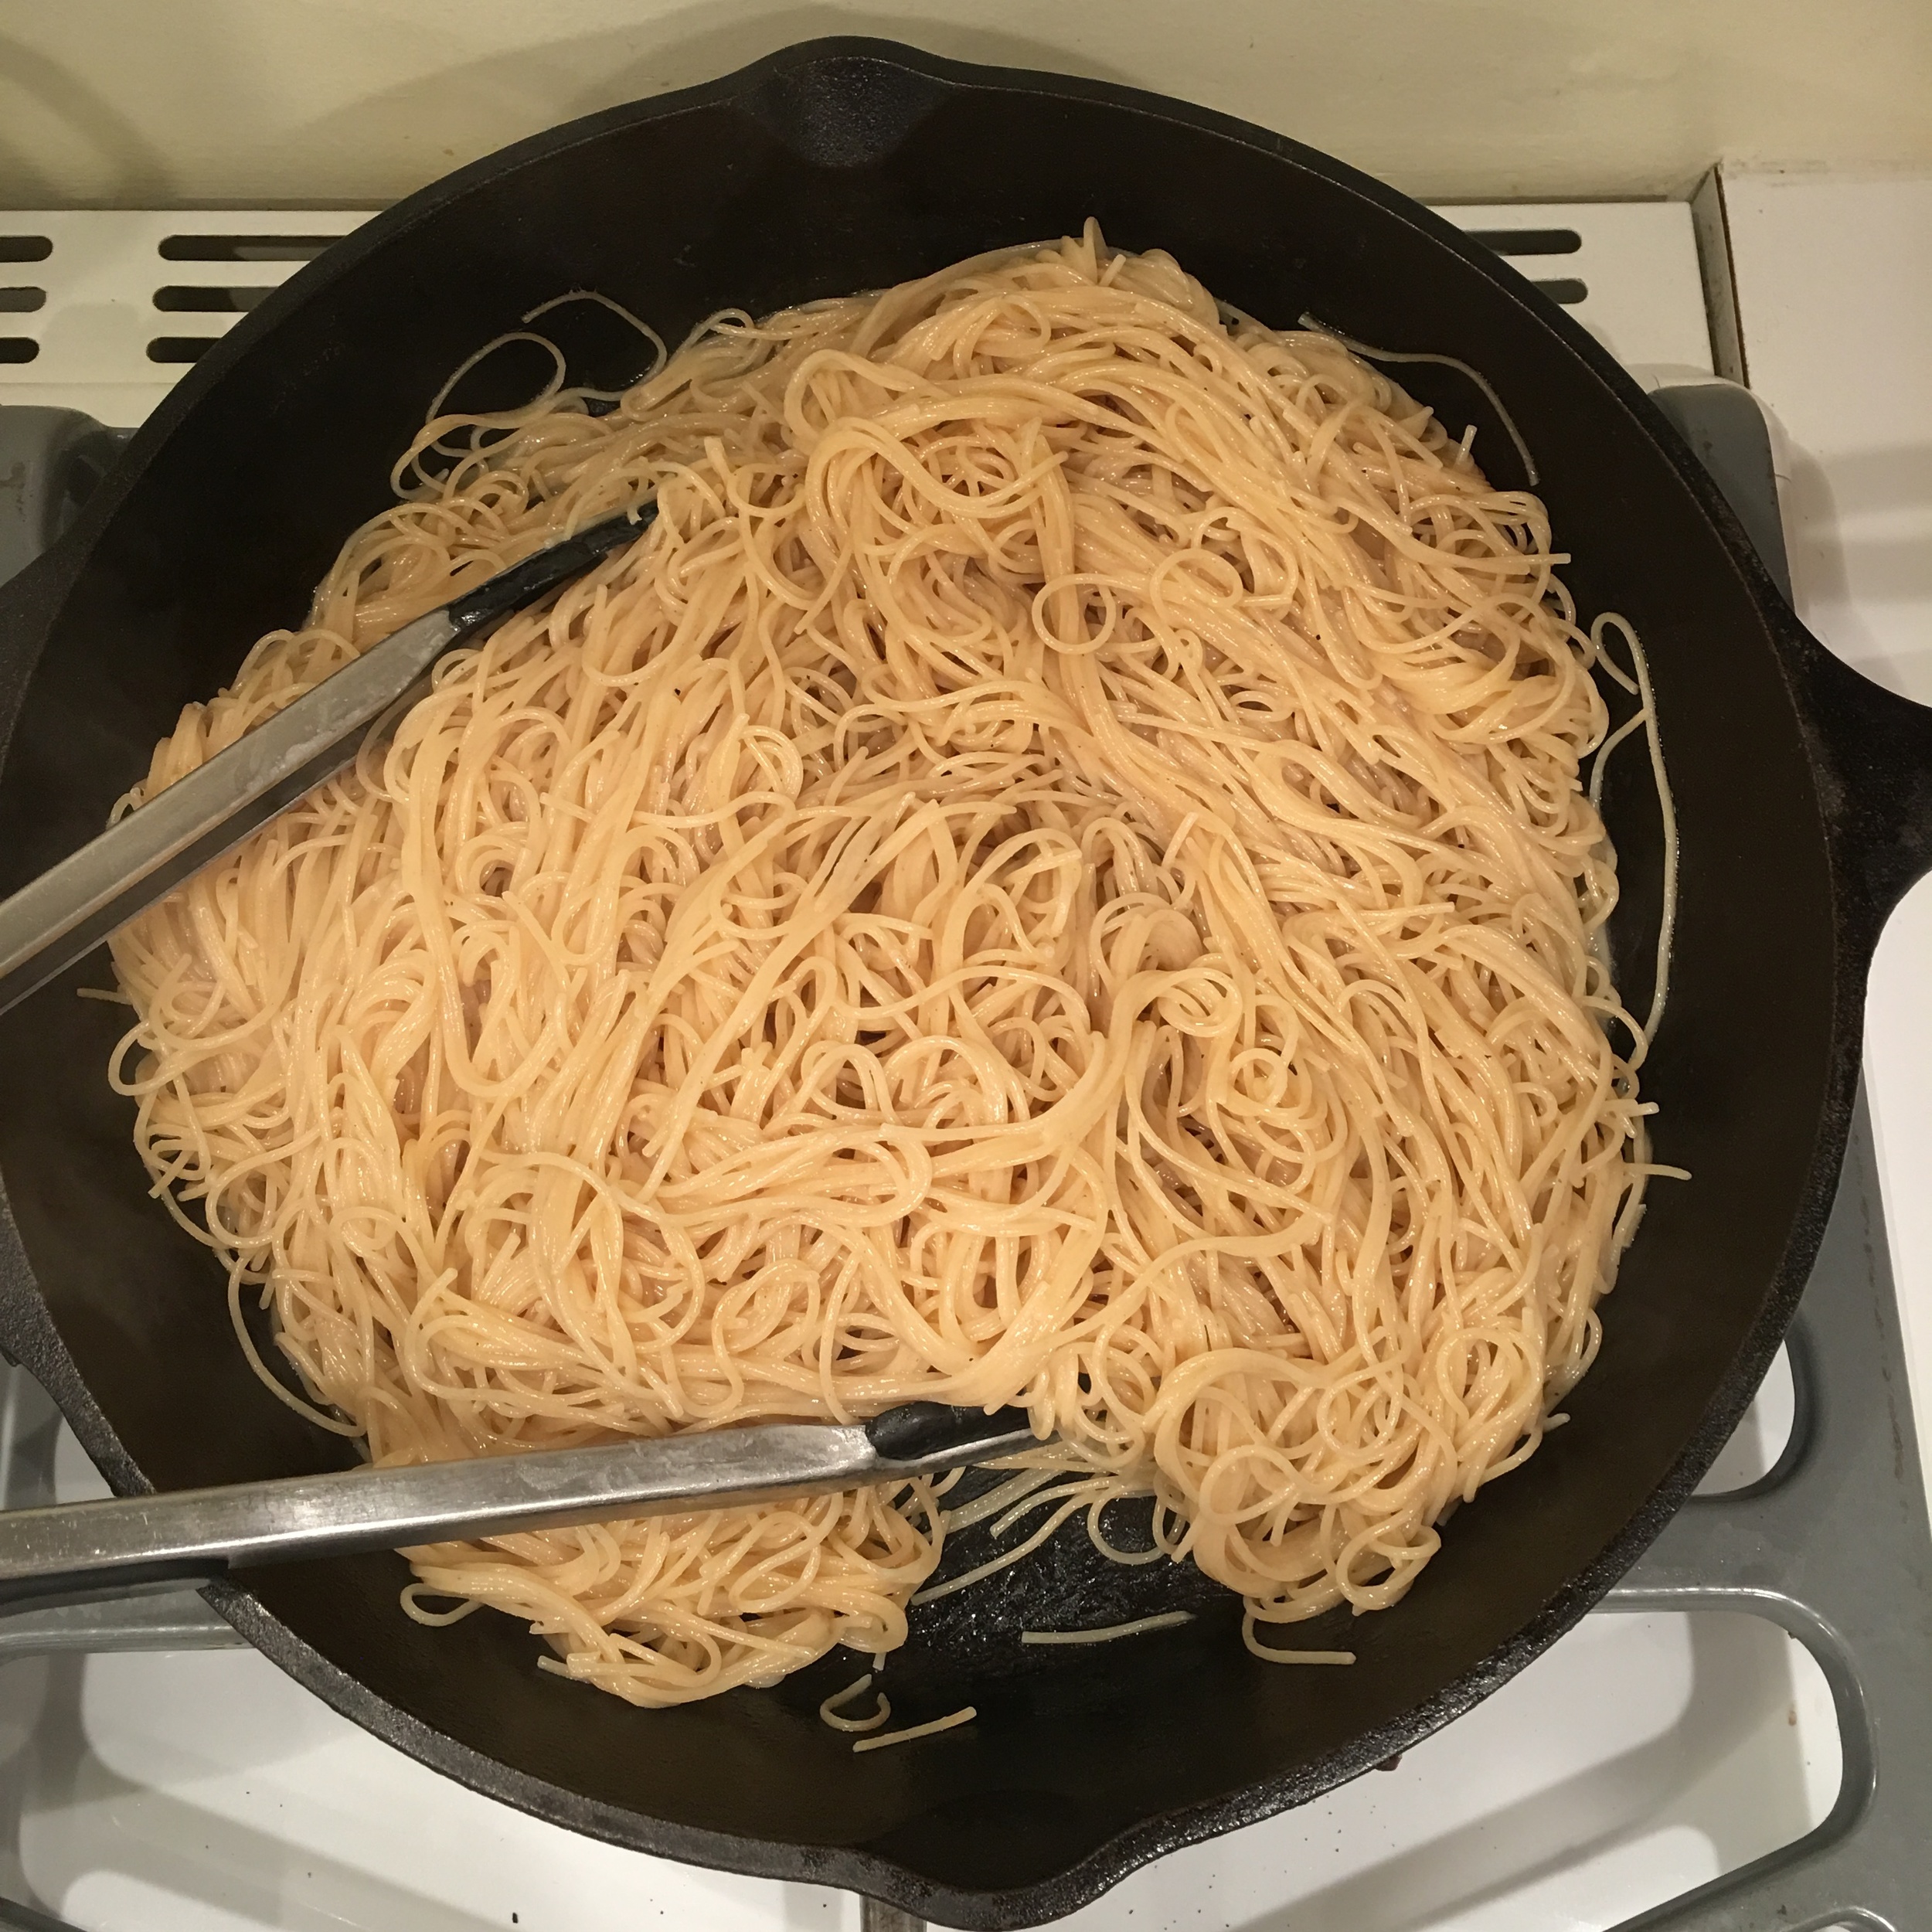
Turn on the heat and bring up to a gentle simmer, stirring occasionally to ensure the pasta doesn't stick together, until the pasta is cooked to your liking.
It will take about 10- 12 minutes, depending on the thickness of the pasta.
And that's it! Perfectly cooked pasta in less time than it would take to even get a pot of water boiling.
Once it's done you can serve as is, or add your sauce. My kids are picky about sauce, some like it and some don't, so I tend to serve the sauce on the side. But you could just add a little cream and some herbs and parmesan cheese to this for a super quick and simple weeknight pasta dish, or toss in a jar of your favorite tomato sauce.
I love a tip that helps me get dinner on the table faster!
Basic recipe: pancakes and waffles
Add to the list of things that I can't for the life of me figure out why I ever bought in a box: pancakes.
Pancakes and waffles are so easy to make from scratch. Call me lazy, but I love a recipe that's versatile and adaptable to a number of uses. I like to think about it once and use it a lot - and this one definitely fits that bill.
Add to the list of things that I can't for the life of me figure out why I ever bought in a box: pancakes.
Pancakes and waffles are so easy to make from scratch.

Call me lazy, but I love a recipe that's versatile and adaptable to a number of uses. I like to think about it once and use it a lot - and this one definitely fits that bill.
I started with the basic pancake recipe from my favorite cookbook Mark Bittman's "How To Cook Everything", and I have adapted slightly from there to suit our needs. I like to use whole wheat flour to make them healthier, and real maple syrup for a more natural sweetener. My pancake recipe is a little sweeter than most, because I personally like for the pancake or waffle to taste really good without the need for syrup. I make a lot extra and keep them in the freezer to pop out for my kids for a weekday breakfast or lunch, and it's just quicker and easier if they already taste great without having to get out the syrup. But if you're going to only eat these with a generous pouring of syrup, then you'll probably want to cut back on the sweetener in the recipe.
Basic Pancake Recipe:
- 4 cups flour (whole wheat, or half whole wheat and half white)
- 2 tablespoons baking powder
- 2 teaspoons cinnamon
- 1 teaspoon salt
- 3 cups milk (I use whole milk)
- 3 or 4 eggs - Enough to make about 4 cups of liquid when added to the milk & syrup, depending on the size of your eggs.
- 1/2 cup pure maple syrup (less if you plan on soaking your pancakes with syrup)
- 1/4 cup butter, melted and cooled. (optional, I often leave it out)
- 2 teaspoons vanilla
- butter for your pan
Directions:
Measure all the dry ingredients into a big mixing bowl and stir to combine.
For the liquid ingredients: I fill my big measuring bowl up to 3 cups with milk, then add the syrup and vanilla, then add eggs until it gets to around 4 cups of total liquid ingredients. Then mix all that together with an egg beater until well combined (or you can use a whisk). Then pour into the dry ingredients and stir gently until combined. Try not to mix more than necessary, this will help keep your pancakes nice and light.
For pancakes you want the batter to be pretty thin, they puff up a lot and stay nice and light.
Waffle batter needs to be just slightly thicker, so I use 1/4 cup less liquid if I'm making waffles - either use one less egg, or cut your milk back a little.
Then cook: Pancakes on a hot buttered griddle, or waffles on a buttered nonstick waffle iron.

I like to cook my pancakes in lots of butter, I think it adds that amazing final layer of flavor. Pour our a ladle full of batter onto a well buttered griddle. I have a big double sized cast iron griddle that heats really evenly and works great. And the extra big size is perfect for making a bunch of pancakes at once. If you are going to add extras I like to add it at this stage, when the top of the pancake is still wet. We love to add blueberries, or slices of banana, and mini chocolate chips are a fun little treat too. Then watch for a little browning around the edges and bubbles in the middle, and then flip. Serve hot with hot maple syrup, and we like to have whipped cream on ours too.

For waffles, a good waffle iron makes all the difference. I worked with a cheap one for years and I was amazed at how much better the waffles were with just a new waffle maker. They are light and fluffy on the inside, and lightly crisp on the outside. For a big family like ours, the kind that makes two at a time is a must-have. If you want flavored waffles then mix your extras into the batter. Finely chopped nuts are really great, or a little grated apple.
Notes:
- This is a double recipe because we like a lot extra, but feel free to cut it in half.
- You can use all white flour, all wheat flour, or a mix of both. Or take out a little of the flour and add in some oats, or ground flax, or wheat germ, or oat bran - whatever you like to make them even more healthy
- I've also made these with gluten free flour and they work great. They key to that is to separate the eggs, mix in the yolks with your batter as usual, and then beat the whites until soft peaks and then fold in. The beaten egg white provides the light and airy texture that you miss without the gluten.
- Use less sweetener if you really are going to soak these with syrup.
- I've done this vegan many times and it works great. Just substitute flax + water for the eggs. 1 T ground flax + 3T water, per egg to be replaced. Mix that together and let sit for a minute, then add it just as you would add the eggs.
- You can use brown sugar instead of syrup in the batter.
- When I want to make this more of a 'complete' meal for my kids, with more protein, I'll add a little less liquid and more eggs, or add some protein powder in with the dry mix.
- Options for extra flavorings are pretty limitless. We love blueberry pancakes. Bananas or apples are great too. Finely chopped nuts and a little orange zest are really good in waffles.
- If you want to take the extra time, separating the eggs and whipping up the egg whites is also a great trick to get really light and airy waffles.
- For pancakes, I pour the batter on the greased griddle and then add stuff - a few blueberries, slices of banana or apple, chocolate chips, then flip them.

How to Make Homemade Chicken Broth
Once you've had good homemade stock you'll really never want to go back. The store bought stuff tastes so bland, or sometimes tastes like nothing but salt. I love good chicken broth. I love it so much that sometimes it doesn't survive long enough to make it into soup. When someone in the house is sick, I make up a big pot of it and drink as much as I can. I think it's the definition of classic comfort food, and it's so good for you. Just do a quick google on the benefits of bone broth and you'll find pages and pages of info.

Once you've had good homemade stock you'll really never want to go back. The store bought stuff tastes so bland, or sometimes tastes like nothing but salt. I love good chicken broth. I love it so much that sometimes it doesn't survive long enough to make it into soup. When someone in the house is sick, I make up a big pot of it and drink as much as I can. I think it's the definition of classic comfort food, and it's so good for you. Just do a quick google on the benefits of bone broth and you'll find pages and pages of info.
The other great thing about making it yourself is that it's basically free. Free! Something so delicious, and so good for you - that costs you nothing. That's because you're making it out of stuff that you would otherwise be throwing away. I cringe at the thought of anyone throwing out the leftover carcass from their roast chicken or turkey - such a waste when you can turn it into such good broth.
People have asked for my recipe for making my chicken broth. It's not so much of a recipe as it is just a simple method with some guidelines for basic ingredients. You need chicken bones of course, and water, but the other flavorings are totally optional.
Here's what I like to use:
- a couple pounds of leftover chicken or turkey bones
- a few pieces of aromatic vegetables (traditionally onion, carrot, celery, but you can use others too)
- salt
- a couple quarts of water
- pepper and other seasonings as desired
- A quarter cup of some kind of acid - either a couple of sliced lemons, or some vinegar
- a good slow cooker or big stock pot
A few additional notes:
- You can use any kind of bones for this, it doesn't have to be whole roast chickens. If you've cooked up a bunch of thighs, or wings, definitely use the bones for those. Or if you really just need broth and you don't want to have a chicken dinner, then ask your butcher for scraps - wings, necks, whatever. I've heard that chicken feet make amazing stock.
- I keep a ziploc bag in my freezer, and when I trim veggies for cooking I add the clean trimmings to the bag - carrot tops, ends of onions, ends of celery, kale ribs. You can use just about anything, just remember that they are adding flavor so don't use anything that you don't want to taste too much. I wouldn't recommend things like broccoli or cauliflower, I think the flavor would be too strong.
- For seasoning I usually just do salt and pepper, but you could certainly throw in a bay leaf, a few sprigs of rosemary or thyme or sage, really anything you like the flavor of.
- A little acid of some kind somehow helps get all the flavor out of the bones. I usually cut a couple lemons in half and throw them in, they give a great flavor. If I don't have lemons then I do apple cider vinegar.
- Don't be shy with the salt.
- I make mine in a slow cooker so that I can leave it overnight or while I'm out of the house for the day, but you can do this in a pot. You'll just need to keep it on a low simmer and keep an eye on it.
- I generally figure on about a quart of broth per whole chicken. I usually do 2 chickens, so I put in a little more than 2 quarts of water and get about 2 quarts of broth.
After all that being said - I've made wonderful chicken broth with just chicken bones, water and salt. If you don't add other flavoring, then it's called stock. With seasoning and flavoring it's called broth. Technicalities. It's all good.
How to make your broth:
After you've had your lovely roast chicken dinner, take all the remaining meat off the bones and put it away to use later in your soup. Put all the scraps and bones and any leftover drippings in your slow cooker - don't forget the skin, it adds great flavor too. Add in your vegetables, seasoning, acid. Add enough water to completely cover it all (in a big slow cooker with bones from 2 chickens you should be looking at about 8-9 cups of water). Turn your slow cooker on low for as long as it will go (mine has a timer that will go for 10 hours). Go to bed. The next morning you will have a lovely stock. You can call it good at this point, or you can just let it keep going. The longer you let it cook, the better it will taste. You might need to add a bit more water. So give it a stir, and taste it. If you were a little shy with the salt at first then you might want to add some now.

When you are satisfied that it's ready, strain out all the stuff. I put a strainer over a big glass bowl and ladle everything into that, catching the chunks in the strainer. Some people will then strain through cheesecloth or something fine, to get all the little bits of stuff out. I usually don't do this because I don't mind the stuff, I'm making soup anyway so it will be fine. But if you want a really clear broth then a separate straining might be good.
You don't have to cook it for 24 hours. You can make a really good broth just simmering on the stove for a couple hours. The slow cooker is just an easy way to bring out even more flavor.
If you want to be even more frugal - you can actually make two whole batches of broth from one set of bones! Just strain out your first batch of broth after simmering overnight or all day, and fill it up with water again, add a little more salt, and let it got another 8-10 hours. The second batch might not have quite as much flavor as the first, but it will still make an amazing soup.
If your chicken was really fatty, you might want to separate the fat. In the one pictured I didn't bother, and you can see there's just a tiny bit of fat on the top. I'm ok with that. But if that is going to bother you, then you must have one of these handy fat separators. They work great.
And that's it! Now go make your favorite soup recipe. Or just pour some in a mug and drink it. A lot of people freeze theirs, but ours never lasts long enough to bother with that.