

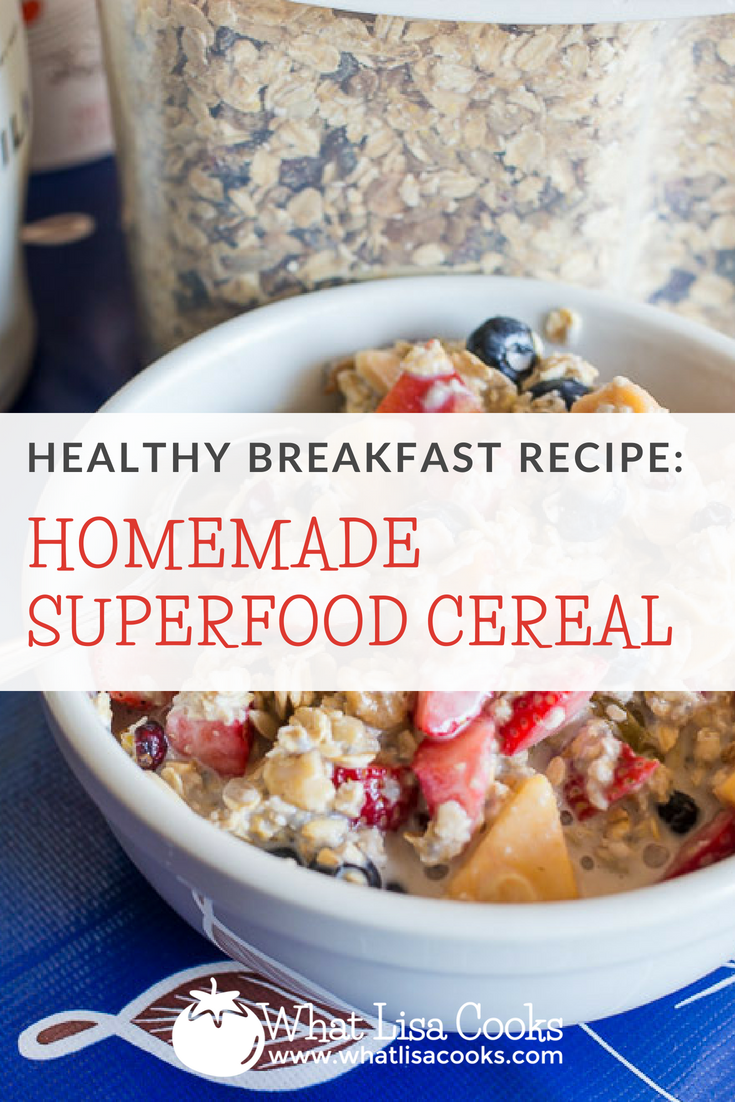
Homemade superfood breakfast cereal
Quick and easy recipe for a homemade superfood breakfast cereal to get your day off to an amazing start.
Do you need a boost of healthy energy in the morning?
A way to get your day going with a super healthy start? This is what I've been having for breakfast every day and I am loving it.
This is my quick and easy recipe for a homemade superfood breakfast cereal.

I was buying some pre-made superfood cereals, until I read the ingredients and realized it was all things I had in my pantry and I could throw it together myself for a LOT less than I was paying to buy it already made for me.
As with most of what I make and share - this "recipe" is more of a guideline. This will give you a basic framework for a healthy cereal to get your morning off to a great start.

You are basically just combining rolled oats with a variety of nuts, seeds, and dried fruits.
For mine I try to shop at Trader Joe's - they have a great selection of nuts, seeds, and dried fruits, and they have a good rice on organic oats. You could also grab your ingredients from the bulk foods section of your grocery store or natural market.
Ingredients:
Rolled oats: NOT steel cut, and not quick cooking. Just old fashioned rolled oats. 1 regular size container - probably about a pound.
Nuts: I like a combination of sliced almonds and chopped walnuts. Use any kind you like, just make sure they are in bite sized pieces.
Seeds: Sunflower seeds, chia seeds, hemp seeds, flax seeds (or ground flax).
Dried fruits: raisins, blueberries, cherries...

A few notes about the ingredients:
Nuts: Don't buy salted ones. They are going to be way too salty for this kind of recipe. I personally prefer to buy roasted nuts, I find that I digest them better. But if you like raw then go for raw nuts. I like to buy the nuts that are already sliced or chopped. That makes it super easy to throw this together.
Seeds: I buy roasted unsalted sunflower seeds - again, my system handles the roasted ones better. But many folks prefer raw. In addition to the sunflower seeds, add whatever combination of other seeds you can get your hands on - chia, hemp, flax - there's no limit!
Fruits: Trader Joe's has a great bag of mixed dried fruit, so that's what I've been using. It's got raisins, cranberries, blueberries, and cherries - so it's everything I need and it's easy.
Feel free to add other stuff - ground flax is great, wheat germ if you're into that.

Quantities:
My personal preference is to have the mix be about half oats and half other stuff. Of the half "other stuff", I tend to go for about equal parts of fruit, nuts, and seeds - slightly more fruit & nuts vs. seeds.
The container I'm using is about 8 cups. So that breaks down to about:
4 cups rolled oats
1 1/2 cups dried fruits
1 1/2 cups chopped nuts
1 cup mixed seeds
Instructions:
Literally - dump it all in and mix together.
Store in an airtight container.
Serving:
My container comes with a 1 cup measuring scoop, so I use 1 cup as the serving. Add enough of your favorite milk to cover, and let sit for a few minutes to let the oats & fruit soften a bit. I use almond milk, but you can use any kind you like.
I top it with whatever fresh fruit I've got around - blueberries, strawberries, etc.

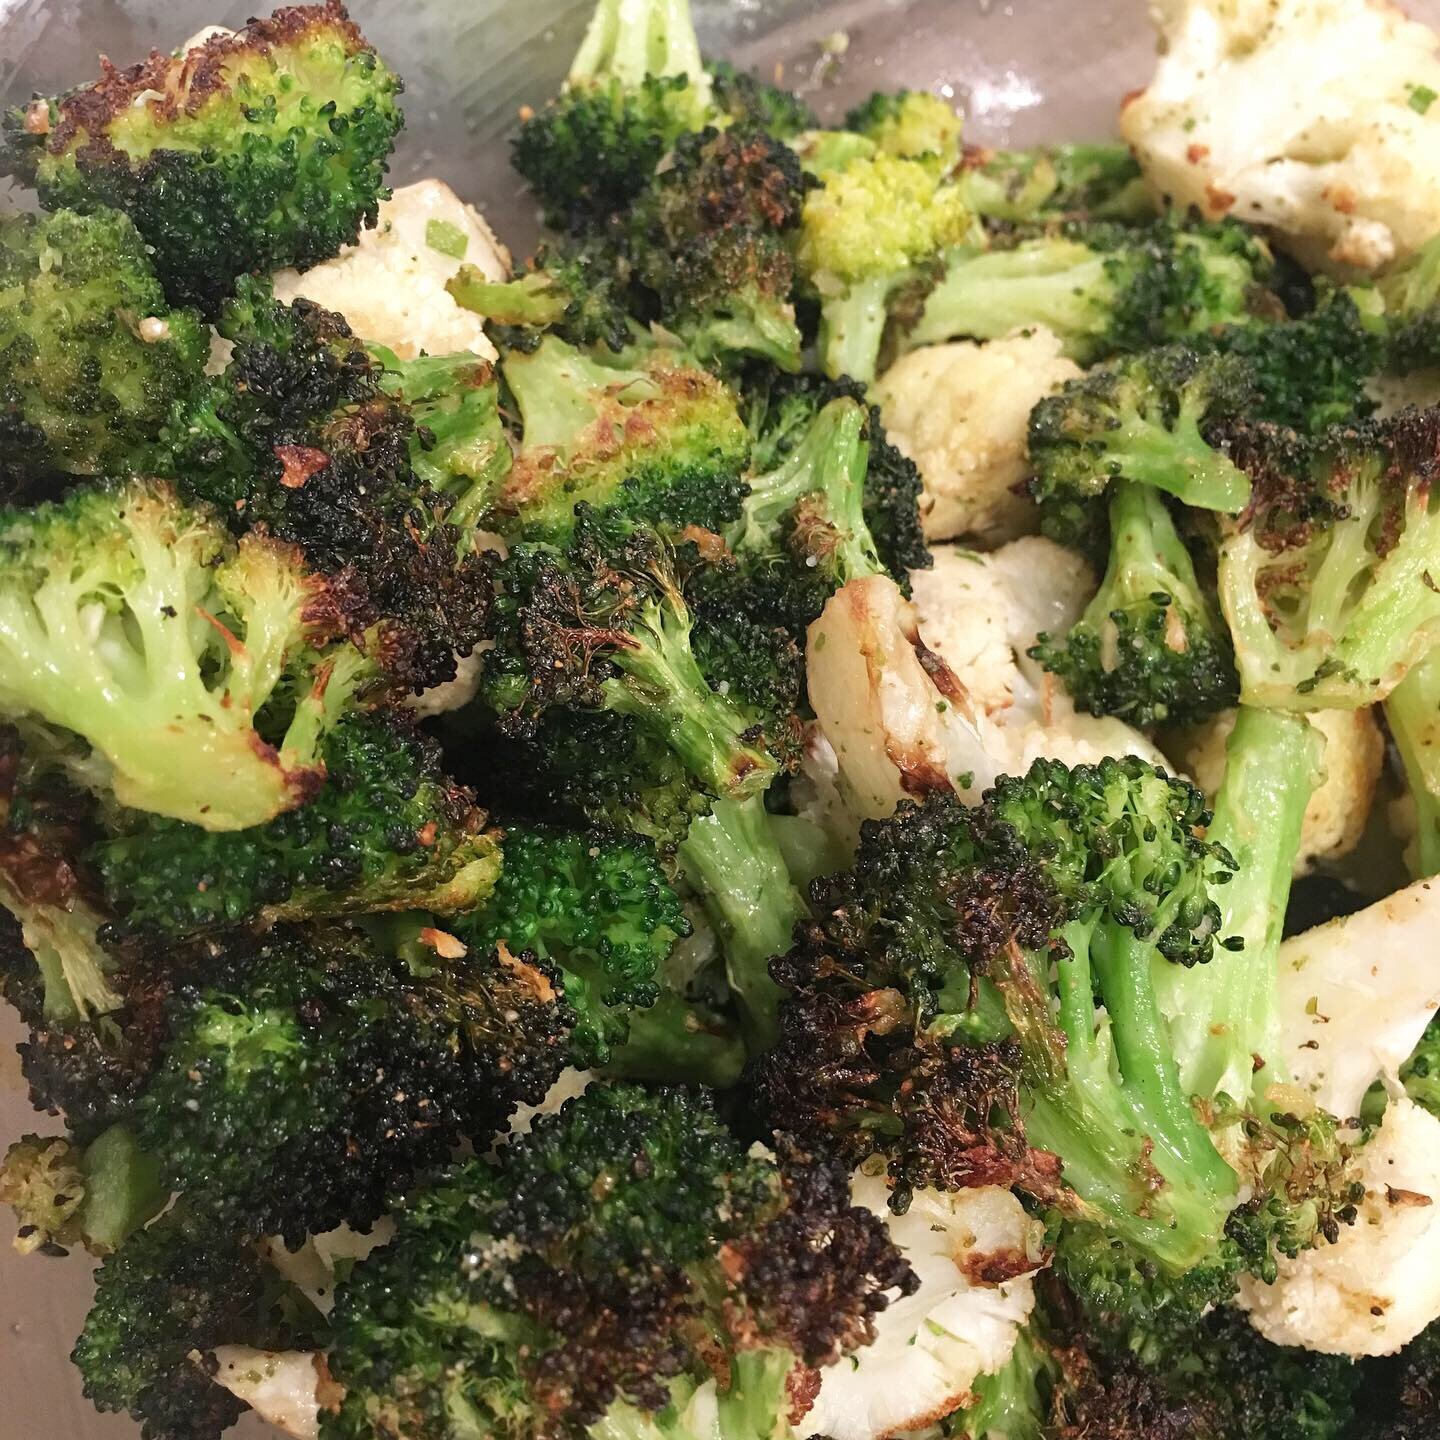
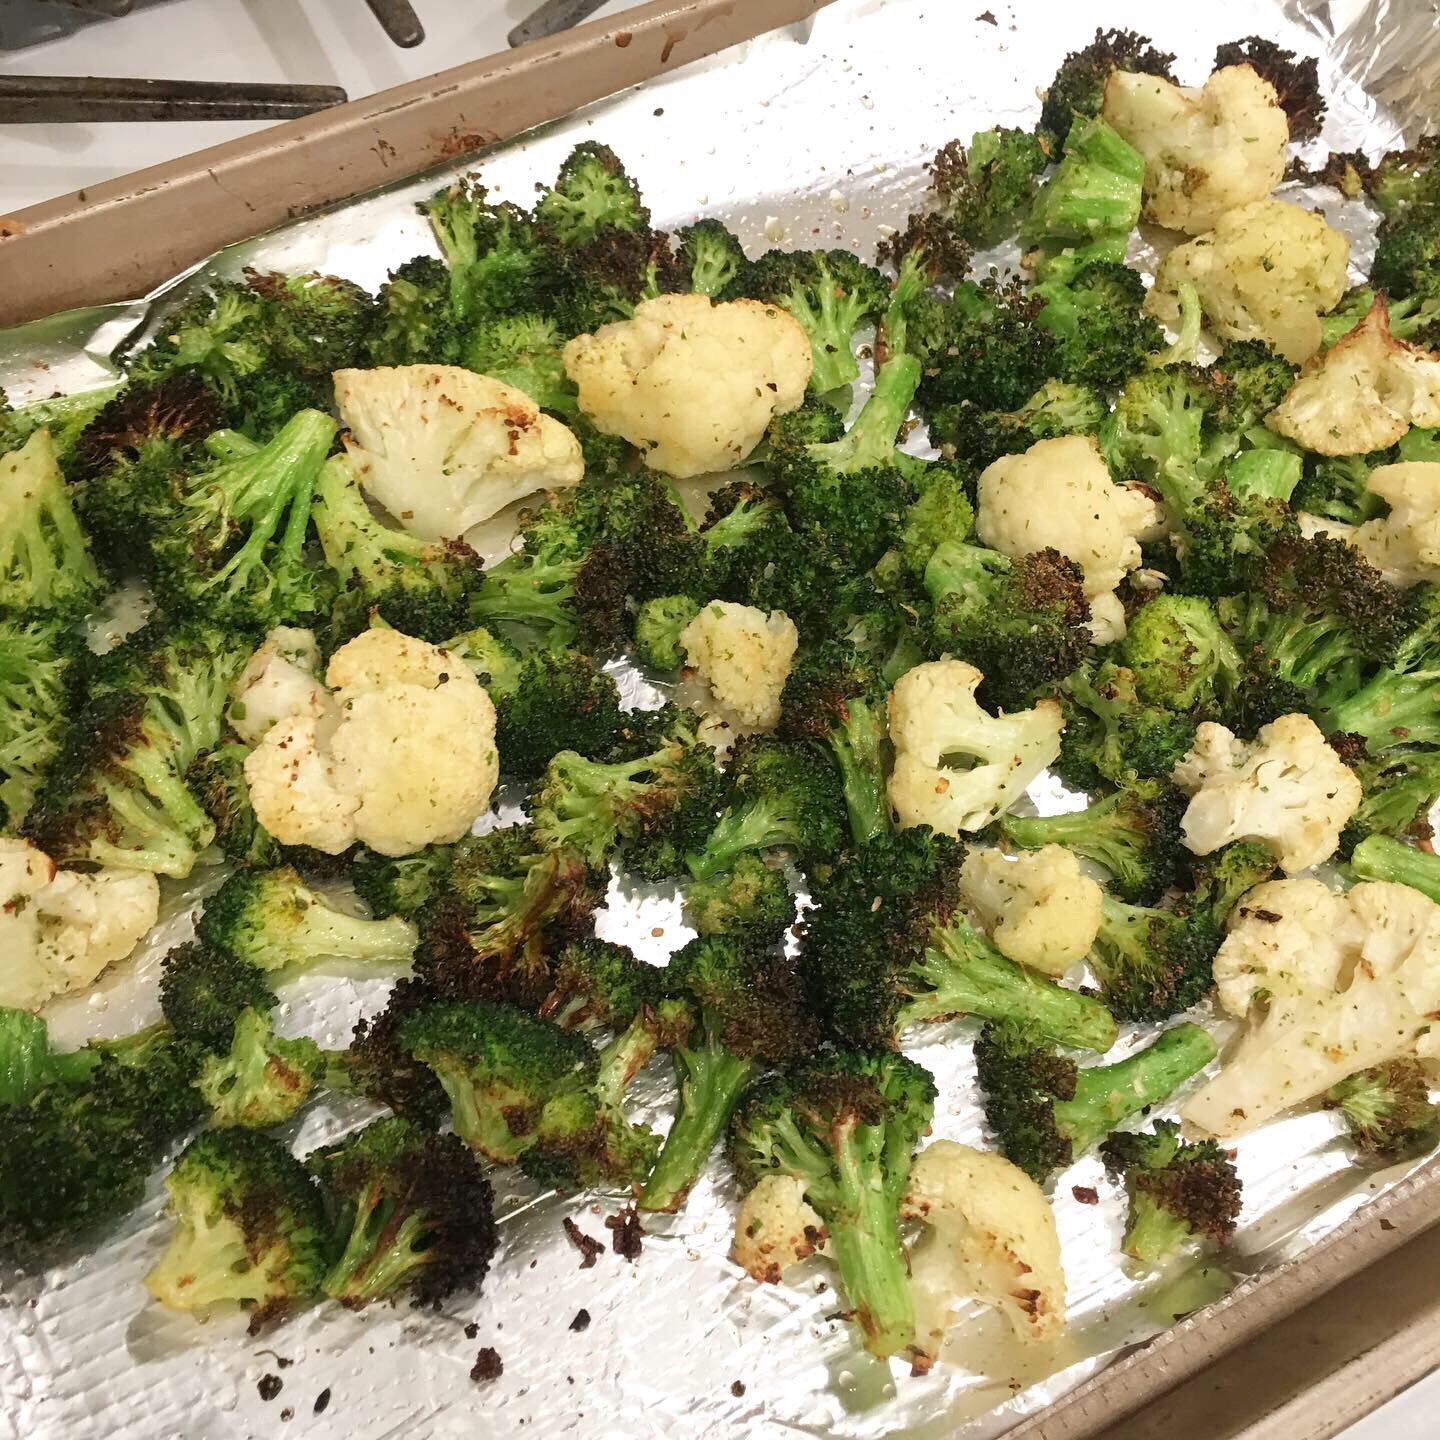
Roasted broccoli and cauliflower
My favorite way to cook broccoli and cauliflower.
Just a super quick post to share with you my absolute favorite way to cook broccoli and/or cauliflower: roasted until it’s just a little blackened.
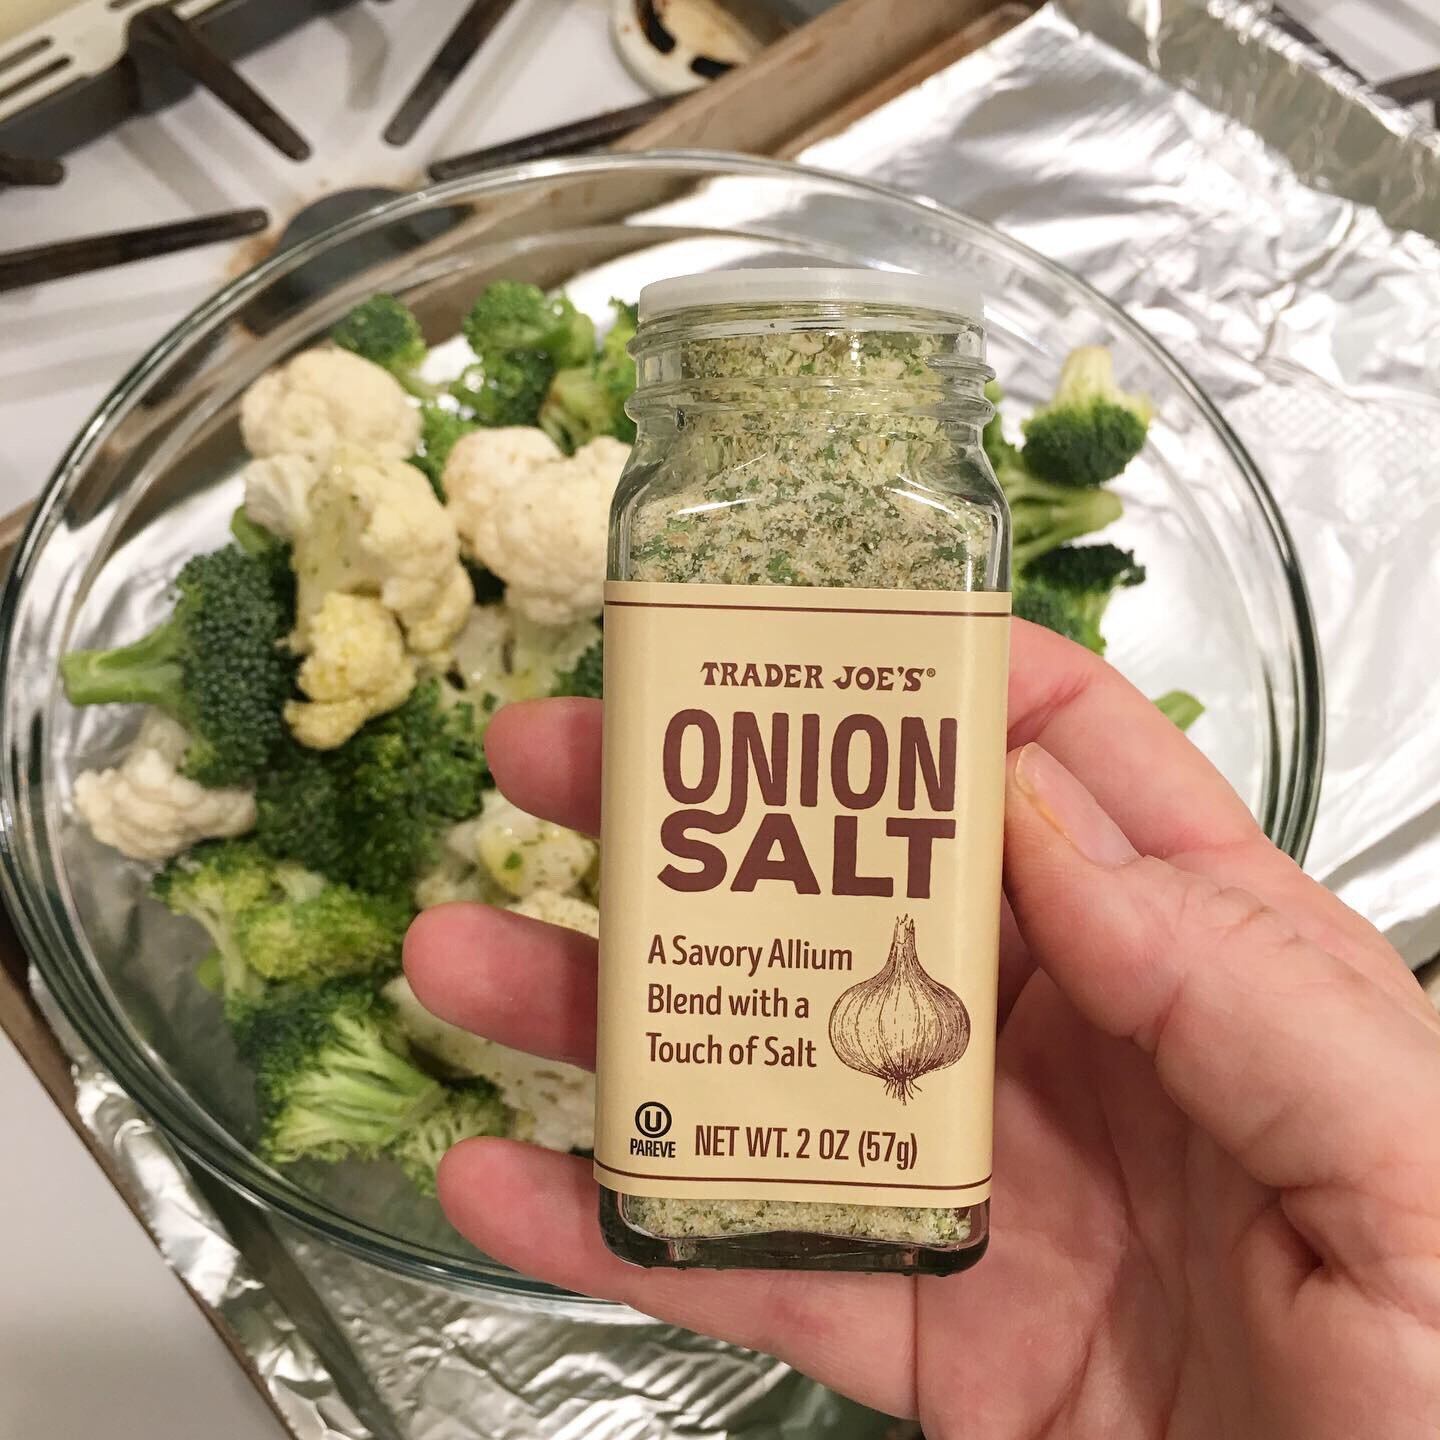
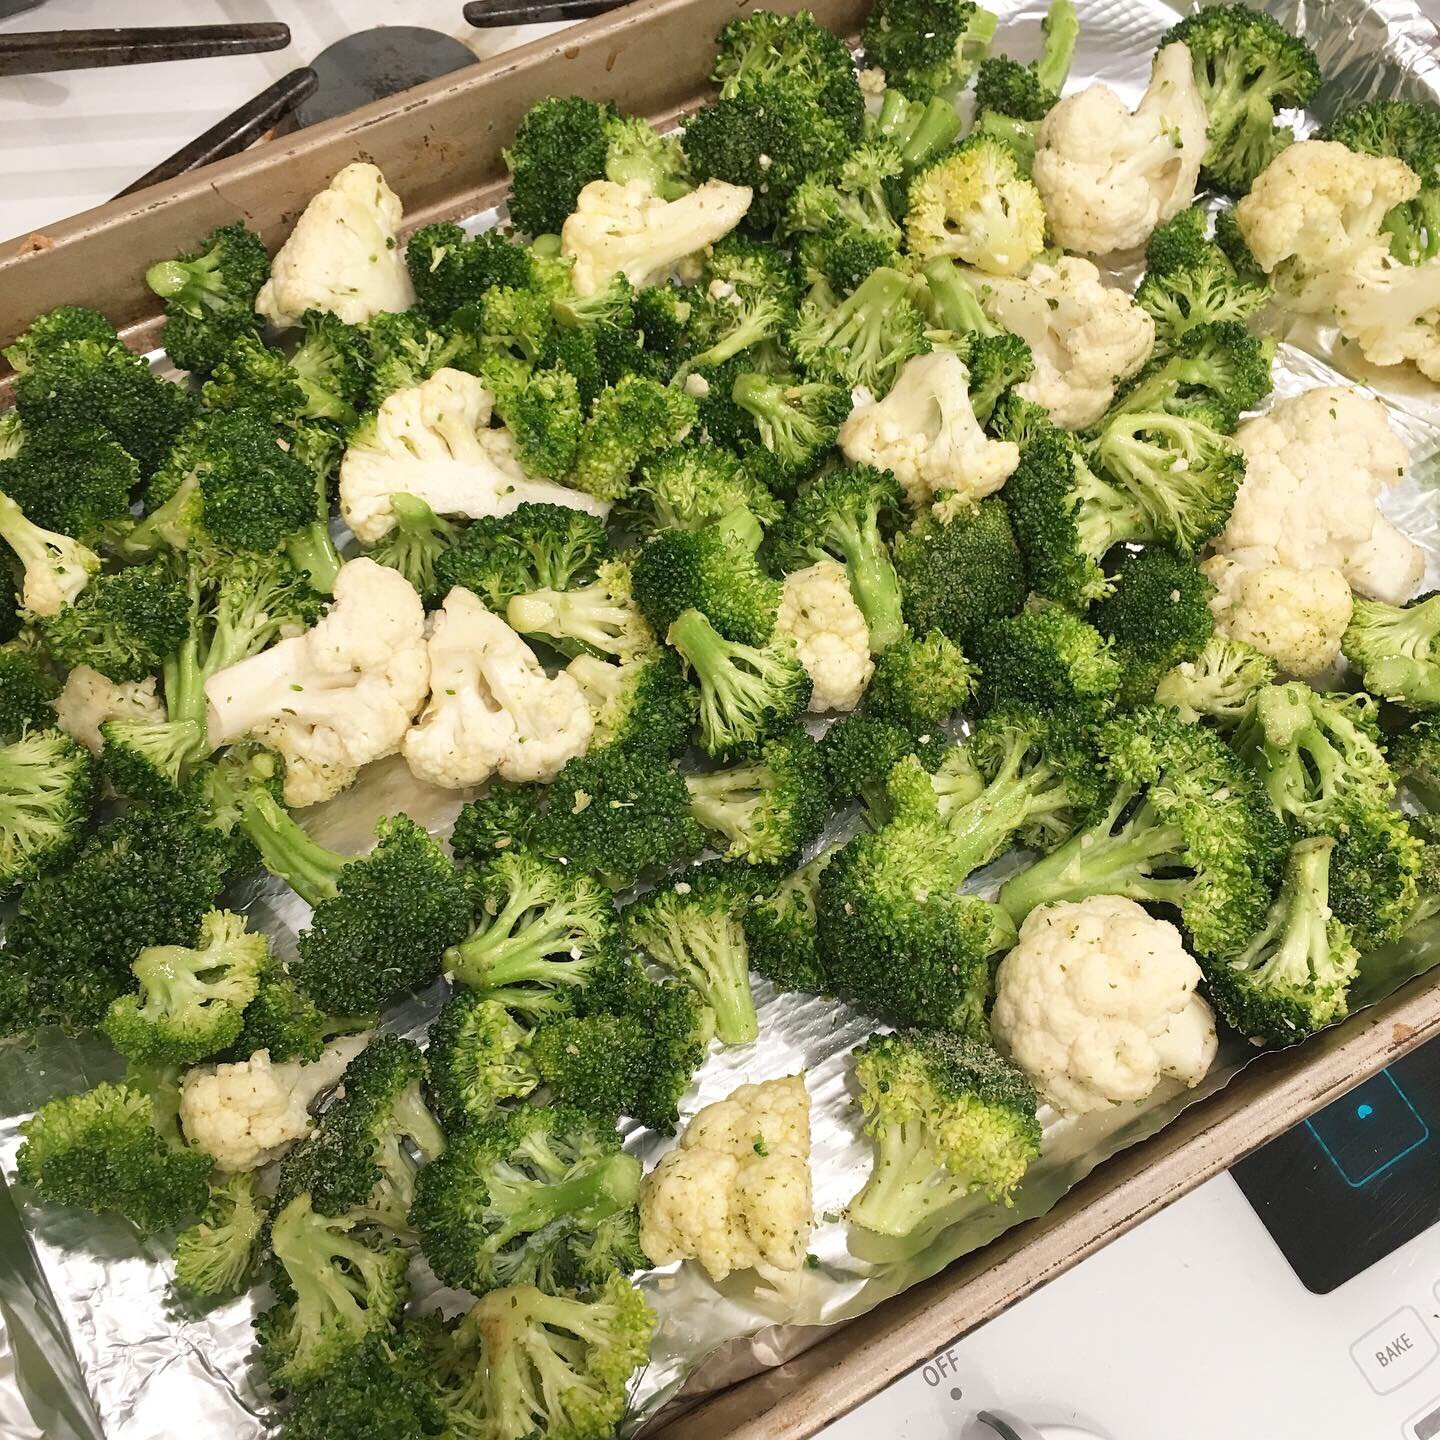
I toss with lots of olive oil, salt & seasoning. Today was this onion salt from Trader Joe’s, sometimes I do salt + curry powder, or salt + za’atar.
Then a 400 degree oven for 10 minutes, a quick stir, and 5 more minutes. It’s perfect when it’s getting a little crispy and charred around the edges, but the thick stems are still crunchy. I could honestly eat this entire tray myself, I love it that much.
Ravioli Lasagna Recipe
Ravioli Lasagna recipe - an easy and delicious family dinner recipe.

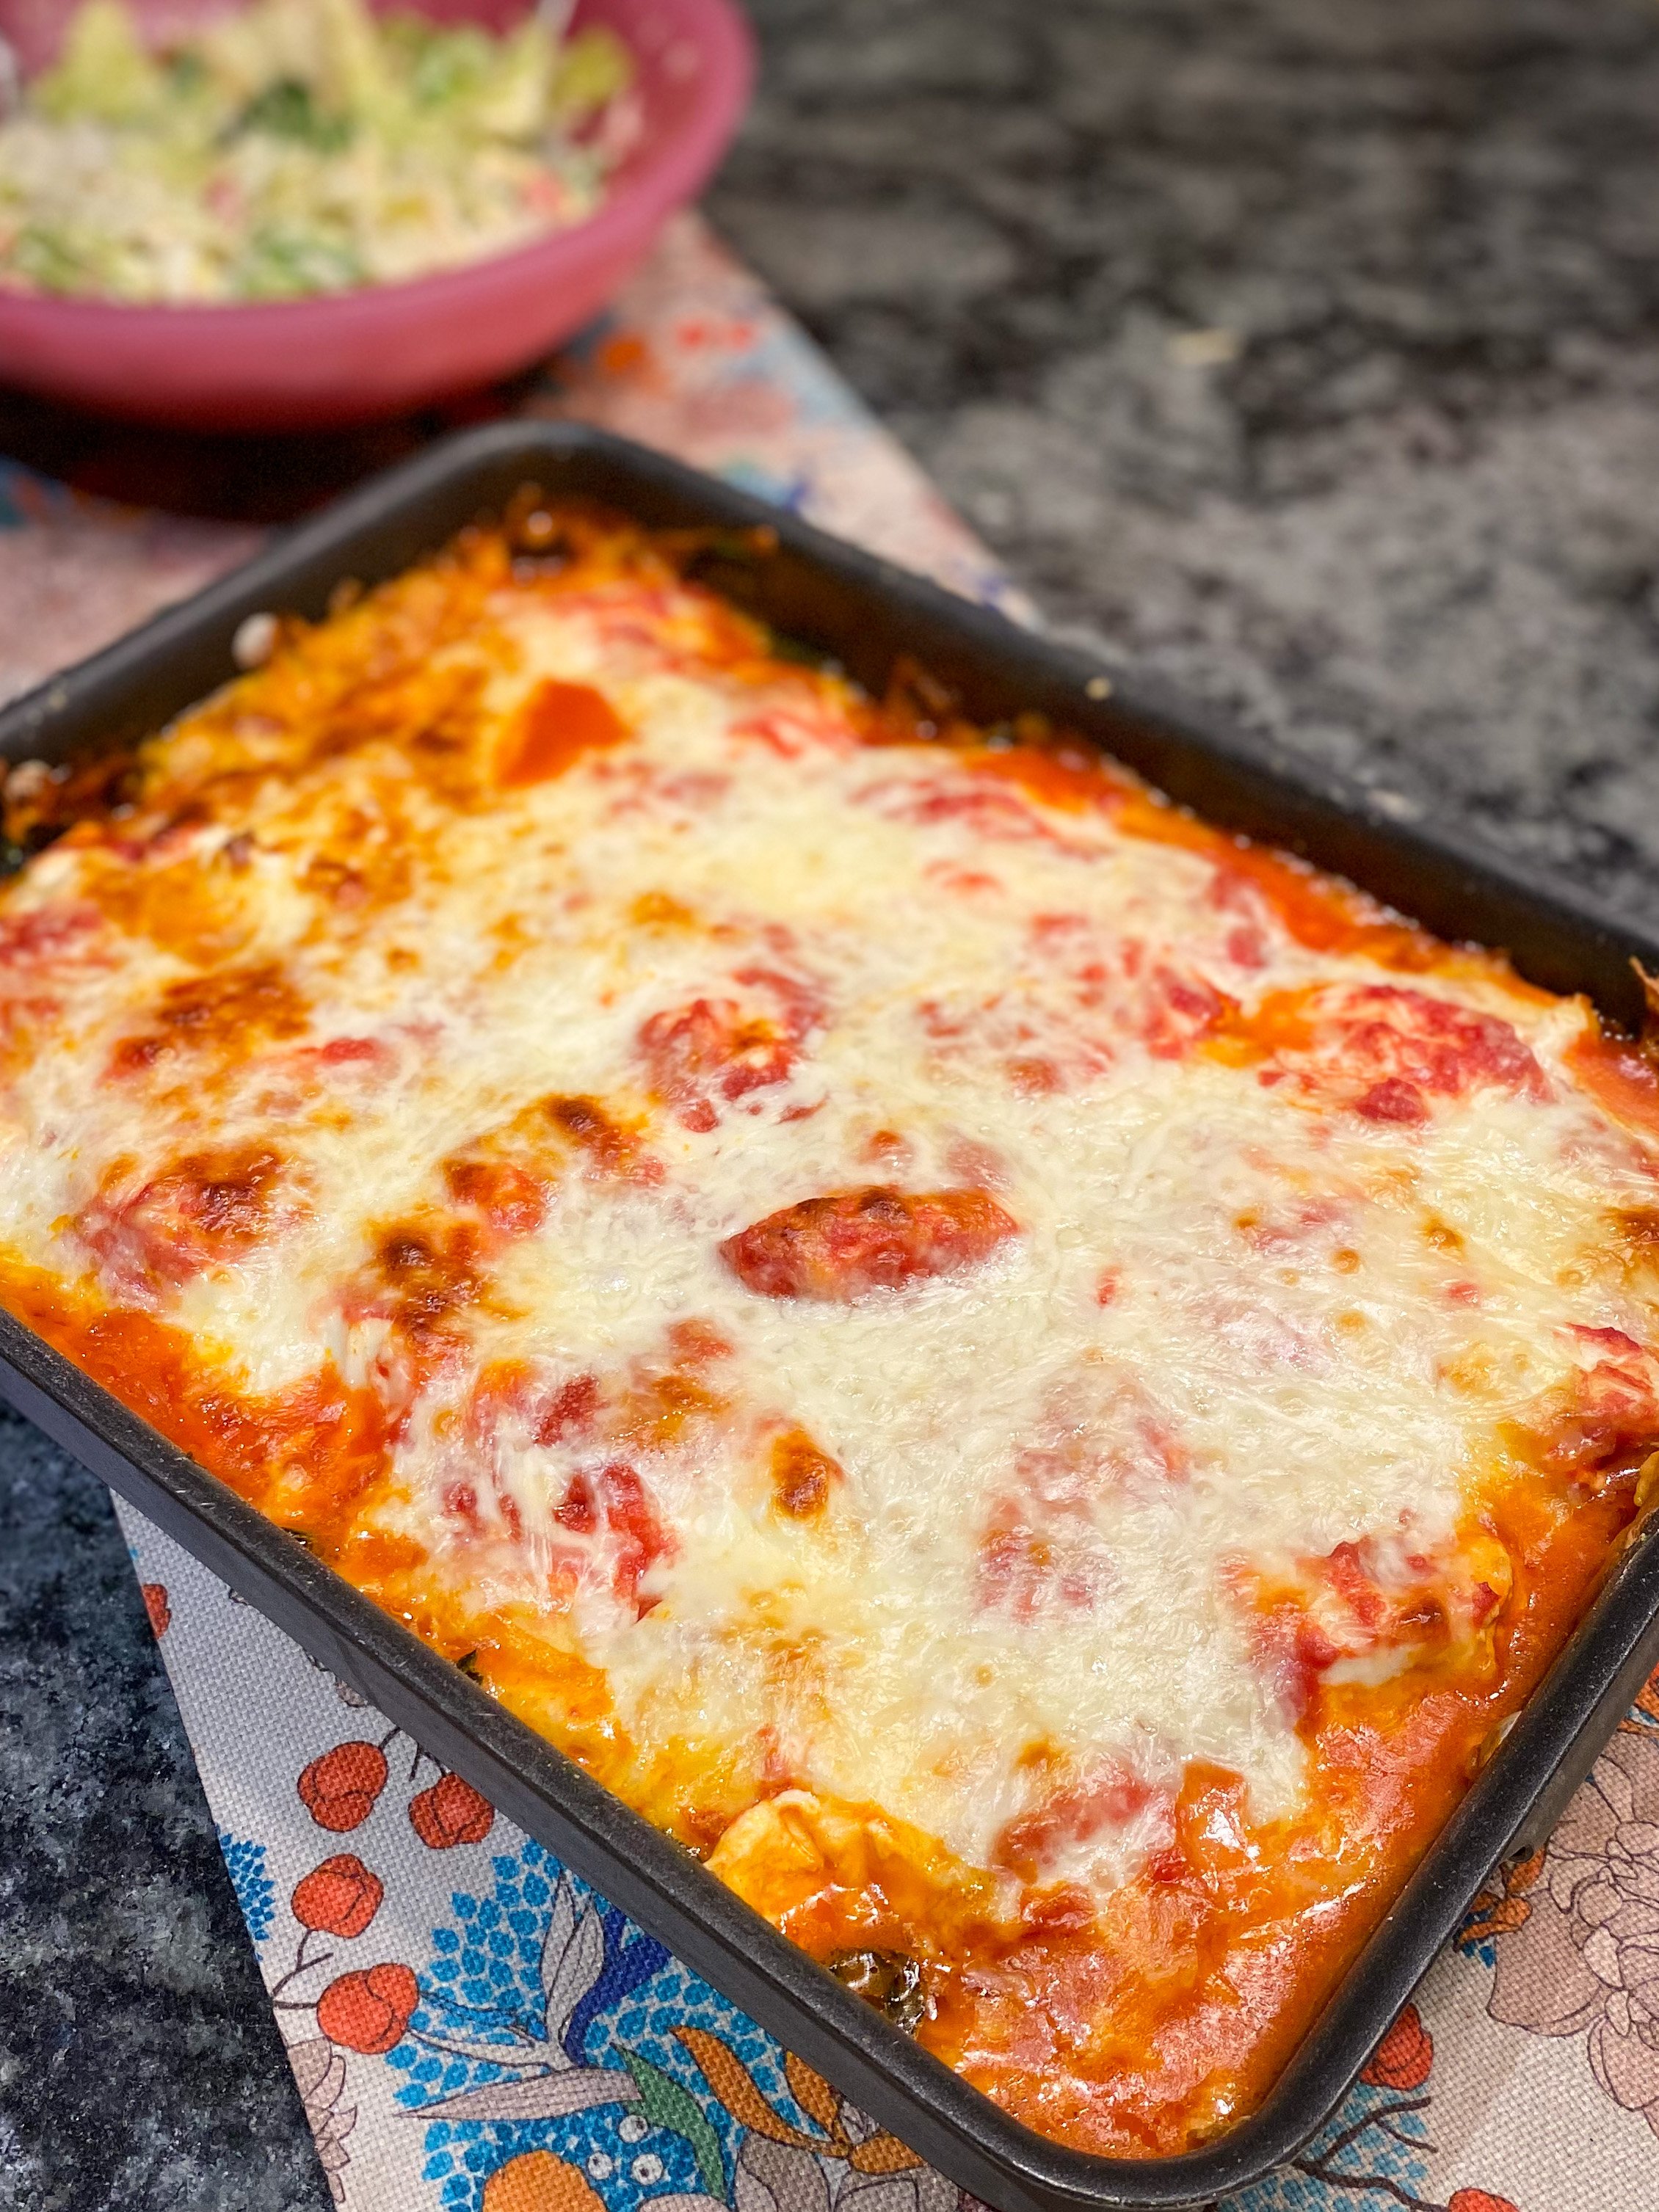
We have a new family favorite dinner. This ravioli lasagna recipe is so easy and sure to please a crowd.
When we were in the process of moving last year we were in a state of limbo for several months. We had to have a lot of work done on our old house before we could sell it, so after the months of packing and moving out of our house, we then lived in an AirBnB for two months while the house was remodeled before we could list it.
With all the chaos and upheaval I didn’t have the energy to do a lot of cooking from scratch. We were very close to a Costco so we basically lived off all the amazing pre-made dinners from Costco every night. They had so many options and we tried them all, but definitely found a few favorites - and their ravioli lasagna was one of our top favorites.
Now that we’re all settled in our new home and I’m back to cooking every night, I thought I could probably easily recreate that amazing ravioli lasagna recipe at home. And I was right. This is so easy to make and everyone loves it, and I’m sure this ravioli lasagna recipe is going to become a regular on our family meal plan.
You hardly need a recipe, but I’ve listed it out below for you anyway.
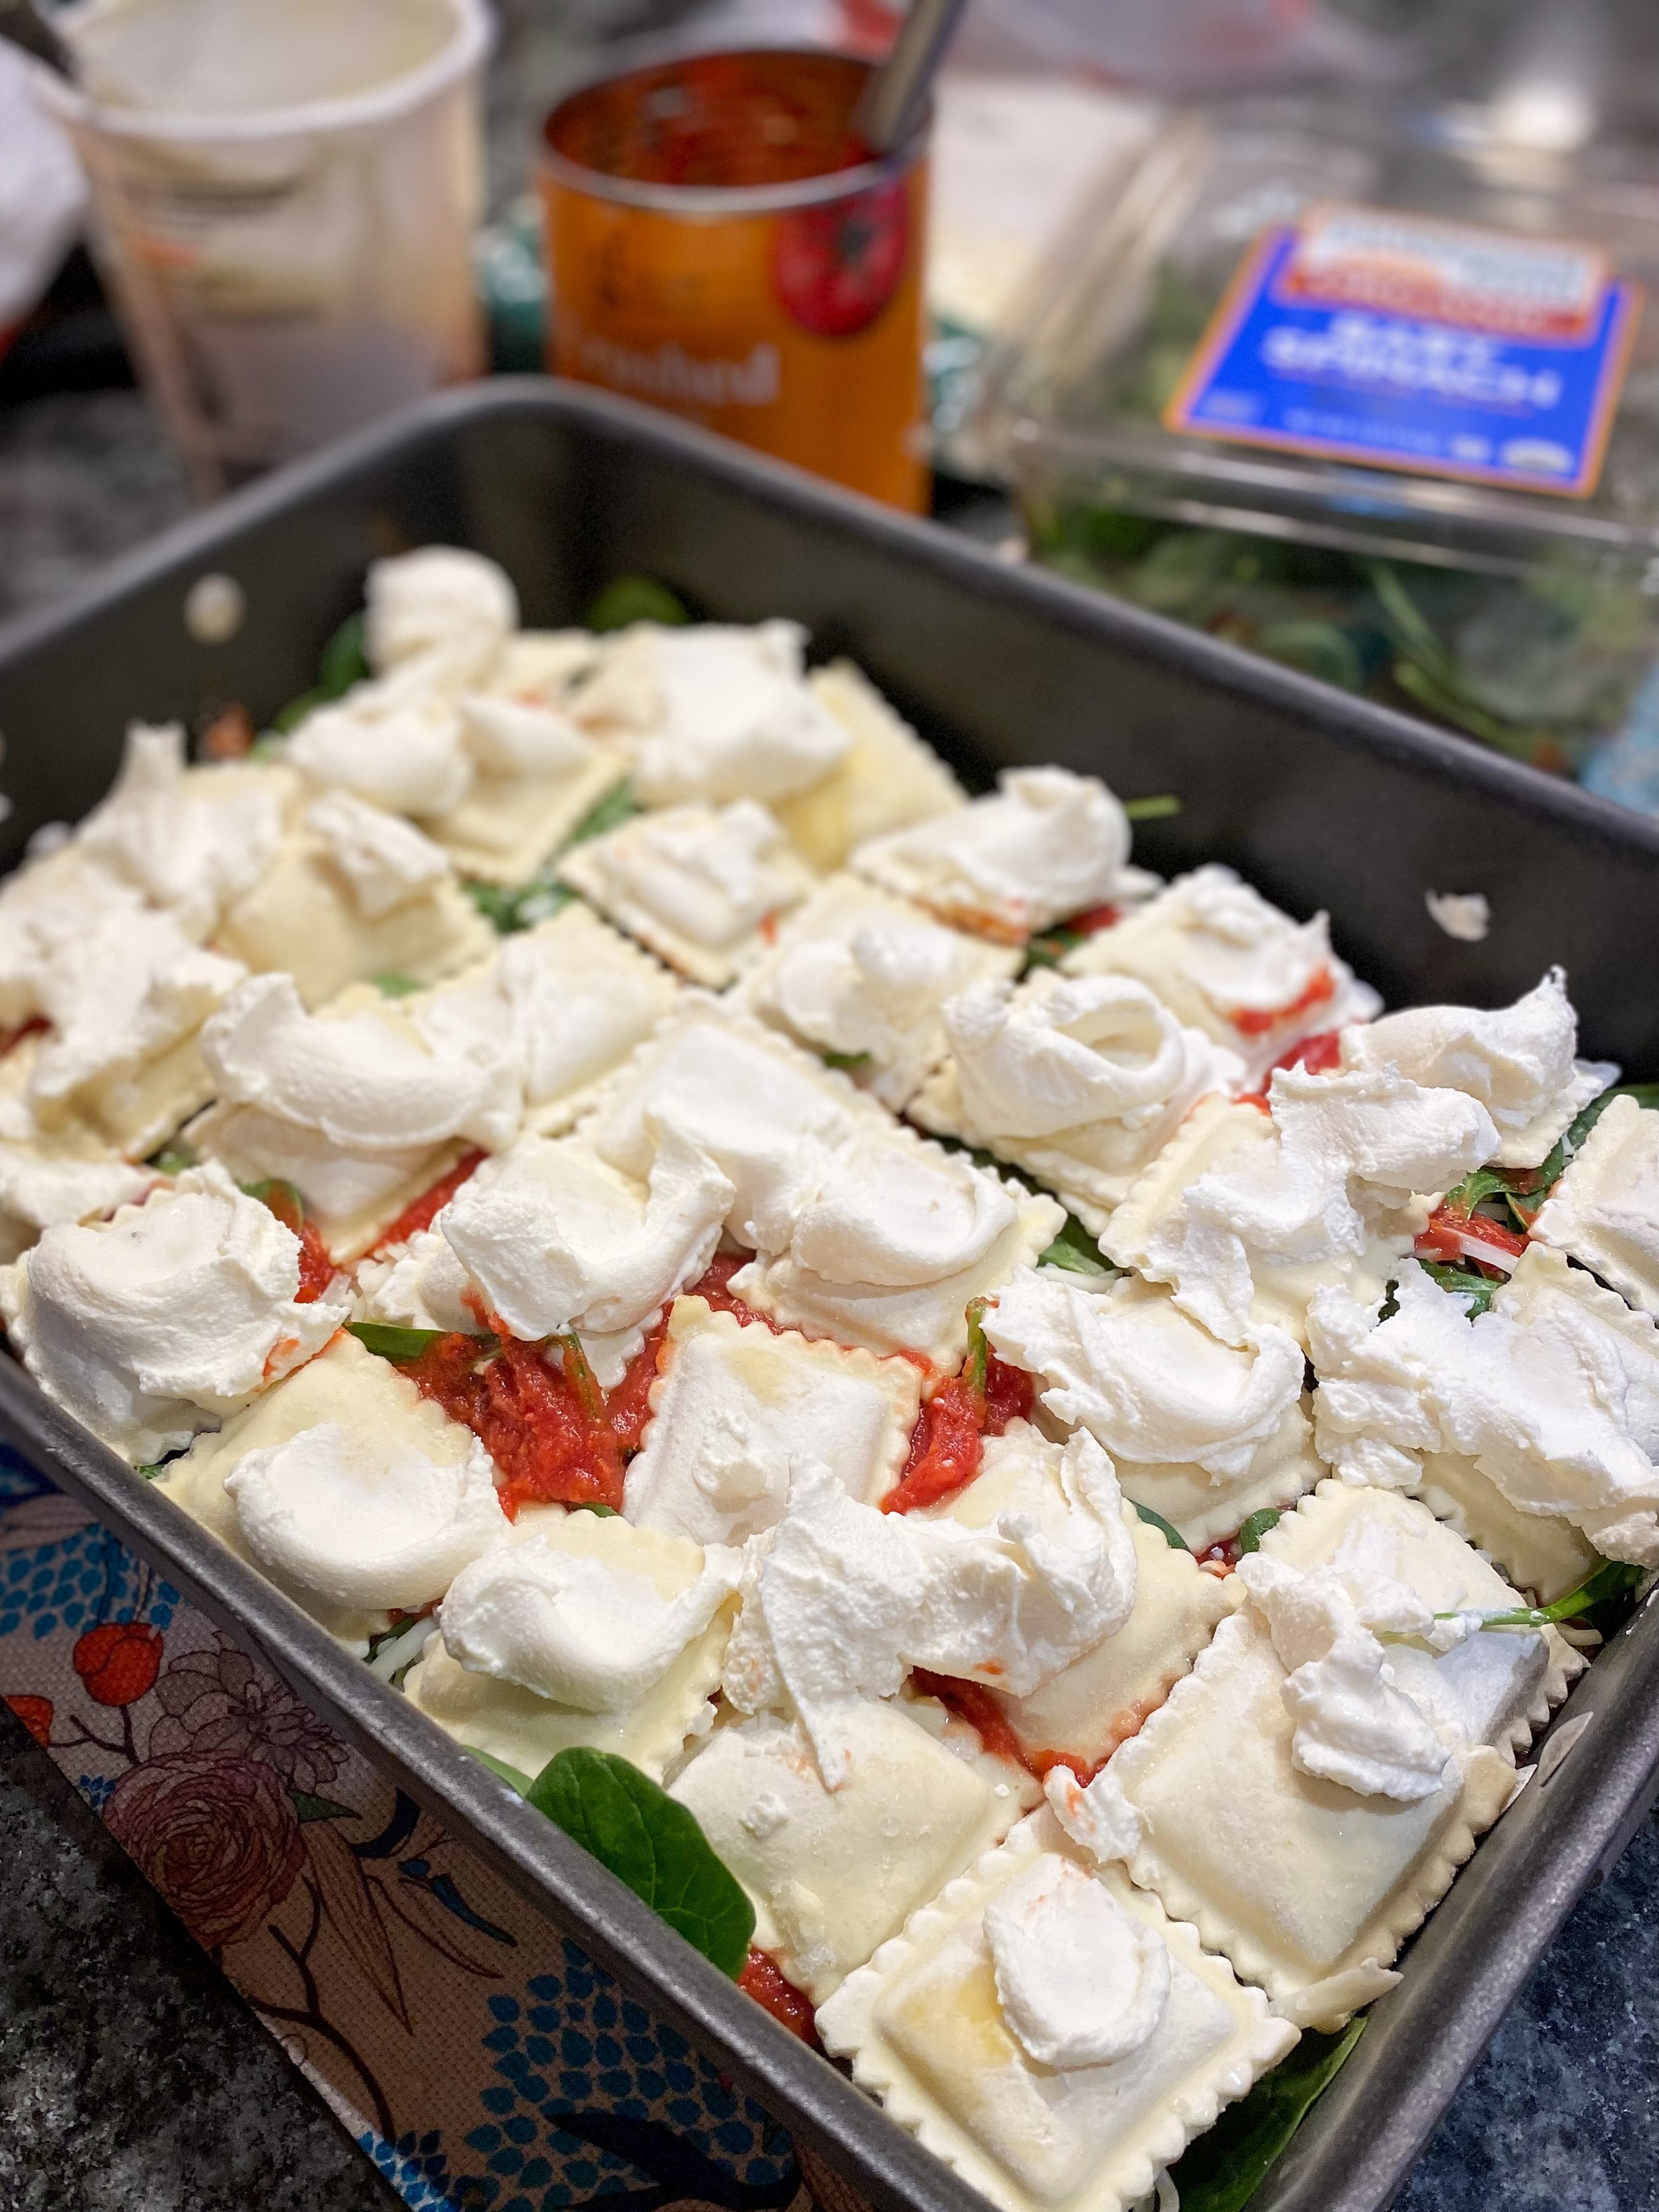
As with everything I make, this will be super flexible and you can basically add anything to it you want. I kept this one vegetarian, mostly just to keep it simple. I added some fresh baby spinach to add a bit more nutrition and some green to the mix. You could certainly add some meat in here too if you like, some crumbled up sausage or browned ground beef. And you could use any kind of ravioli you like, I just went with the inexpensive store brand cheese ravioli because my kids love those.
Ravioli Lasagna Recipe

Two bags of frozen cheese ravioli
Two 28 oz cans of crushed tomatoes (or sauce of your choice)
One container of washed baby spinach
One 32 oz container of ricotta cheese
Several cups of shredded mozzarella cheese
Parmesan cheese
Seasoning as desired - a little salt and pepper, some dried herbs (I like thyme and rosemary), a drizzle of olive oil.
All you’re going to do is layer all these things in your pan. I use a big nonstick roasting pan for lasagna, because we like it thick with lots of layers. I always start with a bit of sauce on the bottom, just to keep things from sticking. And then just layer - pasta, cheeses, sauce, spinach, etc. - until your pan is full. One last layer of cheese on top and then cover it with foil and pop in the oven at 350 for about and hour and 15 minutes, and then take off the foil for another 15 minutes. About 90 minutes total should do it - you just want it all bubbly and melted and getting a bit brown on top.
A note about sauce: I’ve taken to using canned crushed tomatoes as my tomato “sauce” of choice in almost all things. They give you great tomato flavor without any added sugar or salt. I always try to keep several cans in my pantry. This is what I use on pizza also. Sometimes I season it with a little olive oil and salt and pepper, and a little ground thyme and rosemary. Sometimes I leave it plain if I’m in a hurry.


One-Pot Macaroni and Cheese
Easy homemade mac and cheese recipe that cooks in one pot in 15 minutes from start to finish.
Are you looking for an easy homemade mac and cheese recipe?
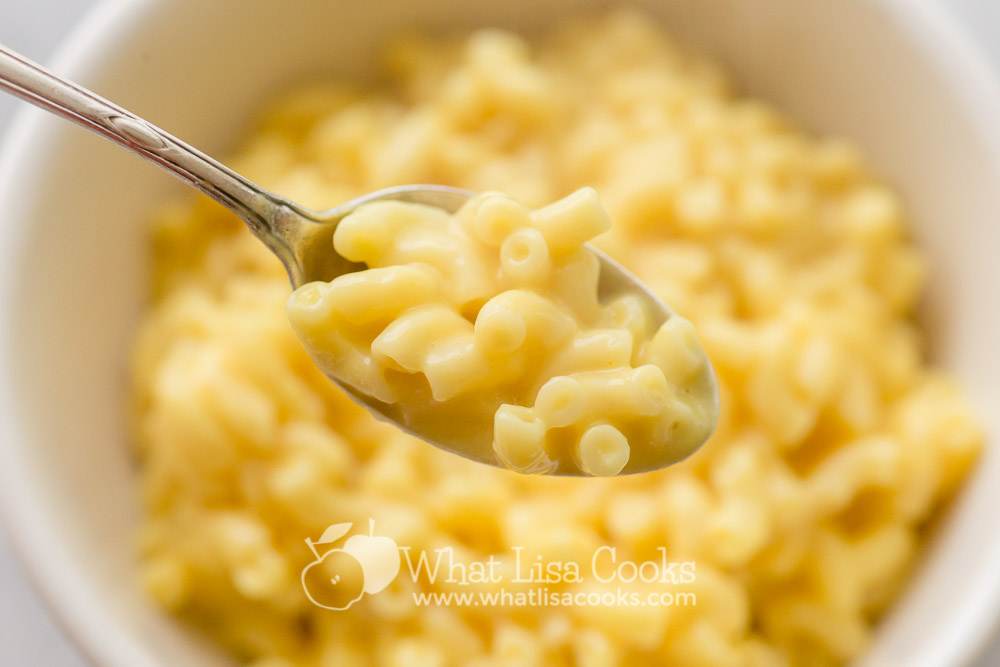
Below is my recipe for the best easy homemade mac and cheese you will ever make!

Not only is it delicious, but this Macaroni and Cheese Recipe also is FAST and EASY to make, and you make it in ONE POT!
Nobody wants to stand over a hot stove on a summer day - so this easy mac & cheese recipe comes together in 15 minutes!
I came up with this recipe when I was in a hurry for a kid dinner one night not too long ago, and it has been one of my favorites ever since.
This is the easiest homemade mac and cheese you will ever make!
It is just as good as Grandma's old fashioned recipe. Maybe even better, because you didn't slave over it.
It takes 15 minutes, about as long as it would take you to make one from a box!
Seriously, I timed it.
I had the whole thing done and the stove turned off exactly 15 minutes from the time I turned the burner on.

You've seen all those Pinterest posts about "one pot wonder" pasta dishes. Well this is like one of those. But it's homemade MACARONI AND CHEESE.
You might look at this and realize that it's similar to a lot of other homemade mac & cheese recipes. It is. The ingredients are basically the same. But the technique is different.

This is a one pot recipe. You don't drain the pasta!
This is comfort food - it is creamy and cheesy and fills your tummy, just like comfort food should. But unlike a lot of comfort foods that take hours to make, this takes only minutes. It almost sounds too good to be true, but it's not!

One Pot Macaroni and Cheese
Ingredients
Instructions
- Put macaroni, salt, 5 cups of water, and butter in a pot. Bring to a boil and then simmer, stirring frequently, until most of the water is absorbed (about 10-12 minutes). If the water is almost gone but you don't think the pasta is done enough, then add the rest of the water, 1/2 cup at a time. Thicker pasta is going to absorb more water.
- Meanwhile, mix the flour and spices into the cold milk.
- When the pasta is mostly cooked and the water mostly absorbed, add the milk mixture and stir until well combined.
- Then add the shredded cheese, and mix over low heat just until the cheese is melted and mixed in.
- Turn off heat, cover, and let sit for a few minutes to thicken.
Notes
- Use whatever kind of cheese you like - I think it's great with a combination of cheeses.
- If you really want this to look like the box stuff, get the small elbow macaroni. If that doesn't matter so much to you, then try other shapes - little shells are nice, or curly pasta - you just want something that is going to grab that cheesy sauce and hold onto it.
- If you really want it to taste more like the box stuff, then go ahead and use a little processed cheese. I've done it with American cheese and it tastes great! I just use the slices and tear it into pieces. I think a blend of a little American cheese plus a little sharp cheddar gets you a really nice flavor.
- The seasoning and spices are definitely flexible. I keep it mild because my kids are picky. But if you want more spice or kick to it, then go for it.
- It reheats great - just add a little more milk.


Game Day Chili
An easy ground beef mild chili recipe the whole family will love.
This isn’t your grown up chunky chili. This is my recipe for the kind of chili you would want on a hot dog at an amusement park. This is kid friendly chili, hot dog chili, the kind of chili that goes down smooth and feels like the meat has melted in your mouth. This is game day chili. Rainy day chili. Snow day chili. This can be mild chili or spicy chili. Top a steaming bowl of chili with a bit of shredded cheese and sour cream, and you’ve got the key to happiness. We’ve even done this in sourdough bread bowls and it was amazing!
I made this recipe to be super kid friendly. My kids don’t like big chunks of meat, and they don’t like heat, but they do like flavor. If my picky kids love this chili - then I’ll bet yours will too.
A bonus for those of you following a low carb, keto, or grain free diet:
I’ve made a variation of this for you! Scroll all the way to the end to read the instructions for a Low Carb / Keto / Grain Free Chili. I’ve made this recipe both ways many times now, and honestly I can’t tell you which I prefer. My kids like the regular way, it’s got a bit more of a gravy/saucy consistency to it. But the low carb version is more meaty. So you decide!

I’ve played around with chili recipes for years. Many years ago when it was just the two of us, I would make a chunky chili - one with cubes of meat that simmered until they were almost falling apart, but still felt like a mouthful of meat. I still do love that style, but for a family friendly recipe I wanted to come up with something that was more like kind of old fashioned ground beef chili that you might get on a ballpark or fast food chili dog - but with better ingredients and made at home!
After trying a bunch of different variations - I think I’ve just about perfected it! This recipe comes together quick and easy - so easy that my 11 year old daughter now makes it herself from scratch. It is packed with wholesome healthy ingredients - nothing pre-processed, nothing artificial. This is the kind of recipe that you can throw together quickly and then let simmer away all day and make your house smell amazing. If I make this while my kids are at school they will notice immediately when they walk in the door - “what smells so good?”

This is the kind of chili you want to make on a rainy or snowy day. You could make this ahead and set out your slow cooker to simmer it all day while you head out for a day or skiing or playing in the snow, or after those rainy soccer saturdays.

As with all of my recipes - this one is super flexible. Feel free to make it your own by adjusting the amount of spice. My mother now makes this all the time and she likes to add a can of beans to hers at the end. If you like beans in your chili - go for it!
Below is the recipe. There are a few secret tips here that make this amazing - a lot of it is about the texture, you want your veggies to be diced very fine, so they just melt into the flavor. I use a food processor for mine, it really pulverizes everything and gets it into tiny bits.
If you really want your meat to also be in very small bits and almost melt in your mouth - add a bit of water as you are browning it. That will help if cook more evenly and makes it easier for you to really mash it around and break it apart with your spoon.
Most of the time I double this recipe. It is awesome for feeding a crowd, and it freezes great.
BONUS Keto / Low Carb Chili:
Make a low carb version by following the variation I included after the recipe card below.
How to control the spice level:
This spice here comes from the chili powder. You can really control how spicy the chili is based on the type and quantity of chili powder you use. If you get an ordinary grocery store brand of chili powder that’s not very spicy, then you can add more. If you buy a more authentic Mexican style chili powder that’s more spicy you might want to add less. I suggest you start with less, unless you know you want it spicy. Get it all mixed together and then taste and see what you think.

Game Day Chili
The kind of chili that's meant for rainy sports days in front of the TV, or piling on hot dogs - a smoother texture, not too spicy.
ingredients:
- 2 pounds ground beef
- 1 large onion
- 2 red bell peppers
- 3 cloves garlic
- 2 stalks celery
- 3 tablespoons chili powder
- 3 tablespoons cumin
- 1 tablespoon garlic powder
- 1 tablespoon onion powder
- 2 teaspoons salt
- 1 (6oz) can tomato paste
- 1 (12 oz) can tomato sauce
- 2 cups beef broth
- 1/4 cup flour
- 2 tablespoons yellow mustard
- 2 tablespoons honey
instructions:
- Brown the ground beef (tip: add a bit of water for faster browning and softer texture)
- Finely chop or dice veggies (use food processor or a mini chopper)
- Add chopped veggies to browned meat and cook until soft
- Add spices and mix well
- Combine tomato sauce, tomato paste, beef broth, and flour in a separate bowl, mix well so there are no lumps
- Add liquid mixture to pot
- Add mustard & honey
- Stir well to make sure everything is combined
- Simmer on low for several hours, stirring occasionally, or slow cook on low 4-6 hours
NOTES:
Don't feel tied to these ingredient quantities! As with all of my recipes, these ingredients are flexible. Feel free to add more or less spices, more or less meat. Add in other finely diced veggies if you want to sneak veggies in! If you want to add a little kick to it, use a dash or more of cayenne pepper. Enjoy! ~ Lisa
Low Carb (Keto, Gluten free, grain free) Variation Instructions:
Leave out the honey, tomato sauce, and flour.
Cut the beef broth quantity at least in half - just add a bit of broth as needed to get to your desired consistency.
Basic Bread and Pizza Dough Recipe
Every time I share our homemade bread pizza on social media I get asked for my dough recipe and I realized that after all these years I’ve never shared it - so it’s about time I got around to writing a blog post for you with my basic easy pizza and bread dough recipe. Keep reading for my recipe and lots of baking notes.

I think there’s a big myth in baking.
We’ve all been sold this idea that we must have extremely precise measurements and use very specific techniques or our recipes just won’t work out to be edible.
I’m here to tell you that this is a giant lie.
It’s just not true. The more I cook the more I realize that just about every recipe I’ve ever come across is actually quite forgiving. So you add a little too much flour, or not quite as much yeast, or slightly less sugar - that doesn’t mean your recipe is going to automatically fail. It might not be picture perfect, but it will still be good enough for a weeknight dinner and you will have learned a lot in the process. I’m sure there are very fussy and fancy French pastry recipes out there that require the exact to the gram amount of the exact perfect kind of milled flour and high fat butter, but honestly very few of us are cooking that kind of stuff. I promise you that probably 95% of the recipes you will come across in your everyday home cooking are really quite forgiving and flexible - and this kind of dough recipe certainly fits in that category.

This is a super simple recipe. It’s very flexible and not at all fussy, and really quick to throw together. I’ve evolved this recipe & method a lot over the years, and learned in the process that making this kind of dough is considerably easier and less precise than most recipes and cookbooks would have you believe.
I actually don’t even usually measure when I make this any more, I just eyeball it and add a bit more water or flour if it seems off. But I’ve measured out the basic ingredients for you so you have an easy starting point. Just remember that this can just be used as a starting point and you can - and should - adapt recipes to suit your personal taste and style. That’s what cooking is all about!
You don’t need fancy tools for this. I used to make dough in the food processor and mixer, but over the years I realized that doing it by hand is just as easy and really just as fast, and you end up with less stuff to wash. I can mix this dough up in a big bowl in less time that it would take me to get out my mixer or food processor, assemble it, mix the dough, put it in another bowl to rise, and then clean the appliance and put it away. Sometimes the old fashioned way is just the best.
The tools I use are a very large wide bowl (like a large wide pasta bowl), and a dough whisk. With this kind of bowl you can do all your kneading, mixing, and rising right in the bowl. It’s really the minimal amount of mess. The dough whisk isn’t strictly necessary, you can just use a wooden spoon, but I find that it helps with the early mixing.
The recipe is below. It’s really quite simple once you’ve done it a few times, but be sure to read through the whole thing so you understand the steps. Also don’t skip the notes at the end - there’s a lot of my knowledge from having done this for many years. If you still have questions after all that, feel free to comment or message me on Facebook or Instagram - I’m not quite as timely with responding to comments here on the blog.
Lisa's Basic Bread & Pizza Dough:
4 cups flour, plus extra for kneading if necessary (see notes about type of flour)
2+ teaspoons active dry yeast
1 Tablespoon kosher salt
2 teaspoons sugar
1 1/2 cups lukewarm water
Instructions:
In a large wide bowl add the yeast, sugar, and warm water. Give this a quick stir to combine, and wait just a minute for your yeast to wake up. If you are sure that your yeast is fresh then you can skip this step, but I like to do it because I feel like it gives the dough a bit of a head start.
Add the flour and salt and give it a good stir to start it mixing together. Very quickly you will get to a point where it's no longer useful to stir and you will want to get in there with your hands. Get it together into a ball and start kneading.
You can knead by hand in your bowl. This is why I use a big wide bowl - I don’t even have to get my counter or another surface dirty for kneading. If you didn’t have a bowl wide enough to knead in, then you’ll want to put it out on a flat surface. If the dough still seems a bit too sticky, add more flour just a small handful at a time. You should be able to easily pick it up, folding and squeezing and pushing it together. After a few minutes of working it should start to feel smooth and tight. If you haven’t done a lot of kneading before, don’t worry about it. It’s a weird thing that just takes practice to get a feel for. You can probably find a few youtube videos if you really want to see how it’s done.
At this point I like to set it down and let it rest for a few minutes. Just leave it for 5 minutes or so while you clean up a little. Then come back to it and knead a bit more. It’s much easier to knead after a short rest.
Lay your nice round of dough down in your bowl and cover with plastic wrap to rise. You want it to at least double in size. I’ll say this takes about an hour on average, but rising time is going to really vary depending on your kitchen situation. If your room is very warm, it will rise faster. If it’s rising too fast you can stick it in the fridge to slow it down. Rising will take longer in a cold room. You can speed this up by turning on your oven and setting the bowl nearby.
After it’s risen to more than double, give it a good punch to deflate, and knead again for a couple of minutes
At this point you can decide if you are going for a full second rise or not. If you aren’t in a hurry, the extra rise will give it a bit nicer texture. But if you don’t have the time then you can absolutely go ahead and get it ready for how you are using it at this point.


For a loaf of sandwich bread:
Shape dough into an oblong blob and plop it into a lightly oiled loaf pan. You can also line the pan with parchment paper if you like.
Let it rise in the loaf pan, again until nearly doubled. I usually put just a little oil on top to keep it from drying out.
Once sufficiently risen, take a very sharp knife and cut a slit straight down the middle. Then spray the top with a bit or water or brush with melted butter, and I like to sprinkle a bit of coarse salt on top.
Bake in a 350 oven for one hour.

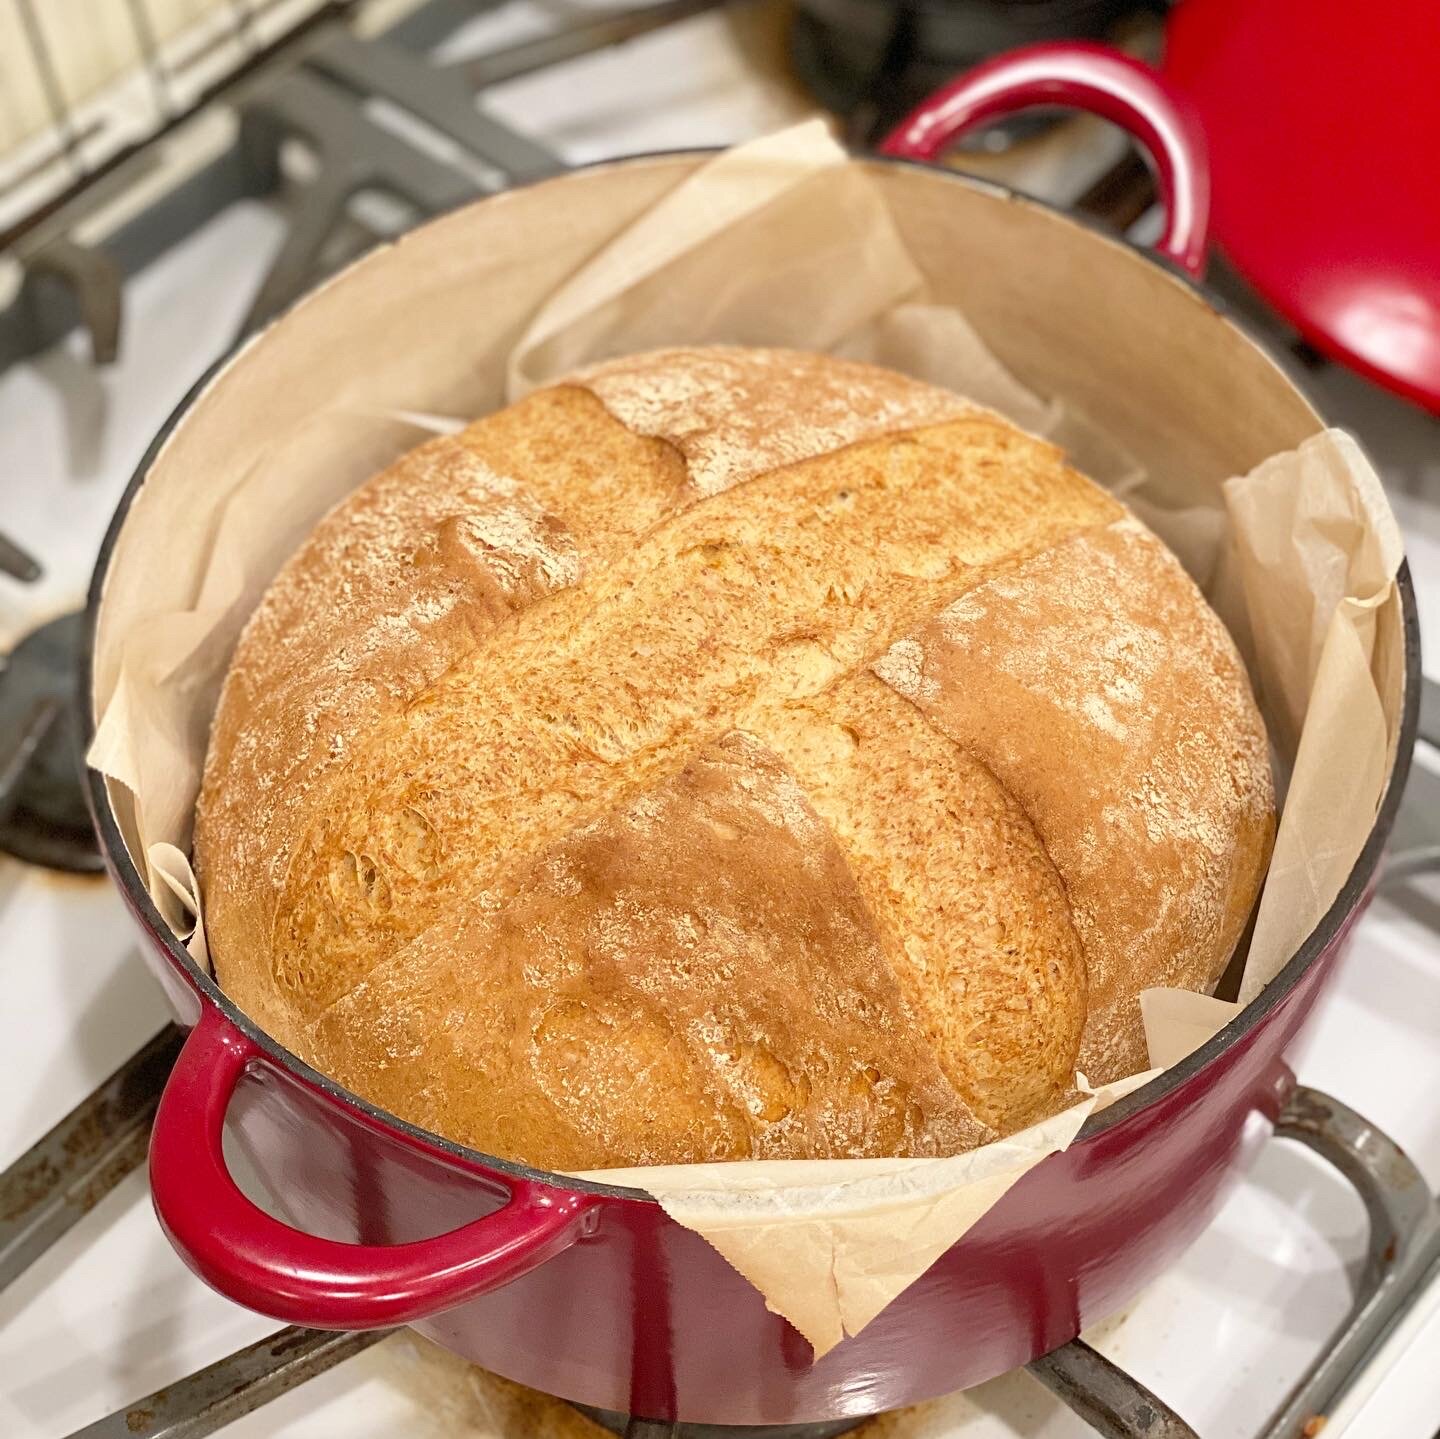
For a round loaf of crusty bread:
Shape into a nice round ball and set on a piece of parchment paper.
Put a large dutch oven in a preheated 450 degree oven to get hot.
When the dough has risen again use a sharp knife to cut slits across the top of the loaf.
Very carefully lift your risen loaf with the paper and set it into the heated dutch oven. Put on the lid and put it in the oven.
Bake for 45 minutes with the lid on, and remove lid to bake for 15 minutes more.
Carefully remove loaf from pan and allow to mostly cool before slicing.
For Pizza:
Divide dough into balls for pizza. If you want thick crust you can divide in half. We like our pizza with a very thin crust, so I divide this amount of dough into four balls.
Let the balls rest for a few minutes and then you can start rolling them out to your desired thickness and add toppings.
We bake our thin crust pizzas on parchment paper on a pizza stone in a 500 degree oven for 7-8 minutes.
Notes:
The flour can be any combination you like, but I recommend you start with white flour to get the hang of it. Bread flour will give you the best results, but all purpose flour works well too. After you’ve done it a few times and you’ve got the feel for the process, then experiment. Substitute in a bit of whole wheat flour, or add other flavorings or grains. For a simple sandwich loaf my typical combination is 2 cups white bread flour and 2 cups whole wheat flour. More wheat flour makes a denser loaf. More white flour makes it rise better and you get a lighter, more airy loaf.
If you want to make a whole wheat loaf, try adding a couple tablespoons of vital wheat gluten. Whole wheat flour has less gluten and won’t rise quite as well, so adding a bit back helps.
Salt is really a personal preference. We like ours salty. If you don’t want it salty, then use a little less than 1 tablespoon. You’ll also need to experiment with different types of salt. Some salts are more salty than others.
Less sugar is fine, but it will need more time to rise. The sugar just feeds the yeast.
Honey works too - and is nice with whole wheat - but you might not need all the water with a liquid sweetener. Try adding 1/4 cup of honey and reduce the water to 1 1/2 cups.
Cold water is fine, but it will also need more time to rise as it warms up. Using warm water helps kickstart the yeast.
Yes this works in a bread machine. I like to add 3 tablespoons of room temperature butter otherwise it sticks in my bread machine, and just use 3 1/2 cups of the flour.
I use this recipe for rolls also. Divide it into 12 little balls and let them rise on parchment. I like to brush them with a little butter on top and sprinkle a little salt. Bake for 30 minutes at 400.
Oven temperatures vary also - so it might take a few tries to find the right temp for your oven and for the size of bread you are baking.
Experiment with it! Try milk instead of water. Try adding a little oil or butter, add an egg. Try adding some herbs or cheese. Try juice or beer. The possibilities are endless, and the worst that can happen is you are out a few cups of flour and a couple teaspoons of yeast.

Enjoy!
Simple roasted tomato sauce
Theres nothing better than a fresh tomato sauce, and roasting the tomatoes first takes even that up a notch. Here is a very quick recipe for a simple tomato sauce with fresh roasted tomatoes. Fresh from the garden tomatoes of course are the best, but you can make this with store bought tomatoes as well and it will still taste amazing. Most commercial sauces have a lot of sugar in them, but roasting the tomatoes concentrates the flavor and natural sweetness so adding sugar isn't necessary.
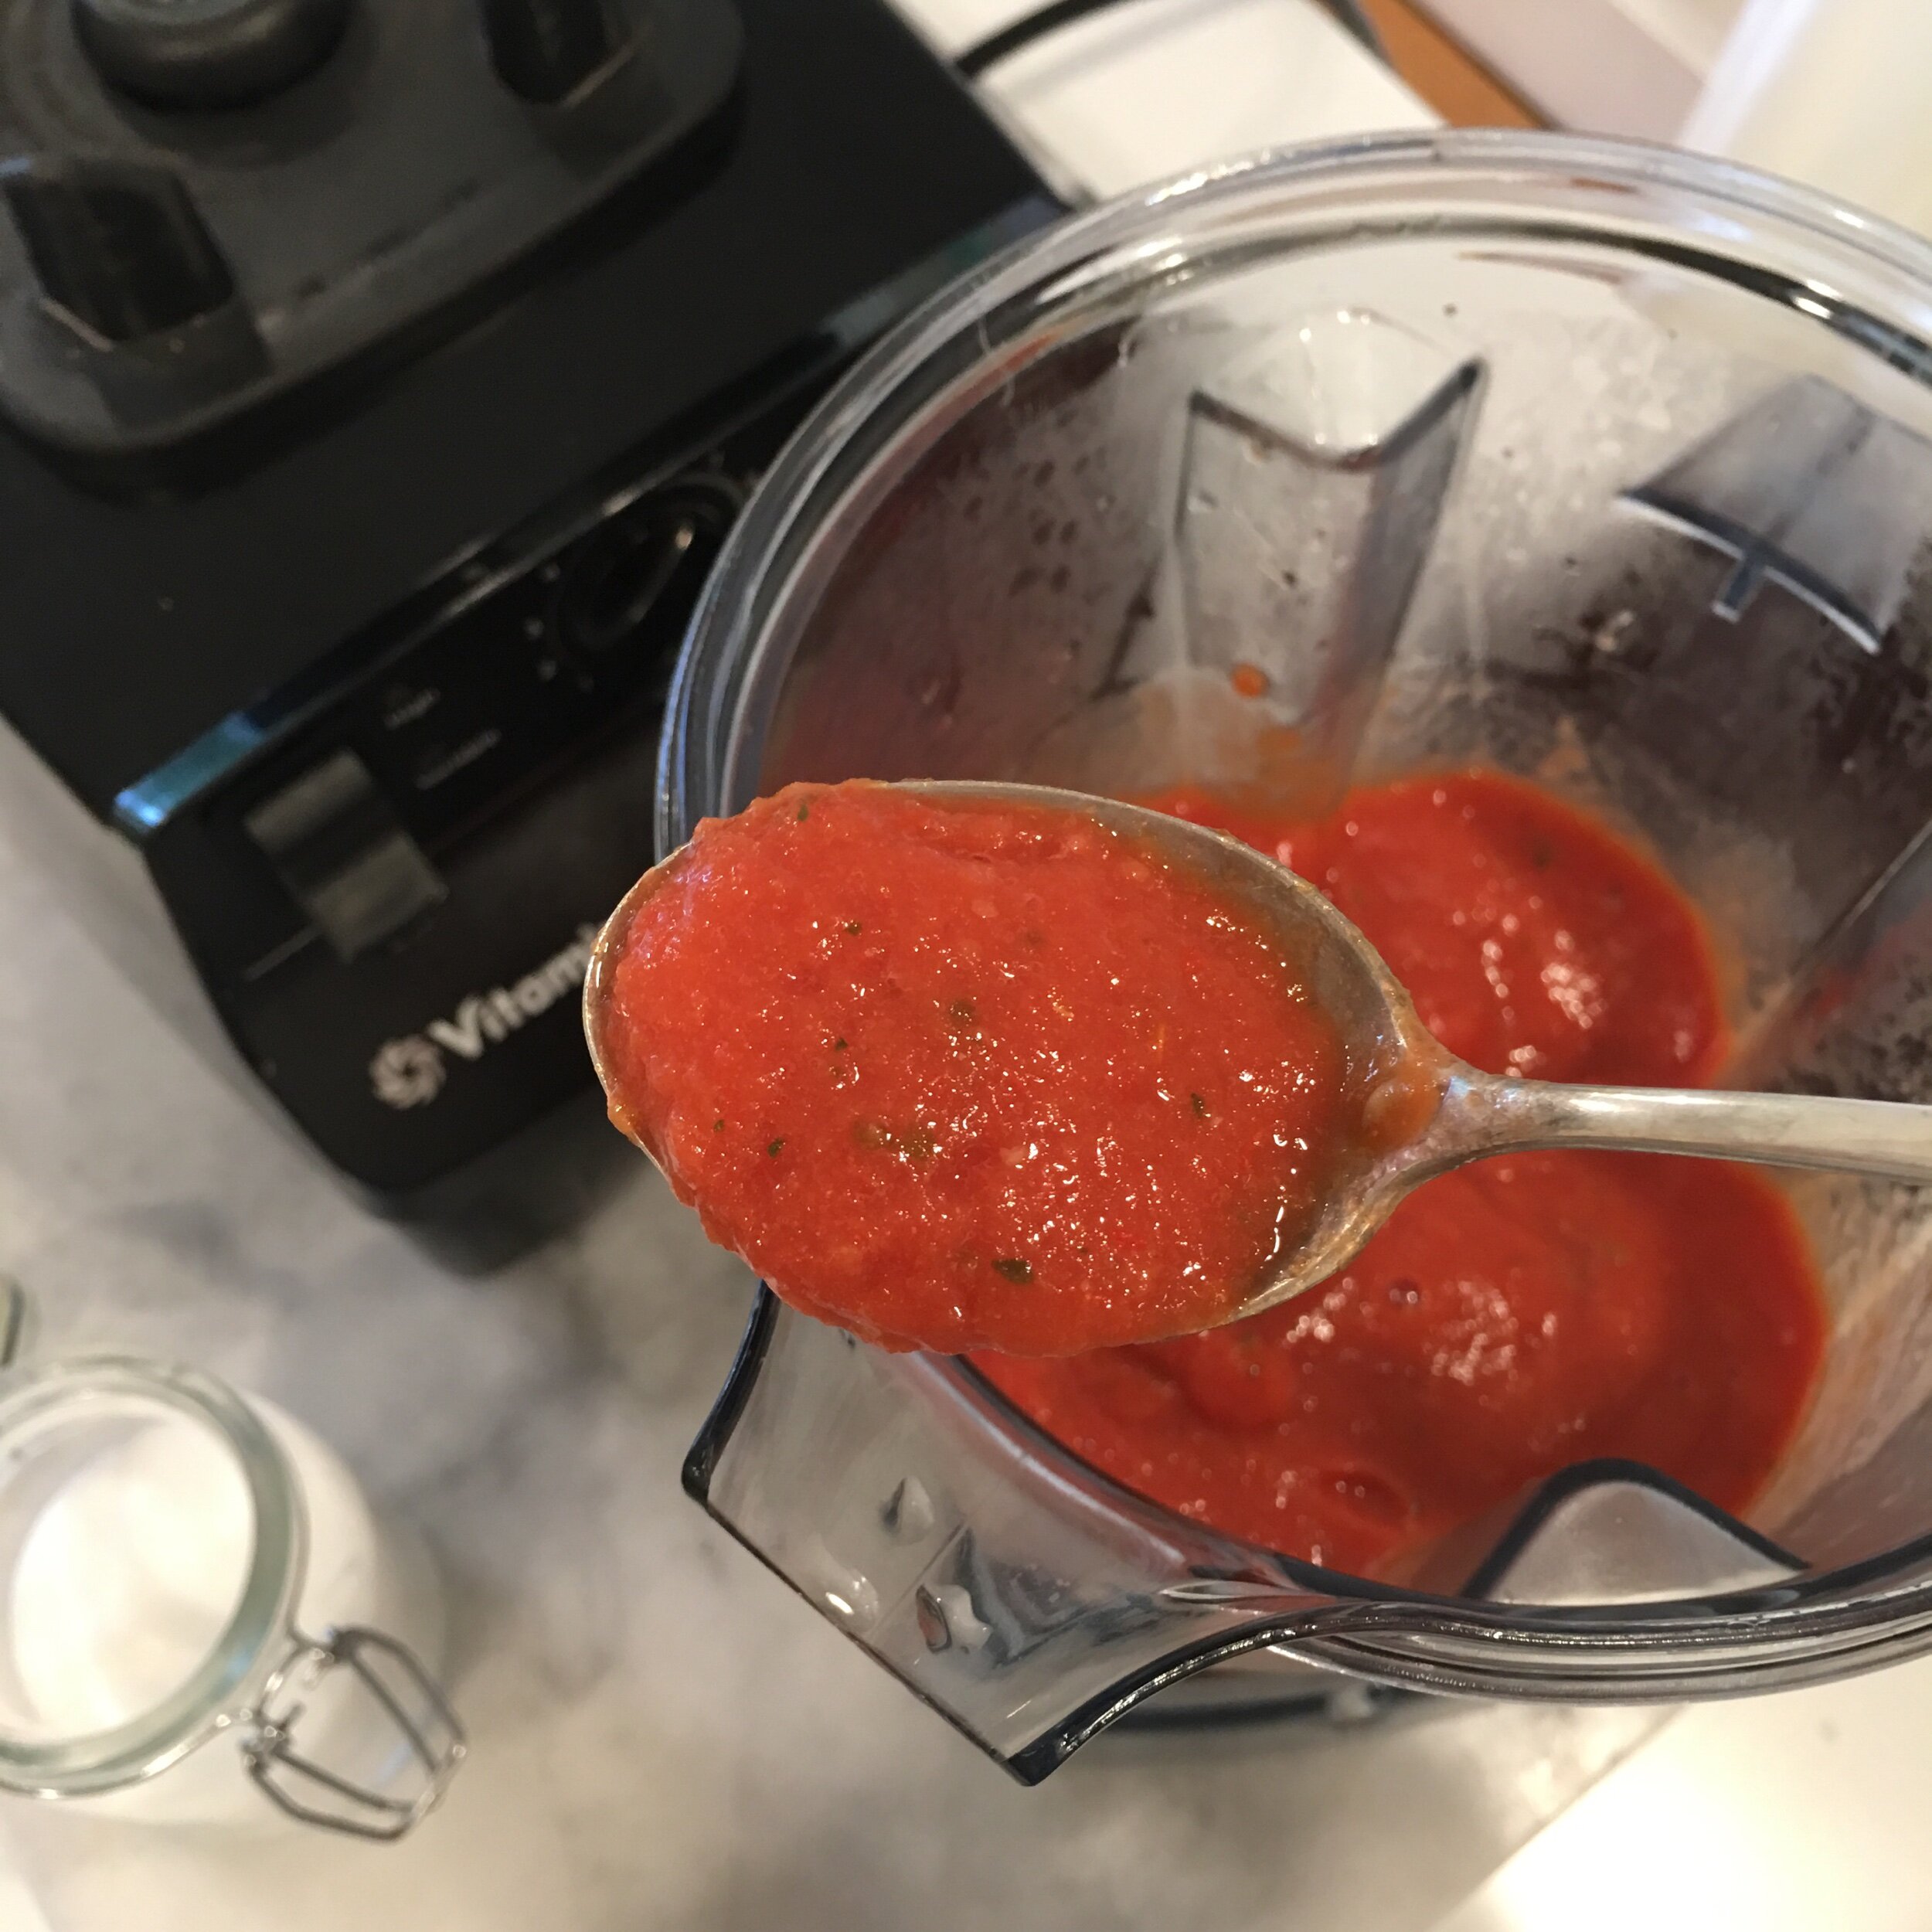
This requires a good blender. I love my Vitamin. Having a high powered blender saves you the time of having to bother with peeling or seeding the tomatoes - it all just purees to a smooth sauce so doing those extra steps isn’t necessary.
Fresh Roasted Tomato Sauce Recipe
Ingredients:
Tomatoes - I like Roma for sauce, but this works with any kind.
olive oil
salt
garlic
onion
basil
Instructions:
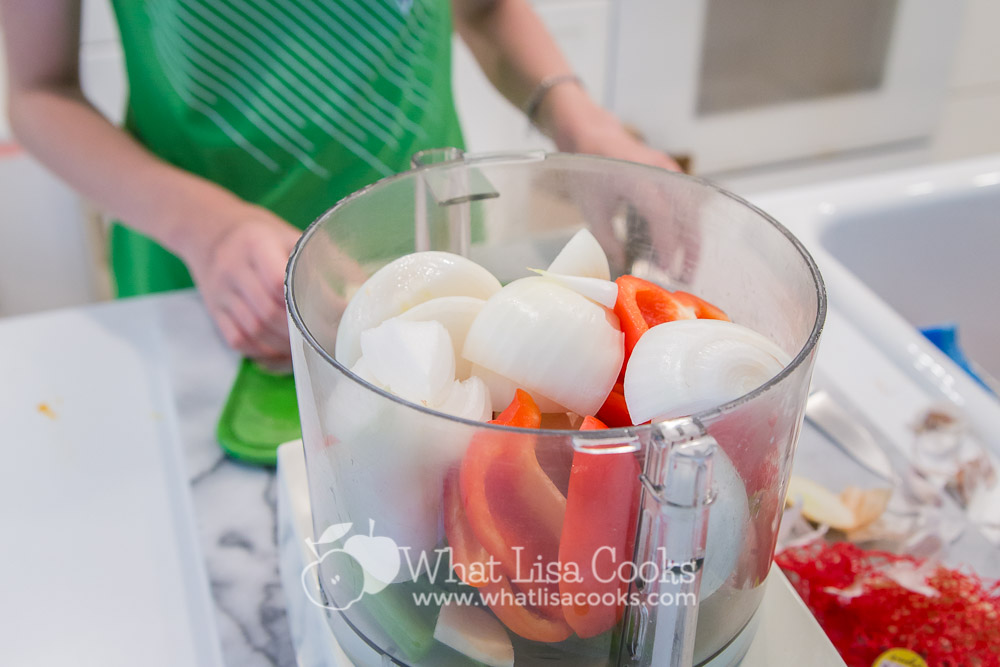
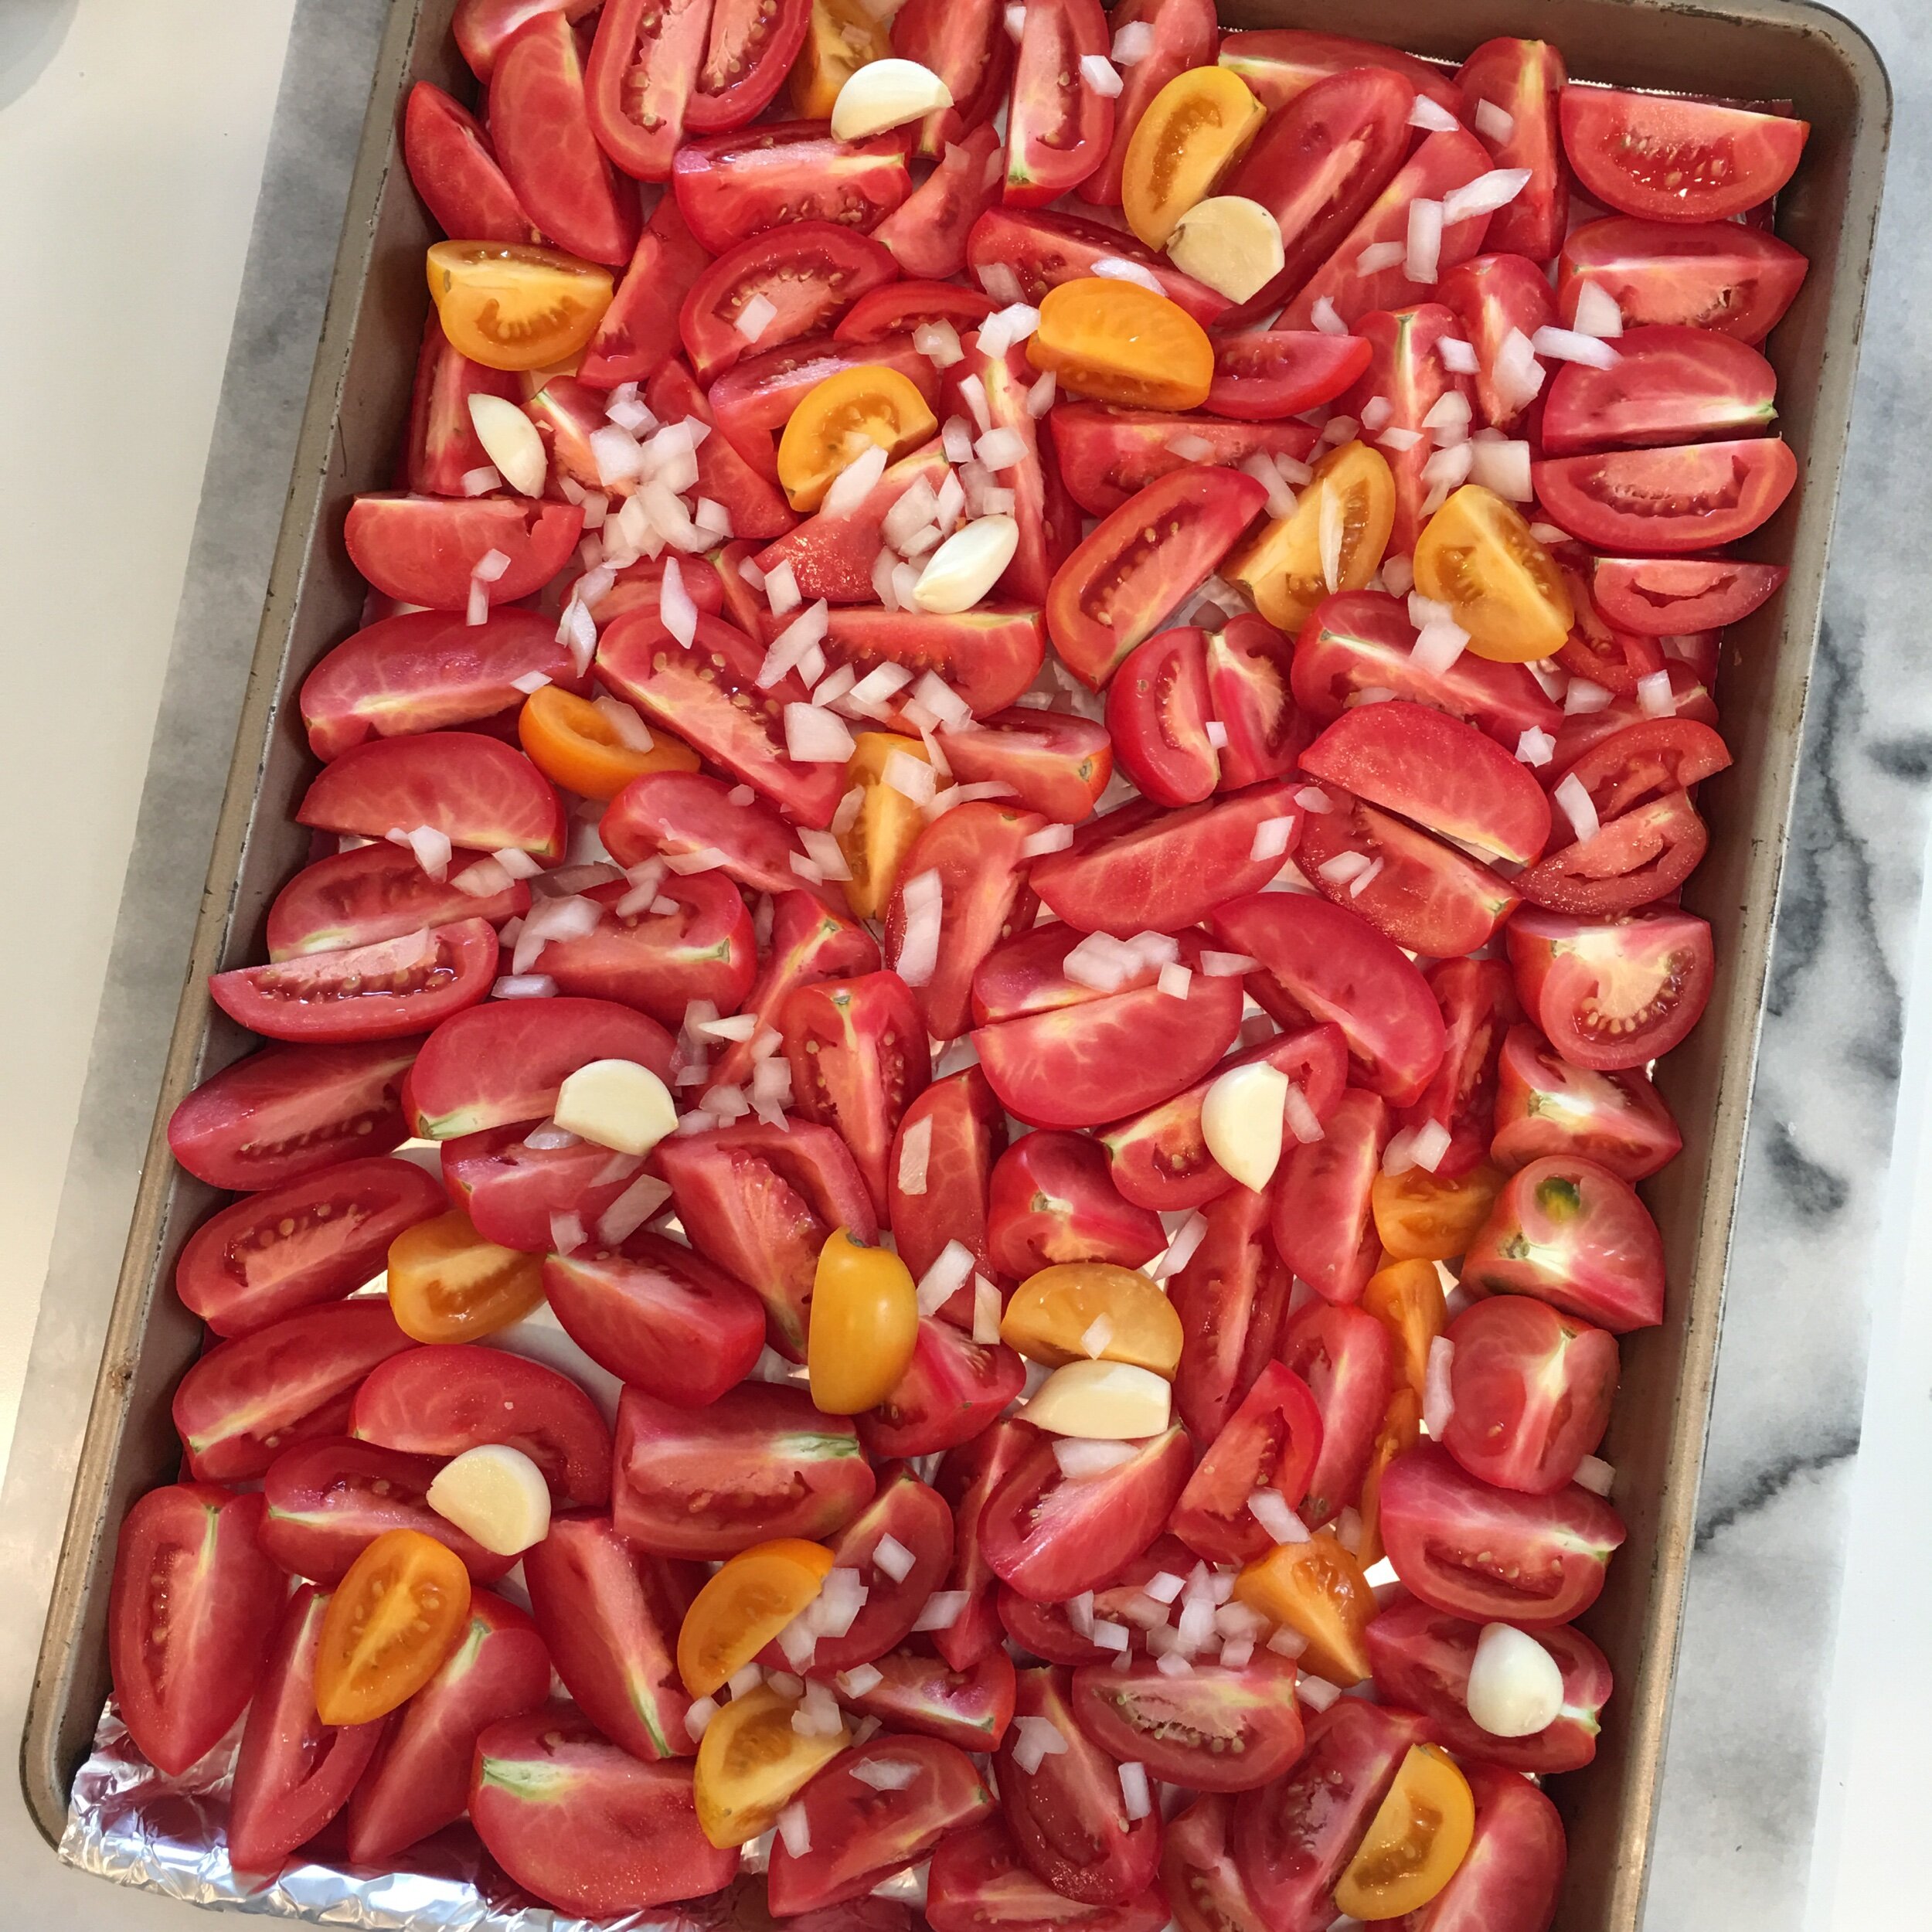
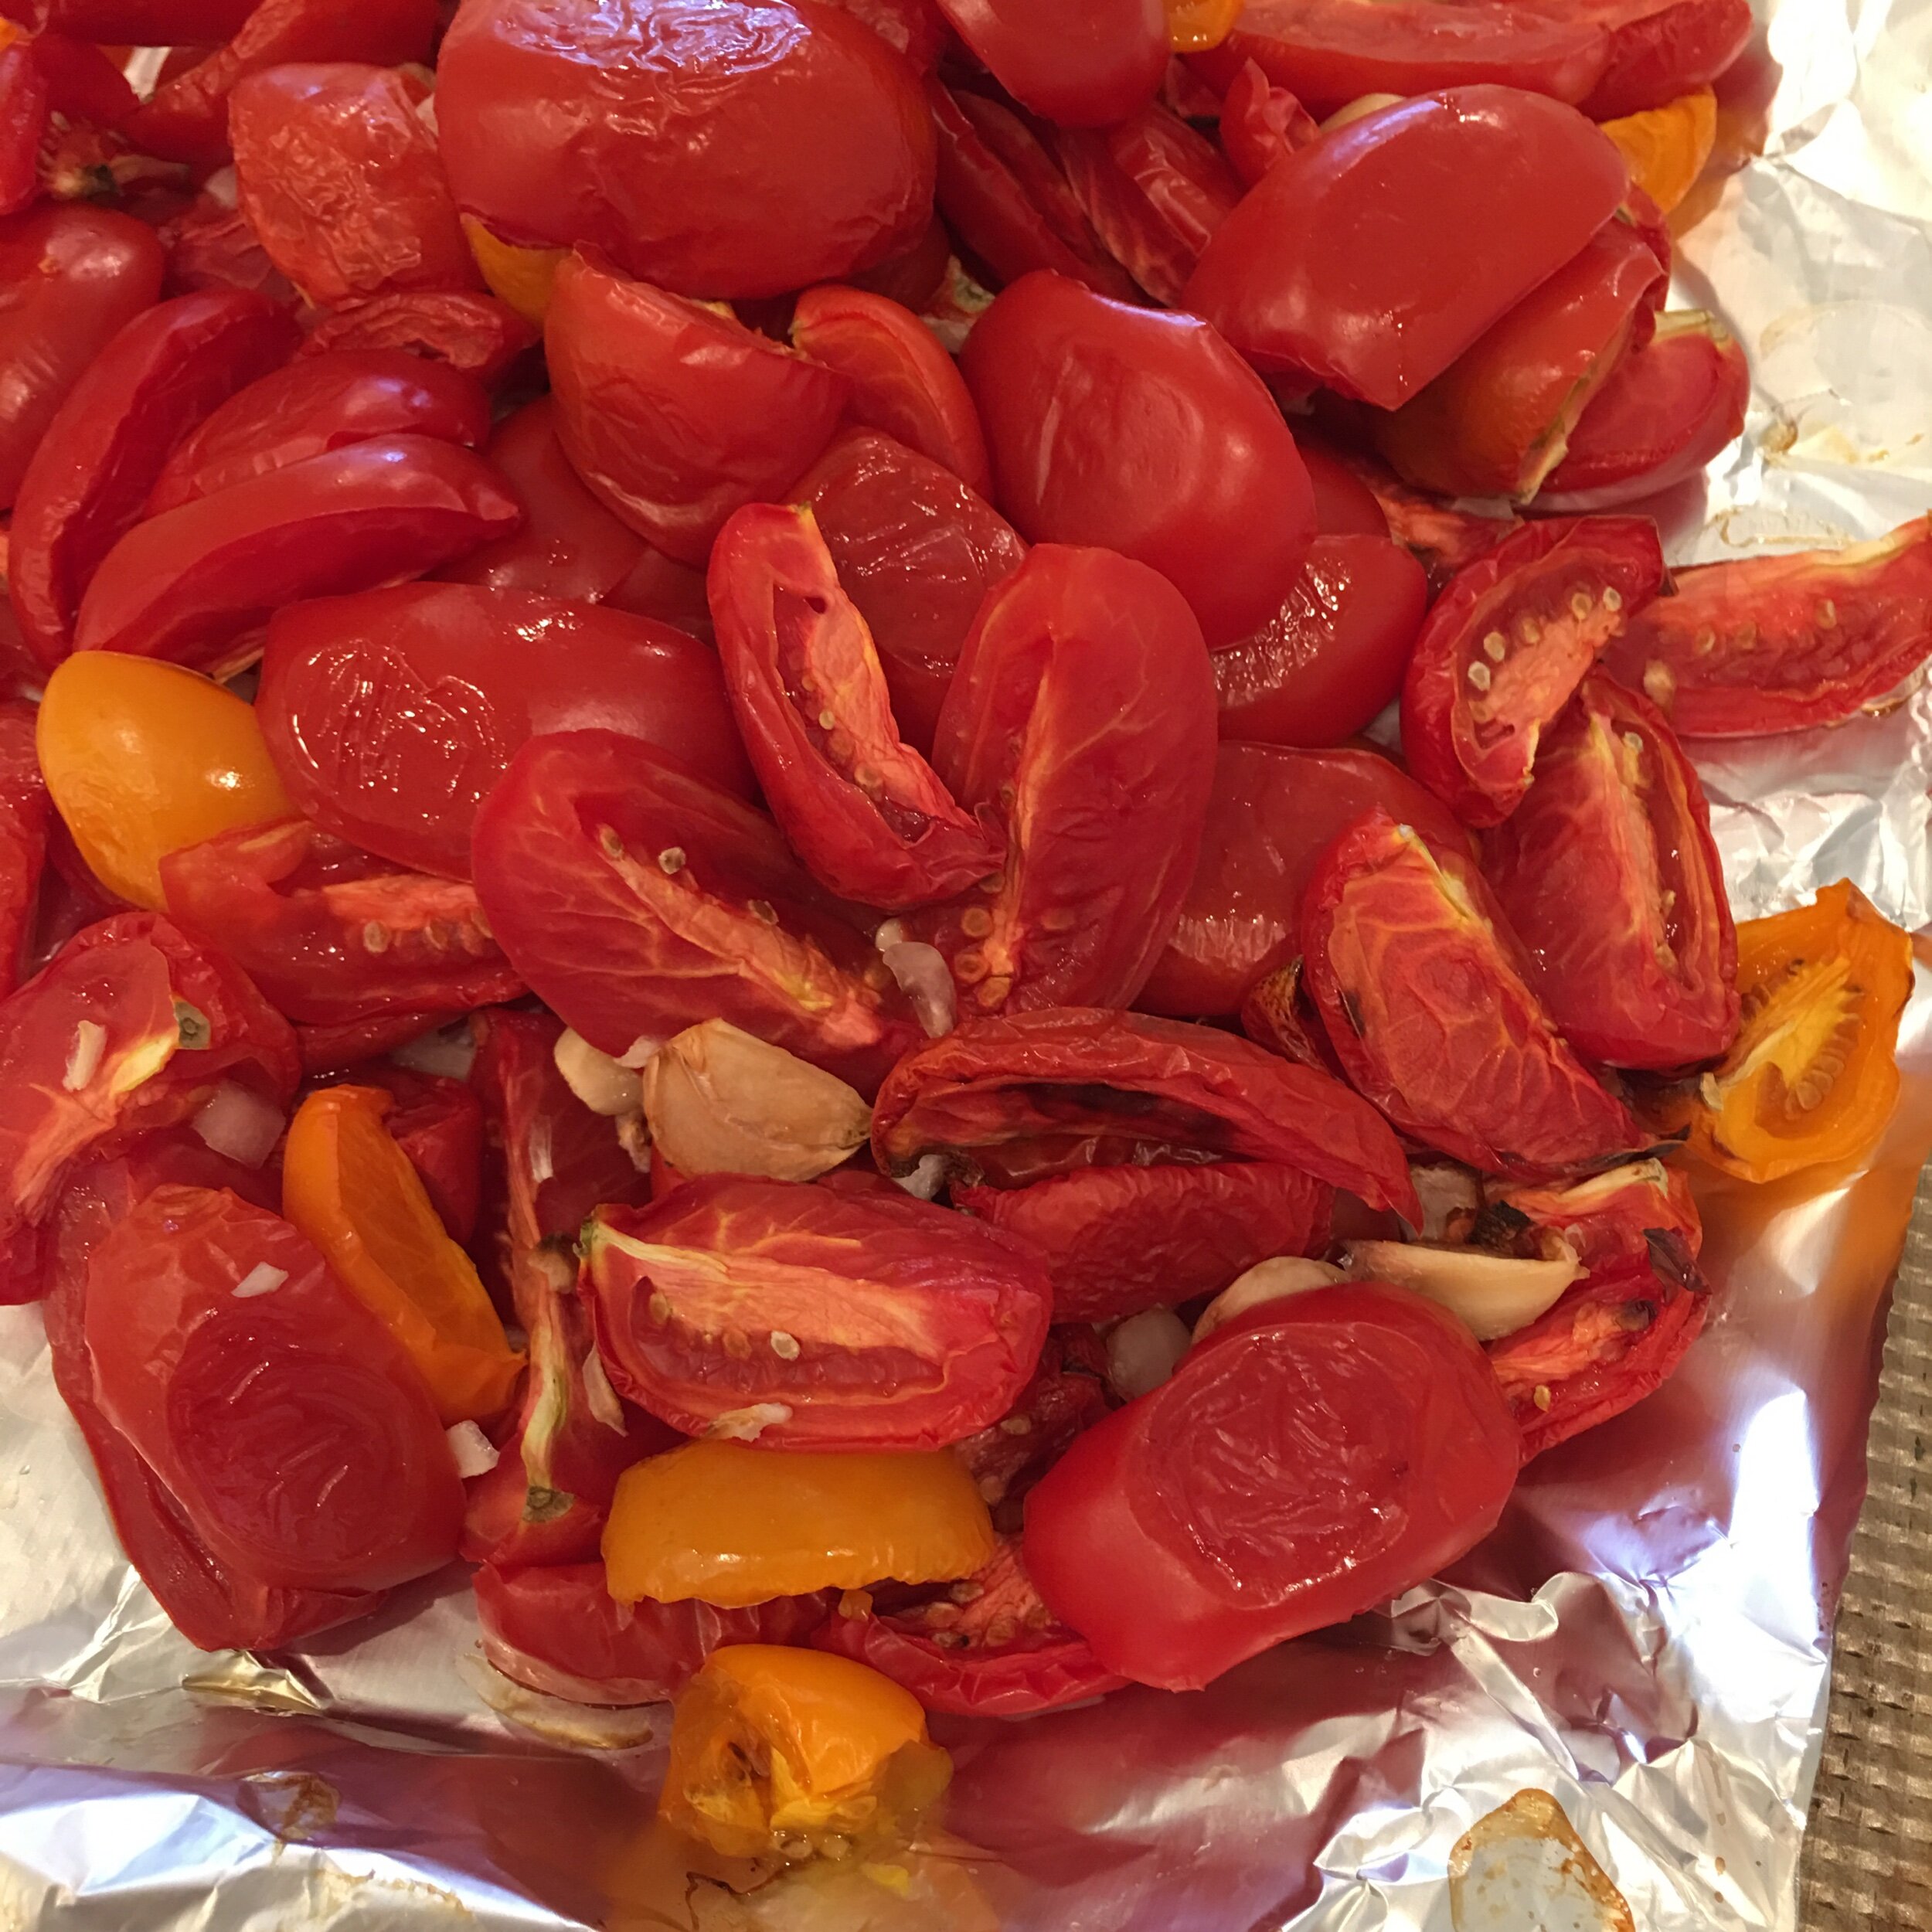
Quarter the tomatoes and spread out on a baking sheet. Add a few cloves of garlic, or more if you like, and some roughly chopped onion. Drizzle with olive oil and sprinkle a little salt.
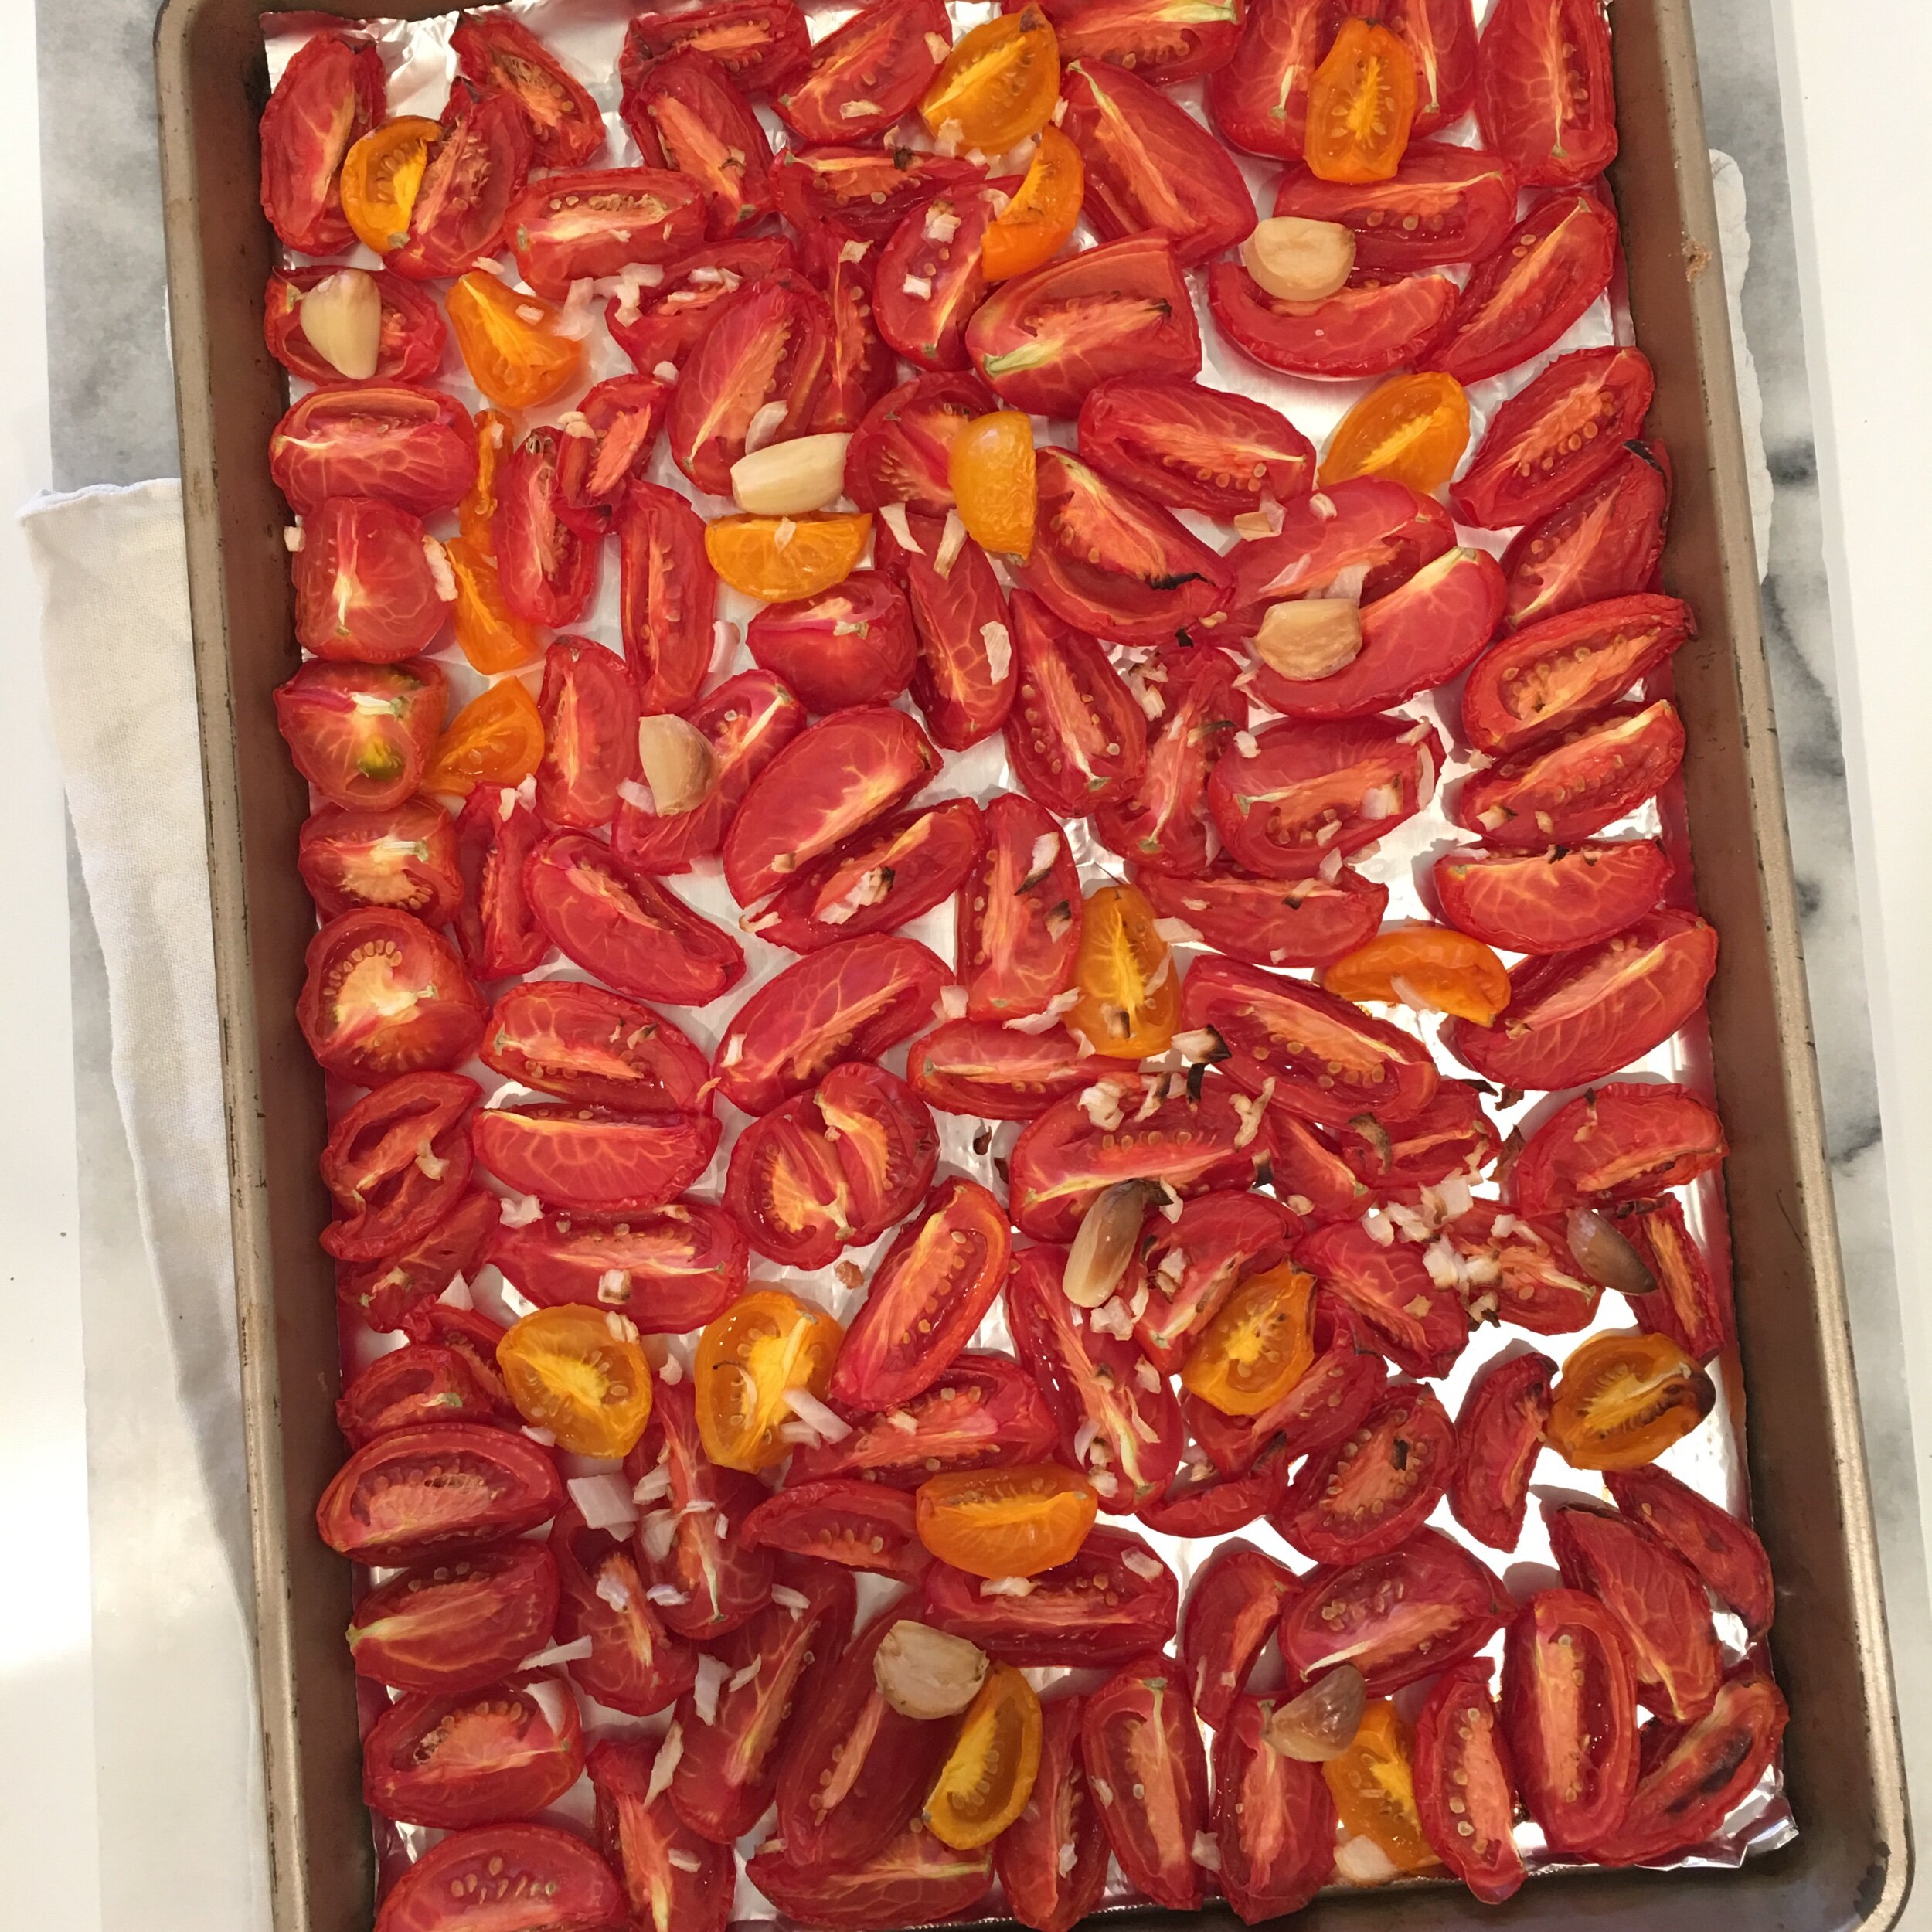
Roast at 350 for about an hour, or until the onions are garlic are soft and have developed a nice bit of color.
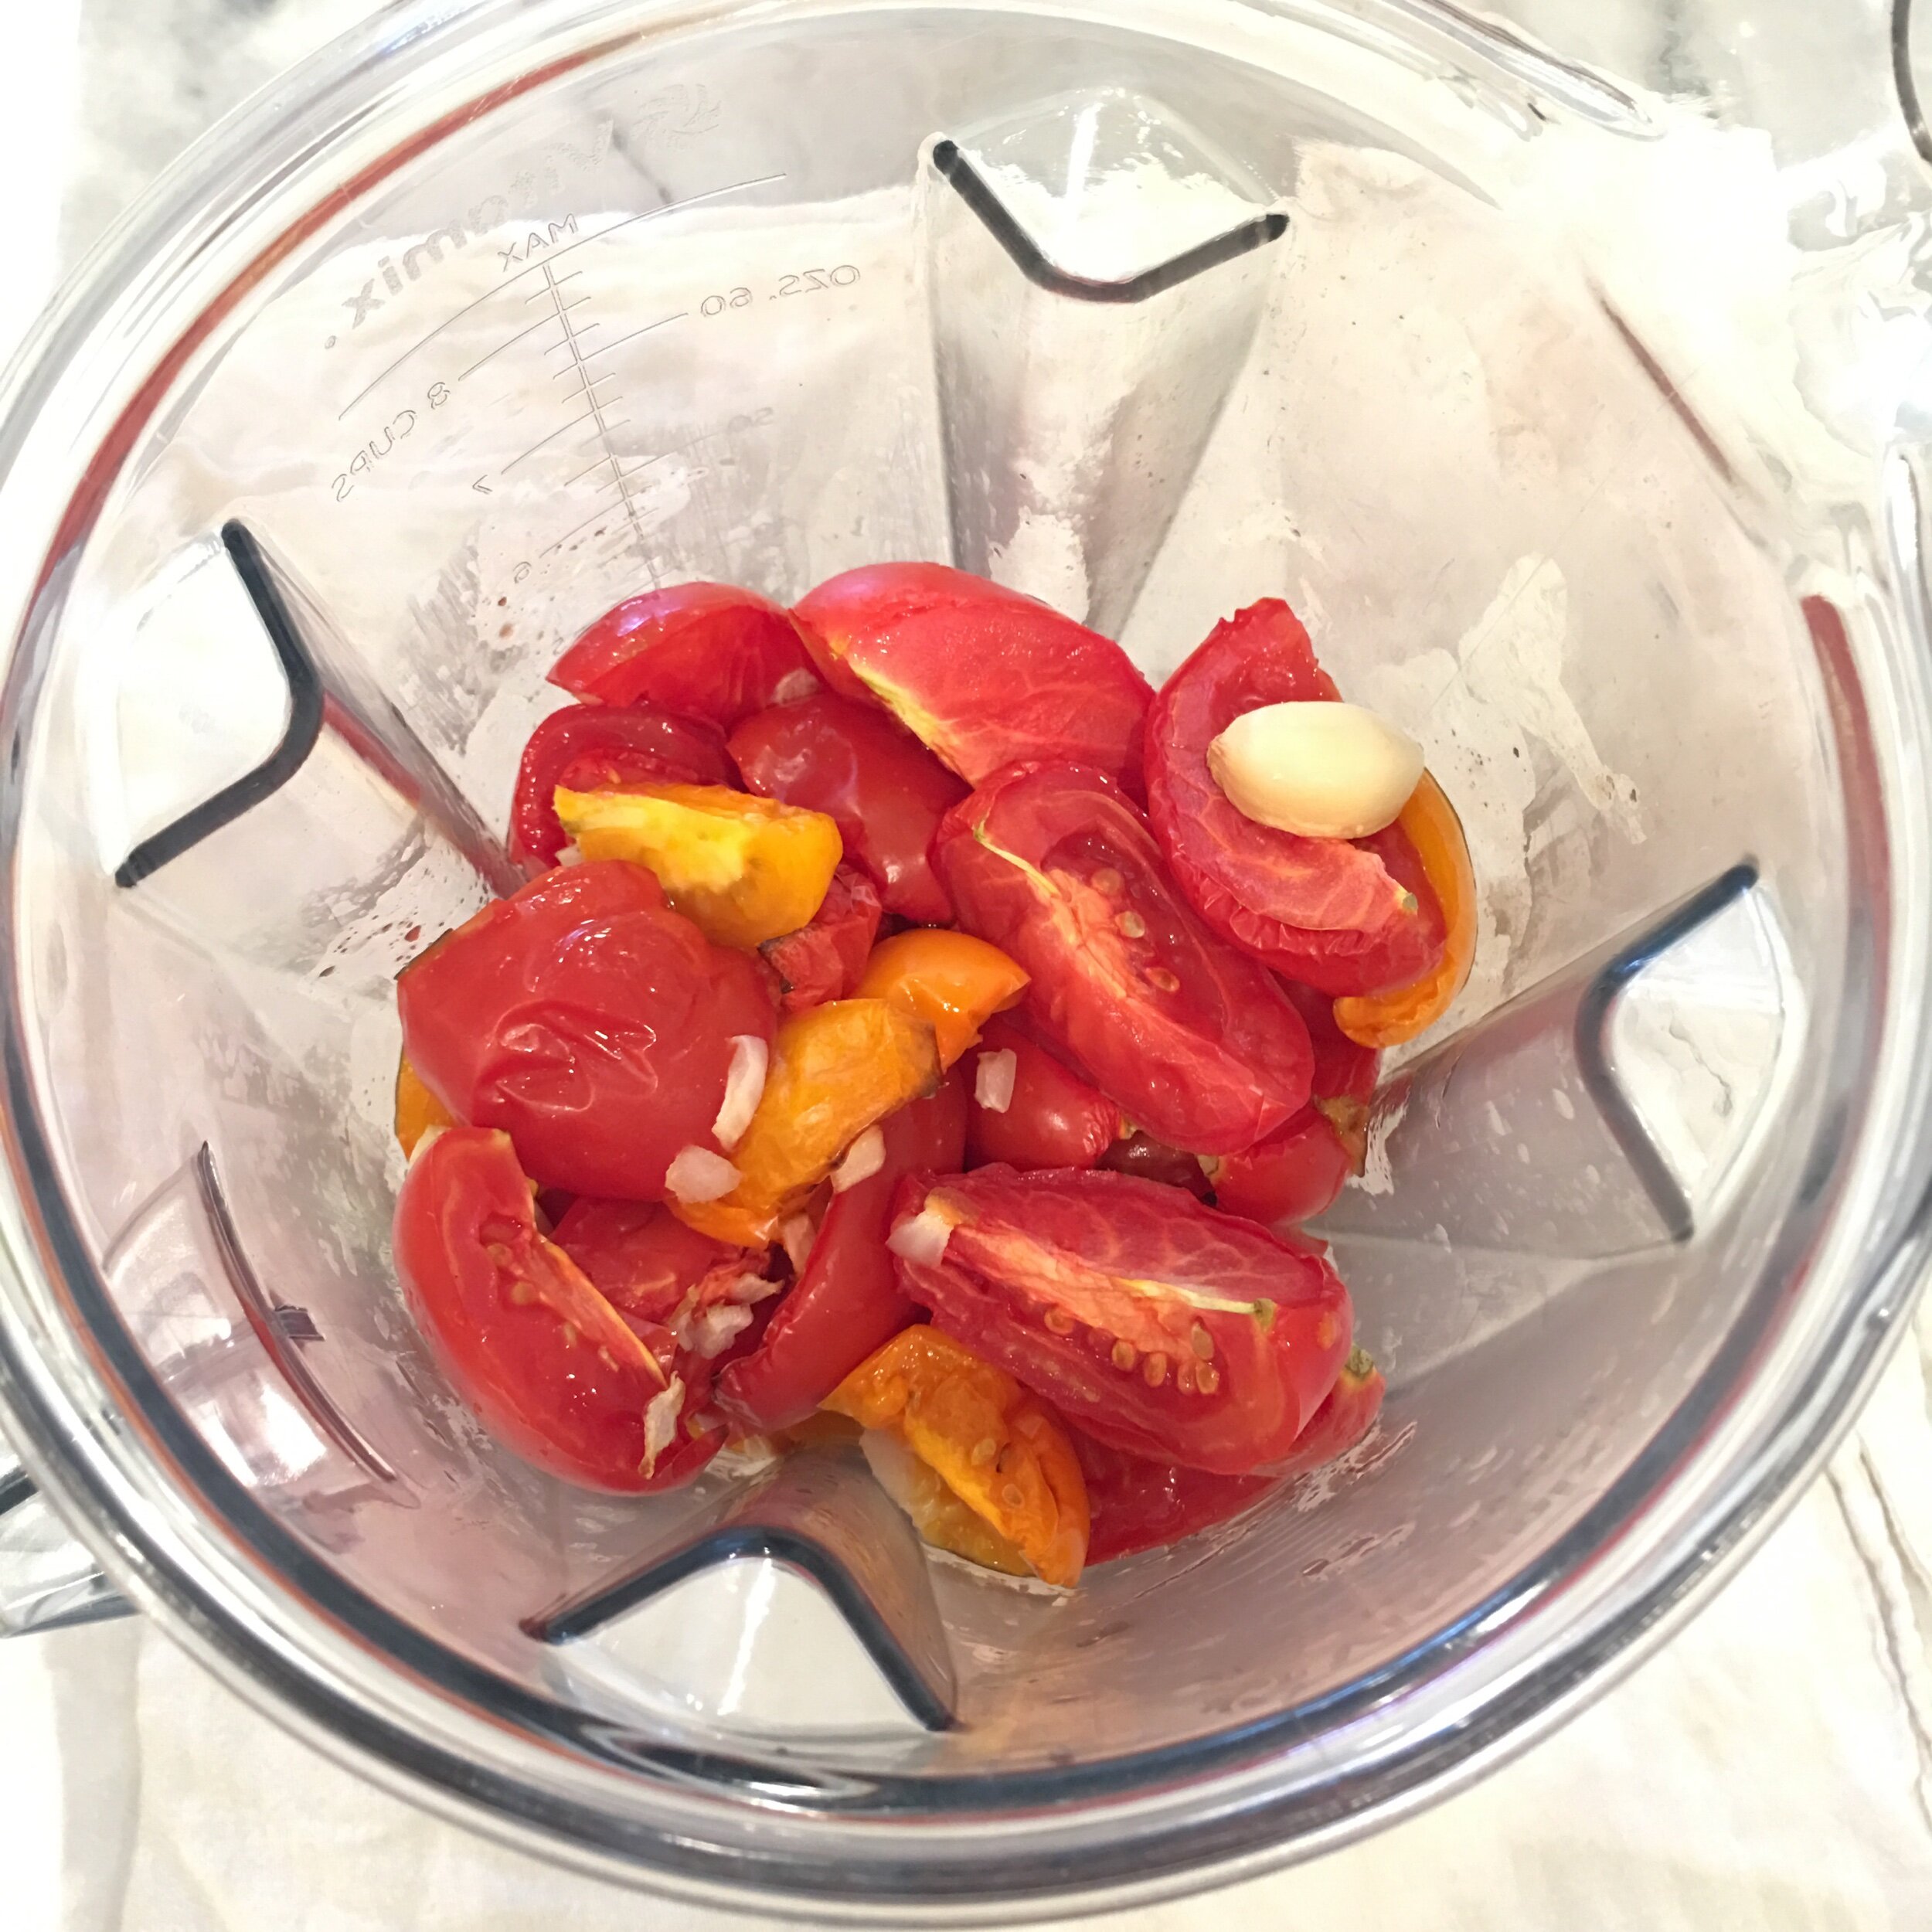
Dump everything in the blender and puree until smooth. Taste and add more salt if needed. Add fresh basil leaves and puree just until the basil is blended in. Serve on freshly cooked pasta.
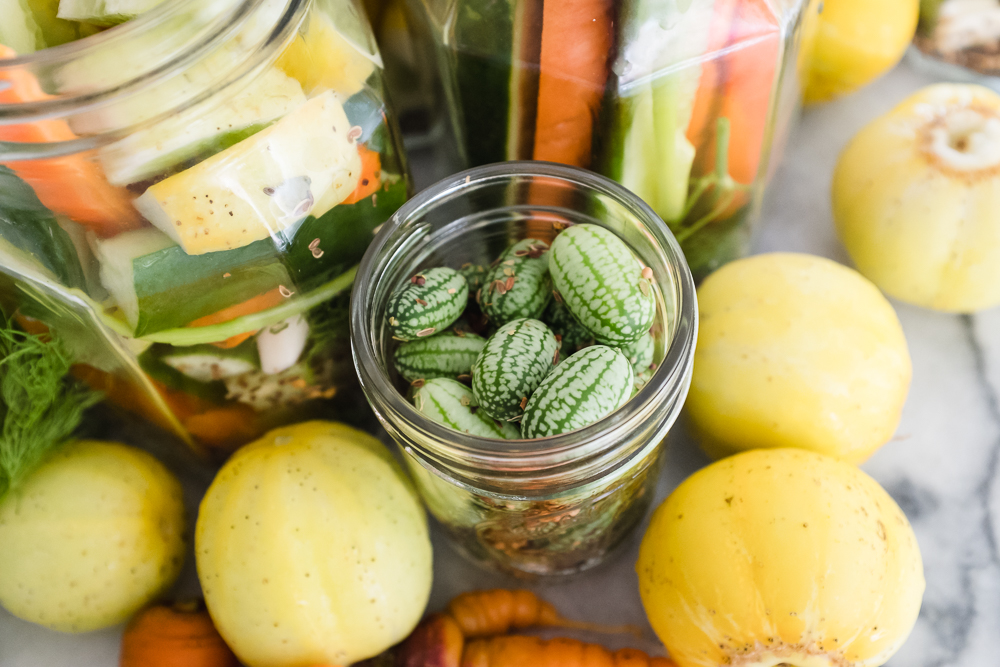
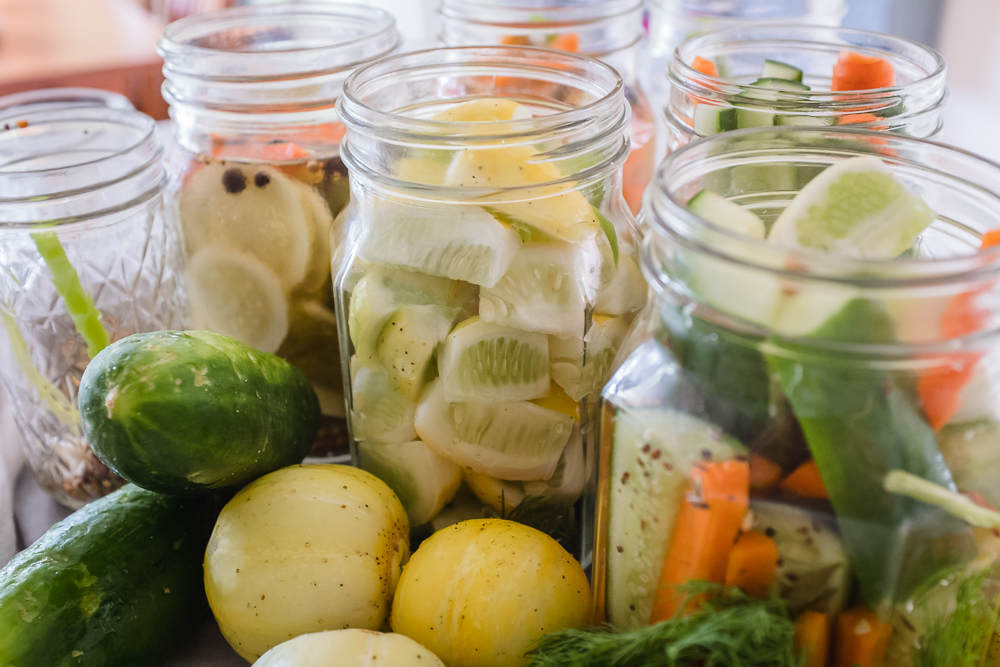
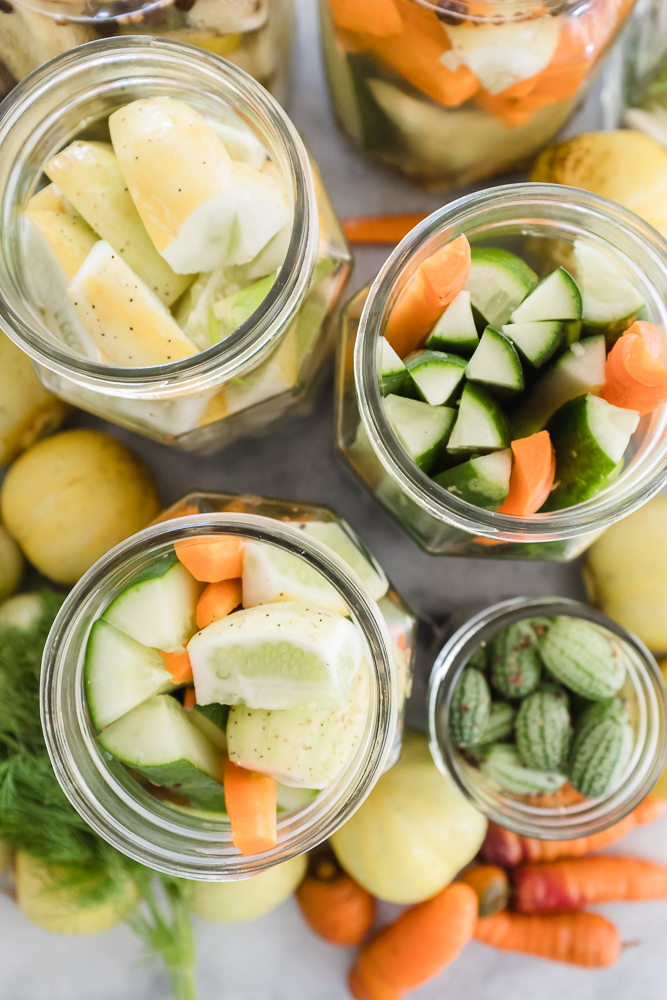
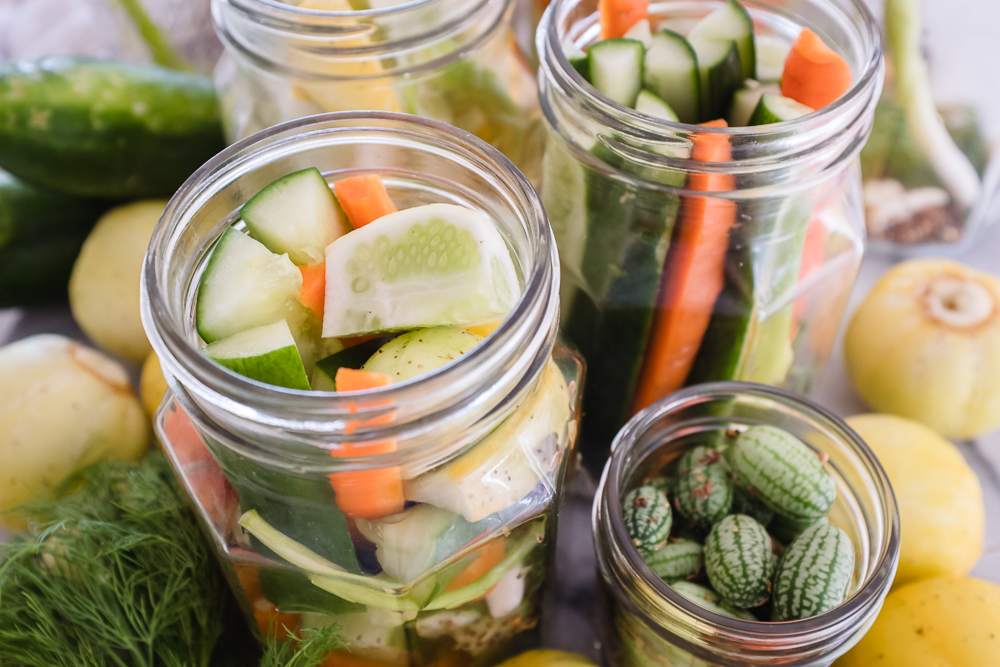
Easy Refrigerator Garden Pickles
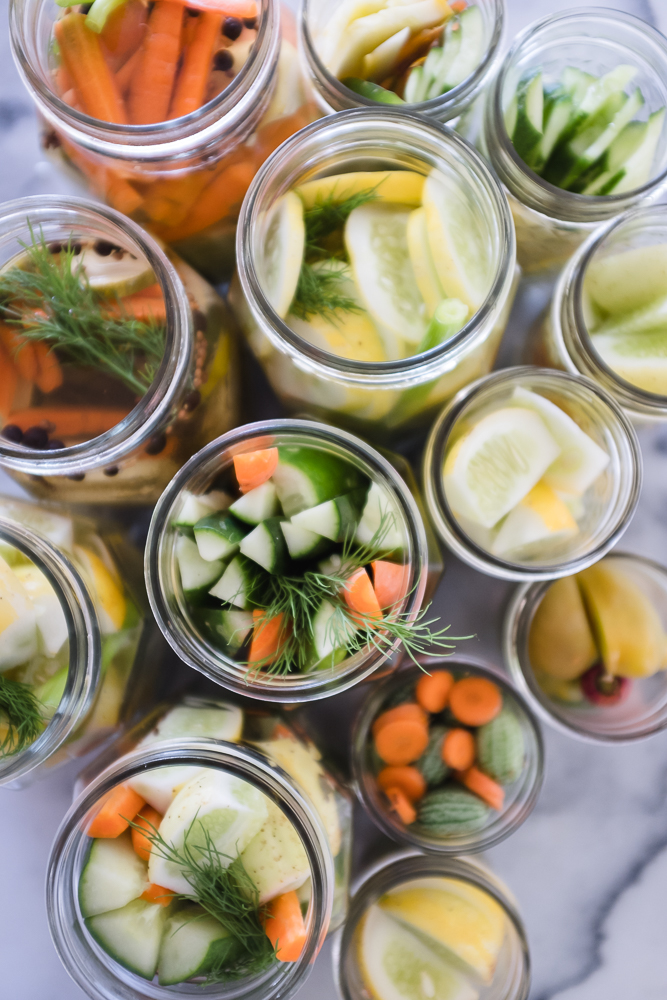
Our garden has done amazing this year! It’s been several years since we had a garden, so it’s been a lot of fun with the kids to go out every day and see what is ready to pick. But even with six of us here there’s no way we can keep up with all that produce! So this year for the first time I decided to try pickling!
I played around with several different recipes and came up with one I really like. I am a dill pickle gal - I do not like any hint of sweetness a pickle. So many recipes I found had a ton of sugar, which was not for me. After a bit of trial an error I came up with this combination that has really worked well. It does have a some sugar which I think just helps balance the flavor, but no sweetness at all.
I’m pickling everything together, I love having a mixed jar of pickled stuff, it’s like a snack plate in a jar! This brine is working well for everything I’ve used so far - cucumbers, zucchini, carrots, onions - also in a variety of shapes and sizes. I love them with lots of fresh dill and garlic.
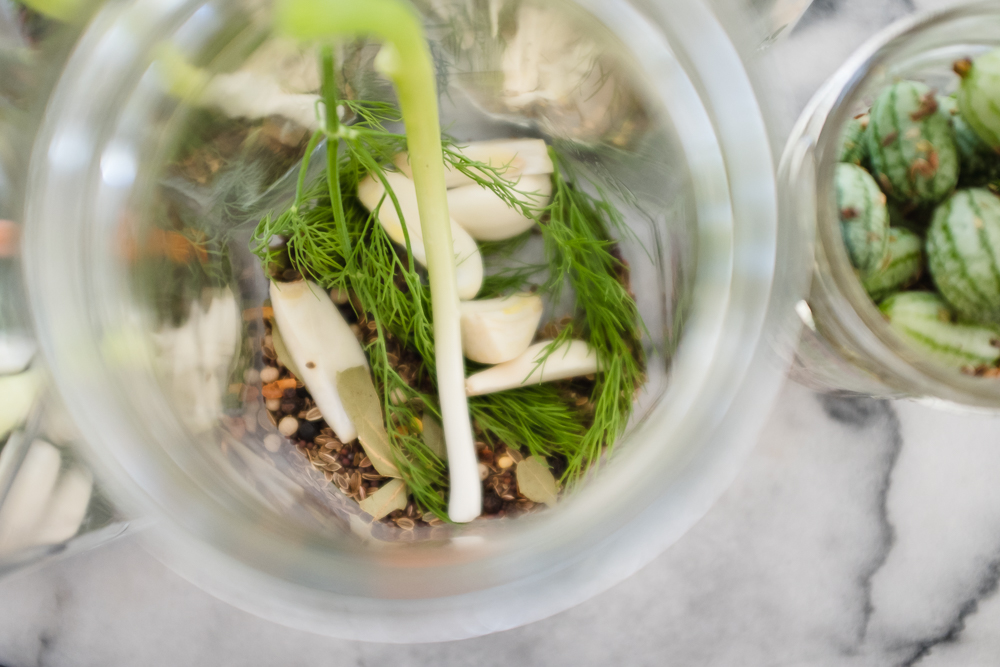
Ingredients for the brine:
8 cups water
4 cups white vinegar
3/4 cup pickling salt
1/4 cup sugar
Combine all the brine ingredients in a pot and simmer until the salt & sugar are dissolved. You can adjust the quantities up and down depending on how many jars you are making. I did quart jars and this was enough for 6-7 jars.
For the pickles:
cleaned and cut up veggies - cucumber, zucchini, carrots, onions, etc.
several sprigs of fresh dill for each jar
2-3 cloves of fresh garlic for each jar
pickling spice - 2 tablespoons per quart size jar
Once the brine is ready - put a couple tablespoons of pickling spice in the bottom of each jar, along with several sprigs of fresh dill and several pieces of garlic - I like to take the whole cloves and slice them in half. Then fill each jar with a variety of veggies - cucumbers, carrots, onions, etc. Then fill each jar with the warm brine, all the way to the rim. Put on a lid and then in the fridge.
These taste great after just a few days, and they are really amazing if you have the willpower to let them sit for more than a week.
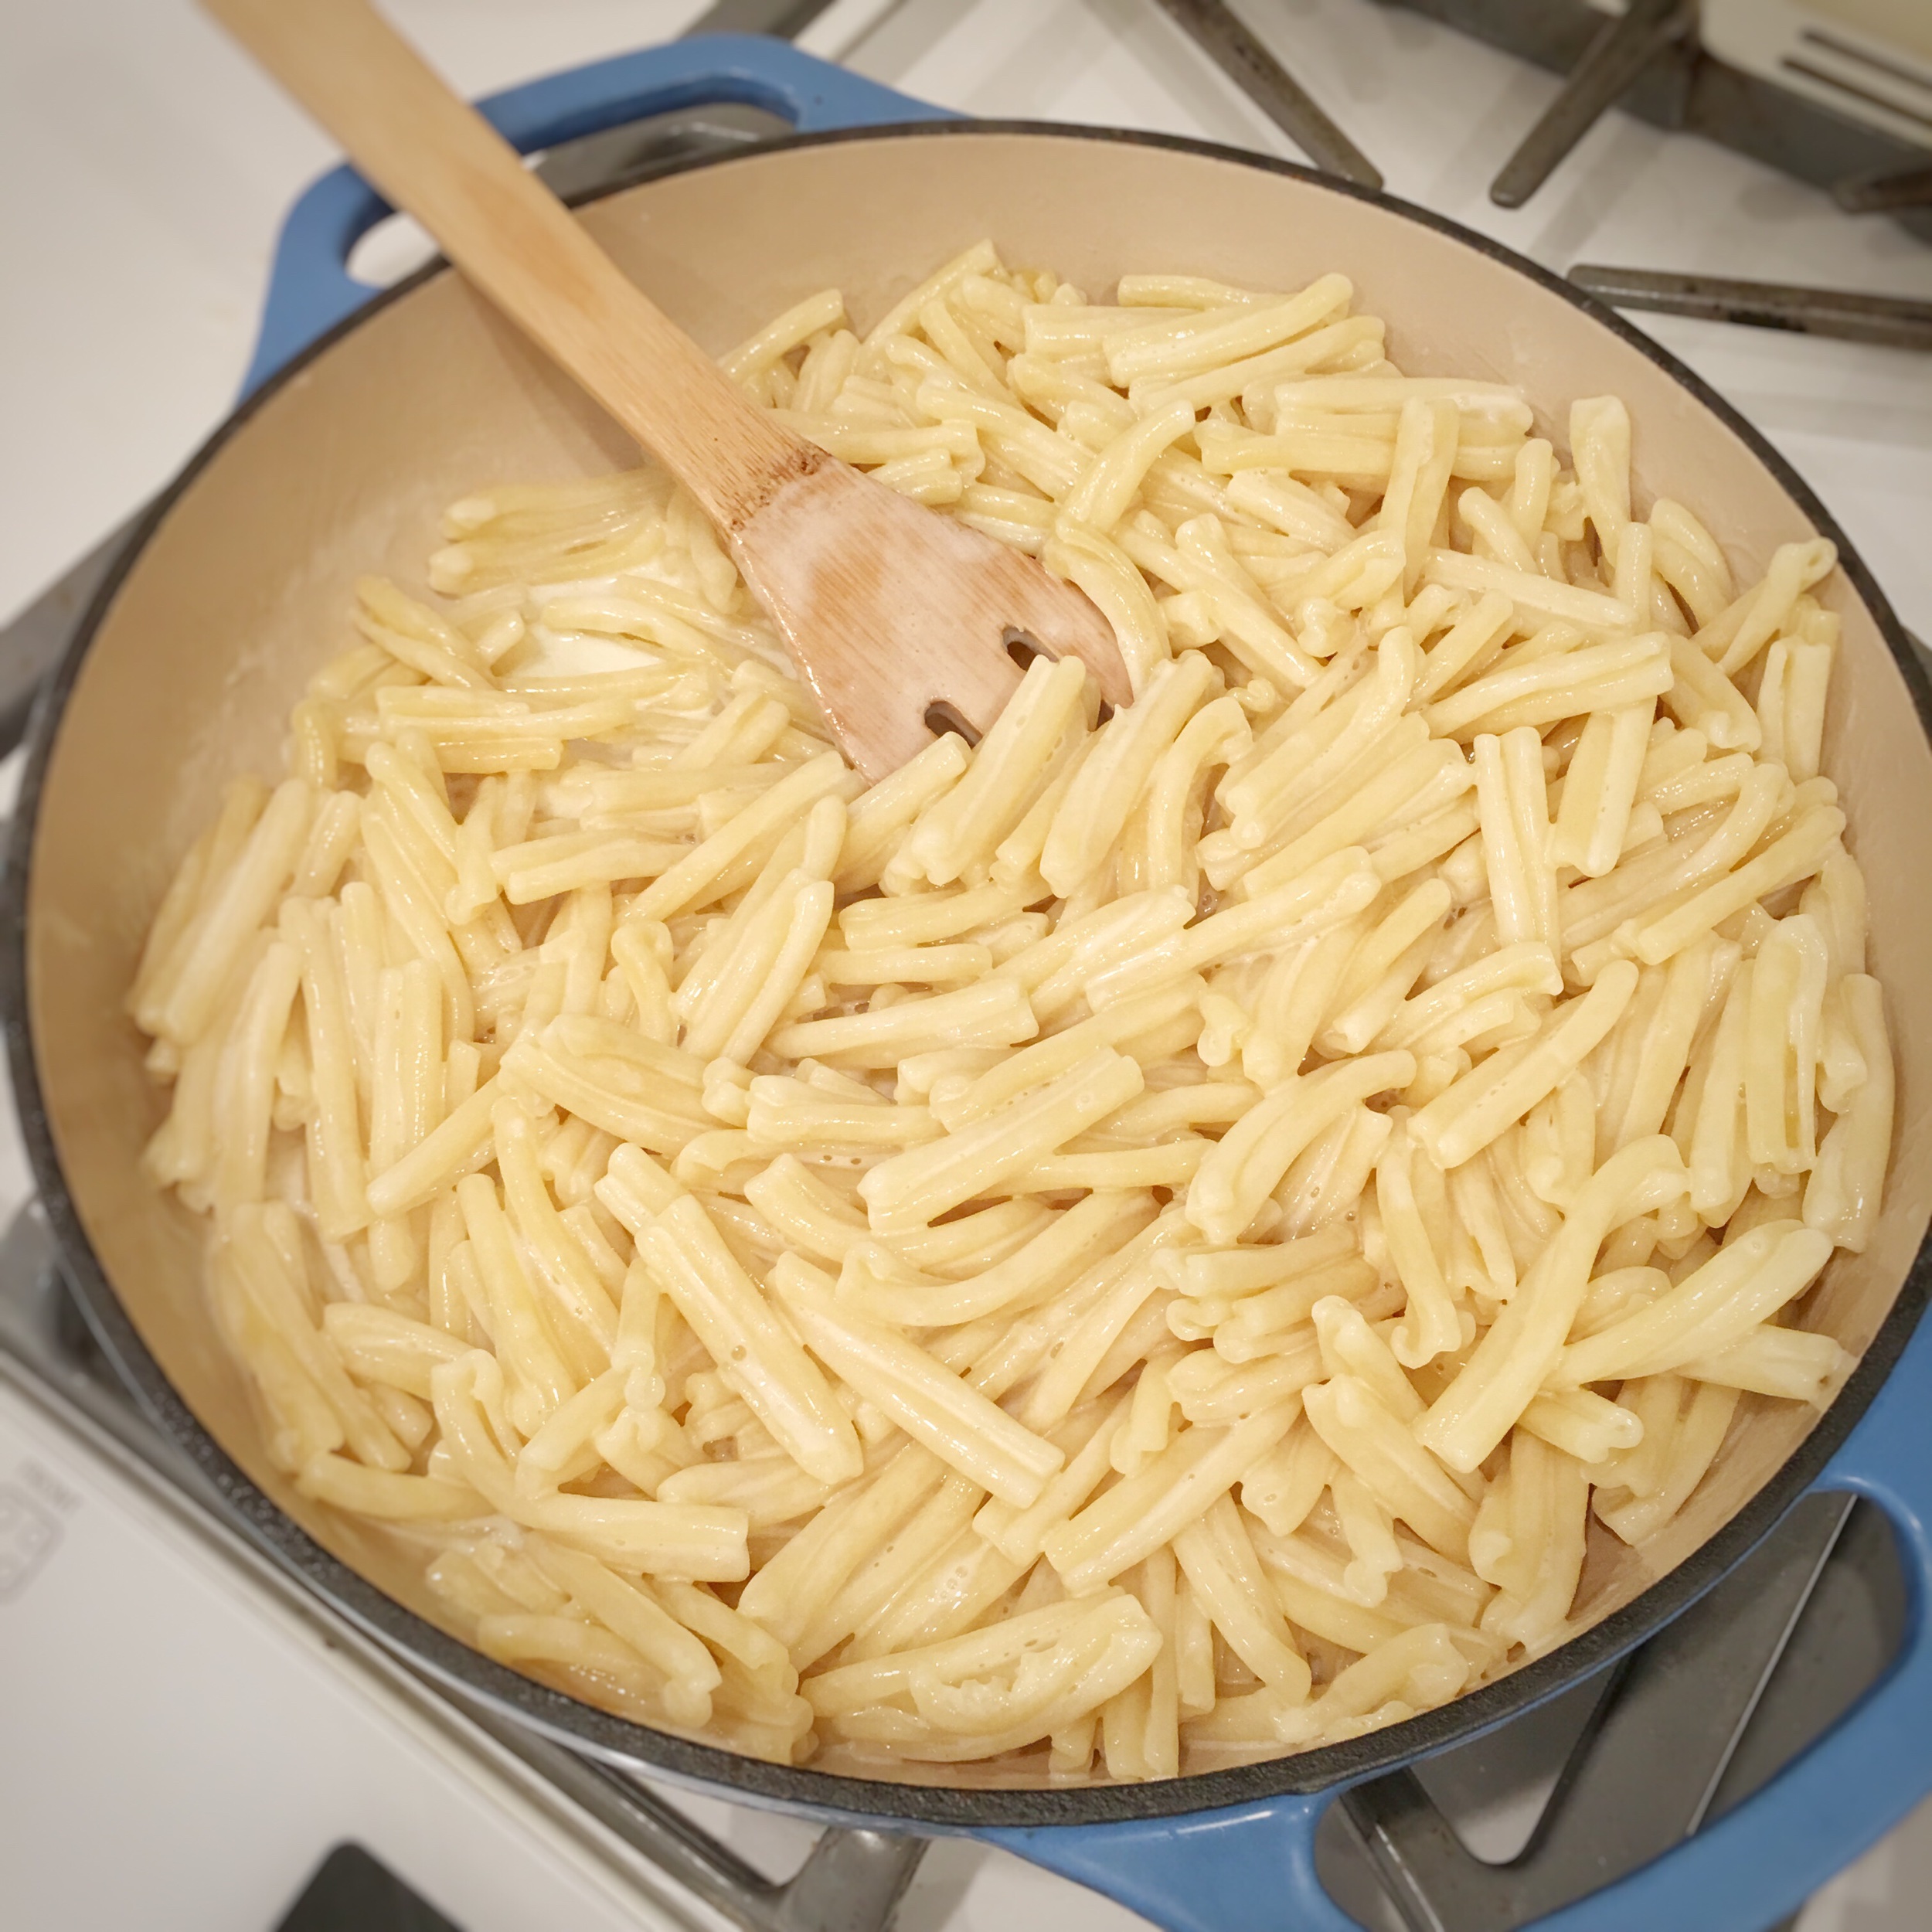
No drain pasta - One pot Pasta!
The quick and easy way to cook pasta - one pot, no draining, ready in about 10 minutes.

I’m about to completely change the way you cook pasta.
Once you cook pasta with this no-drain one pot pasta method, you’ll wonder why you ever did it any other way. This is the only way I cook pasta any more - the no draining method.
All those years spent thinking pasta had to be cooked in gallons of water - I’m here to tell you that you don’t have to do that.
This way is so much faster, and it works perfectly every time.
Here is the basic formula for one pot no drain pasta:
1 package of pasta + 4 cups cold water.
In a shallow pot, one pound of pasta, any shape, needs about 4 cups of cold water. A standard sized package of most kinds of pasta in the US is usually one pound.

You can play around with this ratio and figure out what works for you, if you like your pasta softer or more firm, but I’ve found these quantities to be pretty spot on for us.
I add a bit of salt and butter, bring it up to a simmer, stir occasionally until the water is absorbed and pasta is cooked, maybe 10 minutes. If you want to add sauce of any kind, do that when most of the water is absorbed.
My kids favorite - which I recently found out that most children in Italy eat and they call it Pasta Blanco - White Pasta:
When the pasta is almost finished, add a little more butter and a few tablespoons of cream. Mix well until the butter is all melted. Taste and see if it needs a bit more salt. Serve with parmesan cheese on top.
This is so quick and easy. No waiting for water to boil! No rinsing. No draining. You are going to wonder why you ever did it any other way.
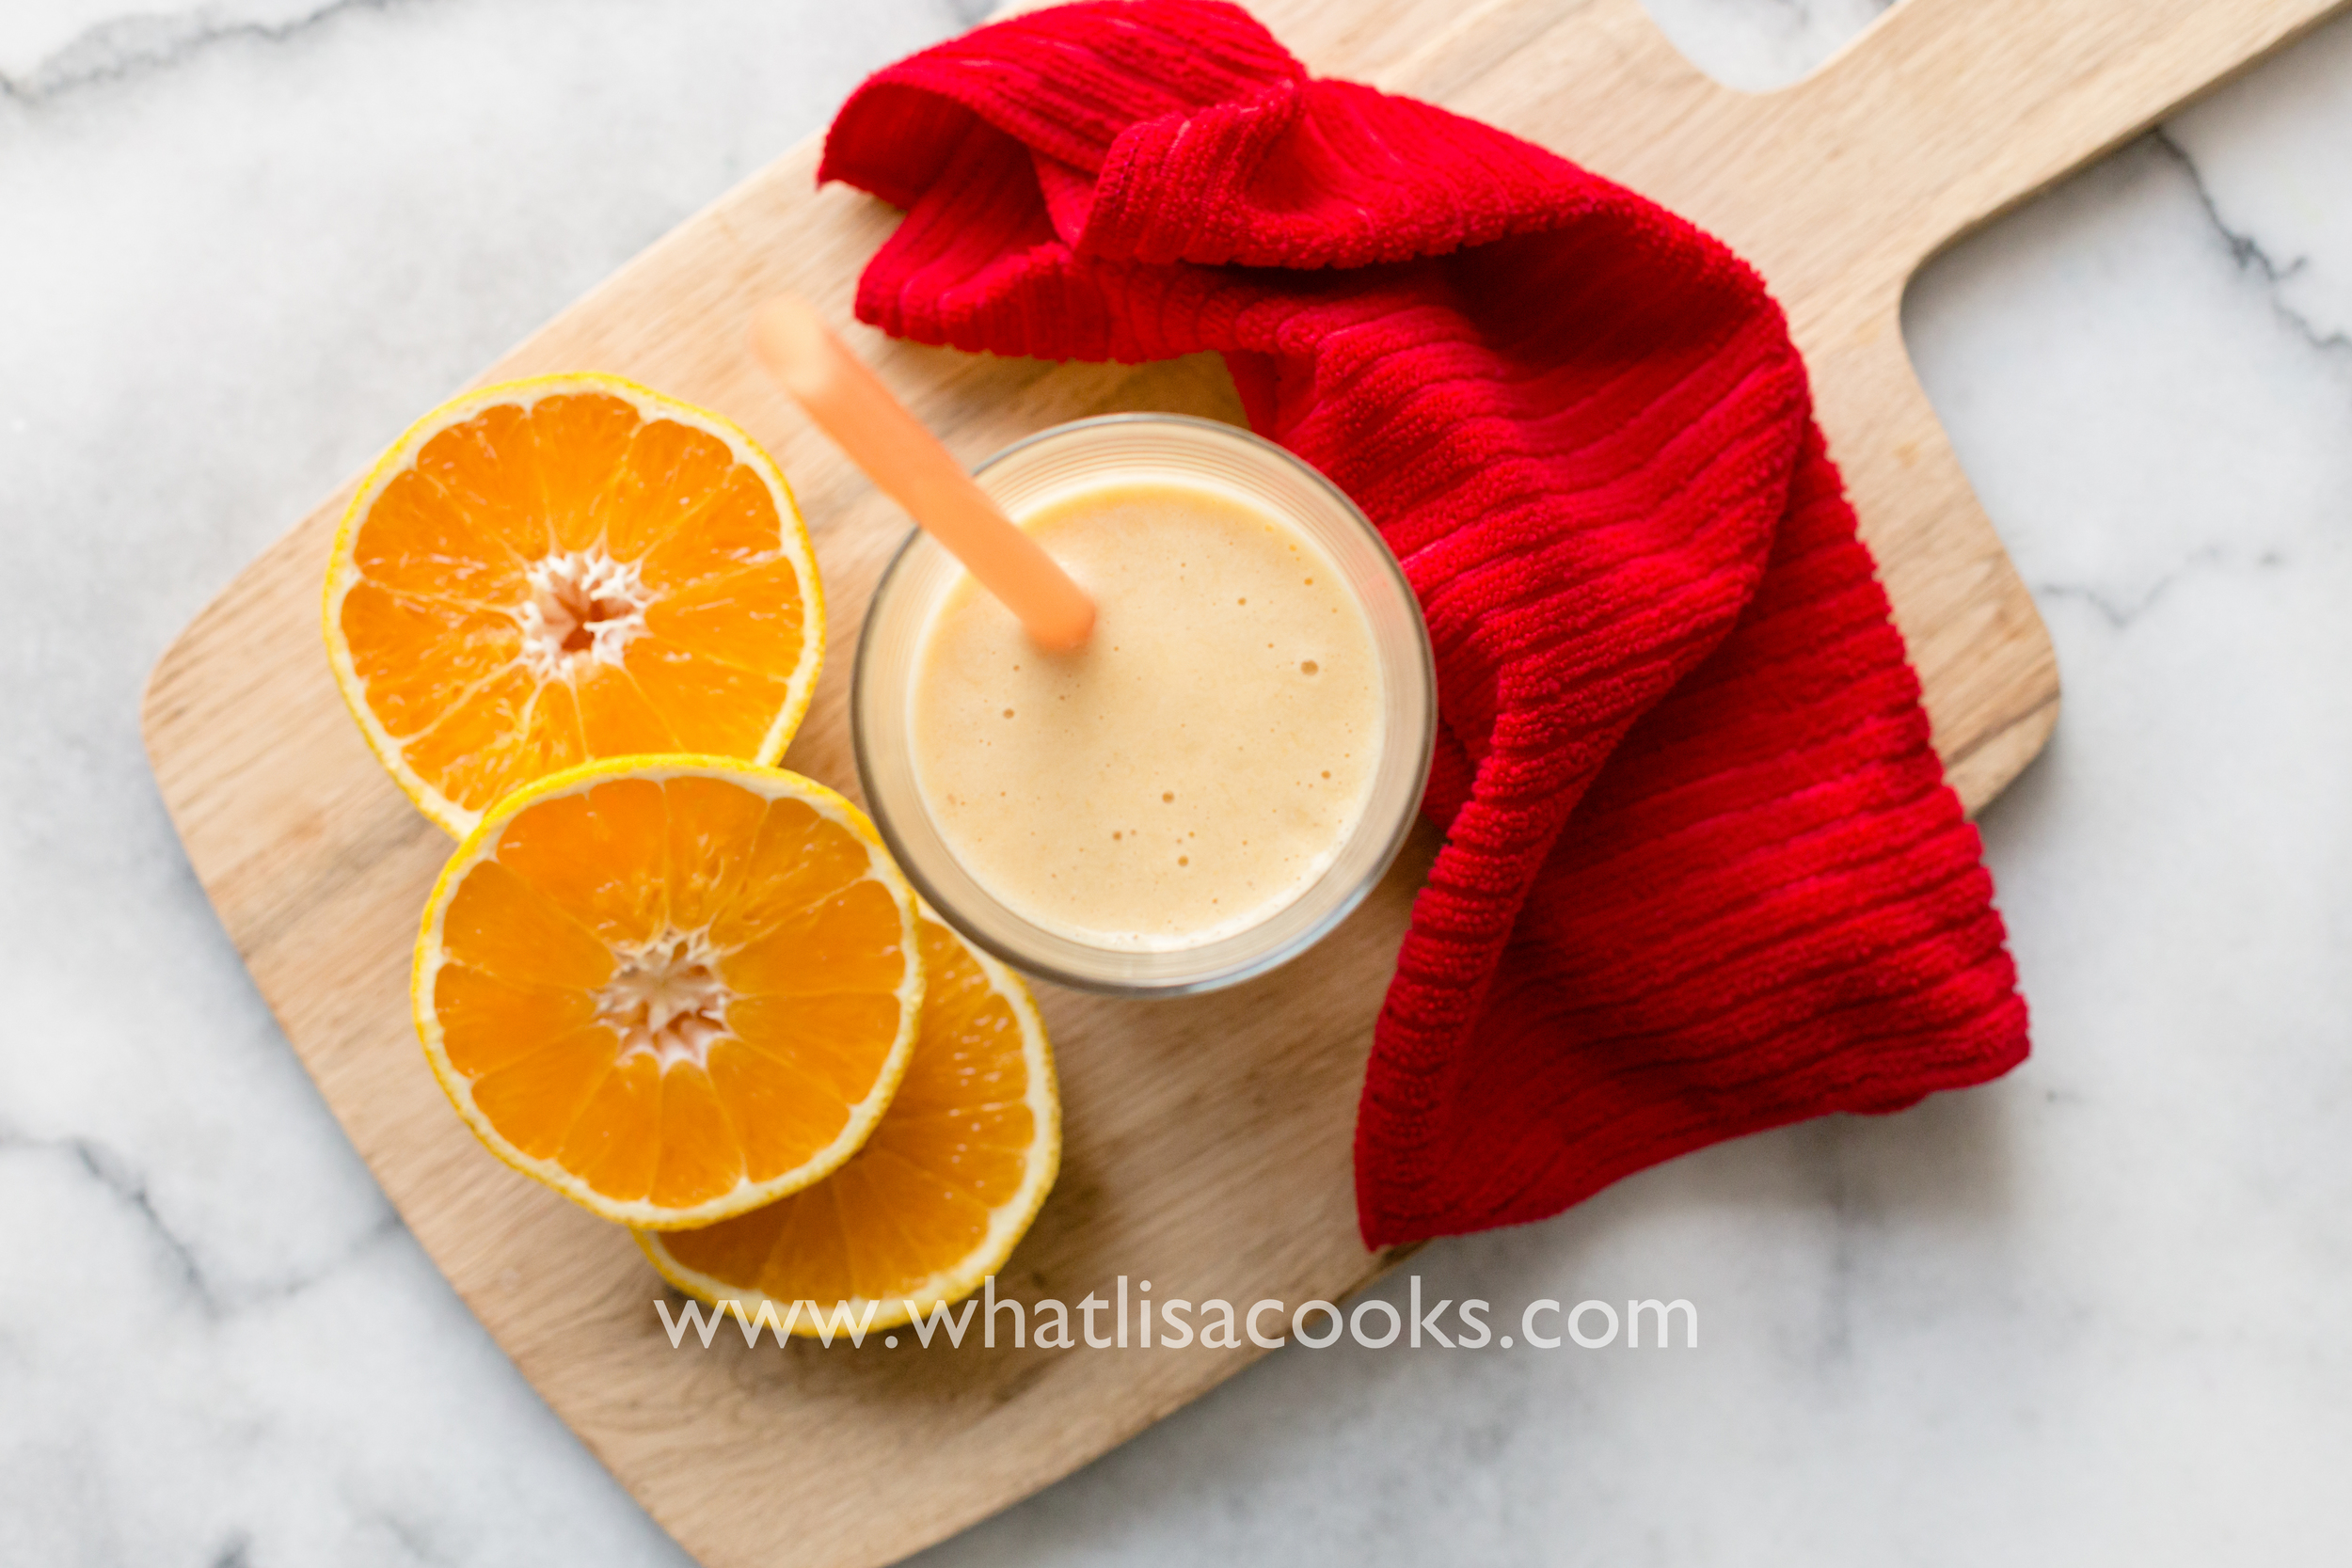
Orange Banana Protein Smoothie
A family favorite smoothie recipe.

This is my favorite smoothie, and my go-to when I want something quick and fresh. It's fast and easy, and I love knowing that it's got whole fruit and no added juice. I make this one for my kids a lot and they love it. And it reminds me of an old fashioned Orange Julius.
Because you are starting with whole oranges, you don't need to add any extra juice or other liquid to this. It's great because you get all the fiber and vitamins from the fruit, not just the juice. You can however add a splash of milk or cream (or almond milk) if you want it a little creamier.
I am making this for four kids, so this recipe makes four small servings, or two large glasses. You could cut this in half or thirds if you want a serving for one.
Ingredients:
3 whole oranges
2 frozen bananas
1/2 cup protein powder
1 Tablespoon honey
1 teaspoon vanilla
Directions:
Peel and quarter oranges. I cut off the ends, and then cut down the sides with a sharp knife. So I end up with a whole orange with no skin. Then I cut into quarters.
Put the oranges in the blender first, and then all the other ingredients, in high powered blender (I use my Vitamix). Start out pulsing slowly so the oranges release their juice. Once you have some liquid in the bottom, then you can turn the blender up to high to puree the whole thing.
You could use fresh bananas, I just like frozen bananas because it makes the smoothie cold. I buy extra bananas, let them get ripe, then peel and break into pieces and freeze. Then I always have bananas in the freezer for smoothies.
For protein powder I prefer a pure whey powder - with no added fillers or sweeteners. This is the brand I buy. It's just whey, nothing else. It has 15 grams of protein per 1/4 cup, so it really gives a nice protein boost in the morning.

Pressure Cooker "Boiled" Eggs
The easiest way to make boiled eggs is to not boil them at all.
I've tried every trick out there for cooking easy to peel eggs. EVERY. TRICK. And I don't think there was a single one that worked consistently. Some methods would work one time, and then not the next time.


Then I discovered cooking eggs in my pressure cooker.
I'm telling you - perfect eggs every time, and the shells practically fall off.
If you have a pressure cooker and haven't hard cooked eggs in it yet, you must try. And if you like hard or soft boiled eggs but you don't have a pressure cooker - you must get one!
If you don't yet have an electric pressure cooker - let me just take a moment and tell you about mine. Don't be scared - they are not the dangerous things they used to be. They are electric and easy to program and super safe.
I have two! The first one I've had for several years and it is my favorite - is the Cuisinart Pressure cooker. It's a workhorse. The second one I had to try because everyone was raving about it is the Instant Pot. They are both great, and they both have their advantages. The Instant Pot is a multi cooker - it can be a slow cooker and a pressure cooker and a rice cooker and a yogurt maker, and I guess it does even more than that because they call it a 7-in-1 cooker. If you really think that you will use all those other features, then it is a great choice. But as for just pressuring cooking, I like the Cuisinart best. It has more options for adjusting your pressure cooking settings, and more options for timing, simmering, and sauteeing your ingredients before you start the cooking cycle. Those things are also possible with the Instant Pot, but I just find the Cuisinart to be more intuitive and easier to program and use. Also, it's less expensive. Either way though, you can't go wrong.
Anyway, back to the eggs. Here are the instructions.
Pressure Cooker Eggs:
Place a rack or trivet in the bottom of your cooker pot
Add about a cup of water - I like to use hot water just to get it going faster. You want the water to be under the rack, not touching the eggs. (be sure to read the directions on your cooker for the minimum amount of liquid you can use - I think it's about a cup for most.)
Carefully place eggs on the rack. A lot of recipes you read for this have you putting them in separate little cups or making little foil nests for them. I have never found this to be necessary and it just takes more time. Yes, occasionally one or two will crack, but I've found that this happens regardless of whether you "nest" them, so I really don't see the point. You can cook just one or two at a time if you prefer to eat them warm (best for soft cooked eggs), or I can fit about 10 at a time in my cooker without crowding them too much.
Close your cooker and set it to low pressure.
Cook according to the times below.
When your time is up - use the quick release method and get the eggs in an ice bath to quickly stop the cooking. I sometimes just dump a bunch of ice and cold water right in the pressure cooker pot on top of the eggs. This is quicker than lifting them out one at a time.
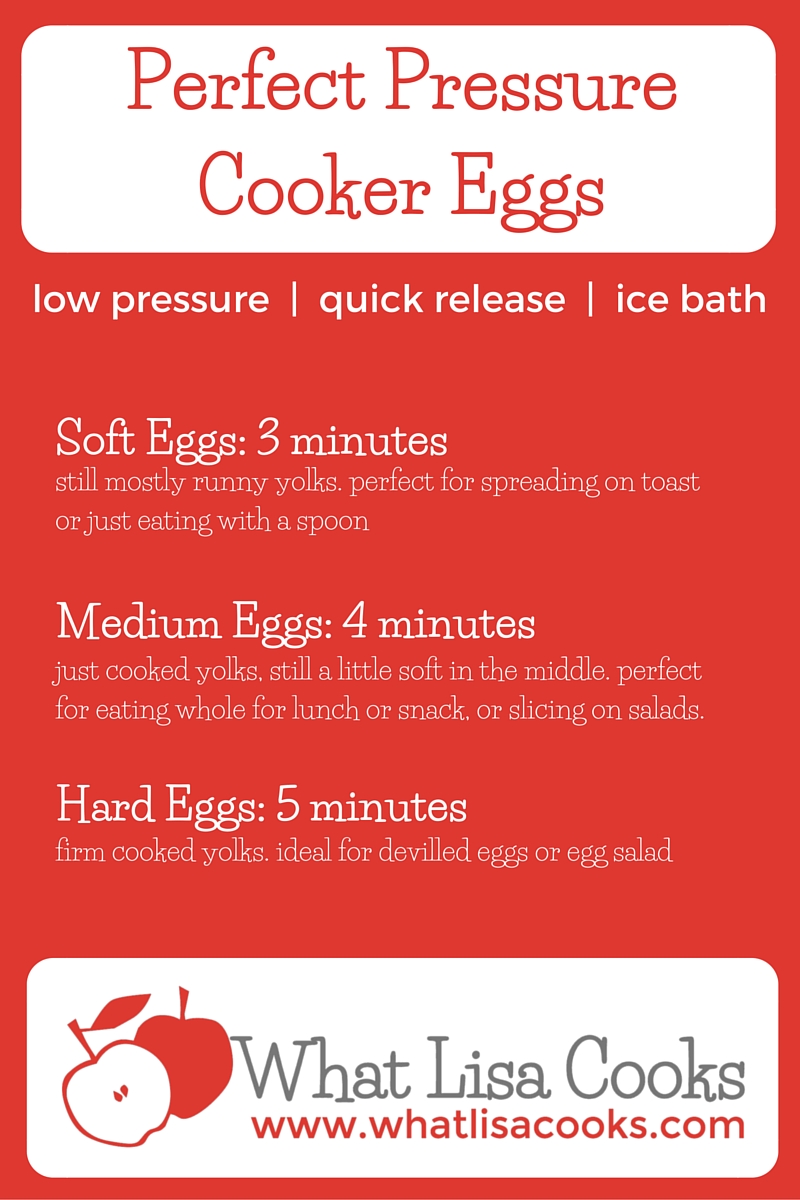
Cook times for pressure cooker eggs:
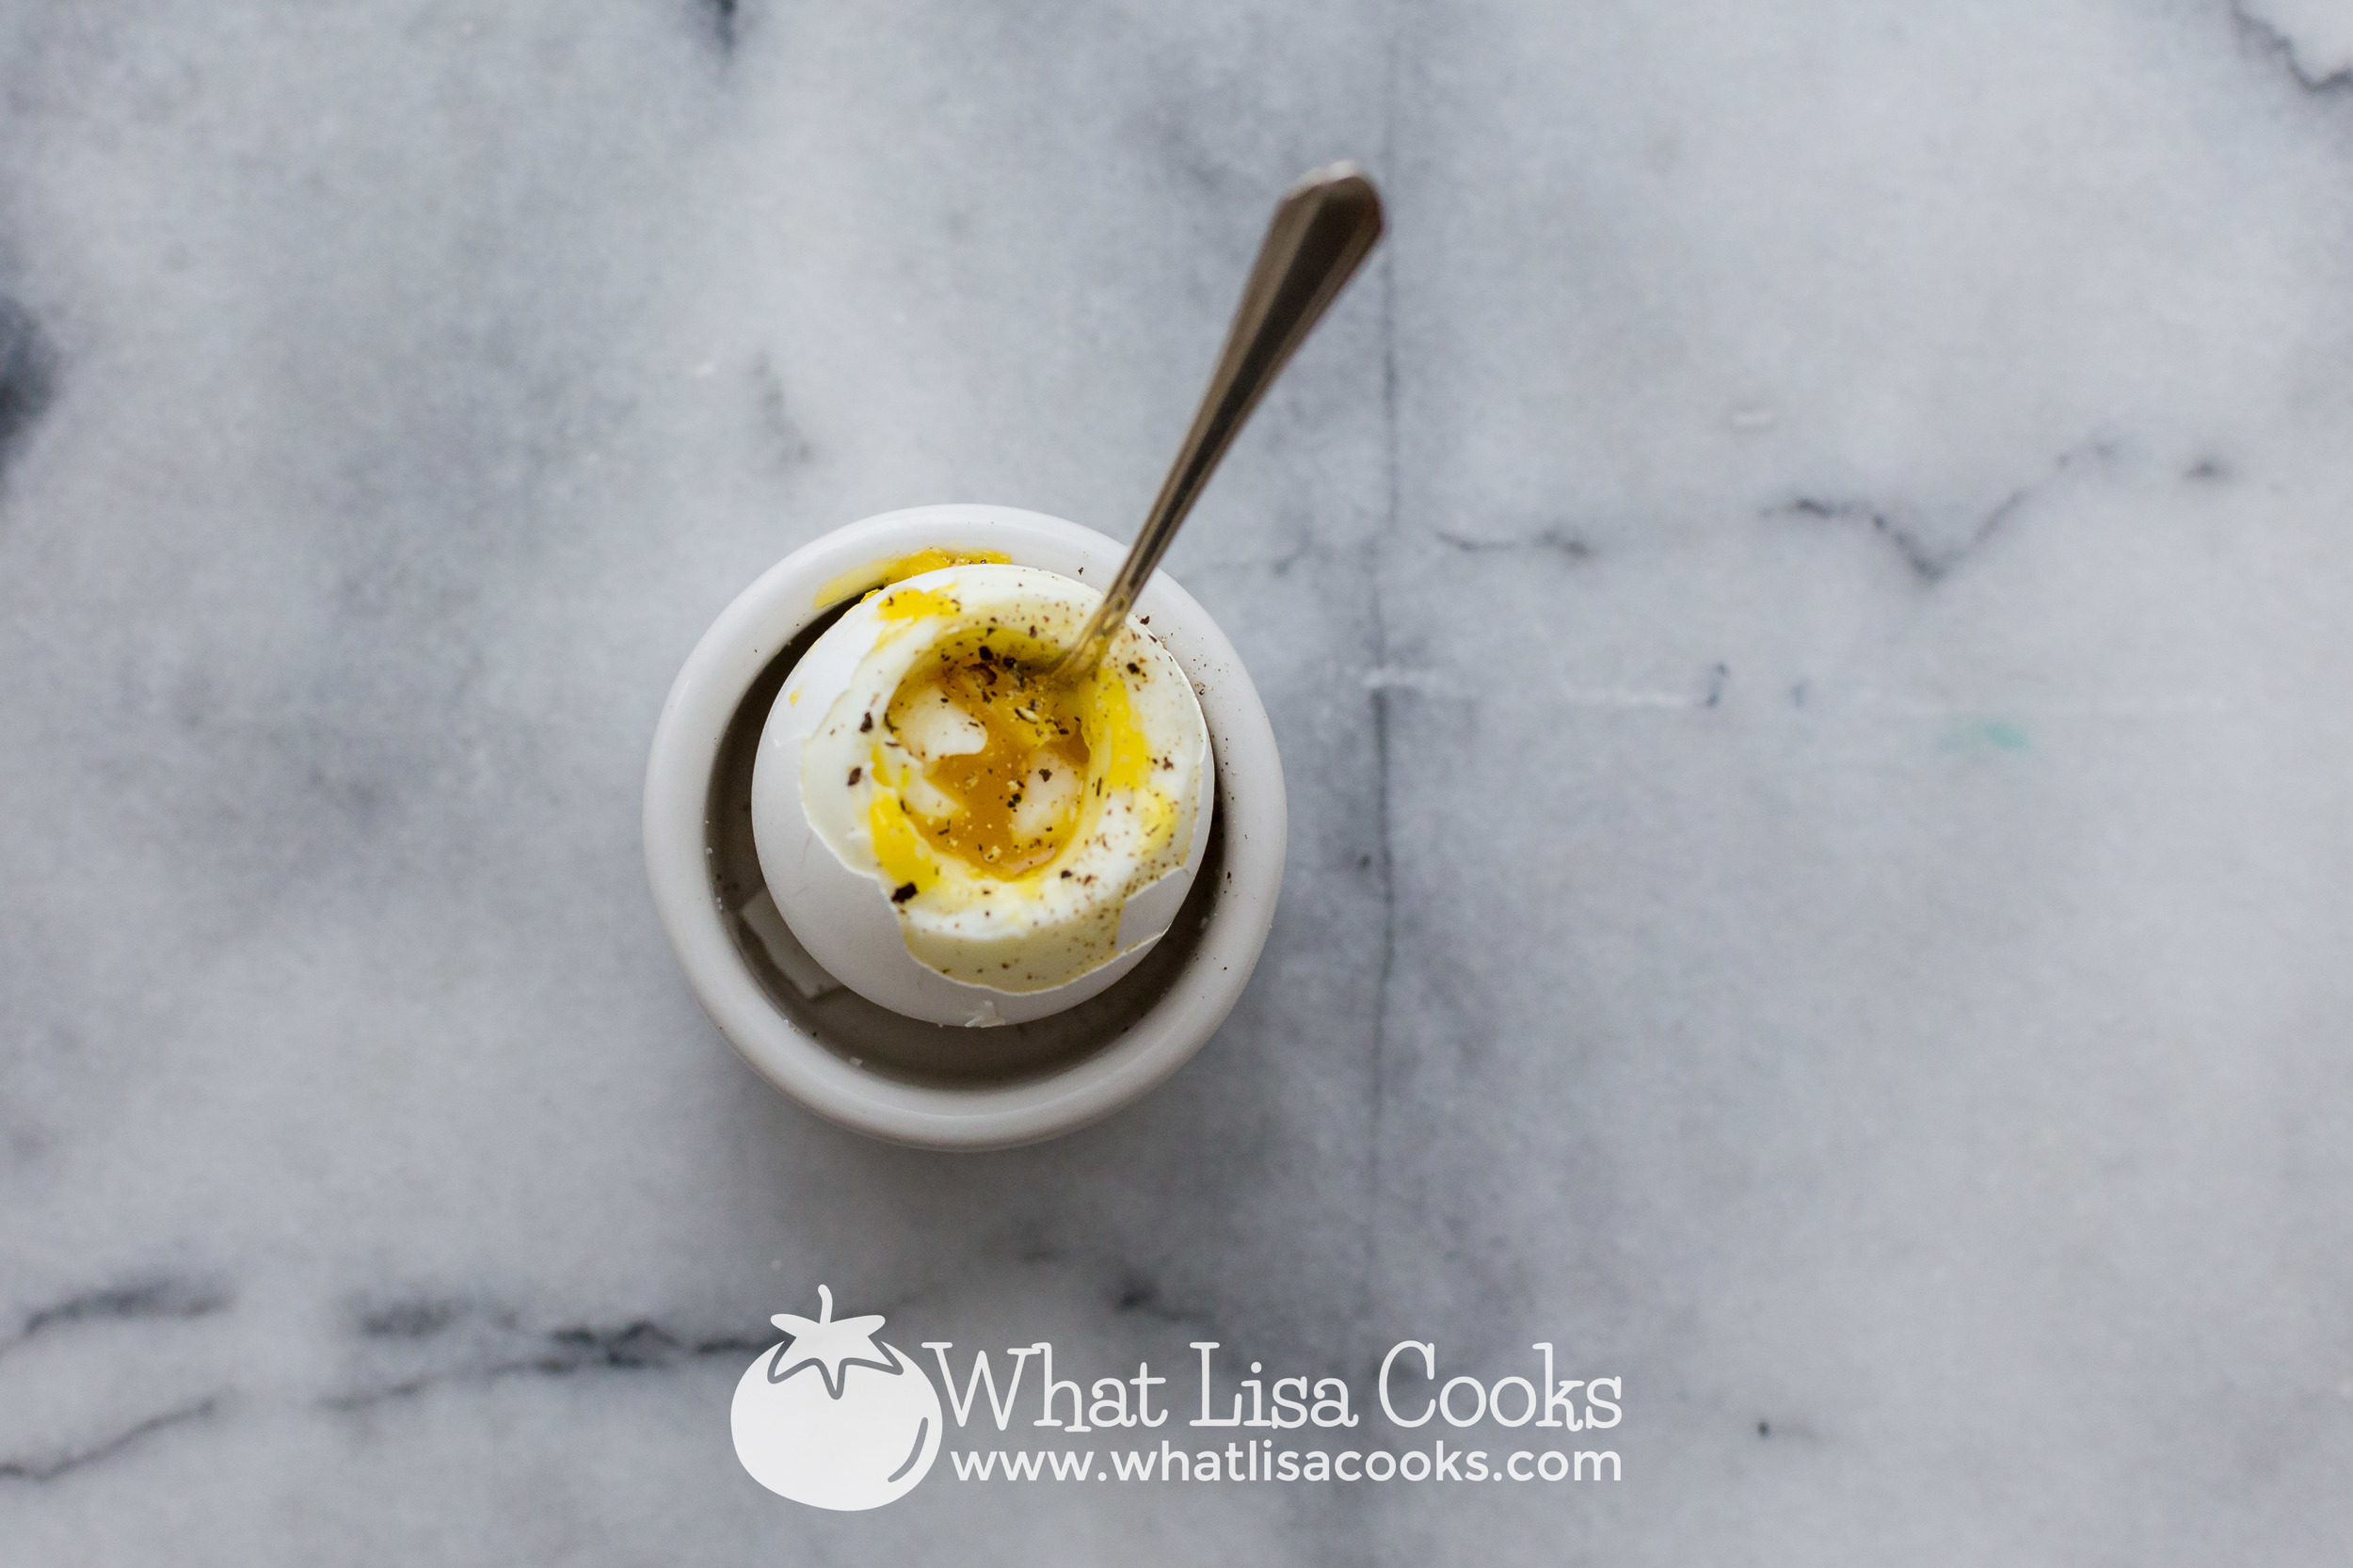
Soft Cooked: 3 minutes on low pressure, quick release, ice bath. These will have still slightly runny yolks. I LOVE these for breakfast - either mashed up on toast or just lop of the top of the shell and eat them with a spoon.
Medium Cooked: 4 minutes for on low pressure ,quick release, ice bath. These will have just solidified yolks, maybe sometimes with a small dot of wet still in the very center. This is my favorite if I'm making eggs to peel and eat whole for lunch or snack. I personally love to dip them in salt. I think this is also perfect for slicing on a salad.
Hard Cooked: 5 minutes on low pressure, quick release, ice bath. These will have fully solid yolks. This is best for making deviled eggs or egg salad.
But seeing is believing! You have to see how easy this is, so I made video. If you don't want to watch the whole cooking process, just skip forward to about the 4 minute mark, to see how they peel so easily that I can do it with one hand!

Lemon Curd
An easy recipe for a homemade lemon curd for a decadent treat your family will love.
I absolutely love lemon curd, it tastes like such a decadent treat. And this homemade lemon curd recipe is so easy you can enjoy this delicious treat any time you want. It’s lovely any time, but it’s especially nice for any kind of special occasion breakfast, and it makes a really lovely little gift for neighbors and friends.
We've been buying this amazing locally made Greek yogurt. It's a total treat for us because it is EXPENSIVE. We're talking $12 for a quart of yogurt. And you know my kids can polish that off in one sitting! I guess if I put it in perspective, $12 for yogurt is certainly cheaper and healthier than taking them out for breakfast. Or maybe I should compare it to going out for ice cream - because this stuff is so decadent that it's more like a desert. Only, yogurt! Protein! So it's better than taking them out for ice cream. Still, expensive for yogurt. We've tried every flavor and our very favorite is the lemon curd flavor.
Since my kids keep asking for it, rather than break the bank buying more and more and more, I figured I'd better try to make my own. It's honey sweetened, creamy Greek yogurt, with lemon curd folded in. I can do that. I make yogurt all the time, so that part is no big deal. Then it just comes down to making lemon curd.
I asked for suggestions, and I searched around a bit, and the recipe I came up with is a combination of a few things. Ingredients and quantities mostly influenced by a recipe that a reader shared with me, some of the technique borrowed from an Ina Garten recipe, and some just made up because it seemed right to me. That's how I cook.
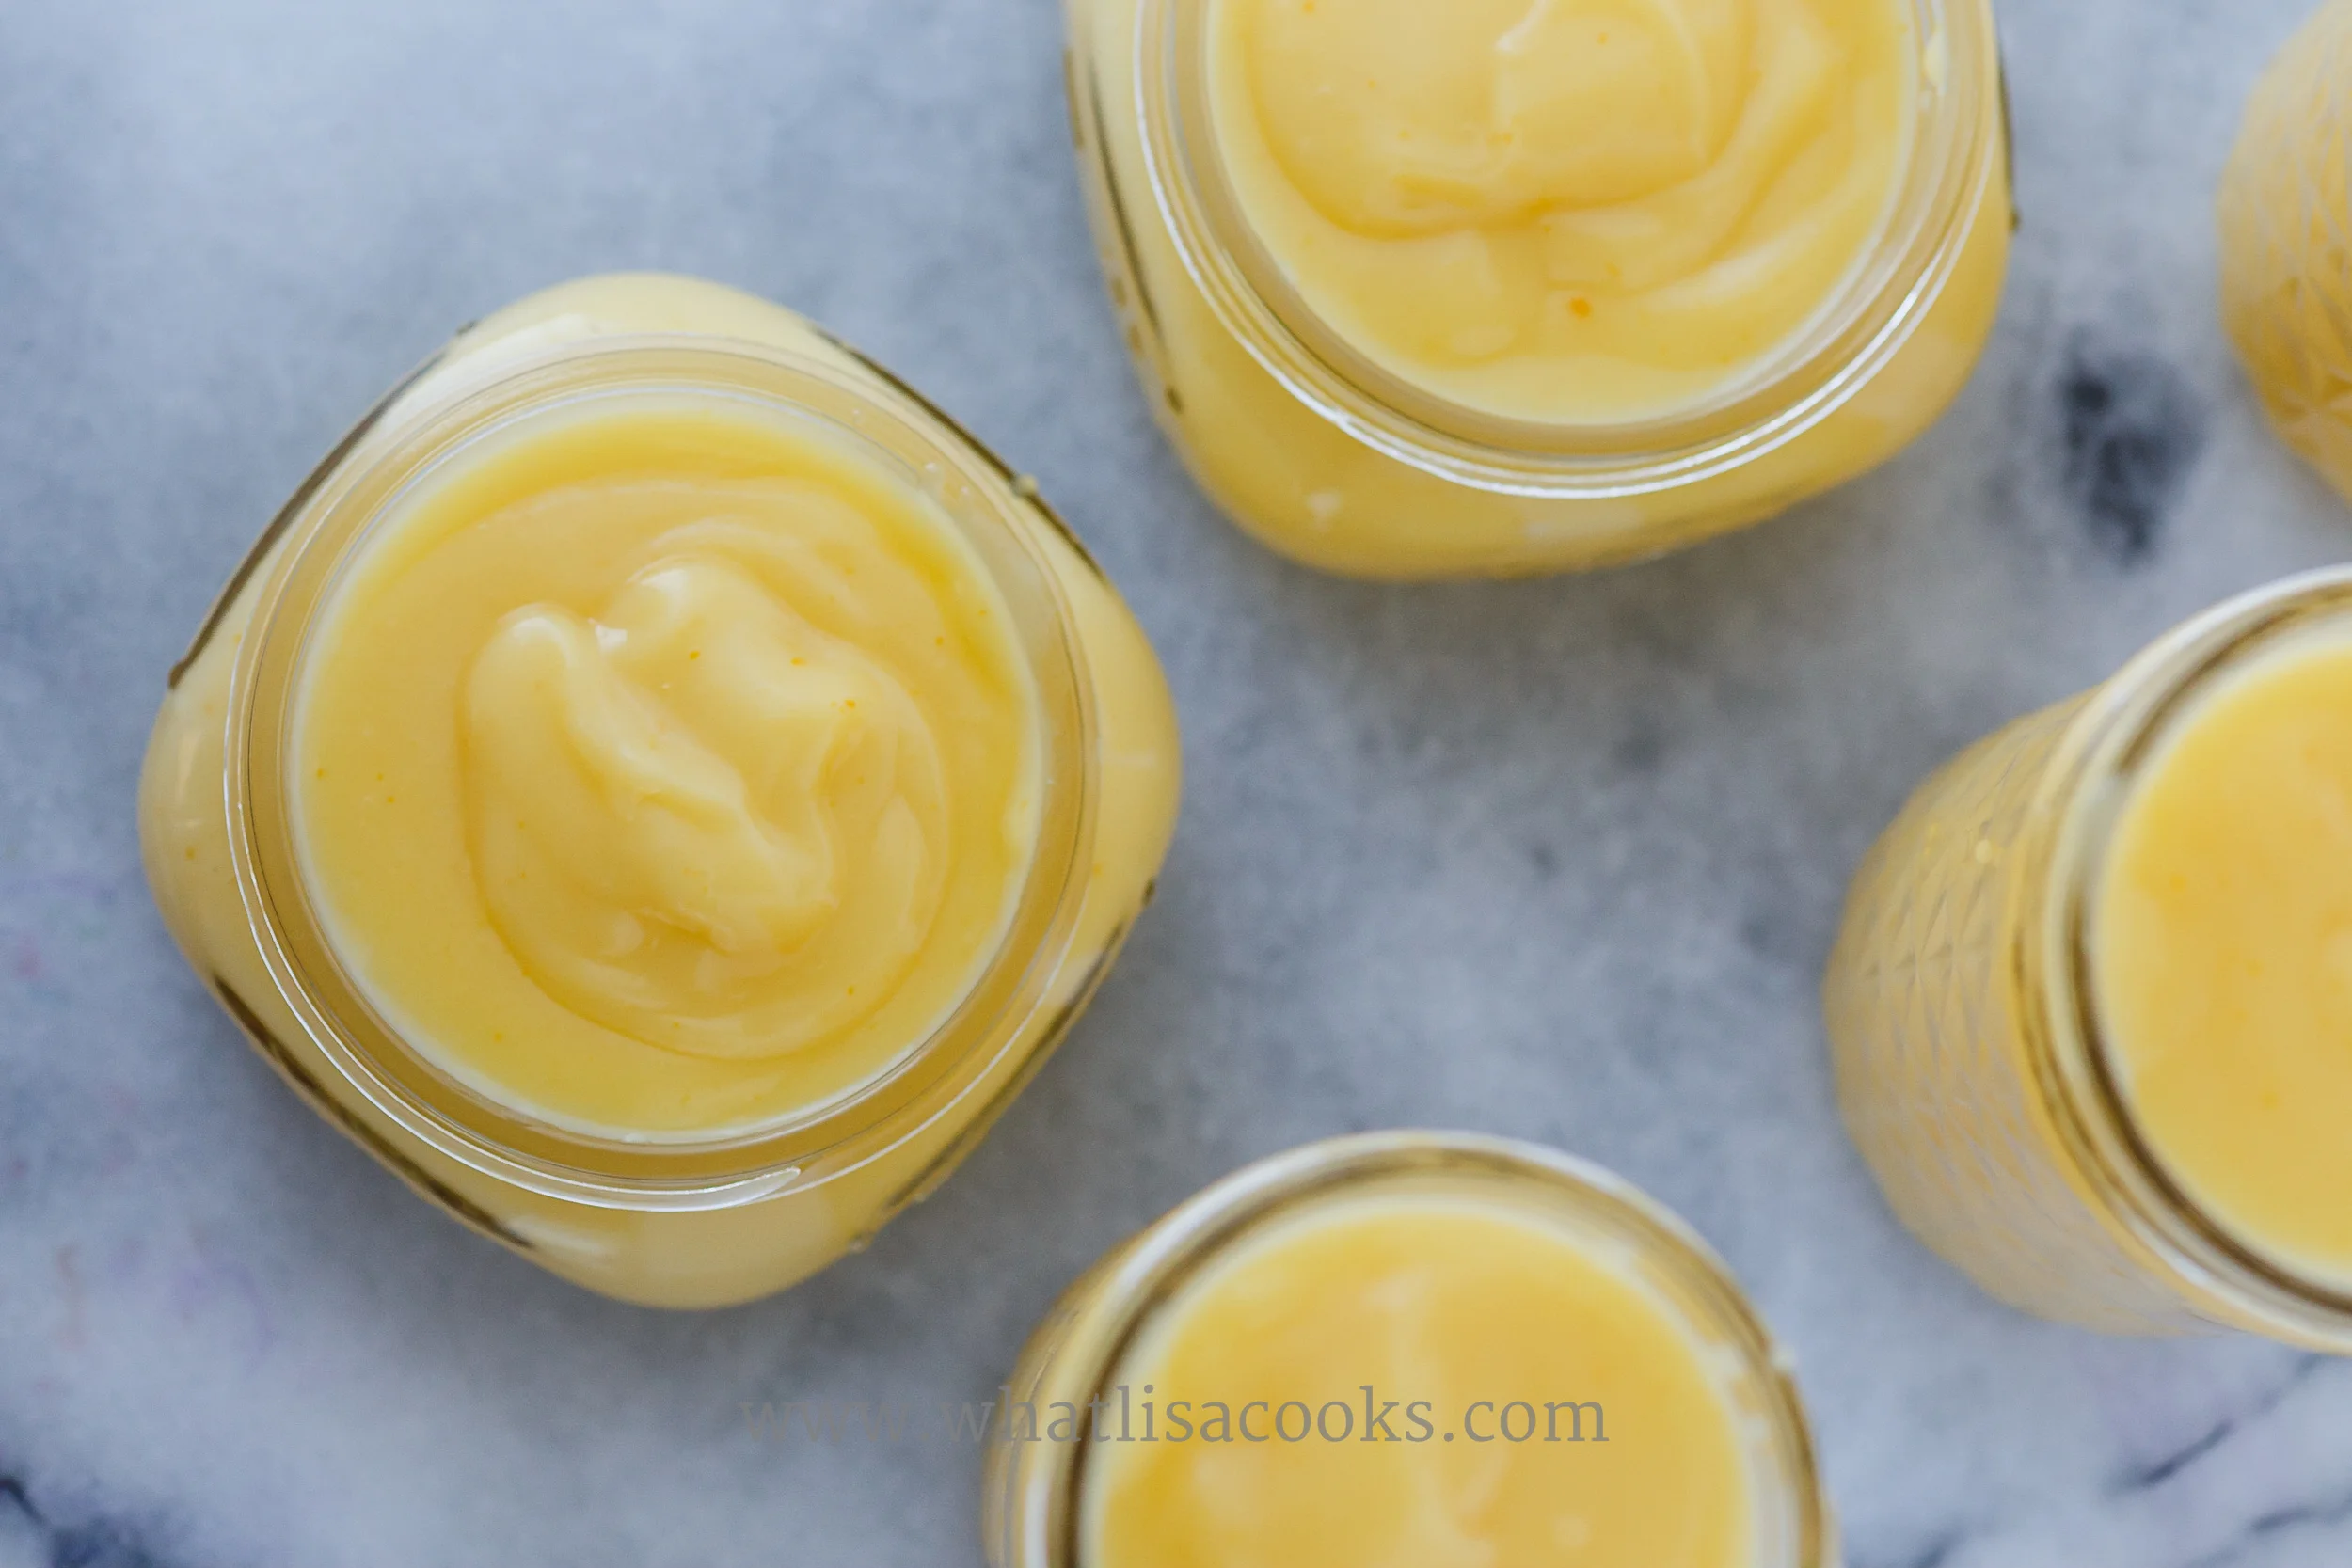
This is a big recipe. It makes about 4 pints - the jars you see here plus a little more (I spilled a little). You could certainly cut it in half if you don't think you'll use this up. But my philosophy when you're making yummy things that take a bit of work, is that you might as well make more and share. It's delicious and decadent and such a special thing to share. So make a few jars and give one or two away, people will love you.
Easy Homemade Lemon Curd
Ingredients:

12 eggs
2 cups lemon juice
Peels from about 6 lemons (about 1/4 cup)
3 cups sugar
1 cup (2 sticks) unsalted butter
1 teaspoon vanilla
pinch of salt
Directions:
Using a carrot peeler, remove the zest of the lemons, being careful to avoid the white pith.
Put the zest in a high powered blender (or food processor fitted with the steel blade). Add the sugar and pulse until the zest is very finely minced into the sugar.
Add eggs, lemon juice, salt and vanilla and process until well blended.
Pour through a strainer into a pot. (You could skip this step, but I thought my kids might not eat it if the texture of the lemon zest remained.)
Add the butter, cut into chunks.
Cook slowly over low heat, stirring constantly. The butter will melt and the mixture will slowly start to thicken. This should take about 10 minutes.
When it is thickened, coating a spoon, remove from heat.
Pour into containers and refrigerate to cool.
It's all really quite easy, and I think if you wanted to speed things up you could probably skip the separate step of pulsing the lemon zest and sugar first, and instead just put everything in the blend and whiz it up and then pour into the pan.
I really want to try a version of this with just honey. I did actually use a bit of honey in this one - I only had about 2 1/2 cups of sugar, so I used that plus 1/2 cup of honey.
We will be enjoying this mixed with yogurt for breakfast. I think it would be wonderful over vanilla ice cream, or spread between layers of a white cake, or even in the place of jam on a muffin or toast.
Enjoy!

Meatballs for the family
My basic recipe for meatballs for your weeknight spaghetti and meatballs dinner.
Oh meatballs! Who doesn't love them? I think they have become a staple for busy American families. A big bowl of spaghetti and meatballs, I think we all grew up on that. I've got one who, at 4 years old, already begs me to make it for her. It's a classic melting pot thing, originally Italian, but now I'd say it's classic American food. But all too often meatballs are purchased in big bags at warehouse stores, with way too much filler and salt and who knows what other processed ingredients. I get it, I used to buy those. But with a little bit time on a weekend afternoon, you can make something that is so much better! They are not hard to make, and are yet another very flexible recipe, and you'll be so glad you did.
To top it off here - I'm not only giving you a great meatball recipe, I'm going to tell you how to cook them so that you'll end up with the most amazing tasting sauce to serve them with!
Ingredients:

4 pounds of ground meat (any kind you like, but I like to use at least 3 kinds together)
3 eggs
1/2 cup grated parmesan cheese
1 Tablespoons worchestershire
1 Tablespoon horseradish
1 Tablespoon garlic powder
1 Tablespoon onion powder
1 Tablespoon dried parsley
1 Tablespoon dried celery
2 teaspoons salt
1 teaspoon fresh ground pepper
a couple quarts of good tomato sauce
First - about the meat. This is totally personal preference. Some people do all beef, some do all turkey. I personally like a blend of meats, I think it makes the meatballs more flavorful. I usually do beef, turkey, and either lamb or pork (this time I actually had a pound of each).
A few eggs help hold everything together. A lot of recipes suggest that you need bread to help bind them, and I have found that this is simply not true. Bread is a great filler. If your budget is tight and you want to make a couple pounds of meat go even further, then bread works great for that, so go for it. (And if you're going to do that to save a little money, then you might as well go one further and use free bread crumbs. I keep a bag in my freezer, into which I throw the ends of the loaves of bread that my family won't eat. When the bag is full, I dump it into the food processor and let her rip - and you have free bread crumbs. Don't buy them!) Anyway - I sidetrack. The point is - breadcrumbs aren't in my recipe because I don't think they're necessary, but feel free to add them if you want to stretch your meat a little further. To this amount of meat I would add maybe up to a cup of breadcrumbs.
After that - the other ingredients are all about adding a little flavor. But I try not to go overboard, I want to actually taste my meat. So many recipes have so much other stuff in them that it's hard to even know what the meat tastes like. I like meat, so I want to taste it. Don't feel like you have to follow this to the letter - if you want more or less of something, go for it. Dried celery can be hard to find, but I dry my own, so I have it handy. Leave it out, or add a little celery seed instead. Or add some oregano, or basil, whatever you like.

Directions:
Throw everything, except the tomato sauce, in a bowl. Roll up your sleeves, and get in there. I've tried other ways, and really the easiest is to just mix it with your hands. Don't worry. You're washable.
Meanwhile - get your sauce in a big pot on the stove and get it simmering. I made a super simple sauce in the summer time with just fresh garden tomatoes, garlic and salt, blended in my vitamix - for this dinner I just took some of my homemade sauce out of the freezer. But it's not summer any more, so fresh tomatoes are not the thing. But you can easily make a similar quick sauce with just a couple quarts of good organic canned tomatoes. Throw them in the blender with some garlic and salt, a little basil if you want. In my opinion, that's all you need. You can buy jars of premade sauce if you want, but I don't think it's necessary.
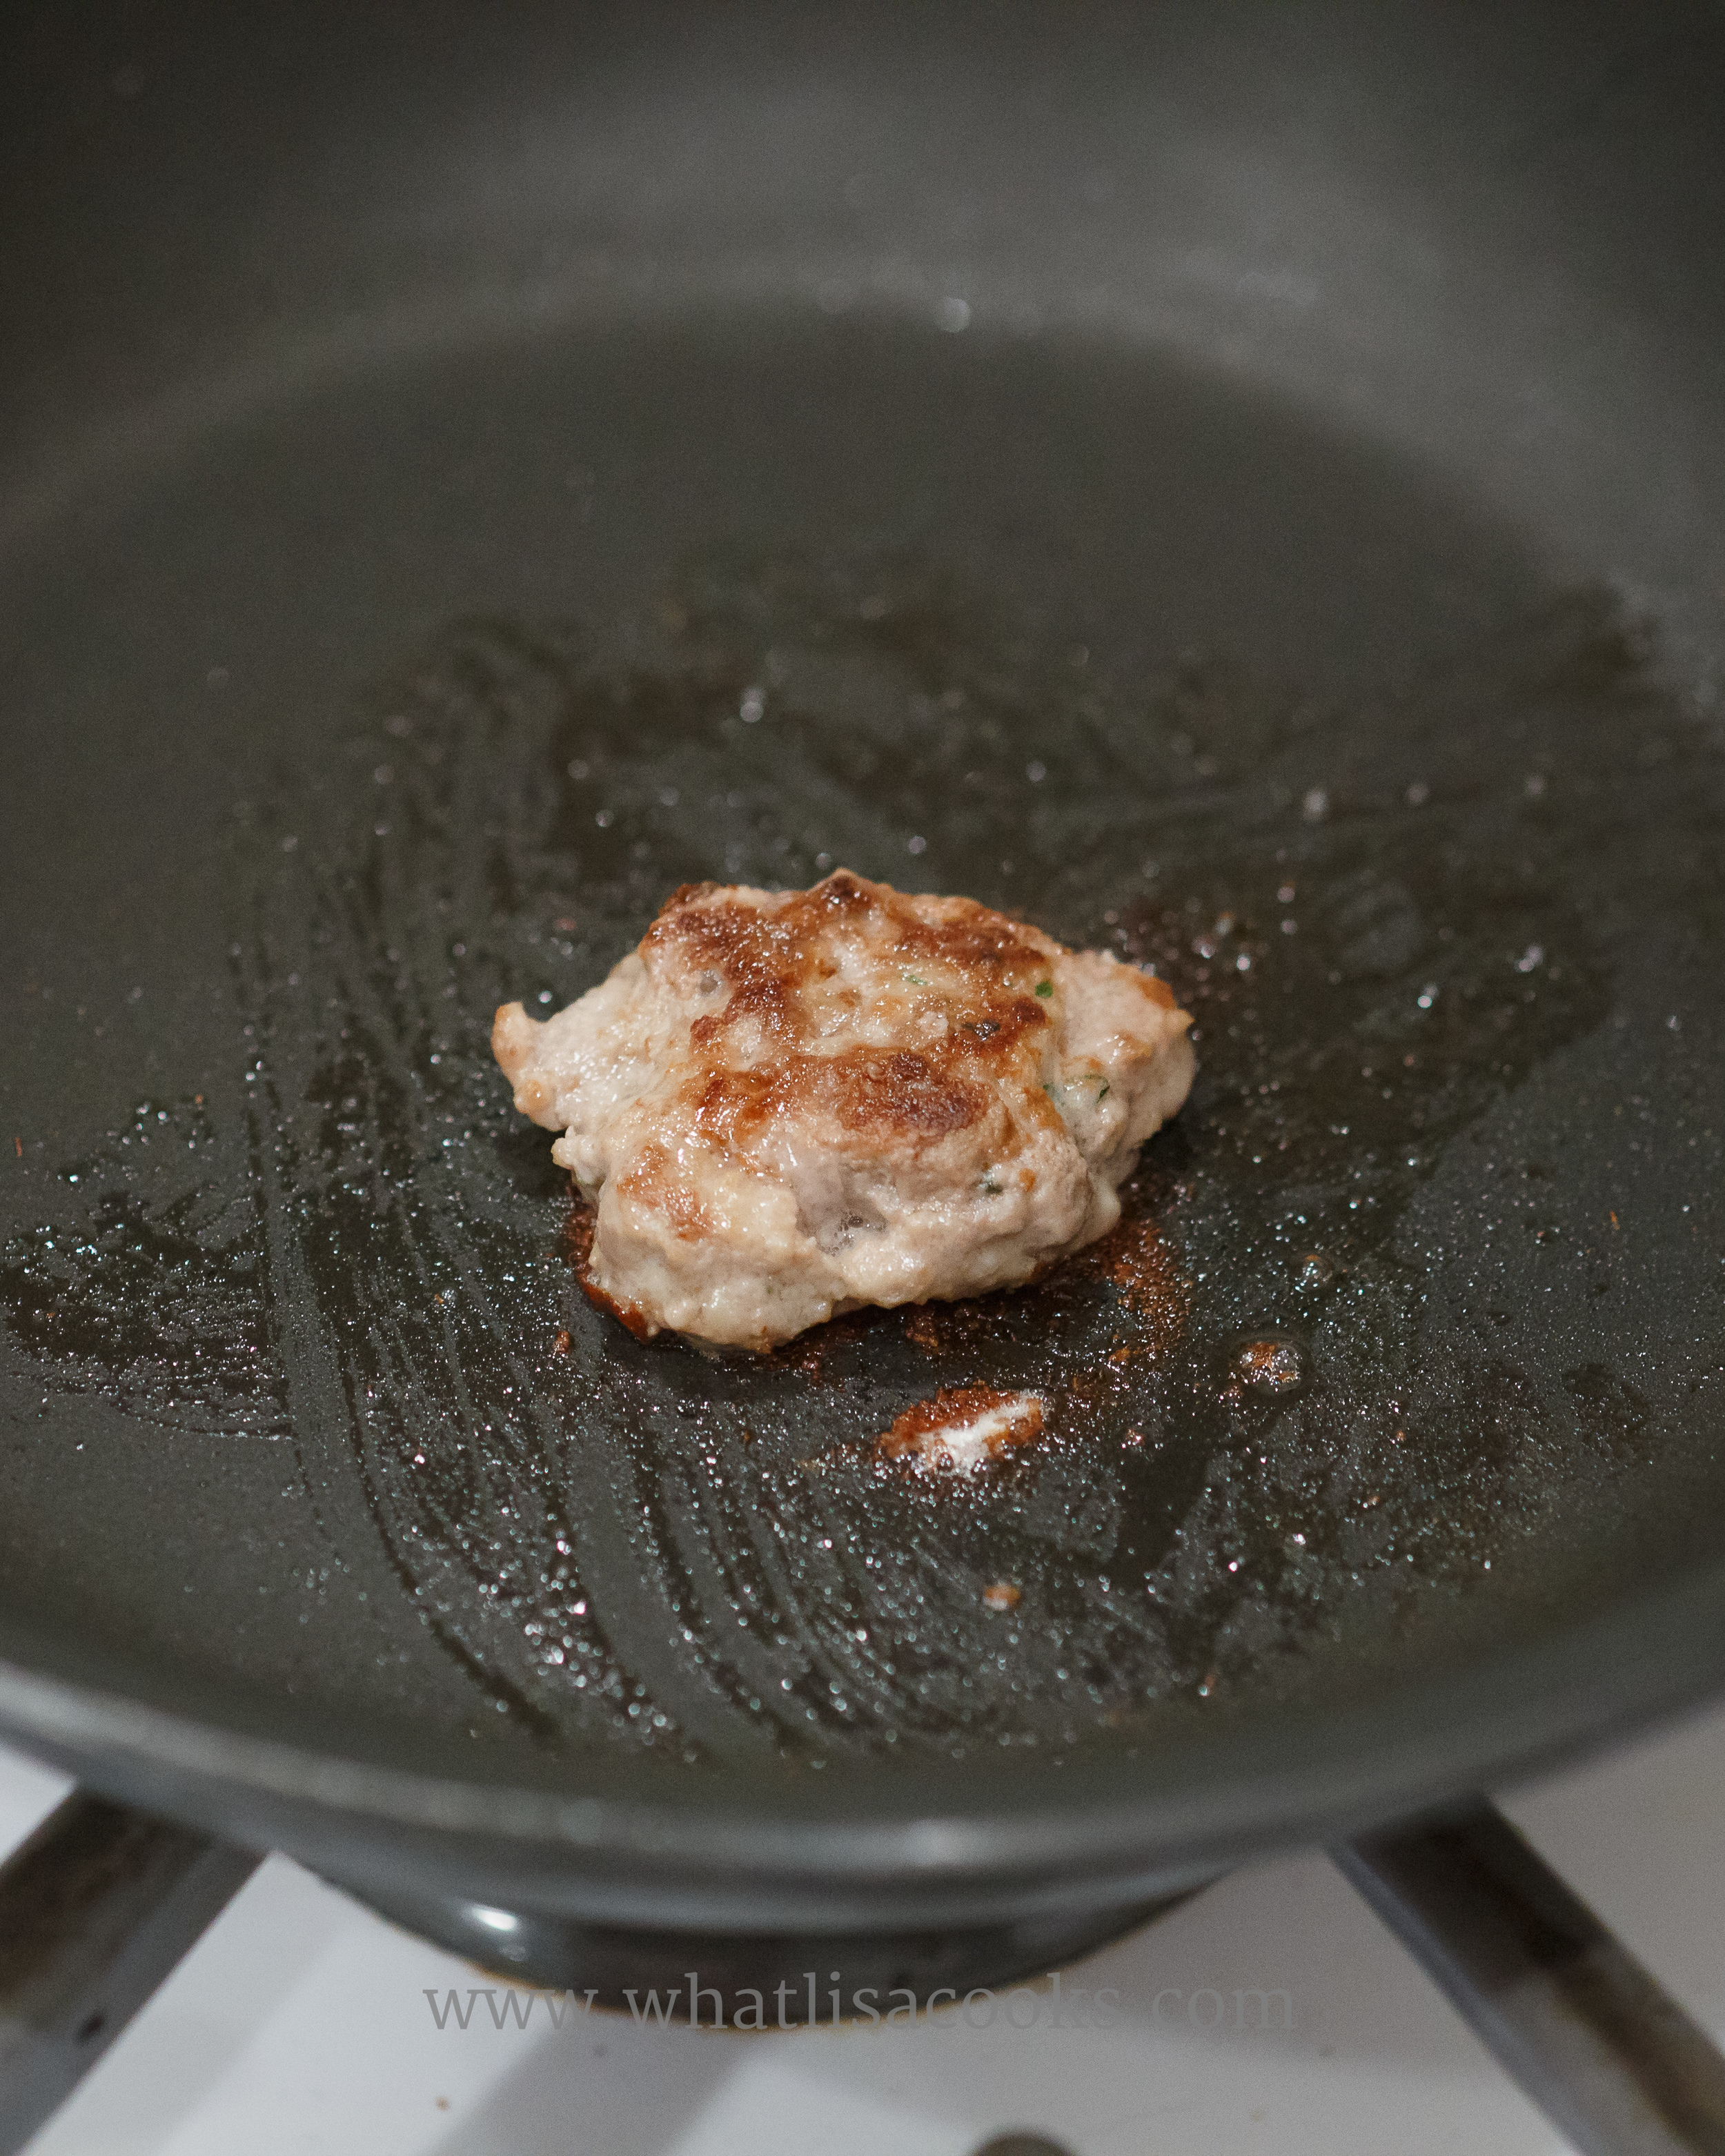
Back to the meatballs. Once it's all really well mixed, pinch off a little piece and cook it in a pan. You want to taste it for seasoning before you cook them all up. A few minutes on each side over medium/high heat should be good. Give it a taste and see what you think. Need more salt? more garlic? more cheese? Adjust your seasoning and then you're ready to go.
Start shaping them into balls. I like to make them small-ish, about the size of a walnut or a golf ball, maybe a little smaller. I love an over-sized meatball as well, but I think smaller is more practical for family meals - little kids have an easier time handling them, they cook more evenly, and they are easier to freeze and reheat.

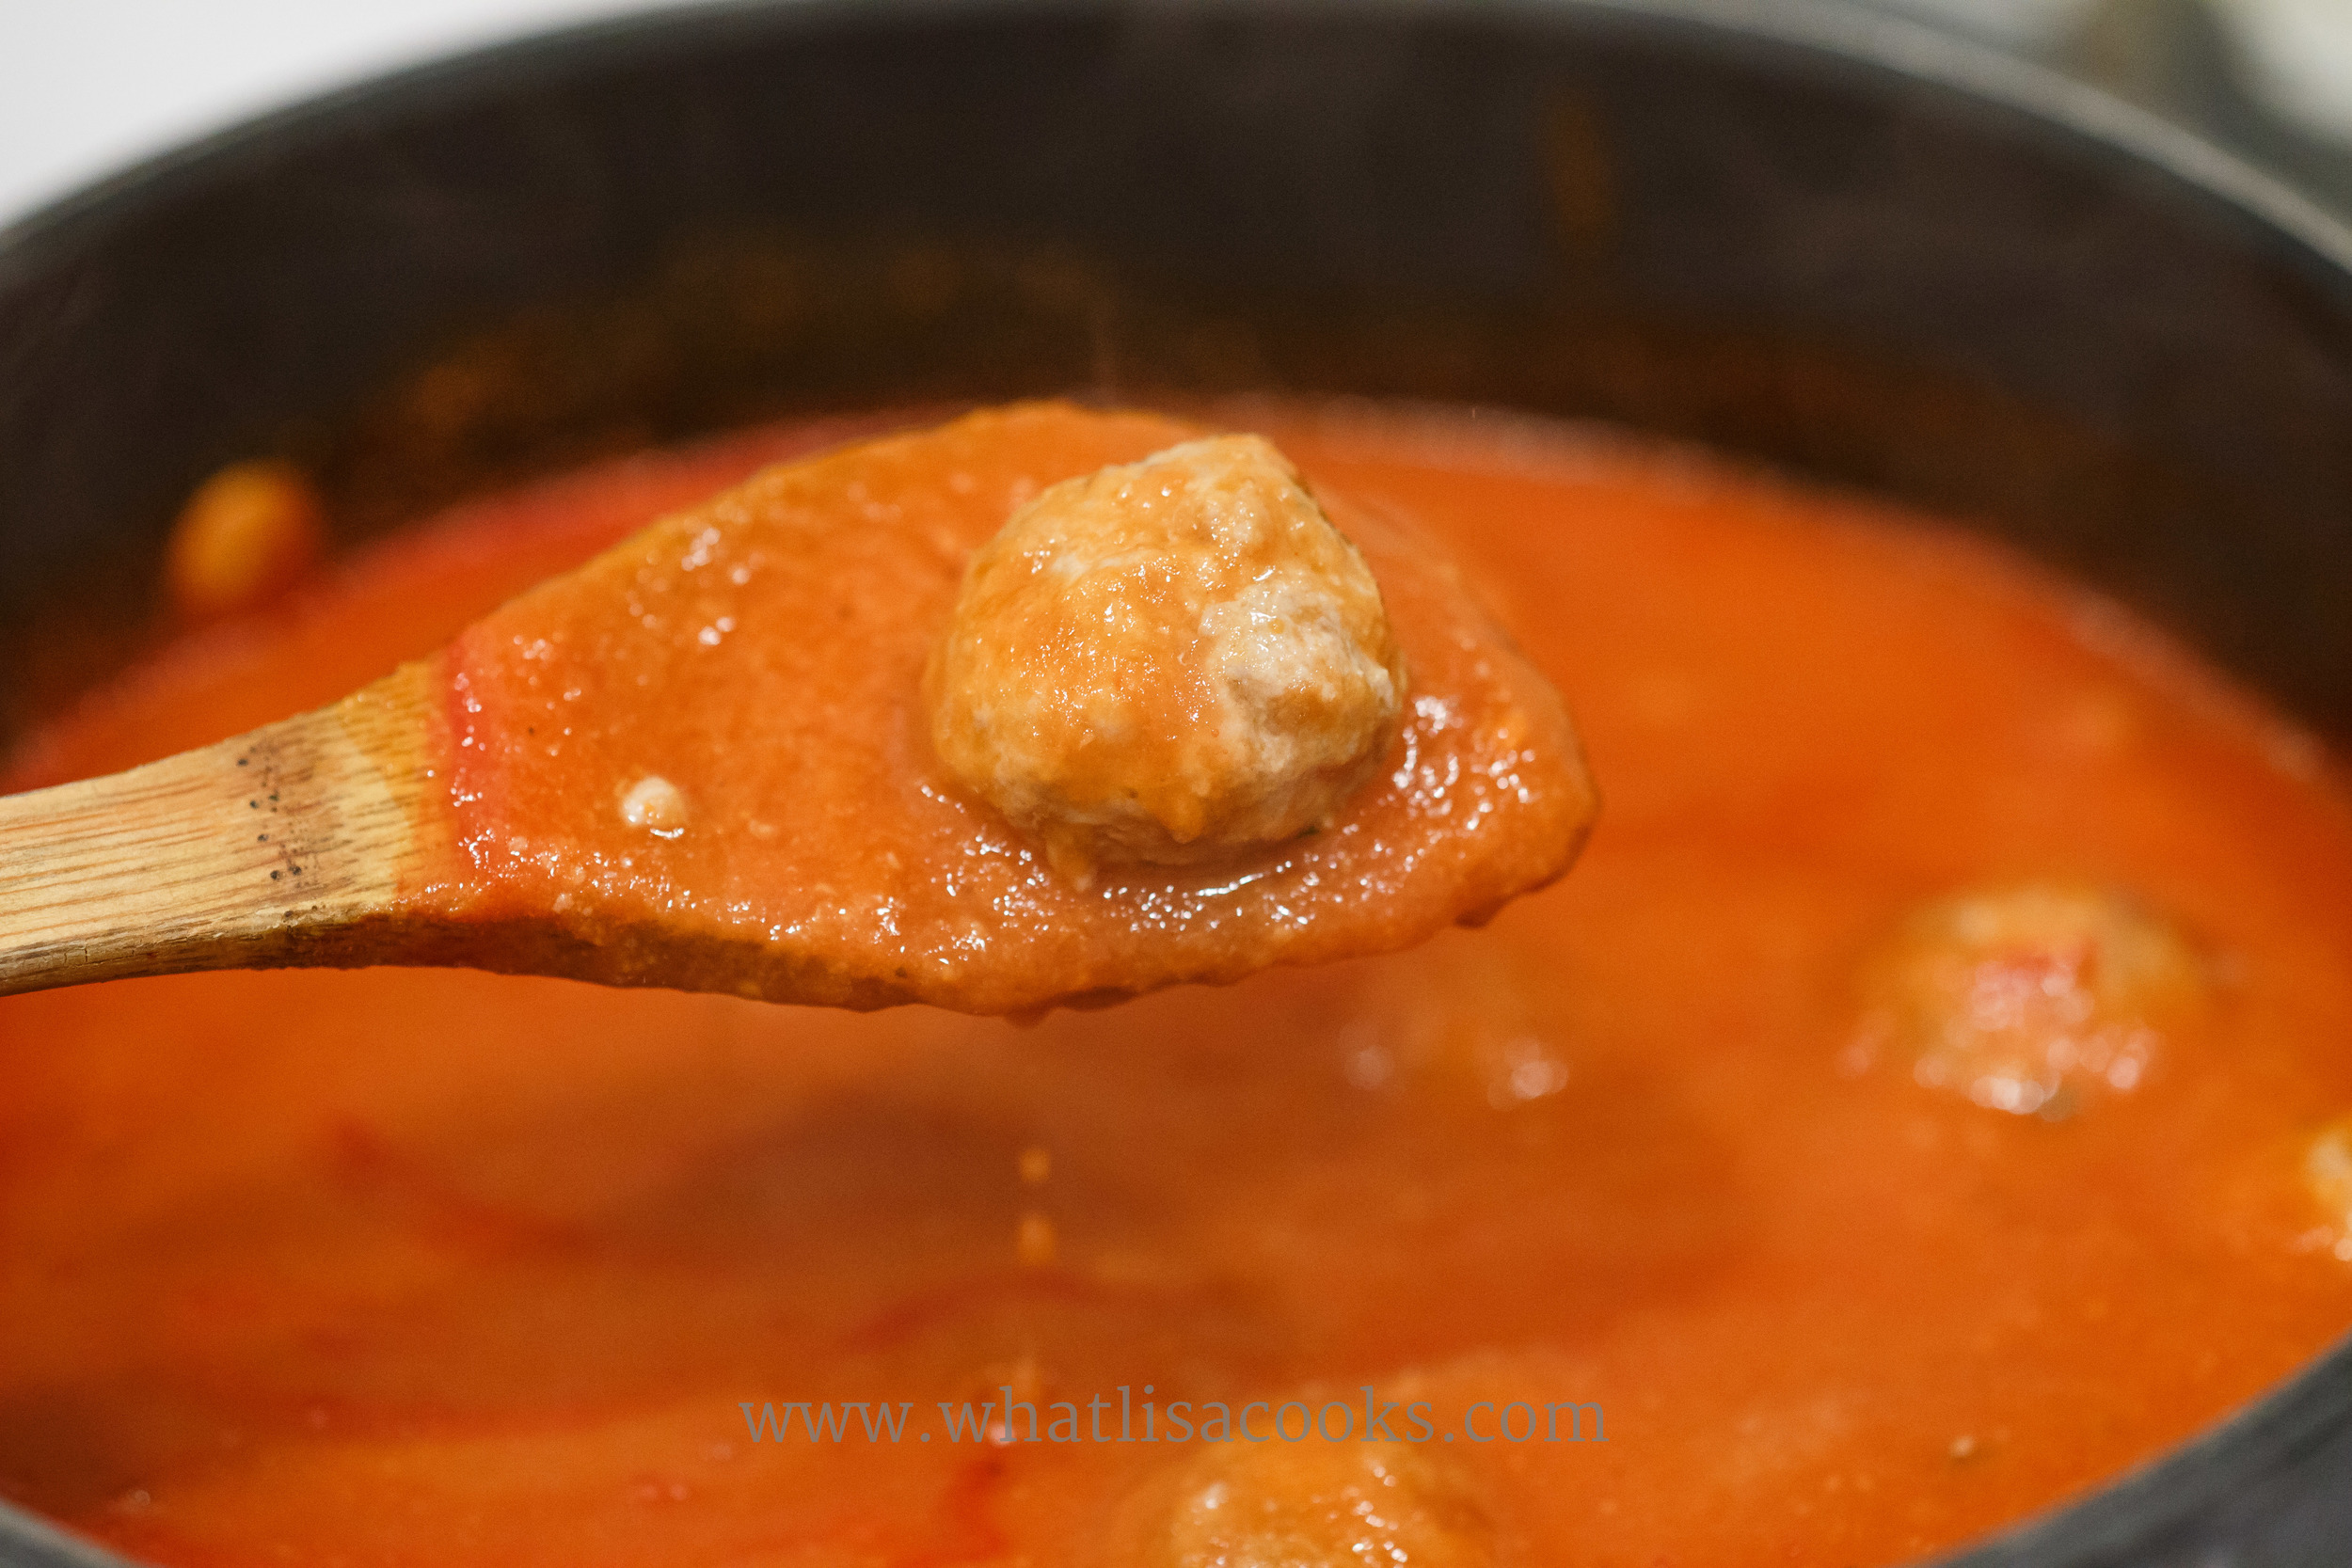
Now here's where it gets a little different from how you might be doing it. A lot of recipes have you cook off those meatballs in the oven. That's how I did it for years (and sometimes still do). But then a friend mentioned how she did them. Actually, she said something about her son wanting some chicken parmesan. But she didn't want to take the time to make it, because in order to make chicken parm, she first had to make meatballs. Wait, what? What do meatballs have to do with chicken parm? Well, it's the sauce! Her tomato sauce recipe for her family's chicken parm recipe requires that you have sauce that has had meatballs cooked in it! Seriously. I had to try this.
Think about it - have you cooked meatballs in the oven? You know all that yummy flavored stuff that oozes out of them and gets left on the pan? Well that now ends up in your sauce!
So go ahead and cook those meatballs in that simmering sauce! Depending on how wide your pot is, it might take 2 or 3 batches of cooking, so you're not crowding them too much. Just set them gently in the sauce, cover, and let simmer on med/low heat for about 15 minutes. Take them out with a slotted spoon so you're leaving the sauce behind for the next batch.
Now you've got a pile of the juiciest meatballs ever, and a pot of sauce with the most amazing flavor. What you do from here depends on what your plans are. If you're serving spaghetti and meatballs for dinner, then you can put the meatballs back in the sauce to keep warm, and then cook up your spaghetti. Or go ahead and use that sauce for your chicken parm, and spread your meatballs out on wax paper lined baking sheets to freeze.
This recipe should leave you with a lot of meatballs. Depending on size, at least 4 dozen, probably more. You can have a nice dinner and then end up with plenty to freeze. Just lay them out on a wax paper lined baking sheet and freeze, then when they are frozen you can peel them off and bag them. Now you have a bag of frozen meatballs that are just as handy as the ones from the store, but taste so much better.

If you don't want to deal with the whole sauce thing, of course you can still use this recipe and just bake the meatballs in the oven. They will still taste great and be great to freeze.

Posole Rojo: a traditional recipe, and a shortcut
Easy Posole Rojo Recipe. A shortcut recipe for a traditional posole rojo.
Posole has been a favorite of mine since I first discovered it. We typically think of soups as a winter thing, but I love it in the summer too. With the addition of the cool, fresh toppings, it makes a great summer meal!
If you are not familiar with posole (or pozole), it's a traditional Mexican soup or stew, with hominy and meat (usually pork) in a spiced broth. You dish out the fairly basic soup, and then you top your bowl with lots of fresh garnishes. There are both red and green versions, both are equally good, depending on whether you prefer the deep richness of dark red peppers, or the brighter tanginess of green peppers and tomatillos.
Traditional posole is, obviously, made completely from scratch. The real recipes have you soaking and pureeing dried chilis to flavor your broth. It gives amazing flavor. It's not particularly difficult to make, but it is time consuming and so usually reserved for special occasions and holidays. It's not generally something that could be an easy weeknight meal unless you've made it ahead.

With a busy family, I'm all about easy weeknight meals. I love taking a classic recipe and looking and the pieces of it to figure out how I can make it quicker and easier and taste just (or almost) as good. I have a great traditional from scratch recipe that I've made many times which is great to make on a weekend. I've included that one down at the end below - I don't know what the original source of this recipe was, I've had it scratched on a piece of paper for years. I highly recommend you make the scratch version at least once. But I also have developed my own cheater version.
If you start with good flavorful ingredients, I really think this version is just as good, and it is so much quicker and easier to make.
Lisa's Cheater Posole Rojo:

Indredients:
1 can/package of enchilada sauce – mild or spicy, however you like it.
1 quart of chicken broth
A large can of hominy, or a couple small cans
An onion or two
Cooked pork – I use pre-cooked pork carnitas from Trader Joes, Costco has some too. Chicken works great too - Costco and Trader Joe's both have packages of grilled chicken, or get a rotisserie chicken and pick the meat off. Or just use whatever cooked meat you might have leftover.
Garnishes: (choose any, all, or none - whatever you like!)
grated cheese
crushed tortilla chips
sour cream
diced tomatoes
diced avocado
chopped cilantro
diced or chopped yellow, white, or green onions
sliced radishes
shredded lettuce or cabbage
quartered limes
Directions:
Easy! Just combine everything in the ingredients list in a pot and let simmer for 15-20 minutes. Basically by the time you've got your table set and your garnishes ready, you'll be ready to eat. It will taste even better if you let it simmer longer, but it's great even if you don't have a lot of time. You could saute the onions first in some oil, but you don't have to. It’s even better if you make it a day ahead and let it sit overnight.
Serve in nice big bowls with your choice of toppings. Really you can put anything you want on this. Keep it simple with just a little lime and cilantro, or load it up. It's yummy either way. Either version of this is great for a party - lay out a beautiful spread of the garnishes and people are very impressed.
Try a few different enchilada sauces and find one you like. I find it's best with a nice dark rich sauce. I've recently used the Frontera brand and I think it was the best yet - very deep rich flavor without being spicy.
This version is such a great weeknight meal for a cold and rainy day. And here's a tip for you - make a big pot of this for a dinner party or other gathering and people will be blown away! They will think you've made something really amazing, when really all you did was throw a bunch of stuff in a pot.

Original Pozole Rojo
serves 8-10
Ingredients:
1 bone-in picnic roast (pork shoulder, also called pork butt), about 5 pounds
Salt and pepper
2 tablespoons vegetable oil
2 medium-large onions, chopped coarse
5 medium garlic cloves, minced or pressed
1 (14.5 oz) can diced tomatoes
1 tablespoon chopped fresh oregano leaves or 1 teaspoon dried Mexican oregano
6 cups low-sodium chicken broth
1.5 cups of water
2 ounces dried ancho chiles (about 3 large)
3 (15 ounce) cans white or yellow hominy, drained and rinsed
Garnishes
2 limes, quartered
1/2 head lettuce, sliced crosswise into thin strips
6 medium radishes, sliced thin
1 small onion, minced
roughly chopped cilantro leaves
chopped fresh oregano or dried mexican oregano
1/4 cup pureed ancho chiles
flour or corn tortillas (or I like tortilla chips)
Directions:
trim skin and excess fat from meat and cut into large pieces of various sizes. dry thoroughly and season generously with salt and pepper
heat oil over medium heat and cook onions and 1/4 tsp salt until onions are softened. stir in garlic
add the meat and stir often until no longer pink on the outside. add tomatoes, oregano, broth, and 1/2 tsp salt. increase heat and bring to a simmer. cover, place in oven and cook until meat is tender, about 2 hours.
meanwhile, bring water to boil. remove stems and seeds from chiles and soak with hot water until soft, about 20 mins. puree chiles and liquid until smooth. pour through a strainer and reserve 1/4 cup for garnish
remove meat and bones from pot. stir in hominy and pureed anchos. cover and return to oven and cook until hominy is hot, about 45 mins.
meanwhile, when meat is cool, shred it. stir shredded meat into the stew. taste to adjust seasonings. ladle into bowls and serve with garnishes.
You can also sort of combine the two versions. I've done it before where I started with a raw piece of pork and sautéed that with the onions as in the first recipe, but then added the broth and enchilada sauce to finish it off. I've also done both versions in the slow cooker. I have a great slow cooker with a metal insert, so you can brown your meat and onions on the stove first, and then put everything else in to slow cook.

You can even make a meatless version! Here are two versions I made once - the one on the left has pork and chicken broth, the one on the right was made for some vegetarian friends, with vegetable broth and a variety of beans. It tasted great too!
Enjoy!
~ Lisa

Dutch Baby (German Pancake)
Dutch Baby / German Pancake Recipe

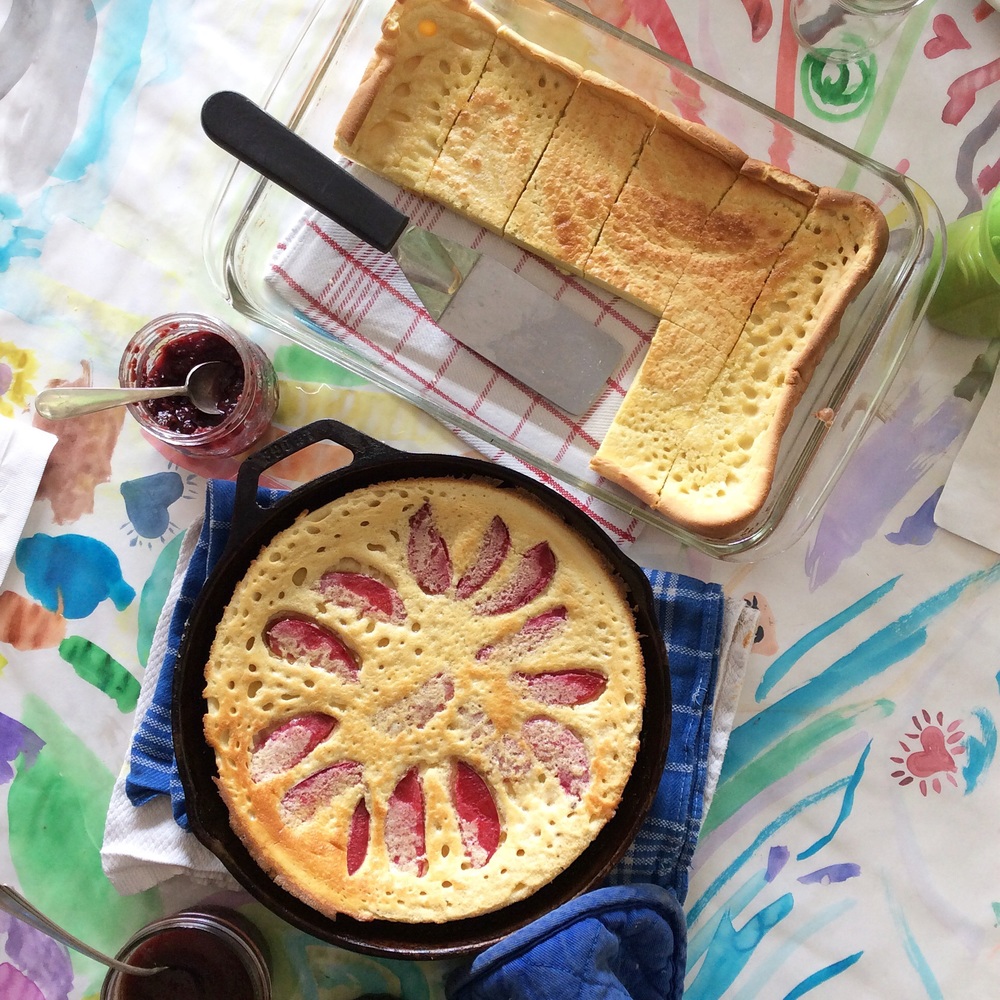
The pretty one in the cast iron pan has plums in it. I just sliced them and layered in a nice pattern right before putting it in the oven.
This is my new favorite breakfast to make for the family! It has all the qualities that I love in a recipe - it's easy, it's fast, it's versatile, and most of all, everybody loves it.
It is a variation of a traditional German dish, called a German Pancake. Some recipes call this kind of thing a Dutch baby, and my kids think that name is a crack up. Apparently the name came from a poor misspelling of the word Deutsch (which means German, in German). I read one source that said that smaller ones are called a Dutch Baby, and bigger ones are called a German Pancake. I don't know. My version is a combination of many different recipes I've tried over the years, I experimented with different variations and came up with a version that works well for us.
The Recipe
6 eggs
1 cup flour
1 cup milk
1/4 cup maple syrup
1 teaspoon vanilla
1/2 teaspoon salt
2 tablespoons butter
up to a cup of fruit if desired (blueberries, sliced peaches, sliced apples, etc.)
Directions:
Preheat oven to 400 degrees, or 375 convection. Put your pan or dish in the oven while it preheats. I usually use a full size casserole dish, or a big cast iron pan. Any good size oven proof dish should work. Alternately, you can use a muffin pan or even a popover pan. A good size pie or quiche dish would work too.
Dump all of the ingredients, except the butter and fruit (if using), in your blender. I use my Vitamix and it is amazing for this kind of thing because it whips it all up super fast with no lumps.

Nothing fancy here - just half a peach sliced and a handful of blueberries, and I left 1/3 plain for the kid that doesn't like fruit cooked in things.
When your pan or dish is hot, put the butter in the pan to melt. My butter is always cold, so I usually toss it in the pan and let it melt in the oven for a minute. Once melted, just swirl the dish around a bit to get it all coated with melted butter.
Once the batter is blended and the butter is melted, just pour your batter into your hot pan. If you are adding fruit, now is the time. If you want to make it pretty, you can carefully line up slices of fruit in a nice pattern. Or you can just sprinkle a handful of blueberries and call it good. Sometimes I just put fruit on half of it, because I have one child who prefers it plain.
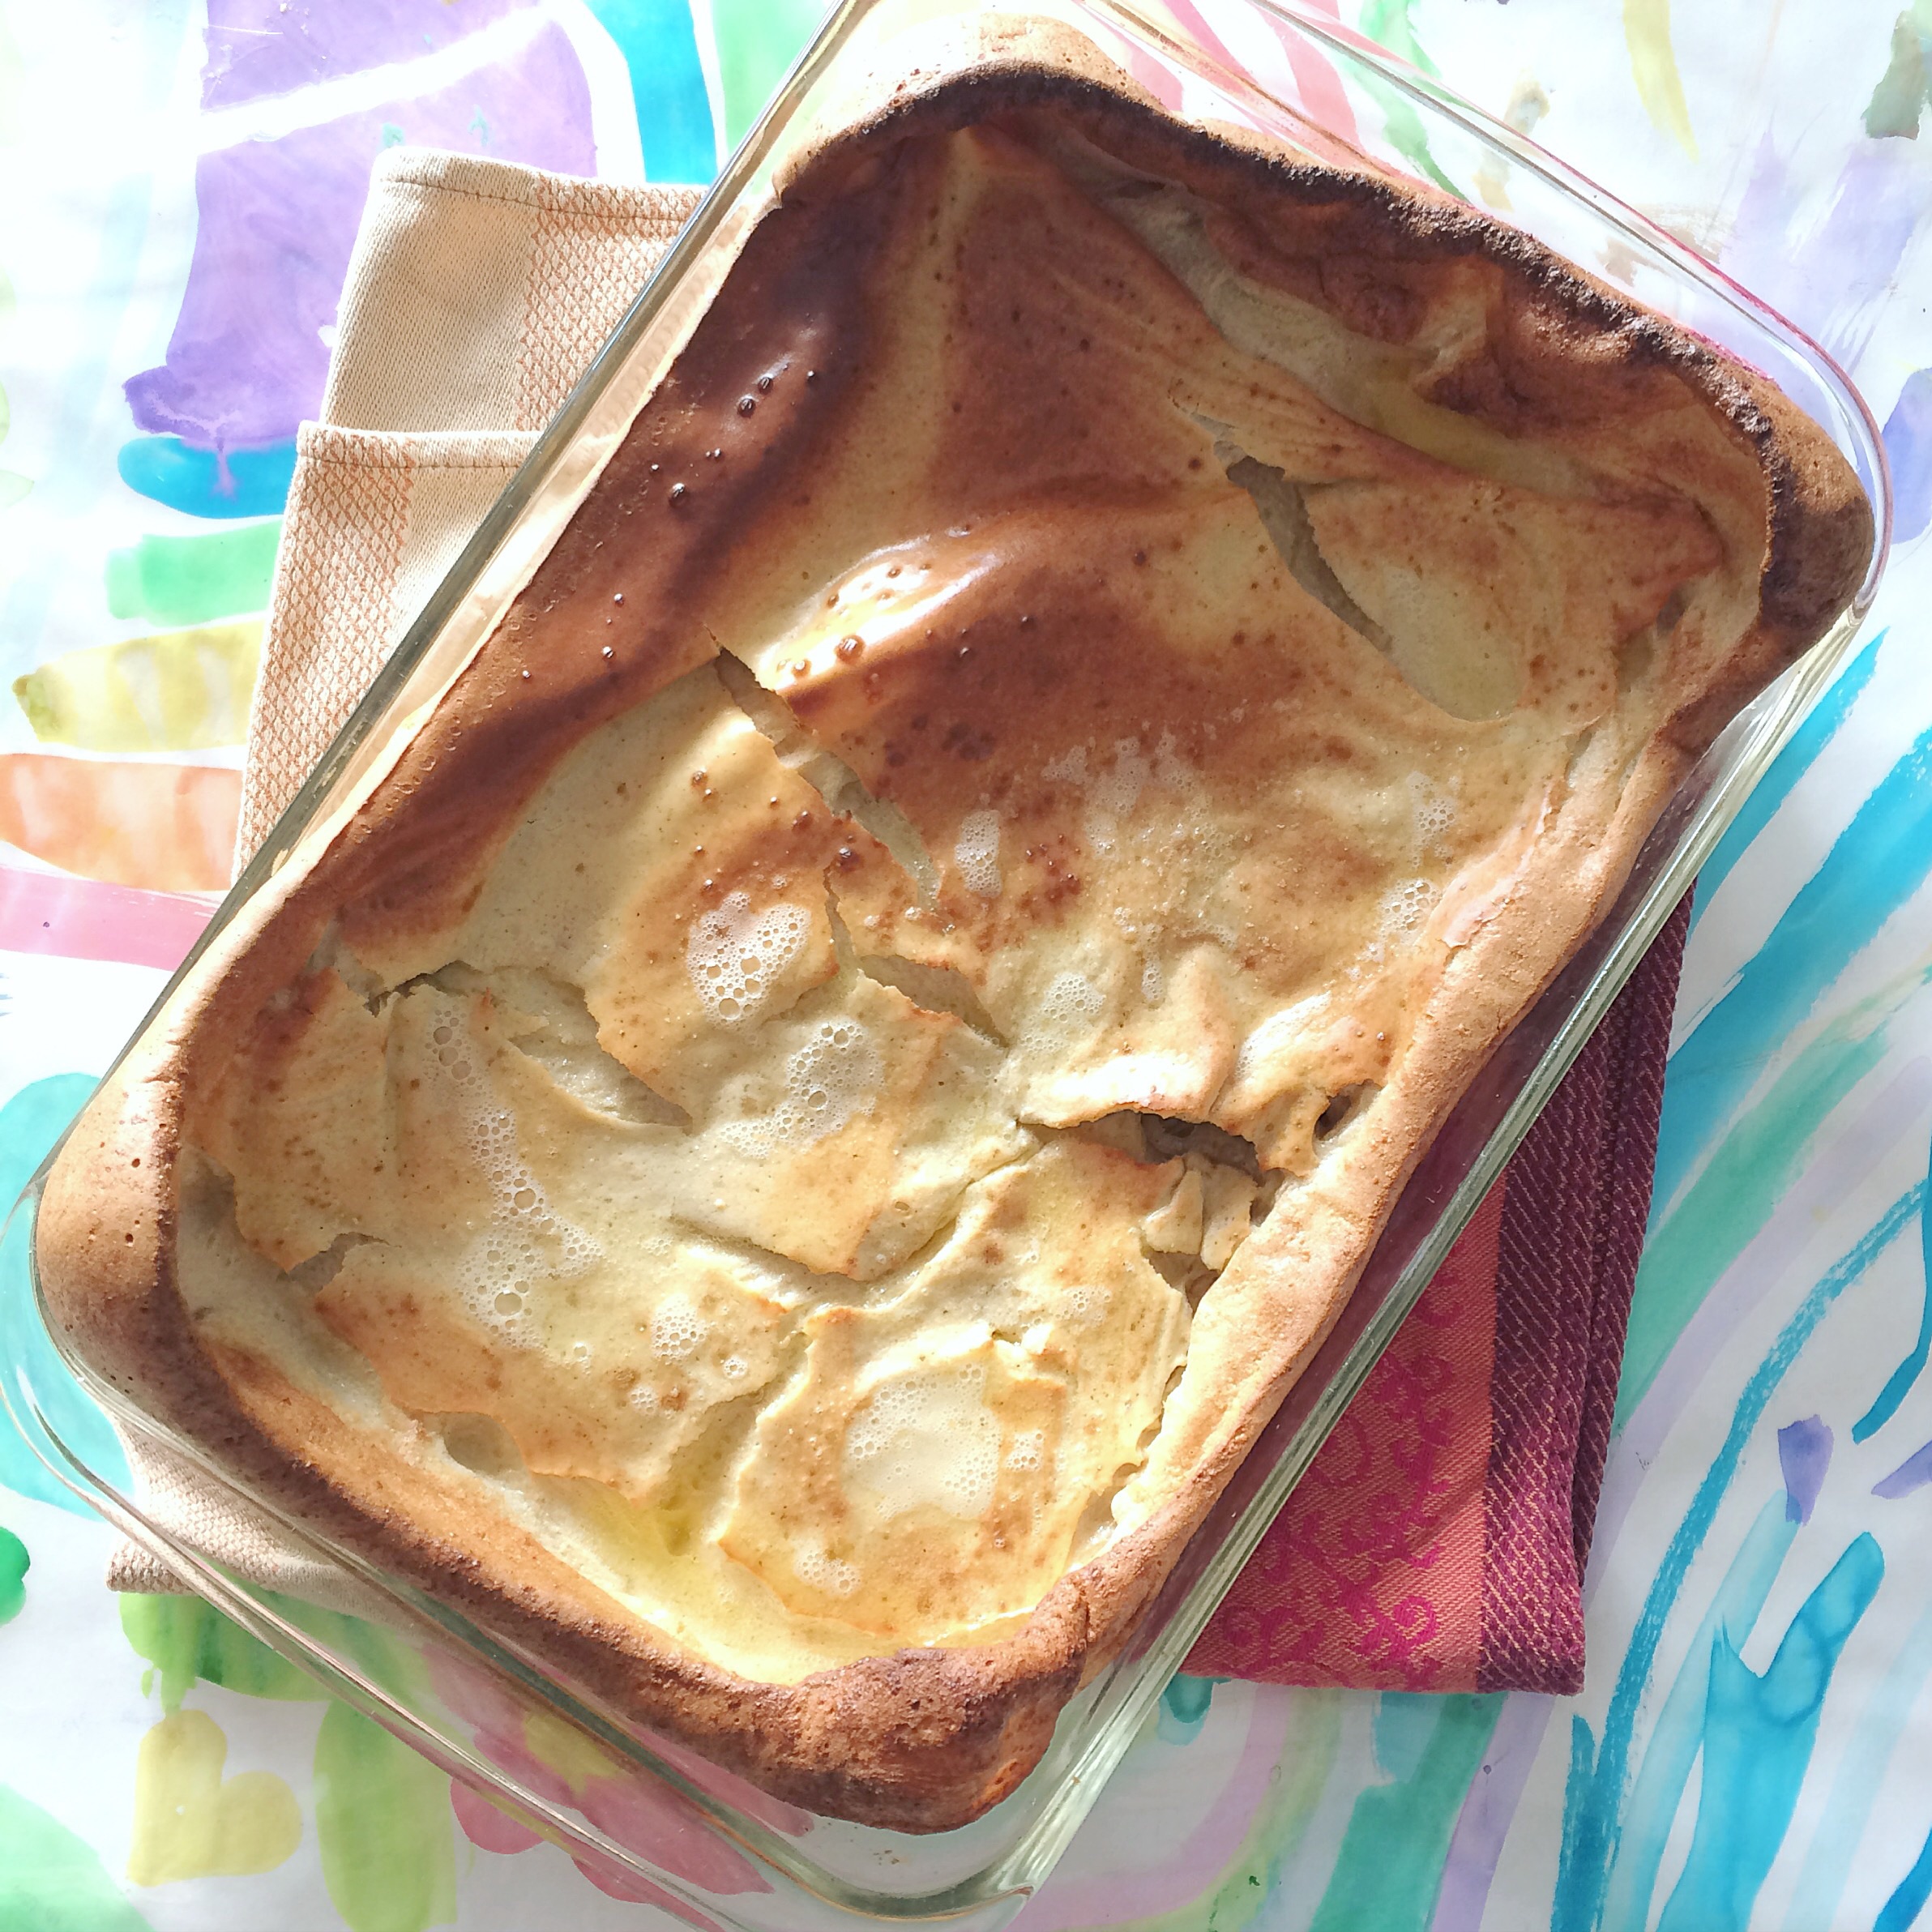
And now stick it in the oven! I do mine in my convection, so 375 convection for about 17 minutes is about right. But it's going to depend on the size of your pan and how accurate your oven is. Go for 15 minutes and then take a peek. It should be puffed up and nicely brown around the edges, and no longer wet in the middle. If it's not quite there, give it a few more minutes.
When you take it out of the oven it will sink pretty quickly. So if you want to impress your guests, just make sure they are at the table when you bring it out.
Variations:
This one was made with a gluten free flour blend.
I've done this with AP flour, bread flour, whole wheat flour, and even a gluten free flour blend. Because the flour just gives it some density and holds it together, but doesn't actually rise, the type of flour doesn't really seem to matter. A friend of mine made it with a grain free cassava flour and she said it was also great. If you try it with a different kind of flour, definitely let me know how it turns out!
I use maple syrup to sweeten because I like the taste, but I've also made it with honey or just regular white sugar. Also great.
If you like cinnamon, add a teaspoon. This would be especially great if you are adding sliced apples on top.
A lot of recipes you see for these call for powdered sugar on top. I don't bother because I don't think we need it, but if you like that and you want to make it look a bit more fancy, go for it. Just sprinkle on top right before serving.
When I make it plain with no fruit, we love to have a little homemade jam on top. It's delicious that way.
This is so easy, but looks impressive and makes breakfast feel special without doing a lot of work. It's great for feeding a crowd, because you can whip up a couple of them in just a few minutes. I like this recipe better than some others because it has more eggs, so it seems a little richer, and gives the kids a decent amount of protein in a breakfast that tastes like a treat.
I think you could even mix up your batter the night before if you want, and just give it a quick stir an pour in your pan in the morning. It would be great for a Christmas or Easter or other holiday morning, because it seems so fancy and special, but really is minimal time in the kitchen for the cook.

Same batter, just poured in muffin pans. It worked just the same and the kids loved the little personal size!


Simple Poached Chicken + Garlic Broth
Poached chicken often gets a bad rap. A lot of people think it's bland and flavorless. But it doesn't have to be that way. I think poached chicken can be a kitchen lifesaver. You may have heard me say before that I always have cooked chicken in my fridge. There are so many quick and delicious meals you can make in just a few minutes if you already have cooked chicken. I often will roast chickens and pick the meat off, but if I haven't gotten around to doing that and I want some cooked chicken to use for a recipe (or just to eat!), then poaching is my next best go-to.

Poached chicken often gets a bad rap. A lot of people think it's bland and flavorless. But it doesn't have to be that way. I think poached chicken can be a kitchen lifesaver. You may have heard me say before that I always have cooked chicken in my fridge. There are so many quick and delicious meals you can make in just a few minutes if you already have cooked chicken. I often will roast chickens and pick the meat off, but if I haven't gotten around to doing that and I want some cooked chicken to use for a recipe (or just to eat!), then poaching is my next best go-to.
Poached chicken doesn't have to be bland or dry. I think the mistake most people make when poaching chicken, or when cooking chicken in just about any other method as well, is not enough salt. I was looking around the web at a few poached chicken recipes just to see how other people do it, and I was shocked at how little (or no!) salt most people use. Yuck. Of course you're going to end up with chicken that tastes like nothing. Chicken needs salt. It just does.
I needed some chicken today for the enchiladas I am planning to make for dinner tonight. So I poached some and thought while I was at it I would share with you how I do it. By adding some extra ingredients to the pot, not only do you get a more flavorful piece of chicken, but you also get a really delicious light broth.
My ingredients are just a guideline - you can put in whatever you like for flavoring, but this is just what I had handy today. Other veggies would be great, or parsley, or other herbs. I used green onions because I had them and I like the flavor, but a quarter of a yellow or white onion will work fine too. Add whatever flavors you like. Just don't skimp on the salt.
Here are the basic ingredients I used today:
1 carrot, broken in a couple pieces
1 stalk celery, cut in half
2 green onions, trimmed
1 1/2 T salt
1 T (about 3 cloves) crushed garlic, or more
a splash of white wine
2 chicken breasts
3 -4 cups of water - enough to fully cover the chicken in the pot
Put everything but the chicken in a medium stock pot and bring to a slight boil. Taste it. Your poaching liquid should taste salty. Not like drinking a mouthful of ocean water salty, but maybe slightly saltier than you would want a good broth to be - the chicken is going to absorb a lot of the salt and will leave your broth tasting just right. If the liquid doesn't taste salty, then add a little more salt.
Gently place your chicken breasts in the broth, making sure they are fully covered. If they aren't fully covered, add a little more hot water, or more wine. Now simmer for 10-15 minutes, depending on the thickness of the chicken. The pieces I got today were from some kind of mutant monster chicken - they were super thick, so I cooked them for 15 minutes. But small breasts might only need 10 minutes.

When you think they are done, take them out of the pot to rest. The way I tell if chicken is done is by pressing on it. If it really gives and feels very soft still, then it's not cooked, so put it back for a few more minutes. But if you press in the middle and it feels fairly firm, then it's done. This method requires a bit of practice and trial and error, but after you do it a few times you will get a sense for what a cooked piece of meat should feel like. I really try to avoid cutting into meat to check for doneness - that lets all the juices out and you end up with a very dry piece of meat. If you think it's cooked enough, then let it rest for about 10 minutes on a plate. It will finish cooking a little, and stay much more juicy.
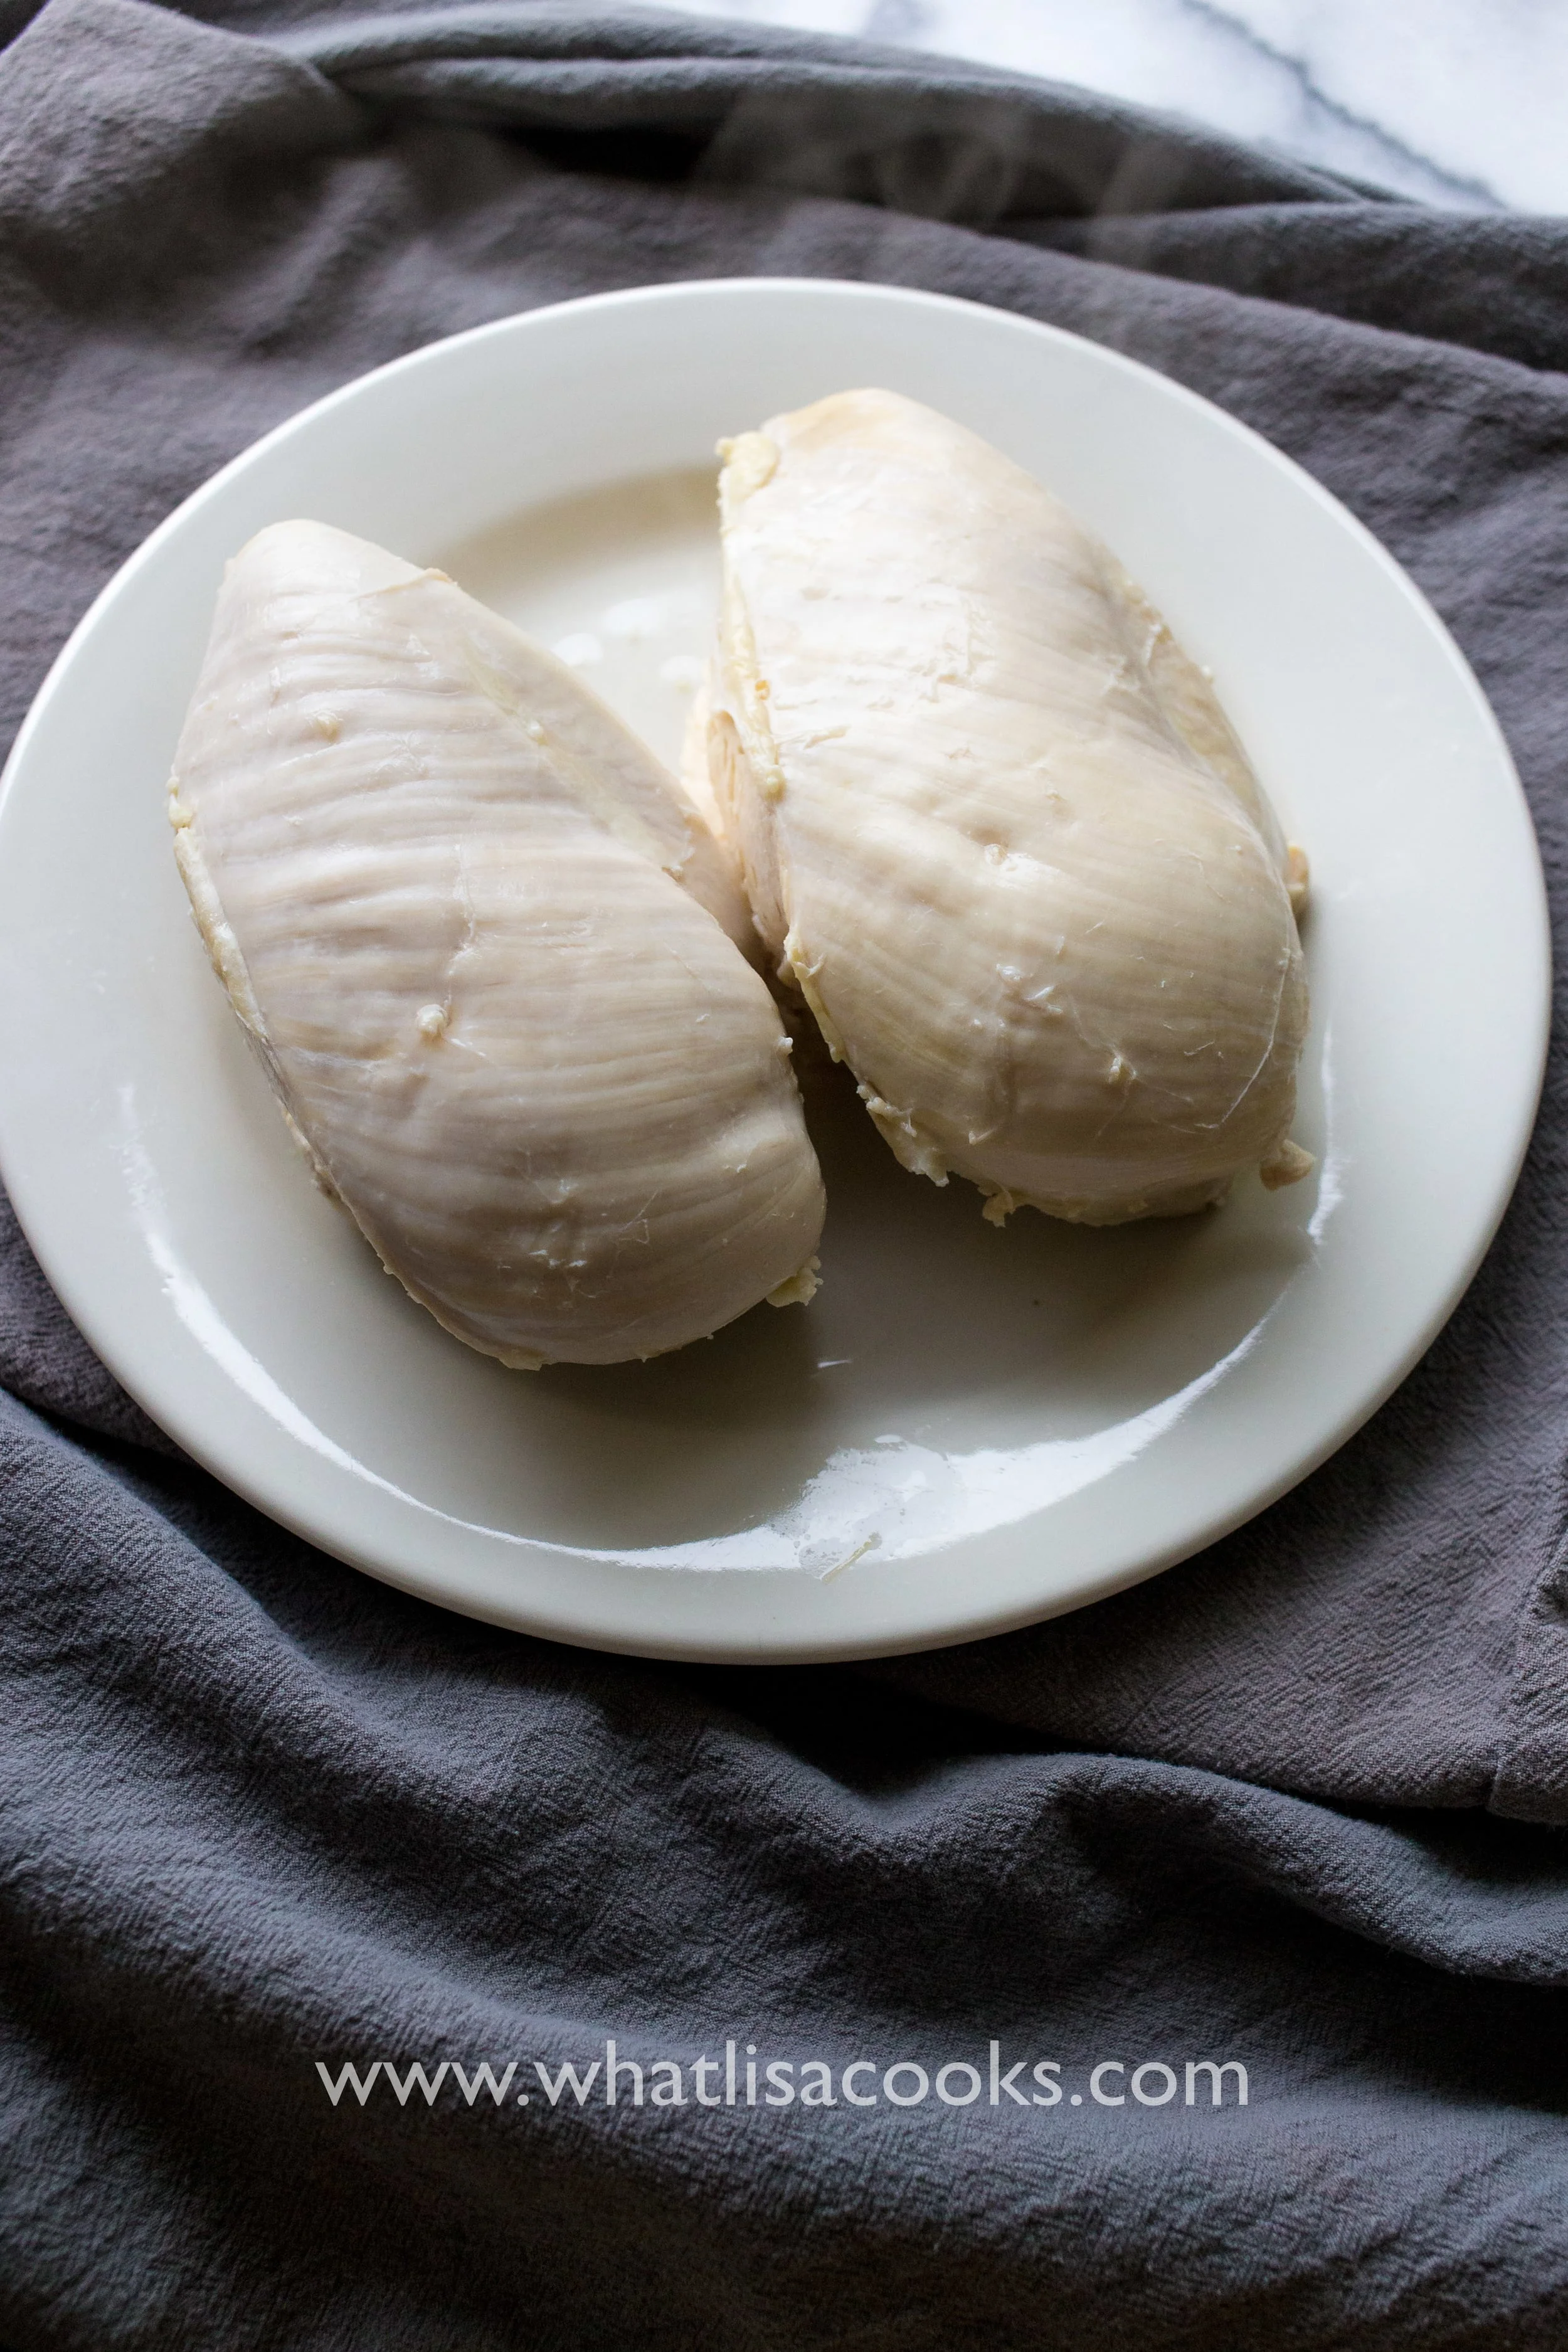

Now you can slice or dice the chicken to use in salads or on sandwiches. Or you can pull it apart into shreds for a soup or a casserole. The lightly flavored broth makes the basis for a delicious mild soup, or it's wonderful to just drink a cup on a rainy afternoon. You can also use it again - I actually added two more chicken breasts to my pot and cooked them in the same liquid, so now my broth has more chicken flavor. I will be using some of it as a base for a spiced tomato gravy that I use in my enchiladas, and the rest I will probably just drink.

Corn Dog Muffins
I think this may officially go down as the very best kid food item I have ever made. I have always loved corn dogs, and my kids love them too. I love the idea of making them at home, but I don't have a deep fryer, and I have no intention of getting one. So when I came across this idea of making corn dog muffins I just knew we had to have it. It's super easy - basically just good homemade cornbread with a piece of hot dog. Cooking in the oven as muffins means no mess from frying, and I loved that I could make different size options using different size muffin pans and cutting the hot dogs.
I think this may officially go down as the very best kid food item I have ever made. I have always loved corn dogs, and my kids love them too. I love the idea of making them at home, but I don't have a deep fryer, and I have no intention of getting one. So when I came across this idea of making corn dog muffins I just knew we had to have it. It's super easy - basically just good homemade cornbread with a piece of hot dog. Cooking in the oven as muffins means no mess from frying, and I loved that I could make different size options using different size muffin pans and cutting the hot dogs. I have a great corn bread recipe that I love - it's adapted from this recipe, with a few changes to make it the way I like it (I changed the oil to butter and reduced the sugar). It's just right - buttery, and just a little sweet. The touch of sweetness worked perfectly with the salty hot dogs.

Ingredients for the corn bread:
1 1/2 cups medium or coarse ground cornmeal
2 1/2 cups milk
2 cups unbleached white bread flour
1 tablespoon baking powder
1 teaspoon salt
1/2 cup sugar
2 eggs
1/2 cup melted butter, (cooled slightly so it doesn't cook your eggs)
And you'll need a package or two of good quality hot dogs. I only buy the Applegate brand.
Directions:
Preheat oven to 400 degrees F (200 degrees C). In a small bowl, combine cornmeal and milk; let stand for at least 5 minutes (longer is better).
Grease your pans with your preferred oil. I have a coconut oil spray that I like, butter would be great too. Or use muffin papers or silicon cups and then greasing won't be necessary.
In a large bowl, whisk together flour, baking powder, salt and sugar (if you use honey, mix that with the wet ingredients instead. Mix the eggs and butter in with the milk and cornmeal, and then combine the wet and dry ingredients. Mix until smooth. Spoon it into your prepared muffin cups to about 3/4 full.
Cut your hot dogs to the size you want and stick them in the center of each muffin cup.
Bake in preheated oven for 15 - 30 minutes until golden brown (depending on size of muffin - 15-20 for minis, 25-30 for big ones, just watch and make sure they don't get too brown), or until a knife inserted into the center of the cornbread comes out clean.
Notes:
Medium or coarse ground cornmeal is a must in this recipe. I tried it once with a finer grind and it was too heavy and dense. I usually buy Bob's Red Mill medium grind.
Soaking the cornmeal in the milk also makes a huge difference, the recipe calls for 5 minutes, I think longer is even better.
The original recipe for cornbread made one 9x13 inch casserole pan. I think this ends up with about 2 dozen standard size muffins, or more/less depending on size.
This recipe works great with gluten free flour!
I have not tried this with whole wheat flour. I think it would be pretty dense. But I am curious to try. Although I'm a big believer in everything in moderation, so I don't mind a little white flour in some cornbread occasionally.
I think you could easily substitute honey for the sugar, maybe just reduce the milk by a little.
Let them cool a little and pop them out of the pans, and serve with some good organic ketchup and/or yellow mustard. I of course had to make a double recipe because we love leftovers - and these things are so good that there would have been no leftover if I hadn't made lots extra. I've packed them in school lunches, and I've put a bunch in the freezer for another day.
And - next time you're making a big pot of soup or chili or stew, make up a batch of this cornbread without the hot dogs - it comes together pretty quick for a weeknight side.
Let me know what you think!


Pancake muffins
I love a good cooking shortcut - or I guess we call them "hacks" these days. So here is one of my favorite breakfast hacks: muffins made from pancake batter.

Muffins made from pancake batter? Yes! It totally works.

When I make pancakes I always make extra batter.
If you look at my breakfast for lunch posts, you'll see that we make a lot of lunches with leftover pancakes. Pancakes refrigerate well and freeze great and they are a perfect item to have on hand for quick and easy breakfasts and lunches.
But sometimes I get about halfway through the batter and I'm just feeling done with standing over the stove and cooking pancakes.
So I take the rest and just make muffins!
All you do is fill greased (or paper lined) mini muffin pans with the batter and then top as you like.
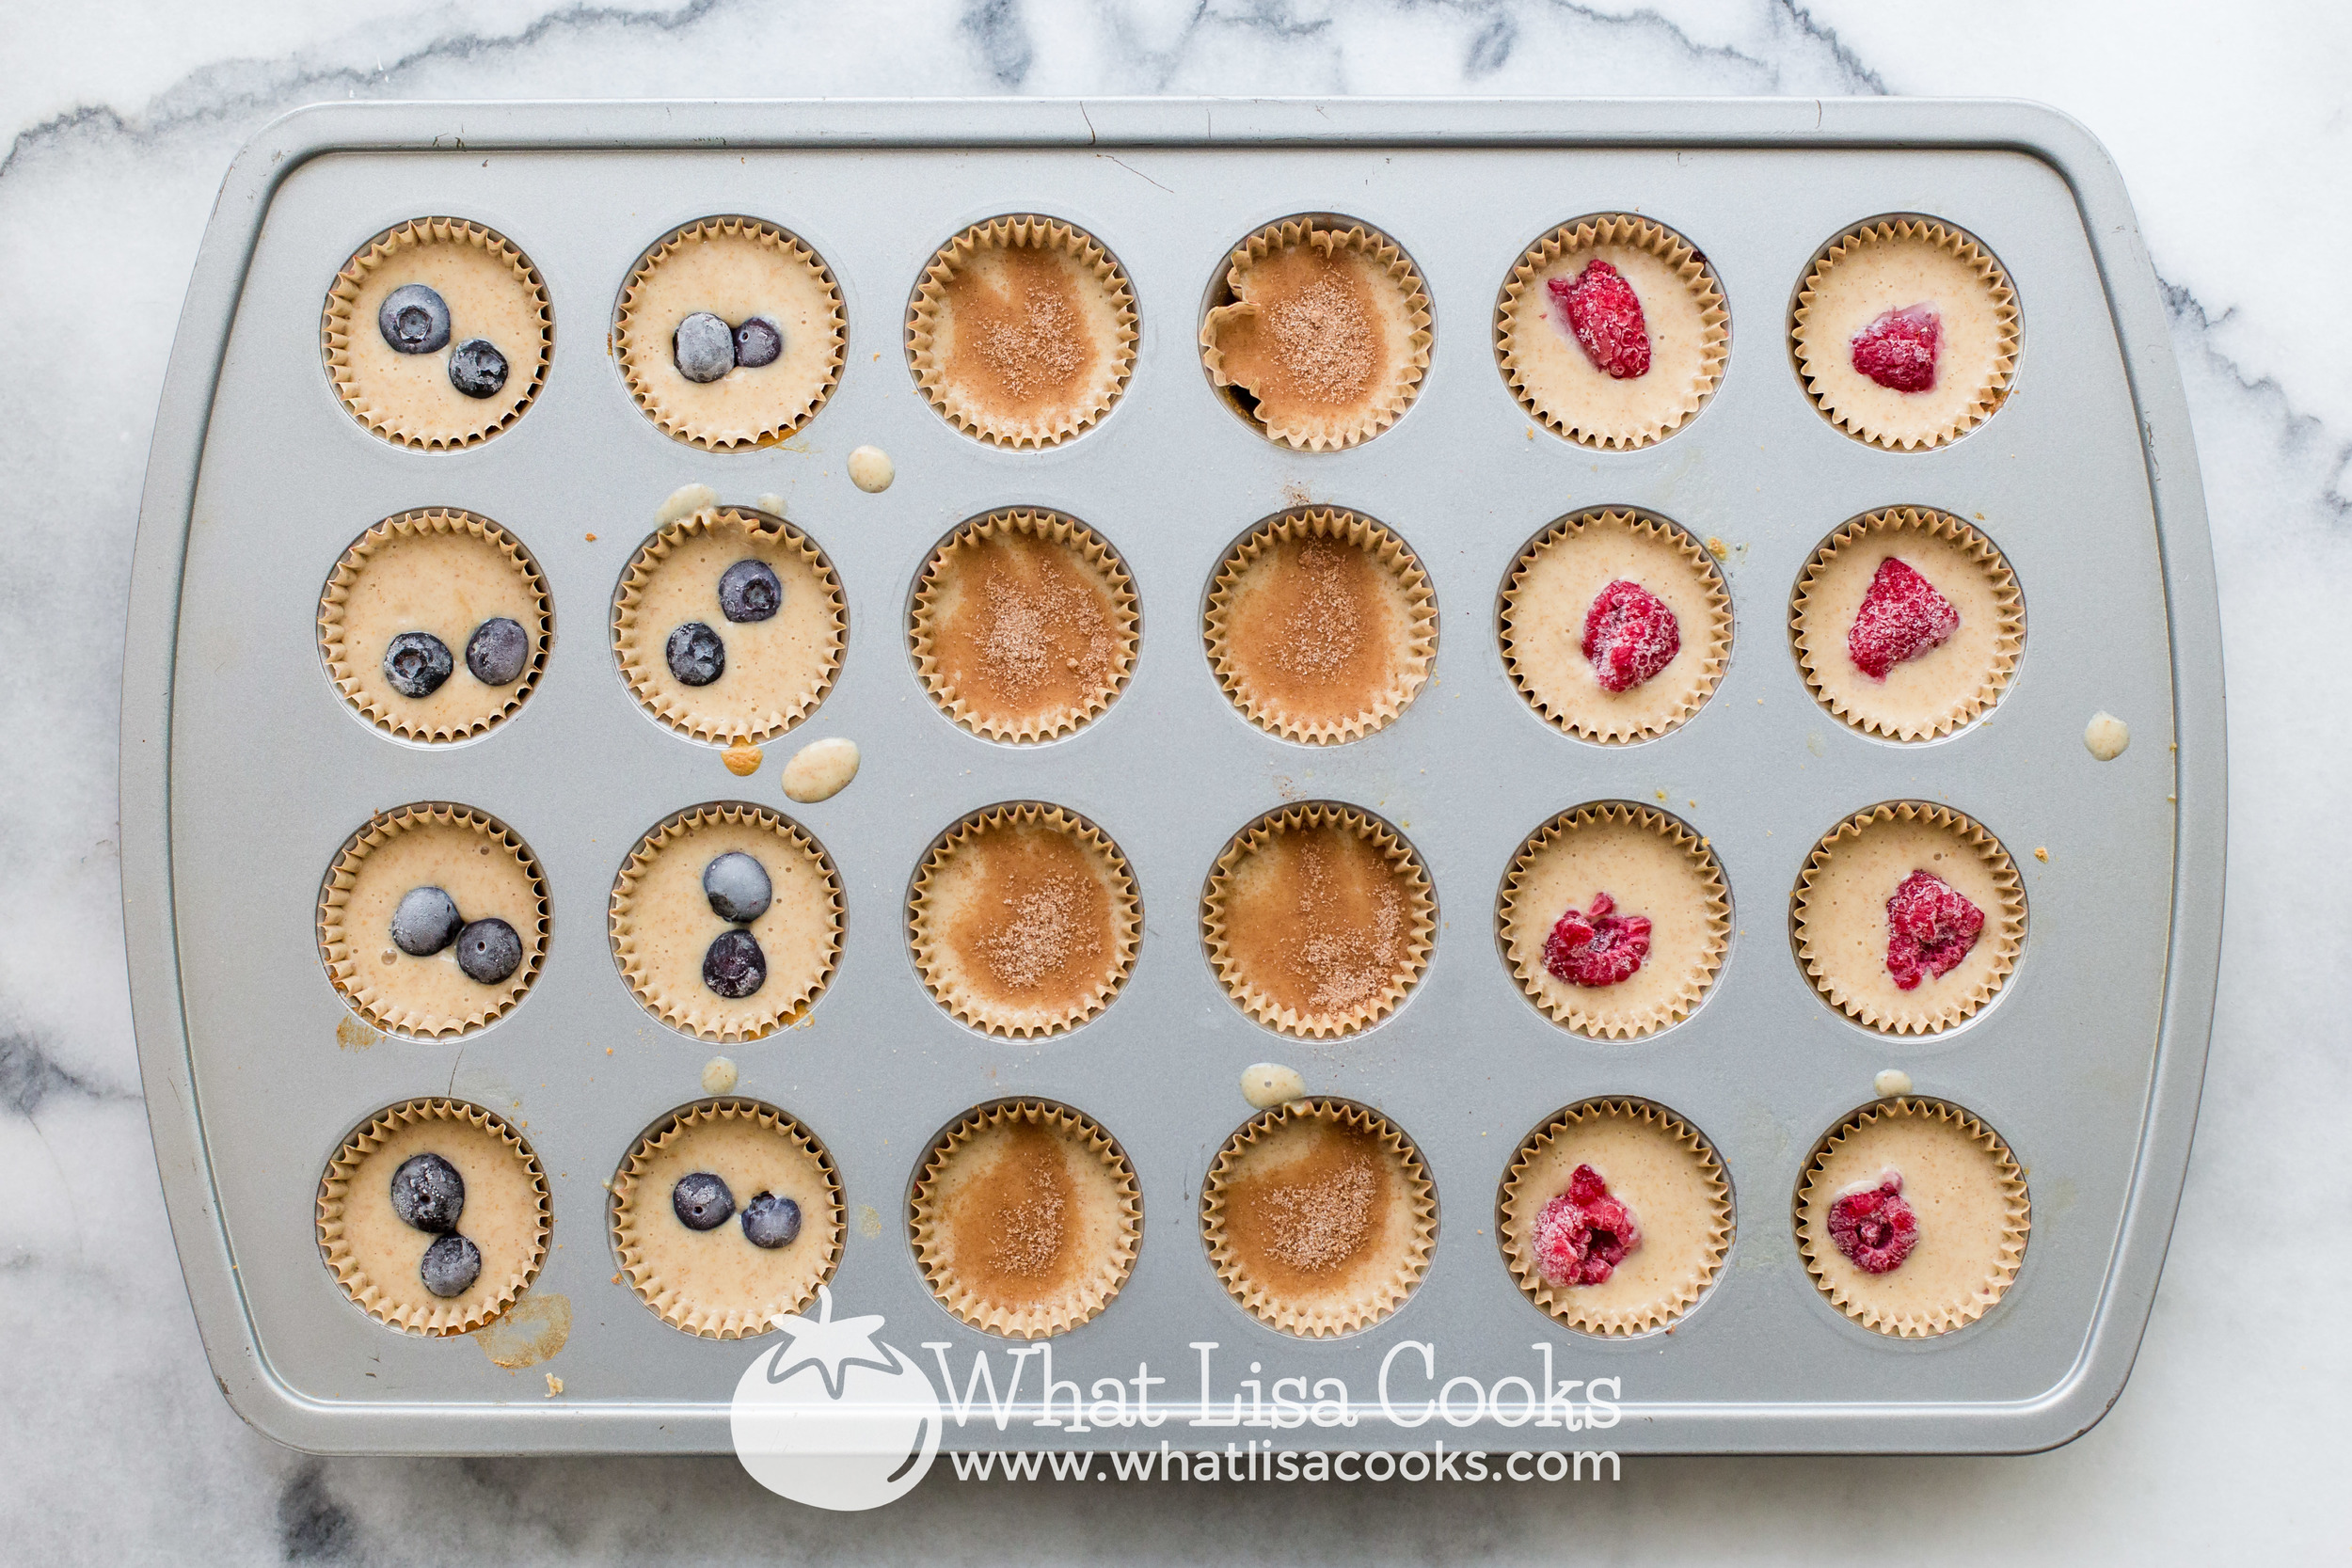
These work best with mini muffin pans because pancake batter is lighter than regular muffin batter, so bigger muffins fall a little and don't look quite as pretty. But bite sized pancake muffins are perfect. You can make them plain, or you can dress them up. I like to fill all the spots with batter, and then add stuff to the top.
In this batch you can see that I did three different flavors. I put a couple of blueberries in some, a big frozen raspberry in the middle of some, and the rest I just sprinkled with a little cinnamon sugar.
They are so good - light and moist and just perfectly sweet enough. They are the perfect size for little hands and small enough to just pop in your mouth, and they make a great portable breakfast.

As for the pancake recipe - I make my own. Pancakes are so easy to make from scratch, it's almost silly. You can read my pancake recipe here. You'll note in my recipe that I say that the butter is optional, but I think it's necessary for muffins - it really helps to keep them from sticking. If you don't want to take the time to melt and cool butter, I've substituted vegetable oil for the butter and they still come out great.
You can totally do this with a store bought pancake mix if you prefer, I would just gently suggest that you try to find one with no artificial ingredients. For extra tasty pancakes, I always add a little maple syrup to the batter. This makes them taste great on their own, which means that for a quick weekday breakfast or lunch you don't need to get out all that sticky syrup.
Pancake Muffins
Mixed pancake batter (be sure to include the butter or oil, and add a little extra sweetener)
oil of choice for muffin pans, or muffin cups
mini muffin pan
toppings / fillings of choice: berries, chocolate chips, cinnamon & sugar, etc.
Preheat oven to 350, or 325 convection. Grease mini muffin pans, or line with muffin papers.
Prepare your pancake batter as usual. Be sure to include the butter or oil called for in the recipe, and add a little extra sweetener. I usually sweeten my pancake batter with maple syrup. My recipe calls for enough syrup to make the batter nicely sweet without needing to add extra syrup when you eat them. But if you're using a different recipe, or a box mix, I would recommend that you add a few tablespoons of extra syrup or sugar.
Fill your muffin cups about half way with pancake batter. Add toppings as desired - a piece of fruit, a frozen berry, a little sprinkle of cinnamon sugar. Bake for about 15 minutes for mini muffins (time will vary depending on your oven temperature).
Enjoy!
~ Lisa

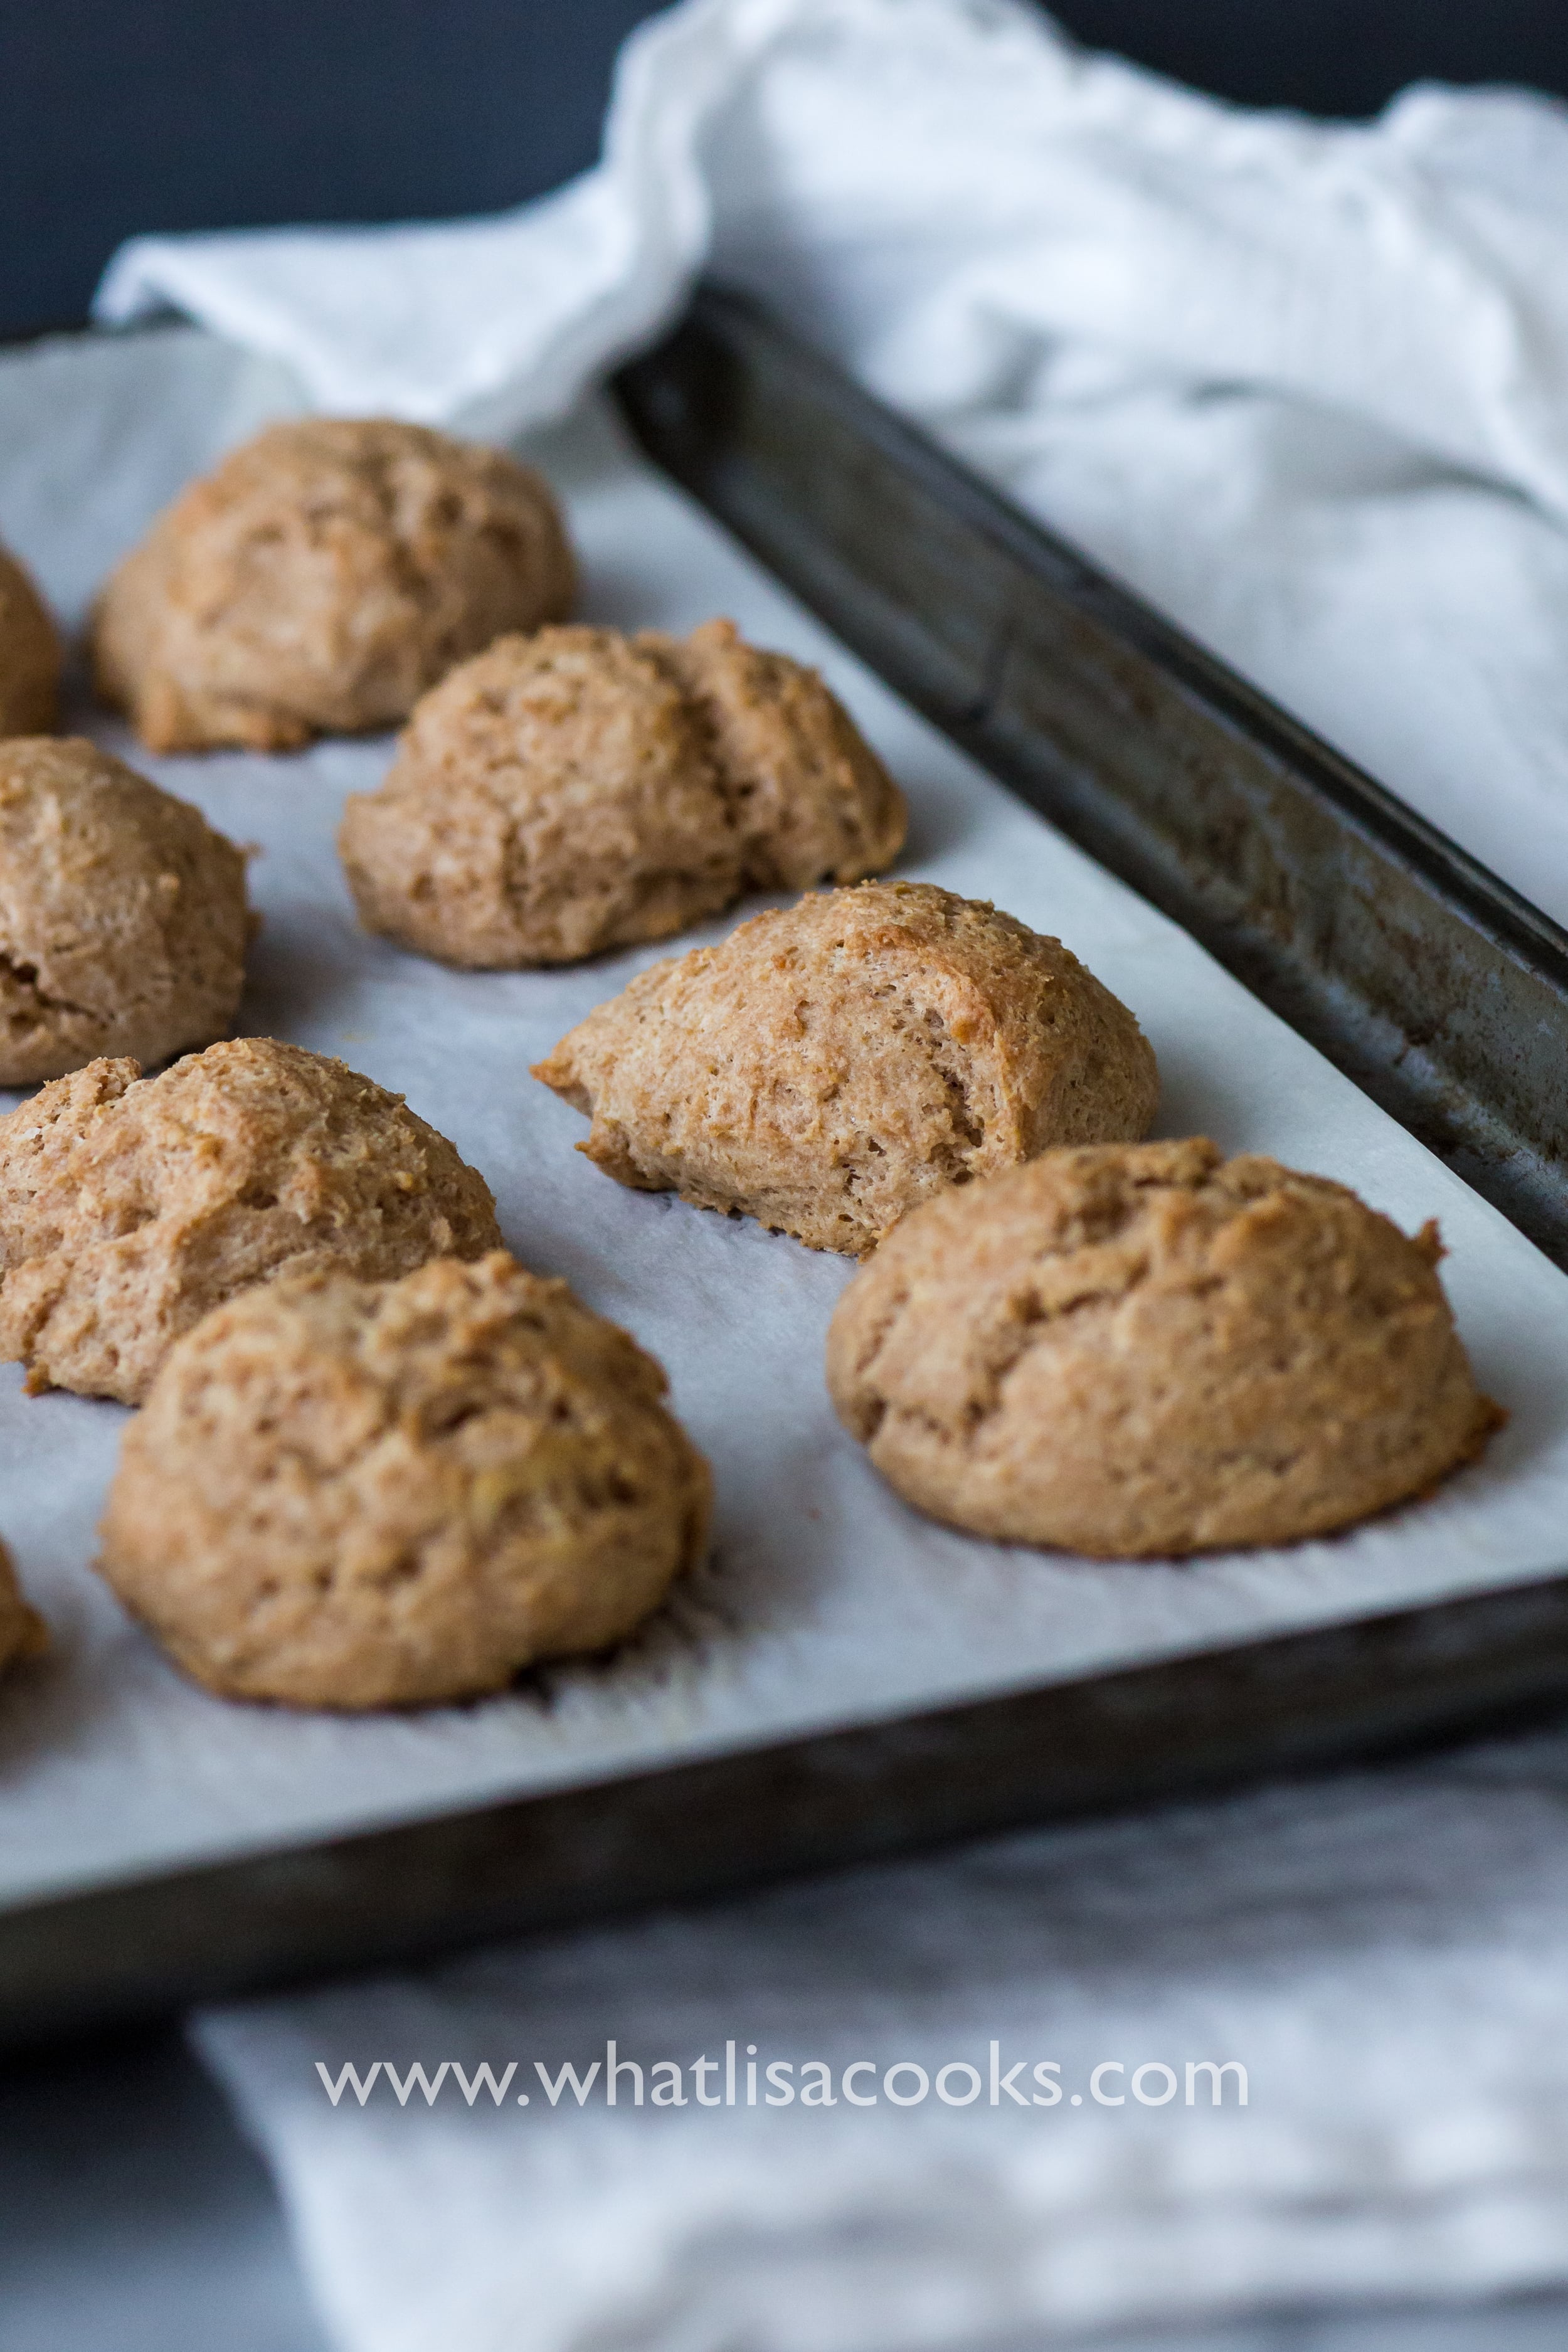
5 minute whole wheat drop biscuits
With simple ingredients and the use of a handy kitchen appliance, you can have fresh biscuits out of your oven in a half hour from start to finish - and in the oven in just 5 minutes from when you start. These are my current go-to when I am making a big pot of soup or stew and we want a little something to go with it. They are absolutely perfect for soaking up gravy and broth, and they are amazing just piping hot with a little butter. They are also perfect for my couple of picky kids, because even if they don't eat the soup or stew that I'm serving for dinner, they are at least getting something made with whole grain and the protein of yogurt, milk, and egg.

With simple ingredients and the use of a handy kitchen appliance, you can have fresh biscuits out of your oven in a half hour from start to finish - and in the oven in just 5 minutes from when you start. These are my current go-to when I am making a big pot of soup or stew and we want a little something to go with it. They are absolutely perfect for soaking up gravy and broth, and they are amazing just piping hot with a little butter. They are also perfect for my couple of picky kids, because even if they don't eat the soup or stew that I'm serving for dinner, they are at least getting something made with whole grain and the protein of yogurt, milk, and egg.
Ingredients:
2 Cups of whole wheat flour
1 cup whole milk plain yogurt
1/2 cup whole milk
1/2 cup (1 stick) cold butter, cut into cubes
1 1/2 teaspoons baking powder
1 teaspoon salt
1 egg
Directions:
Food Processor: Put everything except the flour the food processor bowl and process until blended, then add the flour and turn on again just until the flour is combined.
High Powered Blender: Put everything except the flour in the blender and blend until mixed. Measure flour into a separate bowl, pour the liquid mixture in, and stir/fold until just combined.
The key with either method is to not over process the flour, that will make them tough. The secret to light biscuits, even with whole wheat flour, is mix just enough to get all the flour combined, and no more. It's even ok if you have a few little spots of dry flour, because it will get absorbed as they bake. You can see in my picture below, these weren't perfectly mixed, there are spots of flour and spots of yogurt that aren't mixed in. But they came out perfect.
Once combined, use a medium sized cookie scoop to drop balls onto a parchment lined baking sheet. You can also do this with a spoon, but the cookie scoop is much faster. Bake at 350 for 20-25 minutes, until puffed and golden brown.

Notes:
You could do this with half whole wheat and half AP flour
I have made these with cottage cheese instead of yogurt and they are equally amazing. The cheese gets blended in, so the chunks are not an issue.
You could also use buttermilk instead of the combination of yogurt + milk. Just do 1 1/4 cup buttermilk.
I've used plain kefir instead of the milk also.
I pretty much always cook with salted butter.
Try adding a handful of grated cheese and/or some herbs to your finished dough!
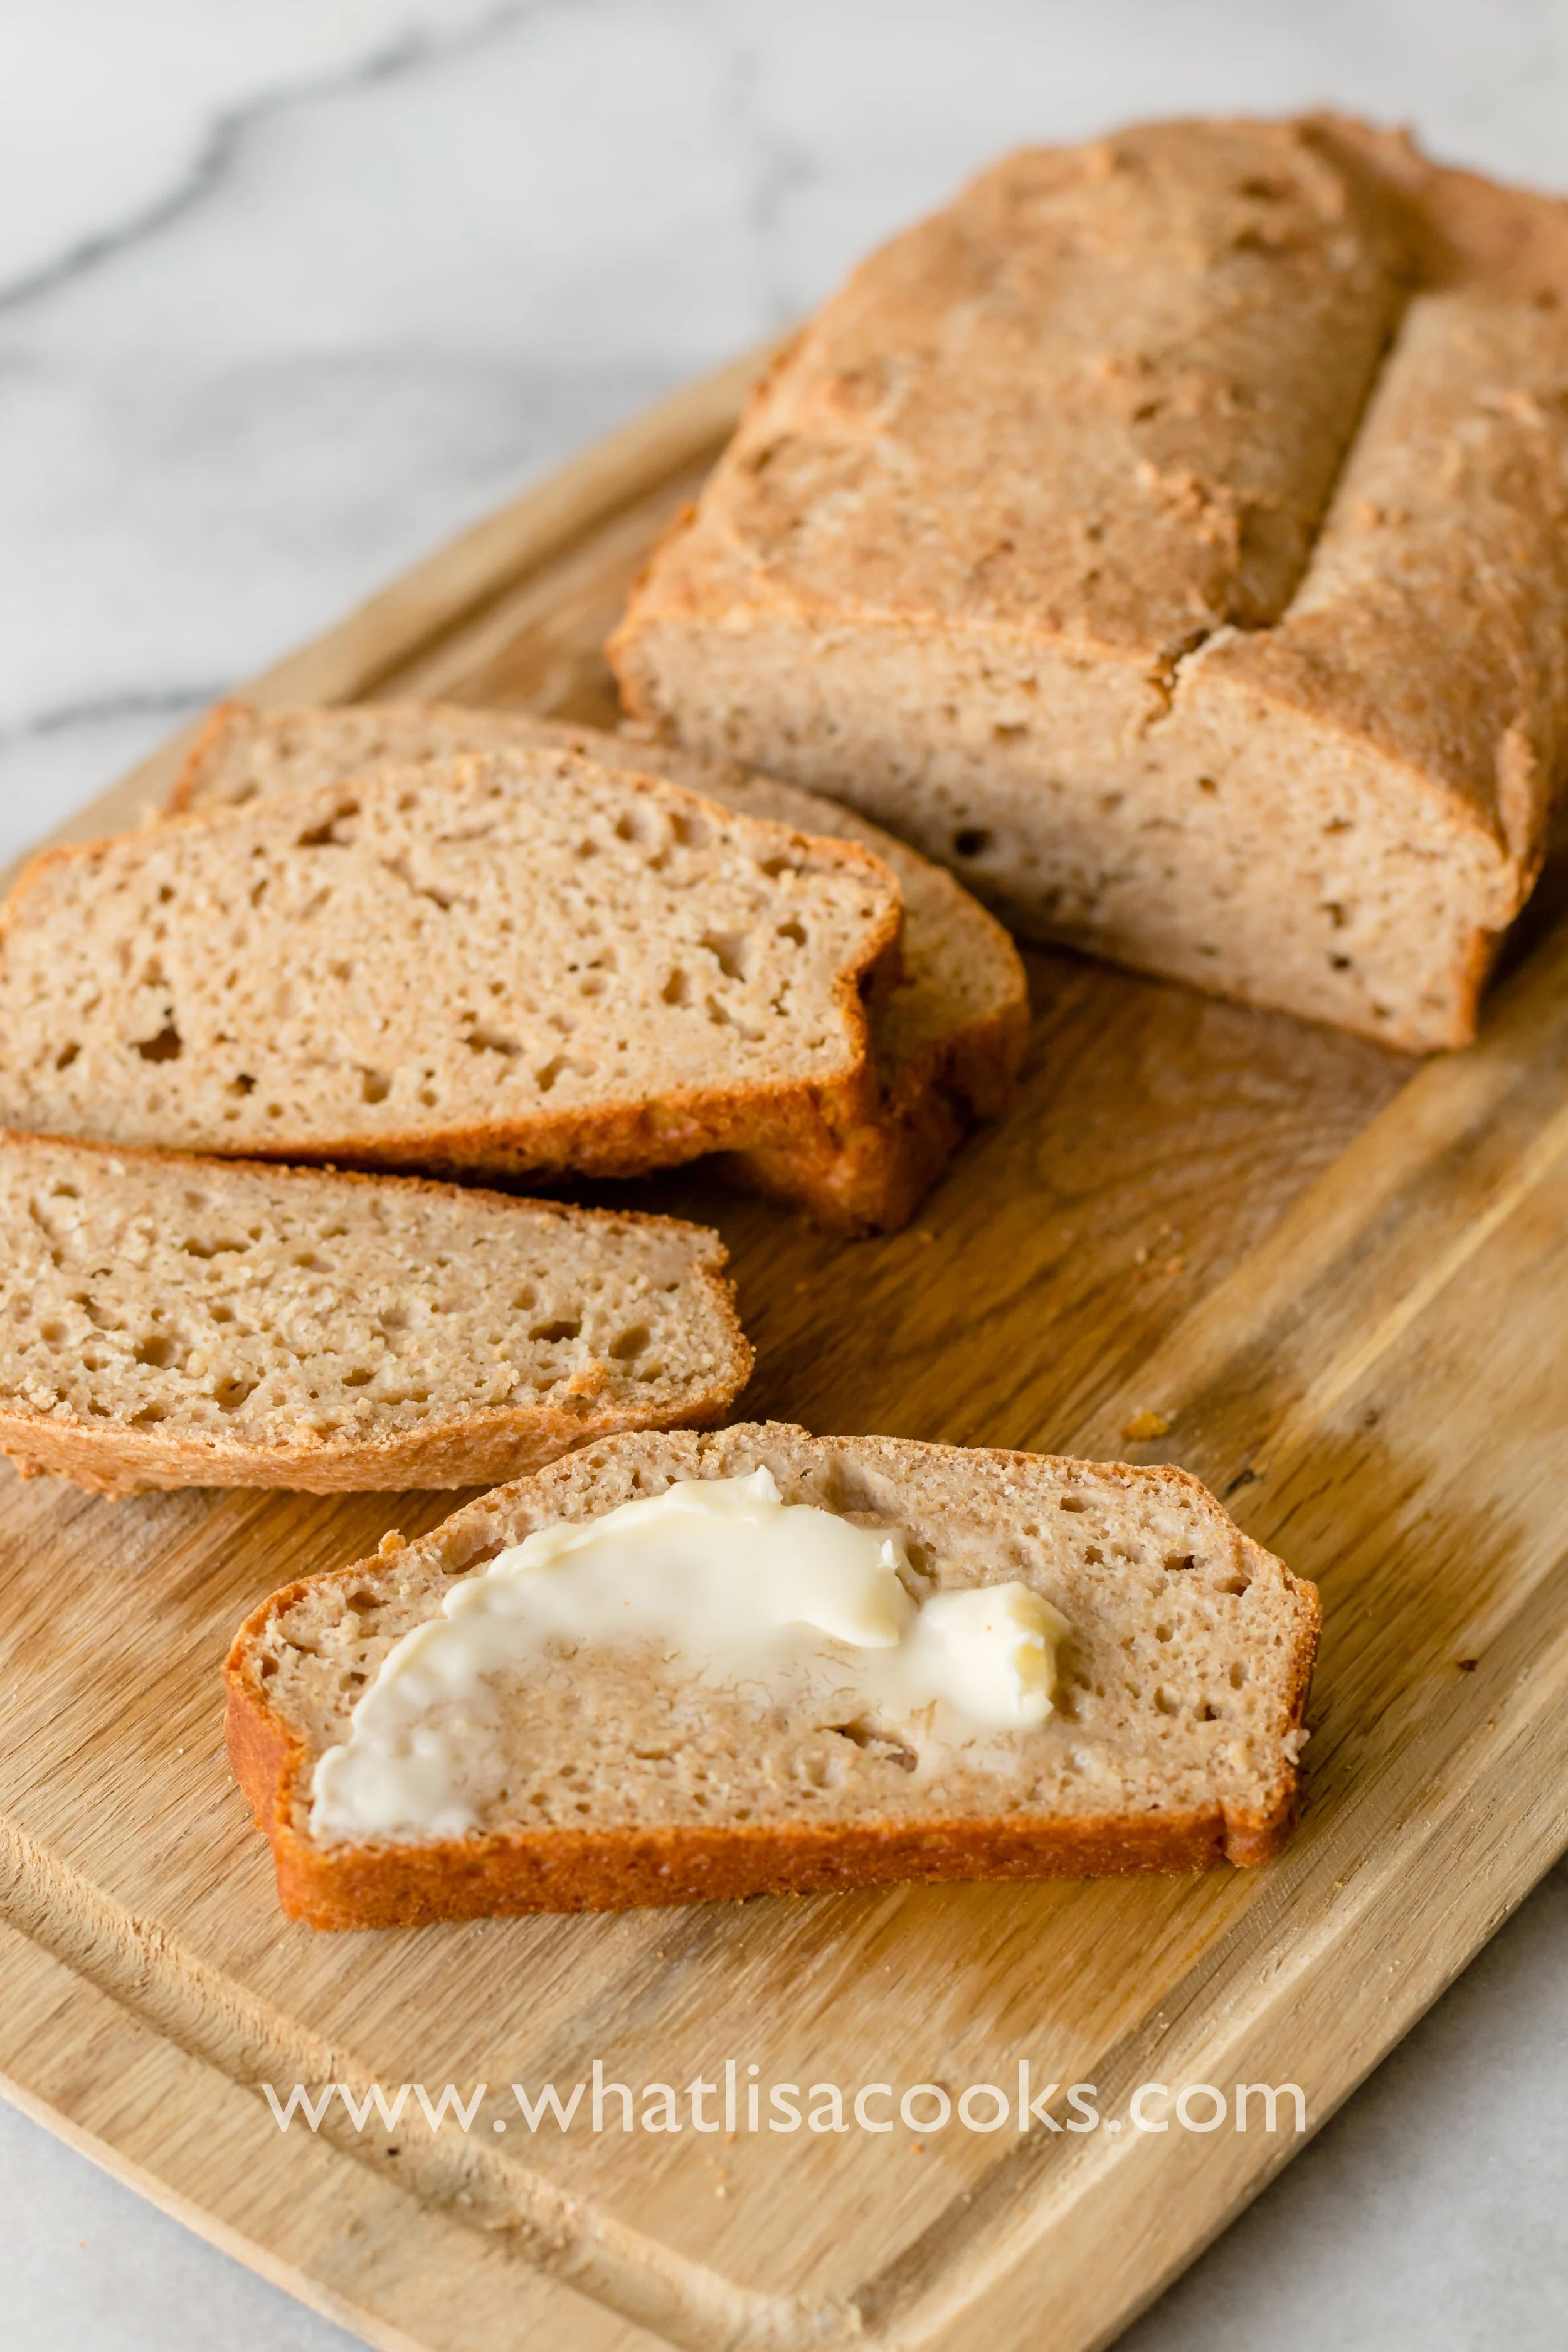
I have also made this recipe as a loaf, and it's equally awesome and even faster. Just dump the whole batch of batter in a buttered loaf pan, and bake for about an hour. It's great as a side with a soupy dinner, and also great toasted - a perfect solution if you need a quick loaf. It's basically like a savory quick bread.

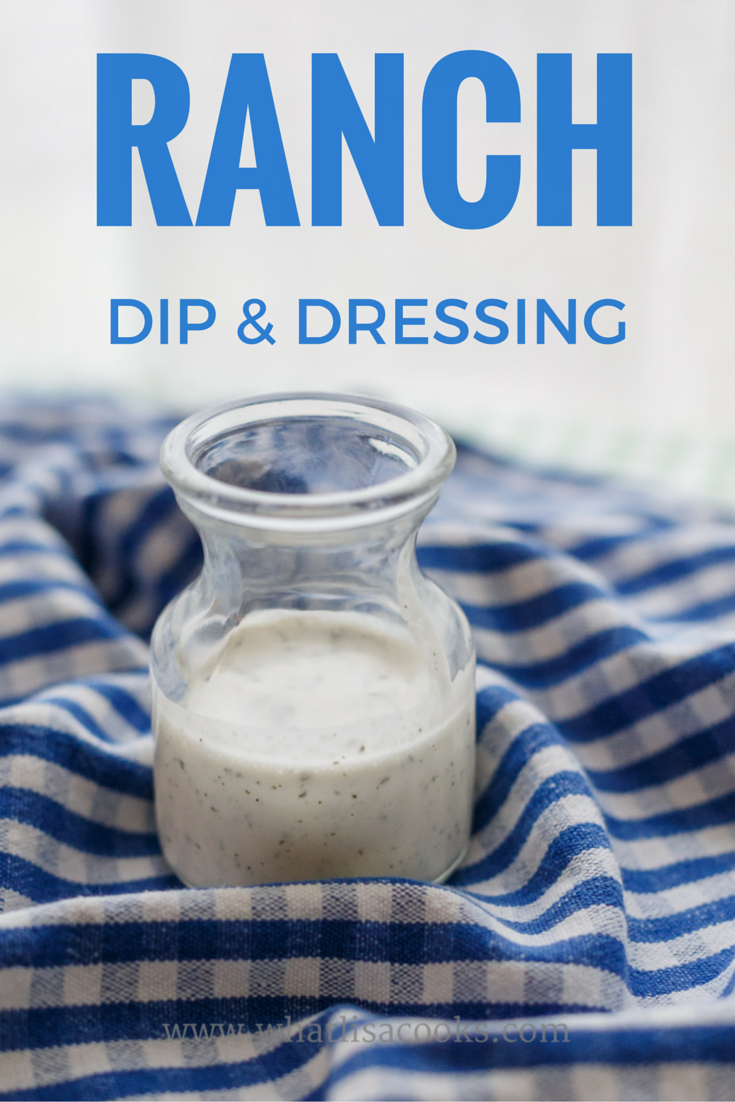
Homemade Ranch Dip & Dressing
Ranch dip and ranch dressing have become classic flavors that a lot of us could not picture life without But do you really need to buy it in a bottle? I don't think so. It's so easy to make from just ingredients that you probably already have in your pantry & fridge, there's really no need to ever buy it again!
This is a light and tangy sour cream & yogurt based Ranch Dressing recipe. A lot of ranch recipes call for mayonnaise. Now don't get me wrong - I LOVE mayo. But not in ranch. I want my ranch dip to be light and tangy. And by light I don't mean low fat - you'll notice that I'm using full fat sour cream, yogurt, and milk - but I mean not oily, not heavy, not that richer flavor that comes with mayo. I just prefer it this way. But honestly you could take this basic blend of seasonings and add it to whatever combination of cream/yogurt/mayo/milk/etc. that you like. It will taste great.
I don't think you can have a summer spread without crisp veggies and a homemade ranch to dip them in! Ranch is also basically my favorite summer salad dressing - I just find it so cool and refreshing.

Ranch dip and ranch dressing have become classic flavors that a lot of us could not picture life without But do you really need to buy it in a bottle? I don't think so. It's so easy to make from just ingredients that you probably already have in your pantry & fridge, there's really no need to ever buy it again!
This is a light and tangy sour cream & yogurt based Ranch Dressing recipe. A lot of ranch recipes call for mayonnaise. Now don't get me wrong - I LOVE mayo. But not in ranch. I want my ranch dip to be light and tangy. And by light I don't mean low fat - you'll notice that I'm using full fat sour cream, yogurt, and milk - but I mean not oily, not heavy, not that richer flavor that comes with mayo. I just prefer it this way. But honestly you could take this basic blend of seasonings and add it to whatever combination of cream/yogurt/mayo/milk/etc. that you like. It will taste great.
Ingredients:

1 cup sour cream (get some real sour cream, not one with a bunch of thickeners and extra stuff)
½ cup plain whole milk greek yogurt
Up to 1 cup whole milk, depending on whether you want this more for dipping or pouring
2 tablespoons freshly squeezed lemon juice
2 tablespoons dried parsley
1 tablespoon dried chives
1 1/2 teaspoon kosher salt
1 1/2 teaspoon onion powder
1 ½ teaspoon garlic powder
1 teaspoon freshly ground black pepper
1/2 teaspoon dried dill
I wanted this to be a recipe that I could make with things I always have in the house. A lot of recipes call for buttermilk, but I don’t usually have buttermilk just hanging out in my fridge. You could certainly swap out the milk + lemon juice for buttermilk if you have it or prefer it, but I like flavor of the lemon juice anyway. You don’t have to include the yogurt, you could just use all sour cream, but I like the tanginess that the yogurt adds. The quantities of seasonings are definitely all about personal taste. Sometimes if I’m looking for more zing I’ll add a lot more of some or all of the seasonings.
So, in keeping with my usual style, this "recipe" is more of a guideline to get you started.
Directions for Dressing: throw all the ingredients together and mix well. I like to make mine in a Blender Bottle, it’s easy to mix and easy to pour out of. But you can just as easily mix in a bowl with a whisk, and then pour in a jar.
Directions for Dip: mix together everything except the milk. Then add milk a little at a time until it's the thickness that you want for dipping.
The milk is where you can control the thickness – if you want a thick dip, don’t add the milk at all (and I would cut back on the lemon juice a little). If you want a nice, pour-able dressing, add up to a cup of milk. If you’re going to leave out the milk altogether (and most of the lemon juice), then the blender bottle probably won’t work as it will be too thick, I would just put it all in a bowl and stir until well mixed.
You can totally make this right before serving, just try to let it sit for at least 10 minutes or so. But it’s really better if you can make it ahead. This is a big recipe – double the size of some of the original ones I looked at for ideas. If you're making dressing it will give you enough for several salads, or it will be a good size bowl of dip for a party. If I’m going to make something I always like to have extra. Making something from scratch does take a little more time than just opening a bottle, but if you've made extra then the next time you want it you do get to just go to the fridge and open a bottle.
If you want to make this even faster the next time - just go ahead and double, triple, quadruple the dry ingredients and store them in a jar. Then all you have to do is mix it in with the wet stuff.
Enjoy!
