
Meal Plan #10
Meal plan for a very busy week.
We are still in the thick of kids' soccer season. Only two weeks left! Yes, I'm counting down. But with soccer practices three days a week after school, dinners need to be things that I can either make ahead and reheat, or have simmering in the slow cooker - either way it needs to be ready to put on the table when we get home late. It's the only way to avoid having takeout 3 nights a week. Having a meal plan is critical during weeks like this. I need to know ahead of time what I'm cooking, because I have a limited amount of time to get it put together and ready before I have to run out again.
If you saw my plan from last week, you might notice a few repeats here. One (the enchilada casserole) is because everybody loved it so much that they begged to have it again right away. The other two repeats are because we ended up changing plans and not having those dinners, so I just copied them over to this week.
The kids breakfasts and lunches are a lot of repeats too. I have a short list of breakfasts that I just rotate though. There is no need to reinvent the wheel each week for breakfast. For lunches I rotate through a short list of themes (like breakfast for lunch, lunchable, sandwich, etc.), but the actual execution looks a little different each time.
So here you go...
My plan for the coming week includes easy meals that can mostly be made ahead and just reheated at dinner time. Subject to change on a whim.
MONDAY: (MORNING THERAPY APPOINTMENTS, DANCE CLASSES AND SOCCER PRACTICE AFTER SCHOOL.)
Kids Breakfast: bagels, apples, cheese
Kids Lunch: Leftover pizza, banana muffins, carrots, fruit.
Dinner: Lentil Soup. Broth, lentils, canned tomatoes, garlic, greens, carrots, sausage. All simmered for a while in the slow cooker. Served with some savory quick bread (recipe coming soon).
TUESDAY:
Kids Breakfast: pancakes, cheese.
Kids Lunch: Lunchable: ham, cheese, crackers. Veggies and berries on the side. Maybe a cookie.
Dinner: Enchilada casserole. Also knows as: Lazy mom's enchiladas - it's much easier to just layer stuff in a casserole dish than it is to carefully roll each enchilada. I did this in the slow cooker last week and it turned out great. I make my own enchilada sauce because store bought ones are too spicy for my kids. It's basically just a tomato gravy (butter, flour - make a roux. Add chicken broth. Then add tomato sauce.) - seasoned with garlic, onion, cumin, and a tiny bit of chili powder. Here is an actual recipe if you like. I make the sauce, then put the chicken in and simmer until the chicken is falling apart. Mix together a can of cream of mushroom soup, some sour cream, and diced green chilis. In a casserole dish, layer: enchilada sauce with chicken, corn tortillas, soup & sour cream mixture, shredded cheese. Just keep layering until your dish is full or you've used up everything. It doesn't have to be pretty and exact quantities don't matter. Top with a bit more cheese, bake at 350 until bubbly. Serve with sour cream and shredded lettuce.
WEDNESDAY: (SOCCER PRACTICE AFTER SCHOOL)
Kids Breakfast: Scrambled eggs, toast.
Kids Lunch: Breakfast for lunch: leftover pancakes, yogurt, cheese, fruit.
Dinner: Chicken curry with coconut rice. I buy a packaged curry sauce and I'm not ashamed to admit it. It's easy, and I really like it. This one is a Japanese style golden curry, it comes in little blocks. You just brown your meat, add your chopped veggies, add the cube of sauce, some water or broth, and I always add coconut milk - and then simmer. I use whatever veggies I've got available. For the rice - just white rice cooked in my rice cooker, but I substitute a can of coconut milk for some of the water, and add a little salt.
THURSDAY: (SOCCER PRACTICE AFTER SCHOOL)
Kids Breakfast: Yogurt with oats, honey, jam, fruit
Kids Lunch: Bean and cheese burritos, maybe with some leftover chicken from the enchiladas. A little salad on the side.
Dinner: leftovers
FRIDAY: (SCHOOL HARVEST DANCE)
Kids Breakfast: Cheerios, fruit, milk.
Kids Lunch: grilled sandwiches.
Dinner: Pizza, probably takeout.
SATURDAY: (2 SOCCER GAMES)
Breakfast: Kids' choice (cereal, toast, etc.)
Lunch: Quesadillas
Dinner: Black bean soup - homemade broth, black beans, corn, rice, tomatoes, garlic, cumin. Served with toppings: chips, cheese, sour cream, diced avocado.
SUNDAY:
Brunch: Pancakes and sausage, eggs, fruit, OJ
Dinner: One Pot Homemade Macaroni and Cheese. You can find the recipe here on my instagram page. It's soooo good, and ridiculously easy.

Meal Plan #11
One week meal plan during a busy kids soccer season.

I've been terrible about sharing meal plans. And, well, I've been terrible about doing them. I'm not totally winging it, I usually scribble down plans for a few days at a time. Which is totally better than nothing, because at least I'm not standing in the kitchen at 5:00 with no idea what I'm putting on the table for dinner. But still, it's better when I plan more ahead.
I feel like I'm still not in the swing of things with this school year. I think it's this soccer schedule that's throwing me off. Practices three days a week and games on the weekends is just messing up my ability to plan. But I'm trying to get back on the wagon of doing the plan for at least the whole week, so here goes. I'm not even taking the time to drop it into a template of any kind - I'm just typing it out and I'm going to print this post and we are going to go with it.
One of the keys to meal planning that works is having a sense of your schedule. Have your calendar next to you as you are making plans and choosing meal for the week - so you know which days you are getting home late, or need something made ahead. And look at this - we don't have a single day this week without some kind of afternoon or evening commitment. yay. (not.)
My plan for the coming week includes easy meals that can mostly be made ahead and just reheated at dinner time. Subject to change on a whim.
Monday: (Morning therapy appointments, dance classes and soccer practice after school.)
Kids Breakfast: bagels, apples, cheese
Kids Lunch: pizza rolls, apple bread (still working on that recipe - the kids get all my test loaves), carrots, cheese.
Dinner: Chicken soup. Also known as "leftover soup" - take all of the leftover things out of the fridge and put them in broth, and call it soup. It's got a bit of veggies, a bit of brown rice, some diced chicken, all in homemade chicken broth. If I have time I'll make some biscuits or soda bread to go with it.
Tuesday: (IEP meeting after school)
Kids Breakfast: Apple bread, cheese.
Kids Lunch: Tuna salad and crackers. Veggies and berries on the side.
Dinner: Enchilada casserole. Also knows as: Lazy mom's enchiladas - it's much easier to just layer stuff in a casserole dish than it is to carefully roll each enchilada. Or I might try a version in the slow cooker that I've been meaning to try for a while. I make my own enchilada sauce because store bought ones are too spicy for my kids. It's basically just a tomato gravy (butter, flour - make a roux. Add chicken broth. Then add tomato sauce.) - seasoned with garlic, onion, cumin, and a tiny bit of chili powder. Here is an actual recipe if you like. In a casserole dish, layer: sauce, corn tortillas, diced chicken, shredded cheese, diced green chilis, diced onions. A layer of a cream of mushroom soup is really nice. Or some sour cream. It doesn't have to be pretty. Top with a bit more cheese, bake at 350 until bubbly. Serve with sour cream and shredded lettuce.
Wednesday: (Soccer practice after school)
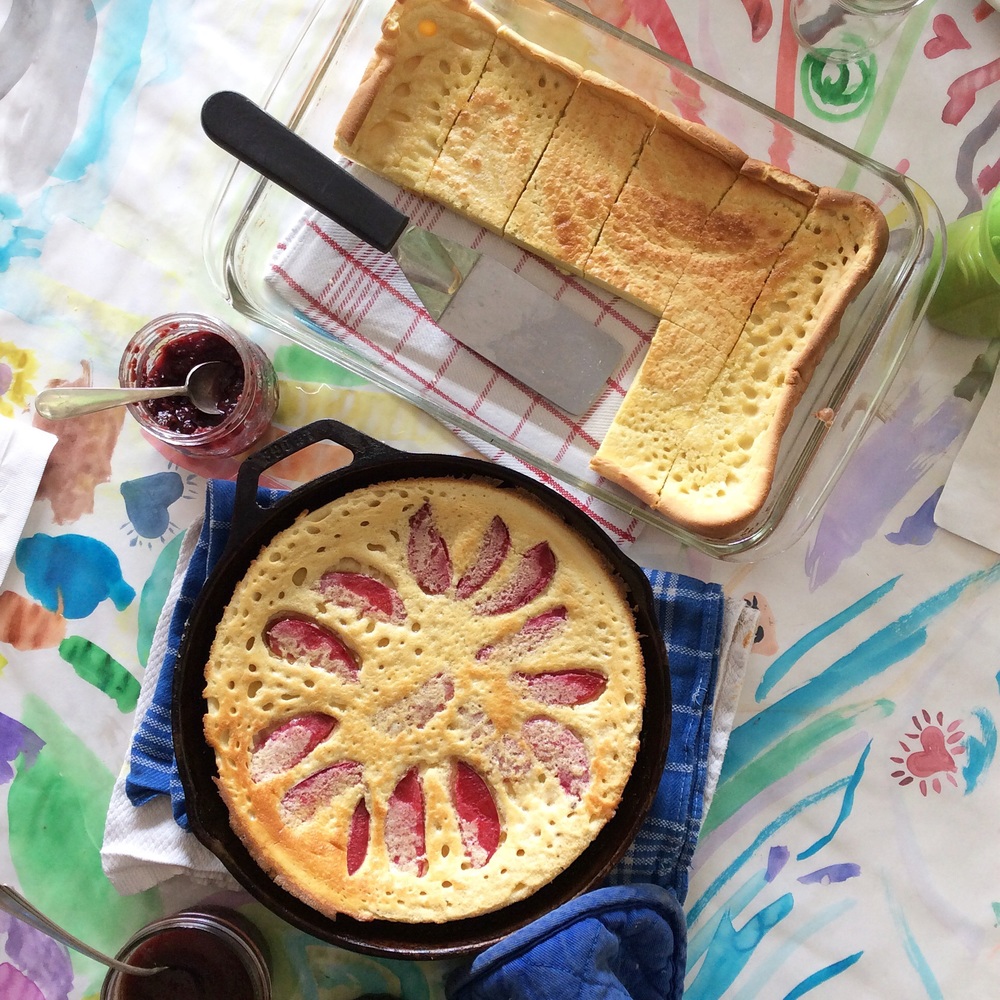
Kids Breakfast: Dutch Baby
Kids Lunch: Breakfast for lunch: Banana bread, yogurt, cheese, fruit.
Dinner: Chicken curry with coconut rice. I buy a packaged curry sauce and I'm not ashamed to admit it. It's easy, and I really like it. This one is a Japanese style golden curry, it comes in little blocks. You just brown your meat, add your chopped veggies, add the cube of sauce, some water or broth, and I always add coconut milk - and then simmer. I use whatever veggies I've got available. For the rice - just white rice cooked in my rice cooker, but I substitute a can of coconut milk for some of the water, and add a little salt.

Thursday: (3 kids dentist appointments after school)
Kids Breakfast: Yogurt with oats, honey, jam, fruit
Kids Lunch: Wraps: Tortillas rolled up with meat, cheese, lettuce. Fruit on the side, maybe a few cookies.
Dinner: leftovers
Friday: (school run-a-thon, and a birthday)
Kids Breakfast: Cheerios, fruit, milk.
Kids Lunch: Sandwiches, not sure what kind yet.
Dinner: the kids are having a sleepover at Grandma's and we're going out. It's my birthday!
Saturday: (2 soccer games)
Breakfast: Out. Kids at Grandma's
Lunch: Quesadillas
Dinner: Black bean soup - homemade broth, black beans, corn, rice, tomatoes, garlic, cumin. Served with toppings: chips, cheese, sour cream, diced avocado.
Sunday: (Hubby has band practice)
Brunch: Pancakes and sausage, eggs, fruit, OJ
Dinner: Tuna melts

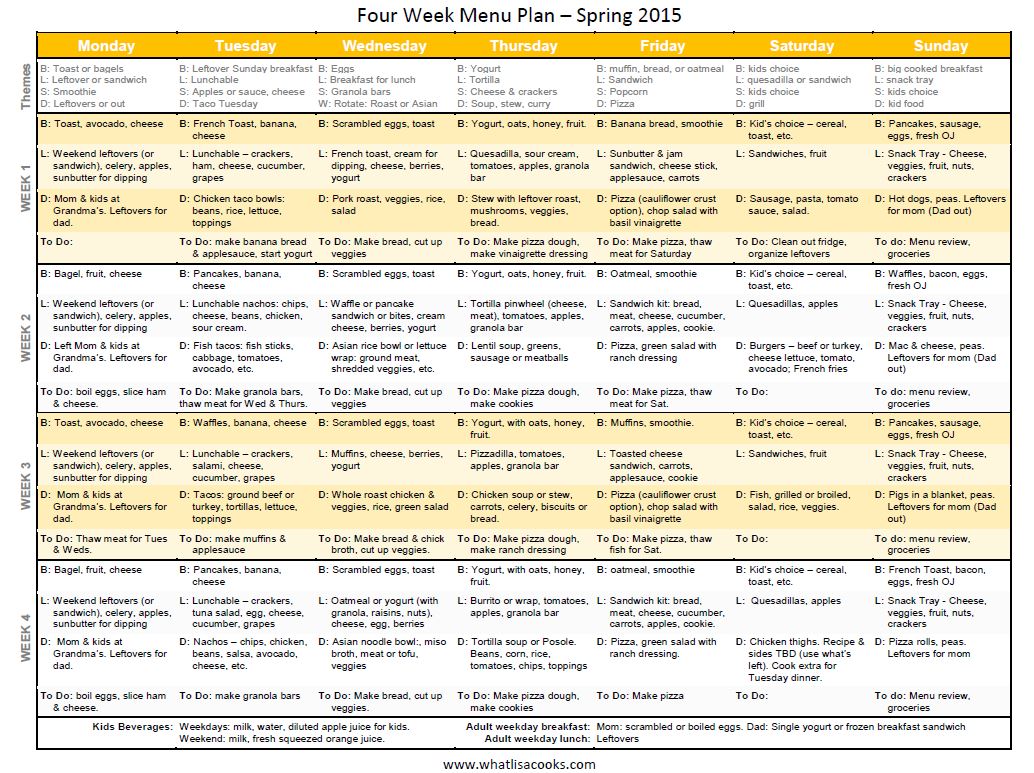
Meal Plan #9: a Full Month menu
A meal plan from the archives - a full month plan with breakfast, lunch, and dinner. Plus notes for how and why, and the template.
Are you struggling with meal planning and figuring out how to manage your meals?
I have a system for meal planning that works great!
It involves a bit of up front work, but once it's done I am always so happy.
Why meal planning?
For me, what inevitably happens when I am not as disciplined about planning is that I spend way too much money on food and end up buying too much stuff that we don't really need.

Some people like to shop for shoes, I like to shop for food!
I really do enjoy going to the grocery store and just browsing. But if I don't have a complete planned out menu, with a grocery list to go with it, then I find myself at the store and just buying what looks good, or buying more than I need just to have stuff on hand.
When you are on a tight budget, you know that just browsing the store and buying what looks good is not a good idea!
So what's the system?
I don't just do a meal plan for one week - I do it for an entire month at a time!
I know it sounds like a lot of work, and the first time you do it is.
But once you have a four week plan, then you can just re-use and make little changes each month - you don't have to come up with the whole thing from scratch over and over again. You can even just repeat the whole thing - it's been a full four weeks since you had one of those meals, so it won't feel like you are repeating!
Scroll to the bottom to get a copy of my four week meal plan template.
Once it's done, I feel a huge sense of relief in knowing that I've got a whole month of meals all figured out.
I design our plan to fit our current weekly schedule, knowing which days I have time to cook and which days I don't.
I work in a few of our regular theme nights that my kids have learned to expect - like Taco Tuesday, and Pizza Friday.
I try to have several nights of the month where I cook a large piece of meat or roast chicken, with the purpose of having lots of leftovers to use in other easy meals. You'll see in my plan that I've got several dinners that are based on the assumption that I've already got cooked chicken or other meat available to use.
In this version I also plan out breakfast and lunch. You totally don't have to do that, but with four kids getting ready for school, and packing four lunches every day, also having an idea of what to do for those meals just makes my life easier. For breakfast and lunch I follow a plan that's pretty much the same each week, with just minor variations in a few of the items. I don't need to reinvent the wheel each week and as long as I don't repeat something twice in one week, my kids are ok to eat the same lunch somewhat frequently.
I should also note that I'm not actually making things like pancakes and French toast on weekday mornings - those are leftovers from the previous Sunday's breakfast. I always make extra of all of those kinds of things and stash them in the freezer, they make super easy weekday breakfasts. The breakfasts and lunches that I've included here are mostly just for the kids (except Sunday breakfast).
As for shopping - planning for four weeks really helps with controlling the spending! I list out everything I need for the four weeks of meals, and I do a big Costco trip once a month for all of the non-perishable foods, as well as all of my meats that can go in the freezer. I do this big trip right after my husband's mid month paycheck - the one that doesn't have to cover the mortgage and health insurance. After that then all I need to buy each week are fresh items like dairy, fruit, and veggies.

In order to maintain a somewhat reasonable grocery budget, I'm trying to really prioritize what I buy organic, and right now my top priorities for organics are our milk, eggs, and most of our produce. Basically the stuff that we consume a lot of (and so our pesticide/hormone/antibiotic exposure would be the highest), and the things on the 'dirty dozen' produce list. I will keep an eye out for sales on organic meats, and if, for example, I see that Whole Foods has organic whole chickens on sale for the same price as the regular ones at Trader Joe's, then I'll try to run over and pick up several and stick them in the freezer. I get a weekly organic produce delivery which is a really good value for what we get, and we are getting our milk delivered weekly from a local dairy. So after those two deliveries each week, my grocery shopping for the rest of the month will be very minimal, which is going to save me a lot of time!
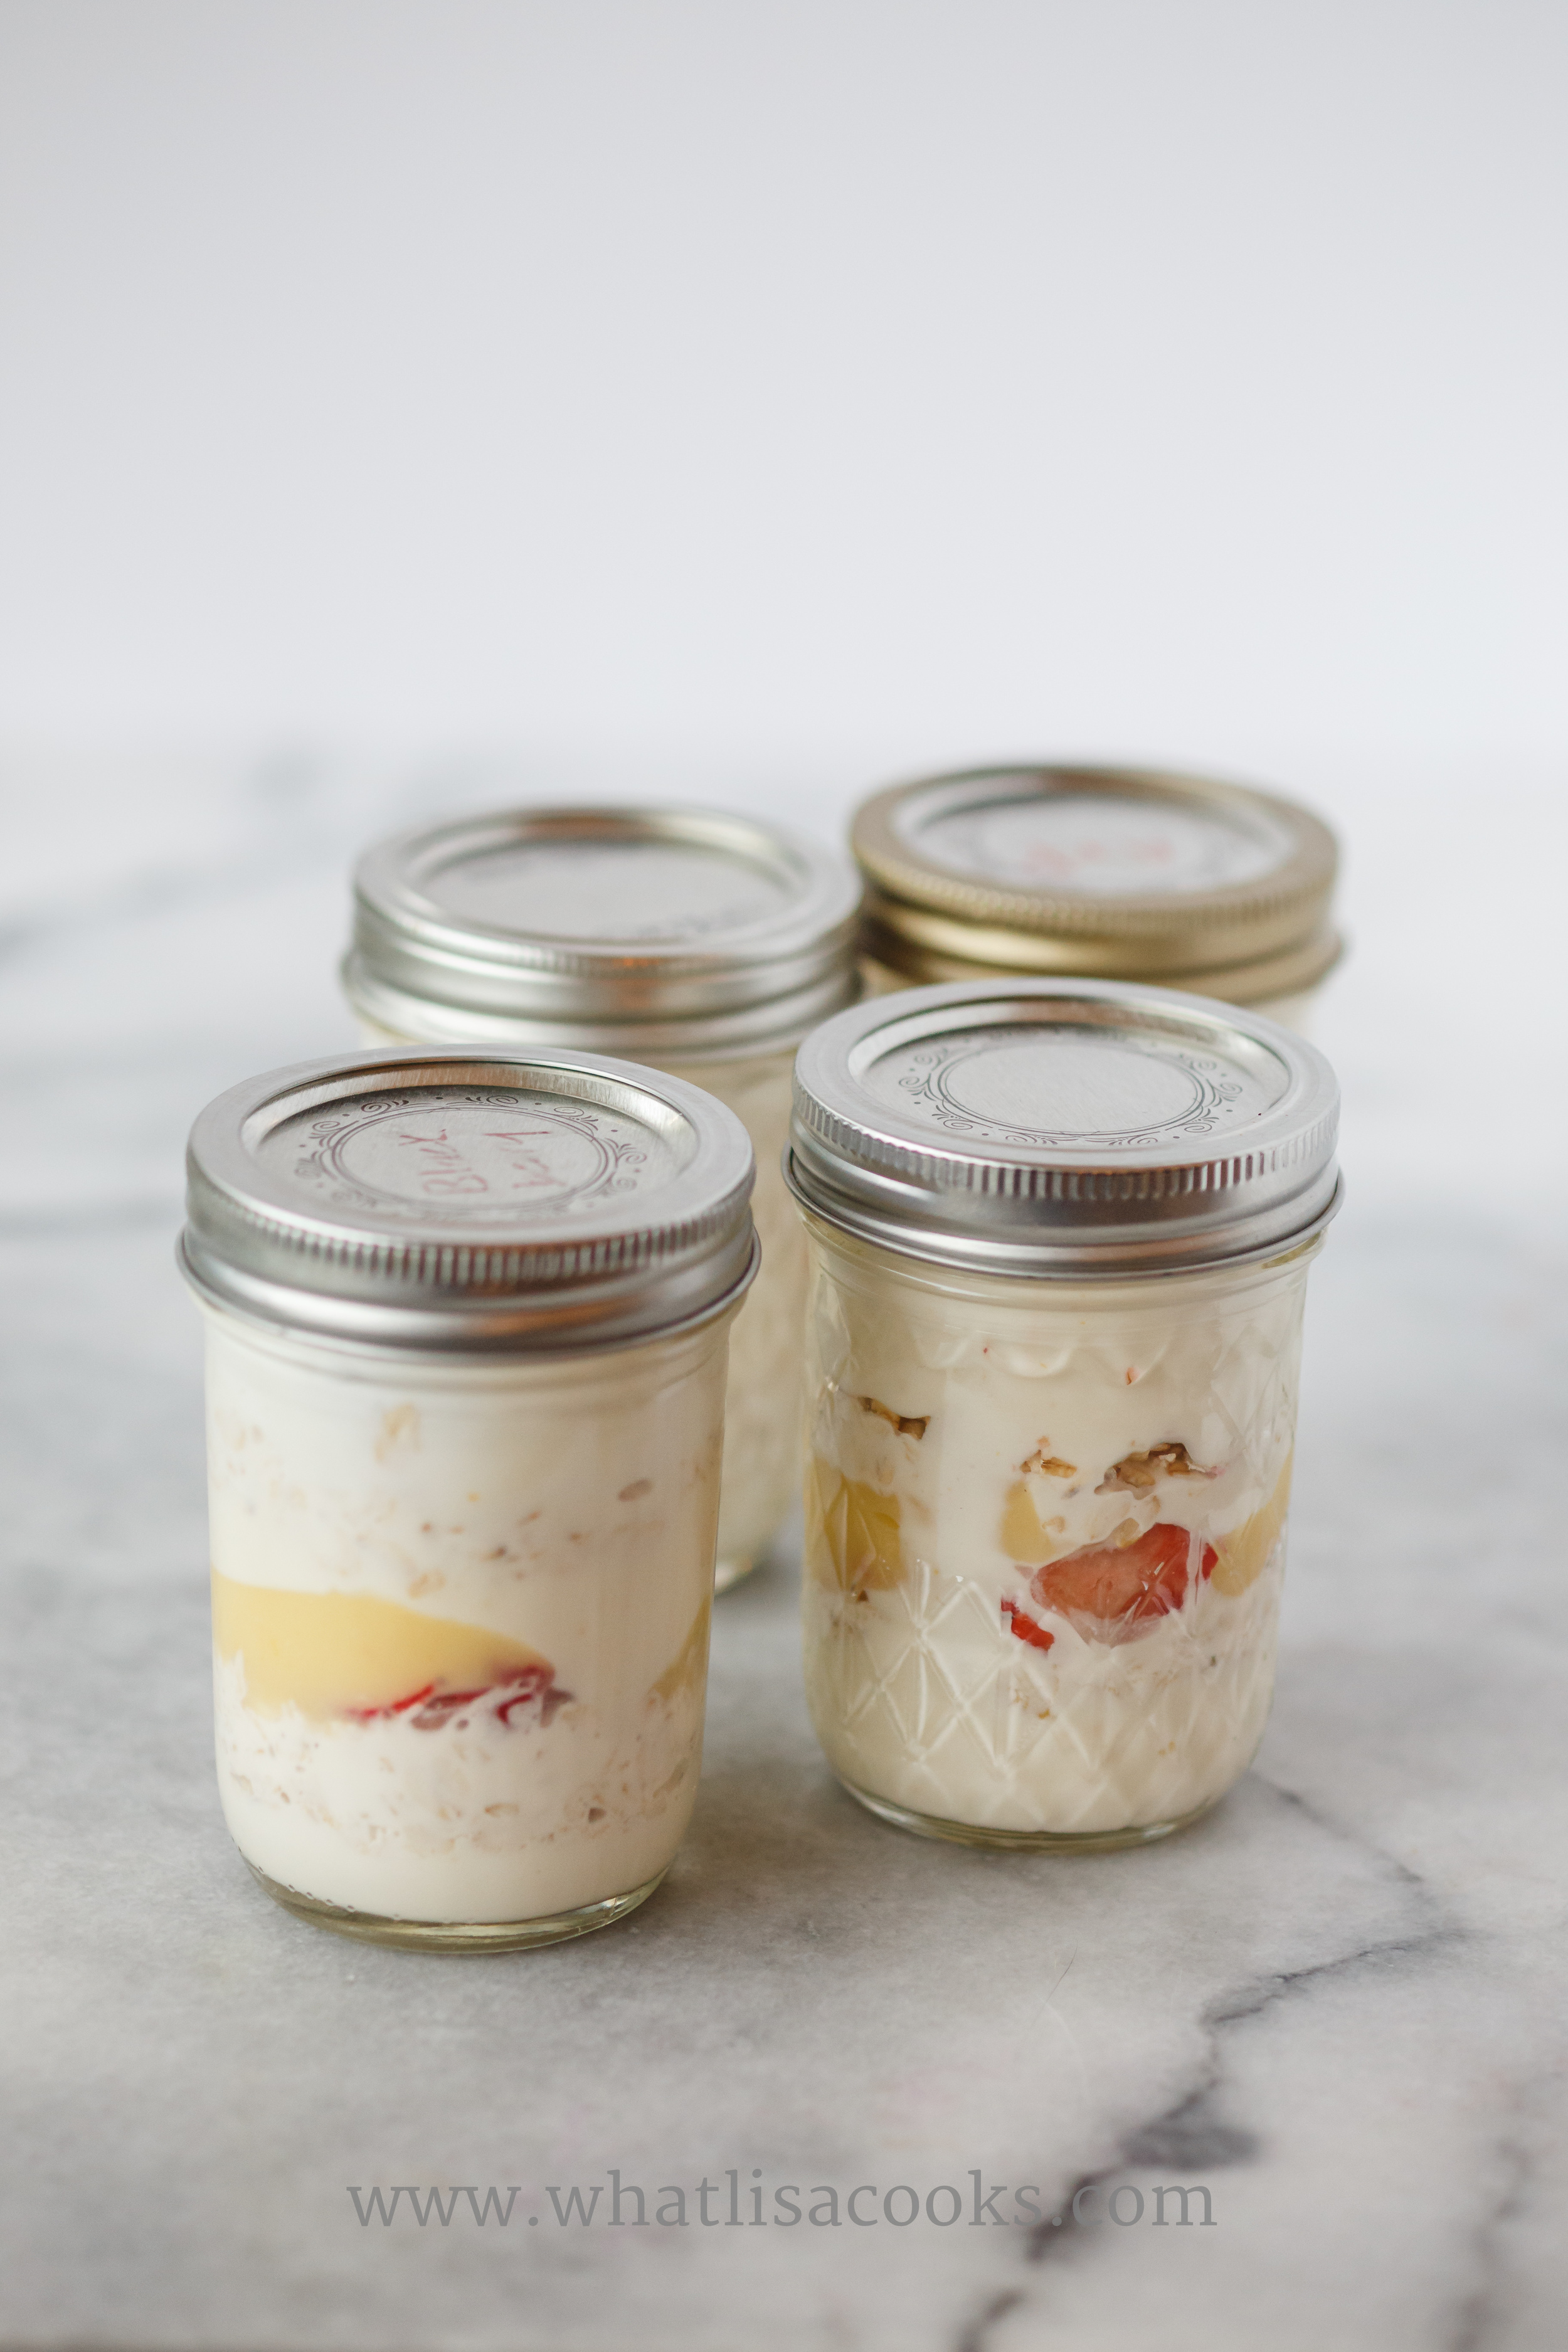
Yogurt Parfaits
I recently wrote about my super picky child, and how she is finally starting to try new foods, now that I have completely given up on pushing her. But we are still in the baby steps phase with that, she certainly has a ways to go before she is eating everything the rest of us eat. So for now, a very large part of her diet is still yogurt. I'm thankful at least that she really loves something that is so healthy, and I can load it up with fruit and oats to really make it an even more complete meal for her.

I recently wrote about my super picky child, and how she is finally starting to try new foods, now that I have completely given up on pushing her. But we are still in the baby steps phase with that, she certainly has a ways to go before she is eating everything the rest of us eat. So for now, a very large part of her diet is still yogurt. I'm thankful at least that she really loves something that is so healthy, and I can load it up with fruit and oats to really make it an even more complete meal for her.
I make plain yogurt, or if I haven't had time, I buy it. She likes her yogurt all dressed up with oats and honey and sometimes some jam or fruit. I recently made lemon curd, so lately that has been her topping of choice, along with a little whipped cream.
It's a fantastic meal for her, but it can be a bit of a mess to get all these things out, so to save myself some time I decided to make her some yogurt parfait's in jam jars, so that she can help herself to one in the fridge whenever she needs a snack. Or they are great for an easy week day breakfast.
These are kind of like a combination of a flavored yogurt + an overnight oats idea.

There's no real recipe here - that's the beauty of it. You just take whatever you would normally put in yogurt or an overnight oats, and layer it. Things like:
- honey
- oats or granola (it will get soft)
- berries
- bananas
- jam
- cream
- dried fruit
- nuts or seeds
For this batch I layered plain yogurt, honey, oats, cream, lemon curd, and strawberries. Just a little bit of each, and then repeat, until the jar is mostly full. Its a good idea to leave a little room for stirring.
Leftover jam jars seem to make the perfect size for a good serving, and I've got tons of them around. But I'm sure you could get creative with other kinds of containers.
Once you've layered everything, just put a lid on and put in the fridge. I think they'll be good for several days, and it will probably very depending on whether you used fresh fruit.
Enjoy!
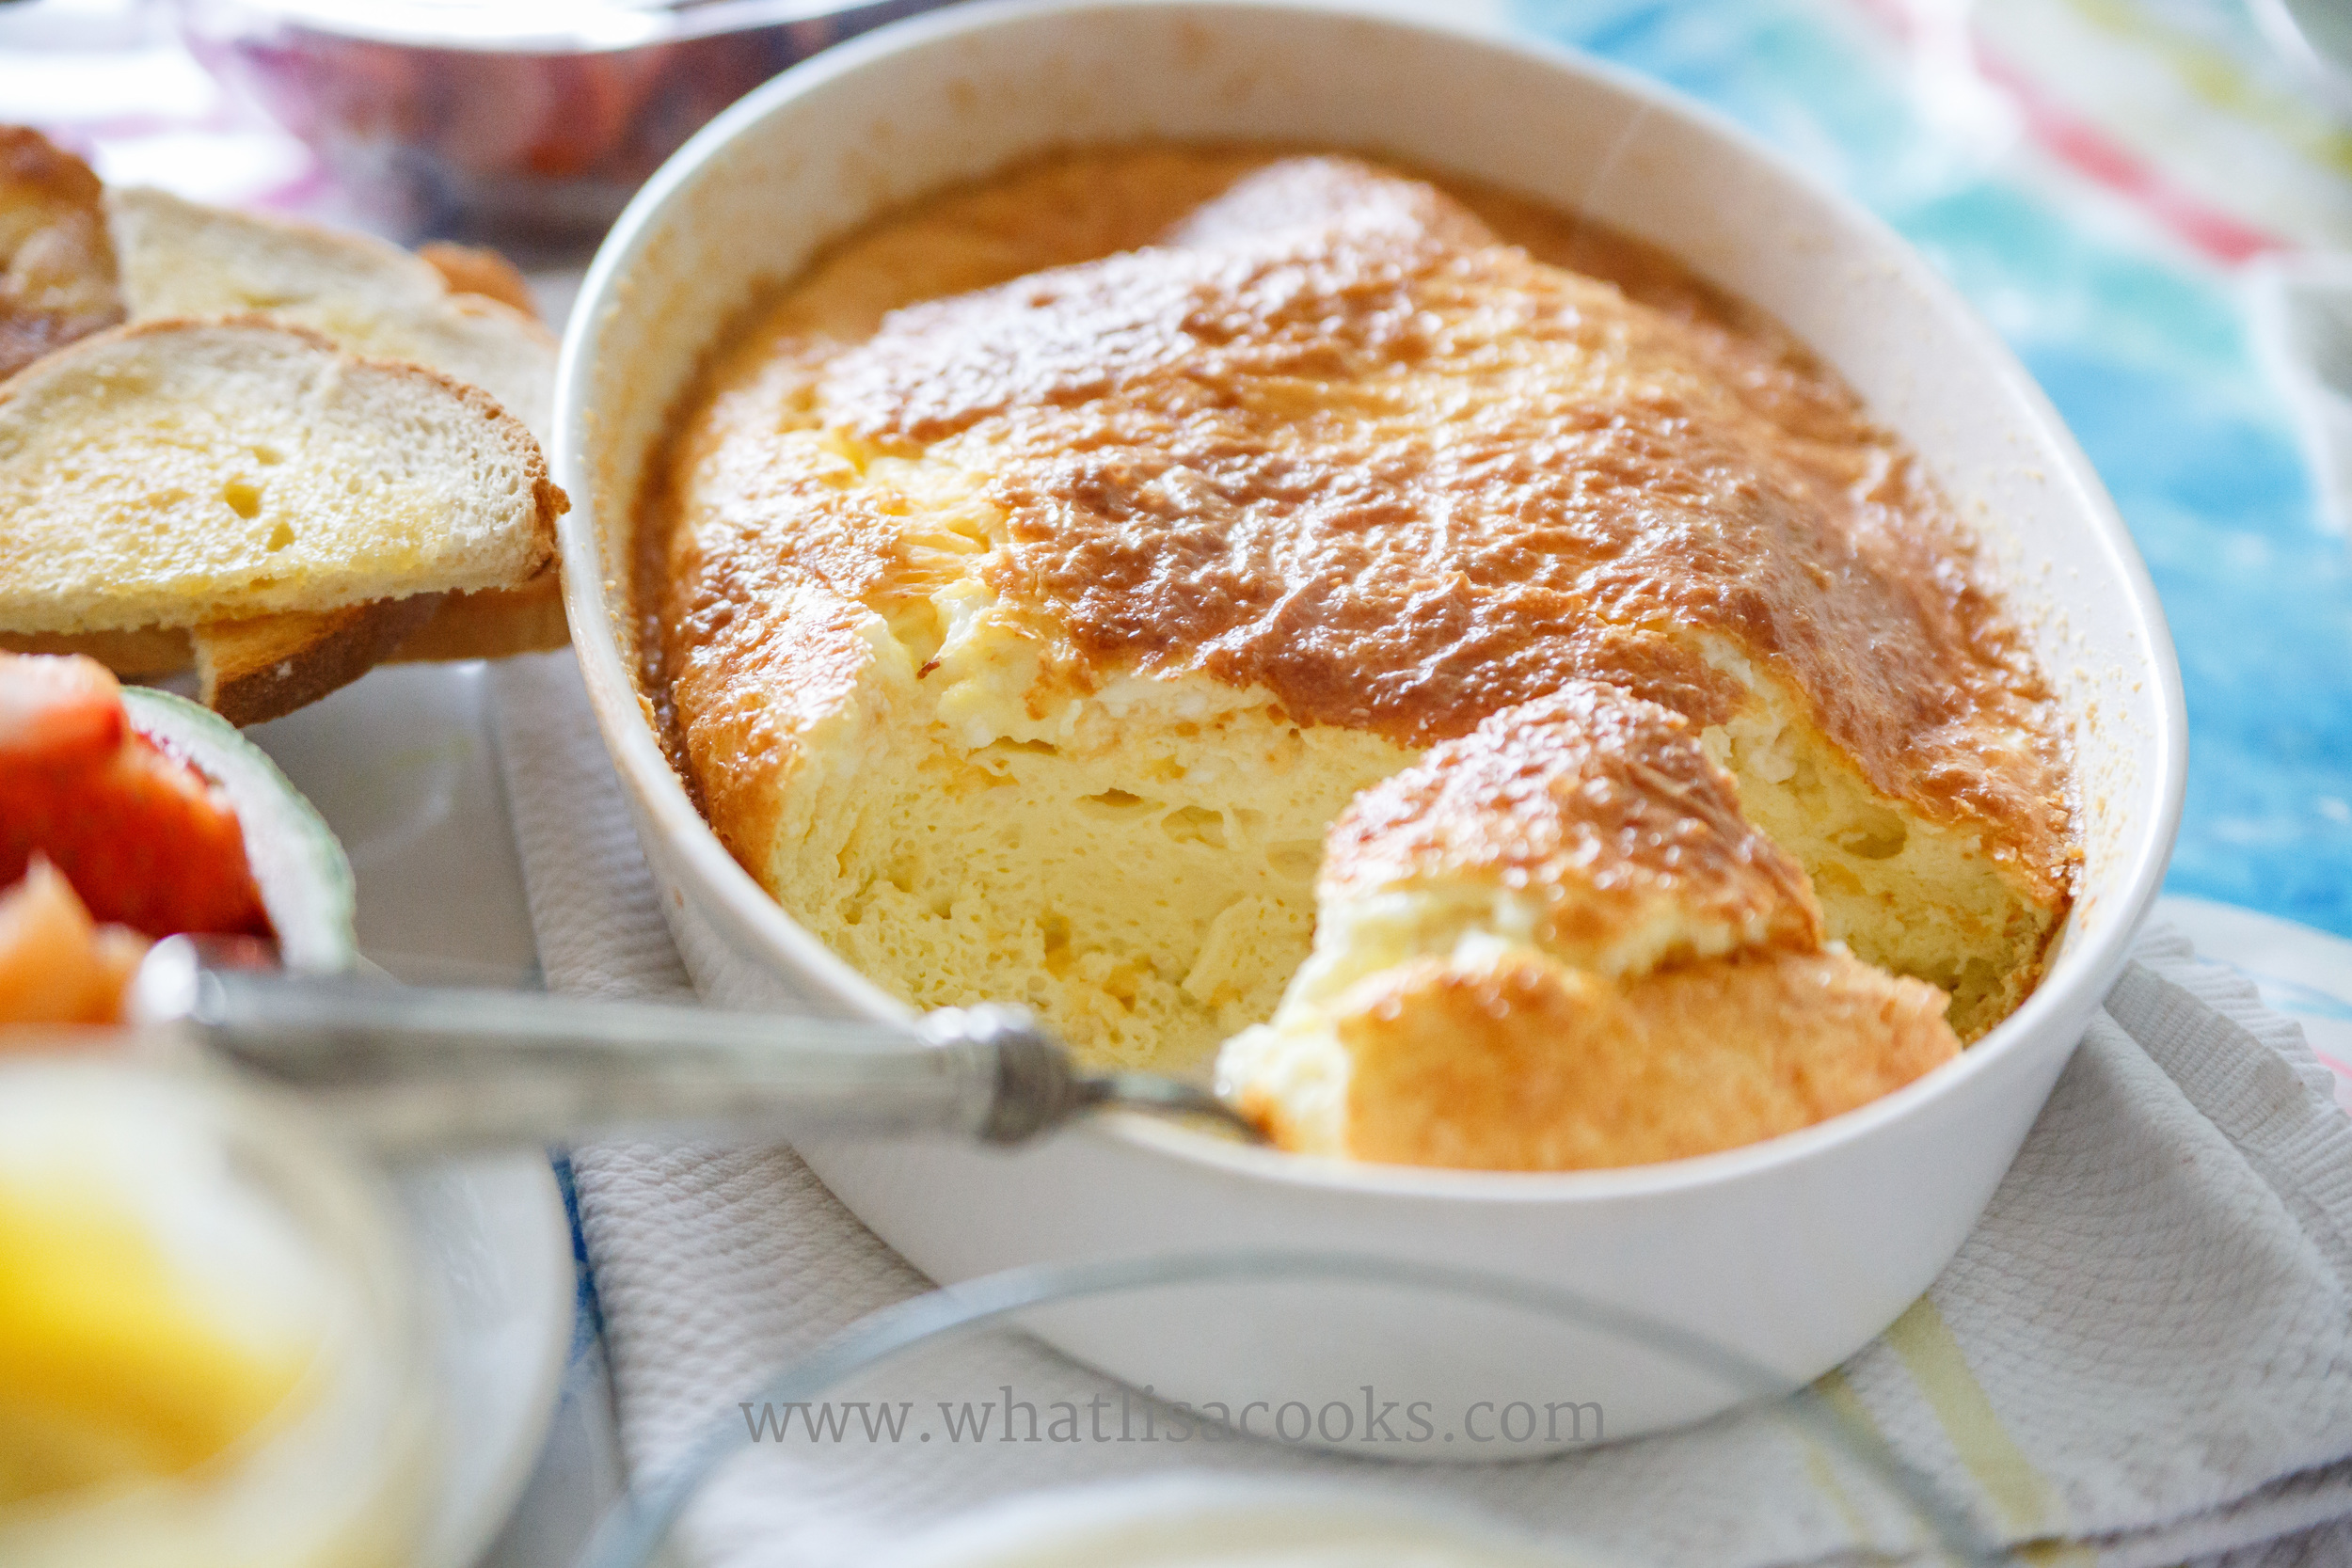
Easy Sunday Breakfast
I love Sunday breakfast with the family. It's a day of the week when we usually have no plans, we take our time, we relax, and we enjoy just doing our thing and hanging out. It's also usually the one day of the week when I get to take the time to fix a real full breakfast for the whole family, and I enjoy it.
I usually make some kind of pancakes or waffles, along with either bacon or sausage, and maybe some scrambled eggs. This Sunday I decided to freshen things up just a bit and experiment with a new egg dish. And I'm so glad I did - this was easy to make, mostly hands off, and very satisfying.
I'm not exactly sure what to call it - a crustless quiche, or maybe a baked scrambled egg. You could easily load this up with lots of extras, but I decided to keep it simple.
Ingredients: (which are approximate)

- 14 eggs (12 would have been fine, but I had 2 extra so I used them)
- 1/2 cup each of grated cheddar, jack, cottage, and parmesan cheese (any mixture of cheese will do)
- butter
- a splash of cream
- salt, pepper, garlic powder
Directions:
I greased by baking dish with butter, and then coated that with most of the parmesan cheese. Then I beat all the eggs very well until frothy, with the cream, and my seasonings, and then folded in the cheeses. I poured the egg & cheese mixture in my dish, sprinkled the rest of the parmesan cheese on top. Then baked at 350 for about 45 minutes until puffed and golden and set.
So easy.
With the eggs we had some fried polish sausage, toast, strawberries and cantaloupe, and honey yogurt (plain yogurt that has been sweetened with honey) with lemon curd. The lemon curd is an amazing addition to the yogurt and/or on top of the fruit. You can find my lemon curd recipe here.

How I have ended meal time battles with a picky eater.
Thoughts about how and why I stopped fighting with my picky eater and made meal times work better for us.
I'd like to introduce you to the pickiest child I have ever known.
Does it surprise you to learn that I have a super picky child? I know that people think that my kids must eat everything, because I post pictures of the wide variety of foods that I serve them. But just because I serve it, doesn't mean they all eat it. (But that doesn't stop me from serving it.)
Up until a few weeks ago, I could count on one hand the things this child would reliably eat, and maybe on my other hand the things she would *sometimes* eat. So, a total of maybe 10 food items at any given time.
Before I had kids I was of the opinion that you could just make kids eat something. I figured you just don't give them an option to not eat it, and they will eat it.
Growing up I remember spending a lot of time sitting at the table in front of a plate of cooked carrots and peas because I was required to clean my plate before I could be excused. My parents weren't mean about it, but I think we had the rule that you had to have some of everything that was served, and you had to clean your plate. I think they had the idea that if I just would eat it, then I would learn to like it. It didn't work. I still don't like cooked carrots, or peas, or lima beans, or corn mixed into stuff. And I'm still very picky about the beef that I eat, I have a steak at most maybe once a hear and that is enough for me. All of the things that they made me eat as a kid - I still don't really like.
I have learned that pressuring children to eat does not work.
What I have learned, as mother who takes food and nutrition very seriously, is that making children eat a food they don't want isn't the key to long term success. It just creates a recipe for miserable power struggles at every meal. Threatening or bribing does not work. Creating arbitrary rules does not work. Negotiating does not work. All of these things create battles that aren't necessary. You might have short term success and get a child to reluctantly clean their plate, but it's not setting them up for long term healthy eating, and most likely not going to make them like those foods. Studies have shown that over time these battles will cause a negative relationship with food that will last them a lifetime, and can even lead to living on junk food, or possibly even eating disorders. I do not want that for my children.
I've tried all the "tricks".
I've learned this from experience. I have gone the rounds with this child. I've tried bribing her. I've tried tell her she has to taste it. I've tried telling her she has to eat one bite (what some people call a "no thank you bite"). We tried making a rule that once she turned four she at least had to taste the food (that worked for about a month). I've tried to tell her she has to choose a protein and a veggie. I've tried telling her that she has to choose something green. I've tried hiding foods in sauces or soups or dips.
I know all the tricks and I've tried them all. They might work on some kids (they sometimes work on my other kids), but they don't work on this kid. If she does not want to eat it, she WILL NOT eat it. You will not get any food in her mouth that she does not choose to eat. She will choose to have not even one bite of dinner before she will eat a food that she does not want. This child is STUBBORN. If there is a power struggle to be had, she will have it.
So I don't do it any more. I have stopped fighting with her.
I put the food out, and I let her decide what to eat. The food is just presented, with no drama and no pressure.
I put the family meal on the table, and let her choose what of it to eat. I don't make special or separate meals of 'kid food'. I do my best to make sure that there is some part of the meal that I know she will eat. If I've made something that I am pretty sure she is not going to want, then I also don't mind getting out some cheese or yogurt to add to the meal. The key is that it is put on the table as part of the meal, and not presented as making a separate or special "kid food" meal. I'm not going to punish her with no dinner just because she doesn't like what I have offered - I don't think that's how you make a child feel good about coming to the dinner table.
I got rid of the junk, and I no longer worry about snacking.
I no longer keep anything in the house (or at least within sight and reach of a small child) that I am not comfortable with letting her eat at any time. It's not like we ever had a lot of junk food, but we did have some stuff that I didn't want her choosing all the time. So it's out of sight. Our snack drawer no longer has packaged granola bars and goldfish. It now contains dried fruits and nuts, my homemade instant oatmeal, seaweed snacks, and a small amount of whole grain cereals and crackers - all things that I am fine with my kids having at any time. I have a drawer in the fridge that she can reach with single serving packs of cheeses that she can help herself to. I keep her cup of milk in the door of the fridge where she can reach it. I set out snacks on the table in the afternoons that consist of fresh veggies, fruits, nuts, and cheese, so that all the children can help themselves.
I've given up on the idea of "spoiling your dinner" with a snack. If the "snack" is healthy food that nourishes her body, then why does it matter if she fills herself up with nuts and cheese at 4:30? Maybe 4:30 is just when her body needs food. Regardless of whether she eats, she still comes to the table with us at family dinner time, and participates in the conversation, and usually at least drinks some milk. But I no longer subscribe to the idea that we need to force our bodies to a meal time that is convenient for somebody else's schedule. I want my children to learn to eat when they are actually hungry, and stop eating when they are no longer hungry. That doesn't stop us from sitting down to a family dinner every night, but it just means that I am not going to stress about how much anybody eats at that time.
I provide the food, but I let her choose what and when she is going to eat.
I let her see what the rest of us are eating and how much we like it. I let her experience the food through sight and smell, and even touch if she wants to. If she wants to have a tasted of something in a separate little dish so that it doesn't touch the rest of her food, that's fine. I continue to expose her to all of the food so she can learn what a normal healthy meal should look like. I let her be involved in the shopping or cooking if she wants to. I let her help arrange the things on the table. I let her see that her siblings are willing to taste things, and that sometimes they like it and sometimes they don't, and that's OK.
And then I leave it up to her to decide when she is ready to try something. I make suggestions, I provide the choices, but she decides whether to eat.
I do not fight with her about her meal.
That's all. I make a variety of healthy food available, and I let her decide. I don't tell her to try one bite. I don't even ask her if she wants to taste. I just say "this is the dinner, eat what you want".
Of course I worried for a while whether she was getting enough nutrition. I went back and forth about whether I should be trying harder to make her eat more so that she didn't get malnourished. But I kept being reminded (by her) that making her eat what she didn't just wasn't going to work. I do give her vitamins, the occasional fortified organic cereal, and lots of smoothies, to make sure she is getting the core nutrients she needs while she is taking the time to accept new foods at her own pace.
And do you know what? It's working!
Just in the last few weeks, she has started asking to try things. She has tasted more new foods in the past 2 weeks than in the past 2 years.
The child that wouldn't eat eggs: Last week asked for the boiled egg off my plate, and ate almost half of it. Over the weekend she asked for some of the scrambled eggs at breakfast, and ate two servings.
The child that wouldn't eat meat: The other night she asked for a piece of ham. Just out of the blue, "can I try some ham?". And she ate it.
The child that won't eat anything green: Monday night with her dinner she chose cucumbers. Tuesday night she chose to put both lettuce and cabbage in her taco.
Earlier this week she watched as everybody gushed about how delicious the broth was from the chicken. So she asked for a taste. And she liked it, and asked for a bowl of broth.
I am happy. She is happy.
The war is not won, but these little victories are underscoring for me that my approach is the right one for this child. Meal time is so much easier. She is smaller than her siblings, but she is healthy and growing along a perfectly acceptable curve. Her color is good. Her energy level is good. She is meeting her developmental milestones and then some. She is learning and thriving. So I feel confident that she is getting the nutrients that she needs, while she explores and tries new foods at her own pace.
I think as parents we spend too much time worrying. I see so many comments from parents saying they worry that their child won't eat vegetables, or doesn't get enough protein, or that their child is too addicted to the junk food. Stop doing that. Just make a wide variety of healthy food available for them to choose from, and then let them choose without worrying that they will make a 'wrong' choice. Children like to feel control. So let them have control.
Recognize their differences and don't try to make them fit your expectations.
One of the biggest things I've learned about parenting in these past 7 years is that each child is so unique and different. Having twins really teaches you this. Having two children come out of the same womb, with the same treatment, the same diet, the same everything, and seeing how different they can be, really teaches you a strong lesson about how our personalities are formed before we are even born.
No matter what the situation, there is no single approach that will work for every child. I have found this to be the case with all of my children at every single major milestone - whether it's sleeping, potty training, separation, weaning from bottle or breast, or giving up their pacifier. Children will achieve each milestone at their own pace, when they are ready. You can push them to fit your timeline, but it will be a difficult and painful battle for all involved. Or you can gently guide and show them the way, and let them achieve their milestones on their own unique schedule. Your life will be so much more peaceful, and their success will be so much sweeter.
This couldn't be more true than with their relationship with food and eating. Everything I thought I knew about feeding kids was thrown out the window with this child. She didn't fit any of the approaches that work with my other kids. So I had to really step back and reevaluate my approach with her.
And I'm so glad I did.
Pizza Muffins and Meatball Muffins!!

These little guys really are irresistible! The meatball muffins are like a little bite size (or two bite!) meatball sandwich. Everything you want - a tasty meatball, a little drippy with sauce, melted cheese, and soft bread that gets a little soaked up with sauce - but in a much more manageable size, so it's not all running down your elbows.
The pizza version is the same, minus the meatball - just a couple bites of saucy and cheesy goodness. They are very much like my pizza rolls, only shaped a little different. I made these for my kids to have for dinner, and enough to save for a school lunch later in the week.
I don't think I can call these recipes, they're just too easy. These were really just something I threw together, but as soon as I shared it on IG and FB I had folks asking me for the recipe. So I guess these easy crowd pleasers are what you all want! I don't get as much opportunities to cook and photograph something as I'd like. This isn't one of those food blogs where people are cooking something just to photograph and blog about. No, here you are getting what we are actually eating. But this was a rare occasion when I was cooking something in the middle of the day to have ready for later, so I was able to actually get some nice photos of it for you.

The "Ingredients"
- Crescent roll dough
- Tomato sauce
- Cheese
- Cooked meatballs

I use Trader Joe's crescent roll dough. I think it has a much more 'homemade' flavor than the other brands, and even though it's still quite processed it at least doesn't have a big long list of unrecognizable stuff in it. It doesn't come out of the can very nicely, they almost always tear when it pops open. I'm guessing that this is because the package isn't lined with all that nice BPA, so it's a tradeoff I"m willing to make. You could use biscuits as well, or you could certainly do this with any kind of homemade dough. One can of dough has 8 rolls, so you'll need 1 1/2 for a dozen muffins. I made two pans, half with meatballs and half without, so 3 cans of dough and 12 meatballs.
My tomato sauce was just canned tomatoes, pureed with a blender. We had spaghetti and meatballs for dinner last night so I had heated up the meatballs in the sauce. I think you could use any kind of tomato sauce or pizza sauce.
The meatballs I used were a combination of some homemade, and some frozen from the store - I had a little bit of each. My homemade meatball recipe is here. If you're going to make meatballs for this I would suggest you make them small. The dough is very tender, so I don't think it will hold a big meatball. These meatballs were all cooked and cold from the refrigerator (not frozen).
And for cheese - well, I would have used shredded mozzarella, but I was out, so I just took some mozzarella string cheese and tore it into pieces. I think any kind of cheese you've got would be just great.
Directions:
- Line muffin tins with dough. For the crescent rolls, I used one piece per muffin space, and just folded and worked it around to shape like a little nest. I did not grease my pans at all because my pans are new and pretty well nonstick, and this dough has a lot of fat in it.
- Put in a small spoonful of sauce
- For the meatball muffins: place 1 meatball on top of dough.
- Cover with shredded or just pieces of cheese.
- If you have pieces of dough hanging over the sides, fold them over just a bit.
- Bake in a 350 oven for 12-15 minutes.
- Let cool for a few minutes before trying to remove from the pans, they are much easier to handle once the cheese has set up a little.
And that's it. Easy!


pineapple, orange & banana green smoothie

This is a bright and fresh tasting green smoothie to start off our day with a little extra energy. I think half my kitchen freezer is full of frozen fruit. Plenty of smoothie recipes call for fresh fruit, but I just like it better with frozen. I buy extra bananas and just let them ripen on the counter, then break into pieces and freeze. I also recently had a glut of oranges that we weren't going to get to, so I peeled and cut them into chunks and froze, and I've been using those in smoothies.
I try to avoid using juice in my smoothies. It just adds a lot of sugar without all the other nutrients from the fruit. Instead I prefer to whole fruits and then add other liquid as needed. In this one today I used my homemade almond milk.
Ingredients are approximate. This is a big smoothie - enough for me and four kids - so if you're just making it for yourself I would probably cut this down by at least half.
- 1 cup frozen pineapple
- 2 frozen bananas
- 1 cup frozen orange chunks
- 1 cup plain yogurt
- 2 cups almond milk
- 3 kale leaves
- 3 tablespoons honey (or to taste)
Blend in a high speed blender until totally smooth.
Cold fighting smoothie

I've got a little one with the sniffles and a cough today, so I blended this up for an afternoon snack. Hopefully it will help her feel better.
Strawberry Banana Orange Smoothie
The measurements are very approximate.
- a cup or so of Homemade almond milk
- a cup of orange juice
- a frozen banana
- a few slices of frozen oranges
- a handful of frozen strawberries
- about a half cup of plain yogurt
- about a tablespoon of grass fed gelatin
- about a teaspoon of raw honey
Blend until smooth, adding extra liquid if needed, or a little more frozen fruit if it's not thick enough.
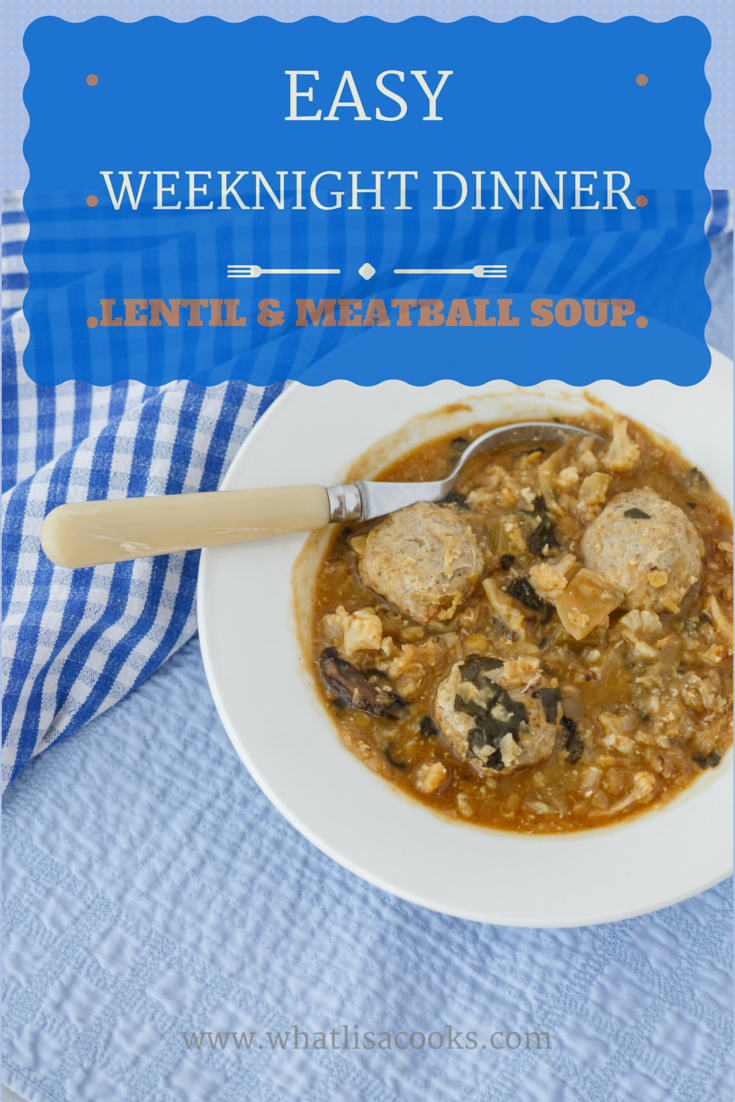
Easy Weeknight Lentil & Meatball Soup
One of the things that I hope people can learn from me is how a little bit of planning ahead can make your life so much easier! One of the biggest benefits of doing yourself the favor of a weekly meal plan is that you can think through how you can use leftovers from one meal as the basis for another meal later in the week. You can plan ahead for how you can cook once for multiple meals.
So what I'm sharing with you in this post isn't so much of a recipe, but it's an example of how I've used my plan and cooked ahead to make a super easy weeknight meal that tastes like it cooked for hours.

One of the things that I hope people can learn from me is how a little bit of planning ahead can make your life so much easier! A huge benefit of creating a weekly meal plan is that you have taken the time to think through how you can use leftovers from one meal as the basis for another meal later in the week. You can plan ahead for how you can cook once for multiple meals.
So what I'm sharing with you in this post isn't so much of a recipe, but it's an example of how I've used my plan and cooked ahead to make a super easy weeknight meal that tastes like it cooked for hours.
This is a lentil soup with homemade chicken stock, roasted vegetables, and homemade turkey meatballs. Sounds like it would take hours to make, doesn't it? No, it was a less than an hour (like 45 minutes really), from start to finish (and only that long because I started with dry lentils).
Ingredients:
- 2 quarts of homemade chicken broth
- Several cups of roasted vegetables - this one had cauliflower, onions, mushrooms, and celery, that had been roasted with Za'atar (a middle eastern spice blend), olive oil, garlic and salt
- 2 cups of dry lentils
- 12 - 18 frozen homemade meatballs
- 1 bunch of fresh spinach, roughly chopped.
How I did it:
Because I had the stock already made, the veggies already roasted and the meatballs already in my freezer, this came together in just a few minutes. Put the broth, lentils and veggies in the pot and let them simmer for a half hour or so until the lentils are mostly cooked. Then add the frozen meatballs and spinach and simmer long enough for the meatballs to be fully heated through. That's it. Serve.
If you want this to be even faster you could buy a package of precooked lentils Trader Joe's has them and some grocery stores do now too. If you use precooked lentils then I would just hold back on a cup or two of the broth. Or you can just use a kind of dry lentil that cooks fast - I used these red lentils, and they cook in about 30 minutes.

A little more background on how this came together - so you can get the point of planning ahead that I'm talking about:
- Last Saturday we had turkey burgers for dinner. At the same time as I was making the burgers, I mixed up extra meat and made some meatballs as well. The recipe was just 1 tablespoon of Za'atar, 1 teaspoon of salt and 1 egg for every pound of ground turkey. Easy. I tripled that so we had plenty of burgers and a couple dozen meatballs. I put the meatballs in the oven at 400 for 20 minutes while we ate dinner, let them cool, and put in the freezer after dinner.
- On Sunday we had roast chicken and veggies for dinner. I always cook 2 chickens and I roast them on top of a whole bunch of veggies so that we will have lots left over. The veggies for that dinner were the cauliflower, onion, mushroom and celery.
- After that dinner I put the chicken carcasses in my slow cooker with a few ends of veggies (celery, carrot, onion), some salt, and cover with water, and I set that to cook on low for 10 hours (overnight), and then again all the rest of the next day and the next night (yes, I cook my stock for at least a day and a half).
- On Tuesday morning I strain the stock and put it in the fridge.
- At about 5:15 I got everything out, poured the stock in the pot and added my lentils and veggies. Then the meatballs and spinach a half an hour later. And we were eating dinner by 6:00.
It really doesn't get much easier than that. Everything homemade and from scratch, made ahead by just taking a little extra time after cooking a couple of other meals. You can totally do this.
A peek into my small kitchen - and how I make it all work
From the archives - in our old house we had a very tiny kitchen. But I still managed to cook lots of amazing meals for our family of six.
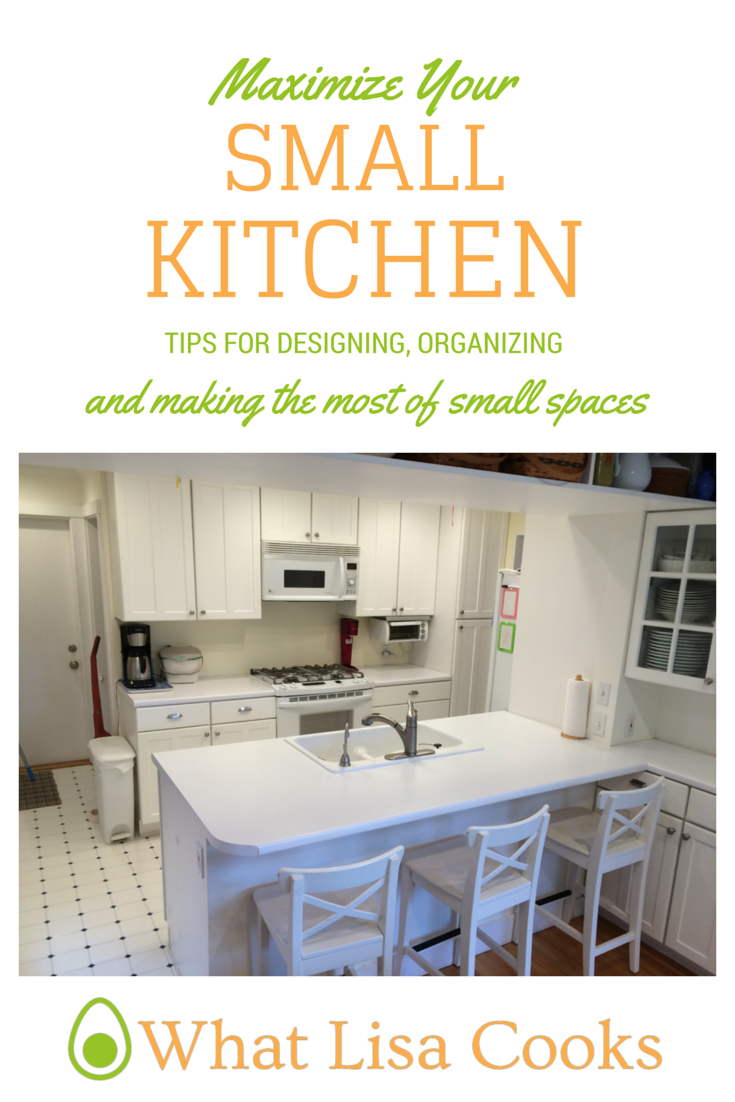
I try really hard to keep my small kitchen clean and organized. It's the space in the house where I spend the most of my time. I put a ton of thought into the design and layout when we created it, and I am constantly re-arranging as our habits and needs change. For a small space, it works very well for me and for the needs of our big family. I get comments and questions about the space every time I share a picture that shows some of the kitchen, so I thought you all might enjoy a bit of an overview of my space and a tour of how I use it.
It is a small galley style kitchen. Even though it's tight on space, I still am very happy with what we came up with when we remodeled it on a very tight budget over 10 years ago. If you have an opportunity to do some updating to a small kitchen, there a couple of key factors I recommend keeping in mind:
- White. White feels open and bright. And having everything the same color gives you a sense of continuity and makes the space feel much bigger than it actually is.
- Lots of light. One of the most important things to me in the remodel was to put in as much light as we possibly could. I have 8 recessed can lights in the kitchen (including 1 over the sink on its own switch), and 6 in the dining room. We how have most of these switched to LED bulbs, so I feel ok with having all these lights on much of the time. I need bright light for cooking, and I think it also really helps brighten and open up a space. It's one of the biggest comments I get about my kitchen, how wonderfully bright it is. (and also on the electrical topic - if you're re-wiring, take the opportunity to put in LOTS of power outlets).
- Get rid of the clutter. I know it seems hard in a smaller space, but covering your counter tops with stuff is just going to make your kitchen seem even smaller. We put a lot of thought into the space we had and got really creative with adding space wherever we possibly could. The kitchen looks and feels so much better when everything is in its place - which is off the counter.
- Look for things that do double-duty, or give the illusion of more space. Our stove is a standard width, but I chose one that had grates that went all the way across the whole top, because I thought it gave the feel of a bigger space. And our microwave also doubles as a convection oven, so I have the use of two ovens when I need them.
- Get creative about creating space - look up, look down, where can you add storage? More on how we did that later.
- Really think about how you are going to use your space. Prioritize your storage needs. Things you use the most often should be kept closest to where you will use them, and then move outward from there, with the items you use the least often being the furthest away from the main work space. Don't take up valuable space right next to your stove with serving dishes that you use once a year.
Nothing you see here is expensive. This is all stock stuff from Home Depot. The cabinets were stock, the counters are just solid white laminate, the floor is vinyl. It was what we could afford, and I think it still totally works. I especially think that if you are going with less expensive materials, then you should not try to fake a fancy look. Solid laminate looks much better than something that's trying to look like fake marble, and I think that embracing the vinyl floor and going with a simple patter looks so much better than faux wood.
On the counter in the kitchen the only things that live permanently are the coffee pot, the SodaStream, and the paper towel holder. We could find a place to hang the paper towels, but we use them so much and this is a place where the kids can reach them, and the roll often gets moved around for meals, art projects, mess clean ups, etc. It drives me nuts to have the compost bucket out here, and I do have room for it under the sink, but I've found that it only reliably gets used if it's sitting right next to where I'm working. Our city has recently started threatening to fine you if you put compostables in the trash, so I'm really trying to be better about using it, so I've started leaving it out most of the time.
We don't have room under our sink for a trash can (we have recycling there, trash bags, dish soap, and space for the compost - so I found the narrowest trash can I could possibly find.
The barstools are from Ikea.
We made some decisions in our planning that left our dining room a little smaller, but made the overall space so much more functional. There used to be a slightly higher half wall behind the sink. We took that down to extend an eating bar out and have the whole thing all one height, it makes the counter space feel so much bigger, and I have space for my kids to sit and have a snack or help with cooking (we have a fourth stool that I keep in the garage and bring out if I've got all four kids at the counter). And we added the cabinets and counter in the dining room. That was just the back of a brick fireplace. It technically made the room smaller by about a foot, but it gave us so much more storage. And because we went from dark brown brick to bright white, I don't think it actually looks smaller at all.
I love that it's so open from the dining room to the kitchen.
The bookshelves just overhead are one of my favorite features.
Another thing we did which I absolutely love, is added the bookshelves up at the ceiling. They fit perfectly in the space above our stock cabinets in the dining room.
Over the counter there was a structural beam that was coming down that far anyway, so all we did was have the contractor build the shelves down either side of the beam. This is where I store all my cookbooks, vases, some big bowls and baskets, and a few small appliances. It's amazing how something so simple can add so much storage space!
You can also see from these pics that we went with all white appliances and white sink. I know stainless appliances are all the rage now, but I didn't like how it would chop up the kitchen. Sticking with my all white theme I think helps my space feel open and bright.
So that gives you some idea of the thinking that went into the design of our kitchen. You don't have to spend a fortune to get a nice looking space and make it functional. My kitchen works really well for me. Everything I need for daily cooking is well within reach, and we were able to set up the classic work triangle between the fridge, stove and sink. It's mostly a one person kitchen, it gets pretty cozy if more than one person is working in it. But the counter space in the dining room allows me to have helpers but keep them out of my work space.
Now for a little tour of how I use some of the space.
All of our dishes for eating and serving are store in the dining room. This makes it easy to set the table. And the dishwasher is just over the counter to the left, so it's pretty easy to put them away too. I would love to have more serving pieces, but this is all the space I have. In the drawers I have paper napkins, trivets and coasters, wine openers and accessories, chopsticks, and some extra silver pieces.

I decided to sacrifice some space recently and convert the lower cabinets to kids space. This houses all our homework and craft supplies. It was tricky to relocate some of the kitchen items I had here, but I'm glad I did because it gives my kids so much more opportunity to be creative when they have easy access to their supplies. It also makes it easy for them to clean up when they are done. My kids are old enough now that I feel comfortable with them having access to their art supplies for independent projects. The only thing I don't keep down here is paint.
On the wall in the dining room is our family info center - calendars, school notices, chore charts, behavior charts, schedules, special artwork - it all goes here. I could have cleaned this up for a picture, but this is reality of what it looks like on an average day.
In the kitchen I keep all the kids cups and water bottles in a bottom drawer that they can reach. Up until very recently I also had plastic plates and bowls here, but we don't use them any more so they were cleaned out. In the drawers above this I have dish towels, washcloths, and plastic bags & wraps.
We have one tall pantry cabinet in the kitchen. I used to use this for food but I don't any more. I actually store very little food in my kitchen. The top section has some small appliances, cereal, vitamins, kids medications. The bottom section has pull out shelves which I have turned into drawers by just adding a plastic bin. The top one has all my plastic storage containers. The second one has lunch boxes and some of my other lunch packing supplies. The bottom two have snack foods that the kids can help themselves to - dried fruit, nuts, granola bars, applesauce, etc. Allowing them to have healthy snacks within reach helps create independence and healthy eating habits.

I have two big drawers to the right of the stove. The bottom one has a variety of things - lunch supplies, measuring cups, a few bowls, and the container of cat food (so the kids can easily feed the cats themselves).
The middle drawer has some of my most used and prized possessions - my Vitamix and my Cuisinart - I use these almost every day, so I keep them very handy (but not on the counter!!). I also have some glass bowls here that we use basically every day.

I have one upper cabinet to the left of the stove that has some cooking supplies - seasonings, oils, vinegars. The containers at the top have baking supplies, rice, hot cereals. And this is where we keep the coffee and tea.

As you can see, there really is no food stored in the kitchen other than the kids snack stuff. This works for us because right around the corner is the door to the garage, and the stairs leading to the basement, and those two places are where most of our storage happens. In this picture, the door straight ahead is the garage. Down to the right are the stairs. And to the left goes outside, to the side yard where we keep our trash, recycling, and compost bins.
Also here I will point out one of my other most favorite kitchen items: my sweeper vac. This thing is the bomb! For a house full of kids and cats, we absolutely could not live without this. It is mounted right there on the wall and constantly charging. I am not exaggerating when I tell you that I use this thing several times every day. It's the best vacuum I've ever owne.
Sorry, back to the to tour...
This closet is just at the bottom of the stairs that go down from the kitchen, very convenient even though it's downstairs. We created this space when we remodeled the basement. We actually took the closet out of the bedroom that is right behind this, and instead have a wall of Ikea closets for storage in that. That gave us space for wine and pantry storage. This is where I store the stuff that I use the least often - a variety of baking pans, some serving things, linens, and extras of Costco sized paper and plastic products. We even have a bunch of bottle water and a box of MREs.
This is just inside the garage - which is just off the kitchen. With just an inexpensive Ikea cabinet, and some very industrial Home Depot shelving, we created most of our frequently used storage space. This is all my pantry food storage. It might not look like much, but it's more than enough. I don't buy all that much packaged and processed food (for a family of 7), so this doesn't fill up too fast.
And just to the right of the pantry are some open shelves where I store my bigger appliances that I use regularly. This is where my slow cooker, rice cooker and meat slicer live - items I use weekly. And, as you can see, the ice cream maker, pressure cooker, stand mixer. I have boxes of jam here, and the plastic bin is where all my empty jam jars go as we use them up.
All this storage is just steps from my kitchen, so it's really convenient and works well. Also just to the left here in the garage are my second fridge and freezer. Because most of what I cook is from scratch, we always have a fridge and freezer full of fresh ingredients.
So there you have it. I hope I've given you a few ideas. I know it's not as perfect and orderly as some of these magazine grade kitchens - but this is a real, working, family kitchen. I prepare 3 meals a day, every day, in this kitchen and it functions very well for me. I sometimes wish I had more storage, but I rarely wish for a bigger kitchen. That would just be more to clean!

Meal Plan #8
A full week family meal plan from the archive.
I need to rework my schedule for ski season. Normally I work on our meal plan on Saturday and/or Sunday and have it all figured out by Sunday evening. But for the next 8 weeks we will be spending all day Saturday up at the mountains with kids in ski lessons, and spending much of the day Sunday reorganizing and recovering. I'm behind with this week's meal plan because I just couldn't muster the brain power to finish it last night, so I'm updating my calendar and this week I'm going to try to get the plan done for next week by Thursday or Friday. We'll see how that works. But I finally got this week done and I think it's pretty good.
I've got a couple of nights where I've got an idea in my head that I'm just going to cook without a recipe. And that's something I've been wanting to post more about anyway. You don't always need a recipe, and once you can break yourself free from feeling like you have to have a recipe, you will enjoy cooking so much more. You just need some basic techniques, like how to cook chicken, and then the possibilities are endless. Once you know the basic techniques, then you just add whatever flavors you think sound good and just go with it. Sometimes it works, and sometimes it doesn't, and that's totally ok. Even if it doesn't turn out exactly like you had hoped, it's almost always at least edible, and you learned something about what works and what doesn't. And if you really screw it up and it's not edible, don't stress about that either - pull out a box of mac & cheese, or order a pizza, and try again next week. It's how you learn - just roll up your sleeves and go for it.
So, for our meal plan this week (click the image to view a larger size)...
Breakfasts are pretty standard fare these days, a rotation of oatmeal, eggs, yogurt, muffins, etc. The difference during ski season is that I'm not doing big breakfasts on the weekends. Saturday mornings we're having something that's already made and/or fast - cereal, instant oatmeal, muffins, boiled eggs. And on Sunday mornings the kids usually won't be home, as they have sleepover at grandparents after ski days, so I'm not planning anything for Sundays. Lunches are also our usual stuff, but I at least try to mix up the sides, or use a little cutter or fun toothpicks to make it look more interesting. But there's no reinventing the wheel here, I go with what I know works.
click to view larger
For dinner Monday night I'm going to roast some chicken pieces. I actually have a couple of whole chickens but I'm going to cut them up before cooking, season generously with salt, pepper, dijon mustard, olive oil, and then put in a roasting pan with a bunch of garlic cloves and lemon slices. I think this will cook at about 375 for about 45-60 minutes. No recipe needed.
Tuesday night I'm also winging it - I will make broth from Monday's chicken, and season it up to give a little Asian flavor, with some ginger, garlic, and miso paste, and then add in some noodles, veggies, and either leftover chicken or some cooked shrimp. I think it will be easy and delicious.
Thursday will be basic burgers, as requested by a child, with a variety of choices for toppings. But I'm going to get some little slider buns and make the burgers kid sizes. I've done homemade buns before using my basic bread recipe, but this week I'm just going to buy some good local ones because I already know that I will not have time for making bread. I will cook the burgers in the oven, like in this post - I've done this many times now and it works great for making a bunch at a time.
Saturday night I need something that I can make ahead and will be warm and comforting after a day in the mountains, so I'm going to make this green enchilada soup again. I will try to cook it on Thursday or Friday and just reheat, and I will use the already cooked chicken from the Monday dinner.
Sunday will be some kind of slow roasted pork shoulder. I usually do this in my slow cooker with just salt, pepper, cumin, onions, and sometimes I cut up an orange for a little sweetness, and cook on low for 6-8 hours. I always cook lots extra and then this will figure into the meal plan for next week as well.
That's it for now! Have a great week.

Family Meal Plan #7
A meal plan for a busy week after a holiday break.
Happy New Year! I hope you have enjoyed the holiday season as much as we did. I've been a little quiet here, because I've really been enjoying time off with my family. For Thanksgiving every year we go to California, it's lots of fun with family and tons of activity. But for many years now we have stayed put for Christmas and the New Year, and we love it. No hectic holiday travel, no fear of weather delays, no expectations, no drama. I am especially enjoying this now that we have kids - I love just being at home and watching them play, without any stress of having to get anybody anywhere or operate on any kind of schedule.
But it's back to reality now. Back to school, back to making lunches, back to weekly therapy appointments for my son, ballet classes for me and all three of the girls. And starting next weekend it will be ski lesson season - all four kids have a lesson on Saturday. We've got full schedules for the next several months, so getting back to the weekly meal plan will be one of my keys to survival. I didn't do any advance meal planning over the holiday, and honestly there were days when I wished I had. Just a few weeks getting out of practice, and this one today took me much longer than it should have, but I'm glad to have it done now, and it will definitely help keep me going this week.
If you are new to my meal plan posts, here's my (way too long) post about how I approach the meal planning process.
So here it is, the plan for the week. It's nothing to get too excited about, but it will get us through. I don't have recipes to post for you yet, some of these are still ideas. I know the basics of what I want and I'll look up a recipe when I'm ready to get cooking. I'll share links to those on Facebook, so make sure you're following along there.
Have a great week!
12 Months of Home Organization
I needed a little motivation to get my house organized without feeling overwhelmed, so I made an organization calendar.
Do you make New Year's resolutions? I generally don't. Or at least I don't think of them that way. It seems a little too much like following the herd and setting myself up for failure to specifically label something as a New Year's Resolution. But I do sometimes have little goals or plans in the back of my head, bad habits I want to correct, or good habits I want to start doing more of. You know, the usual stuff - drink more water, exercise more, get back to healthier eating after the holiday binges, etc.
So today I thought I'd tell you about one of my little plans for 2015. I have this bad habit of going on crazy organizing sprees around the house. I'll let it go and let it go until the entire house is driving me insane and I can no longer put anything away, and then I'll exhaust myself trying to organize and clean it up all at once. Well this coming year I'm going to try not to do that! My goal is to have one or two major organizing jobs each month, to spread it out and keep our home organized throughout the year.

Click the image to open a word doc version that you can save and customize for yourself.
I've come up with a plan for organizing throughout the year, assigning myself jobs for each month. This is somewhat customized for our climate and family schedule, so if you click on the image you can get a word doc version that you can go ahead and edit for your needs. (or click here if you want to just print a pdf of my exact version.)
I grew up in southern California, where the idea of putting summer clothes away for the winter months never even occurred to us, but here in the Pacific Northwest that is something we need to do. At least in our small house with limited closet and dresser space, we don't have room to keep our summer clothes in the closet all winter, or our winter clothes handy all summer. But you may not need to do this sort of thing, so you can update some of those steps to suit your needs. We also do things here like put our patio toys and umbrellas away, empty our fountains, put away bikes. So it makes sense for us to have certain points of the year where the major organizing task is switching over seasonal items - sports & play gear, clothing, coats & hats, etc. I've tried to think through other times of the year and what needs to be done - organizing the office and tax papers in February, school supplies in August, kids clothes in September, toys in December - and then the other random things have just been spread out throughout the year during the months that don't have a specific seasonal task.
So join in with me if you like, let me know how your doing, check up and keep me honest to see if I'm holding up my end of the bargain!
Easy Holiday Teacher Gifts
We made some very simple gifts for our kids teachers.
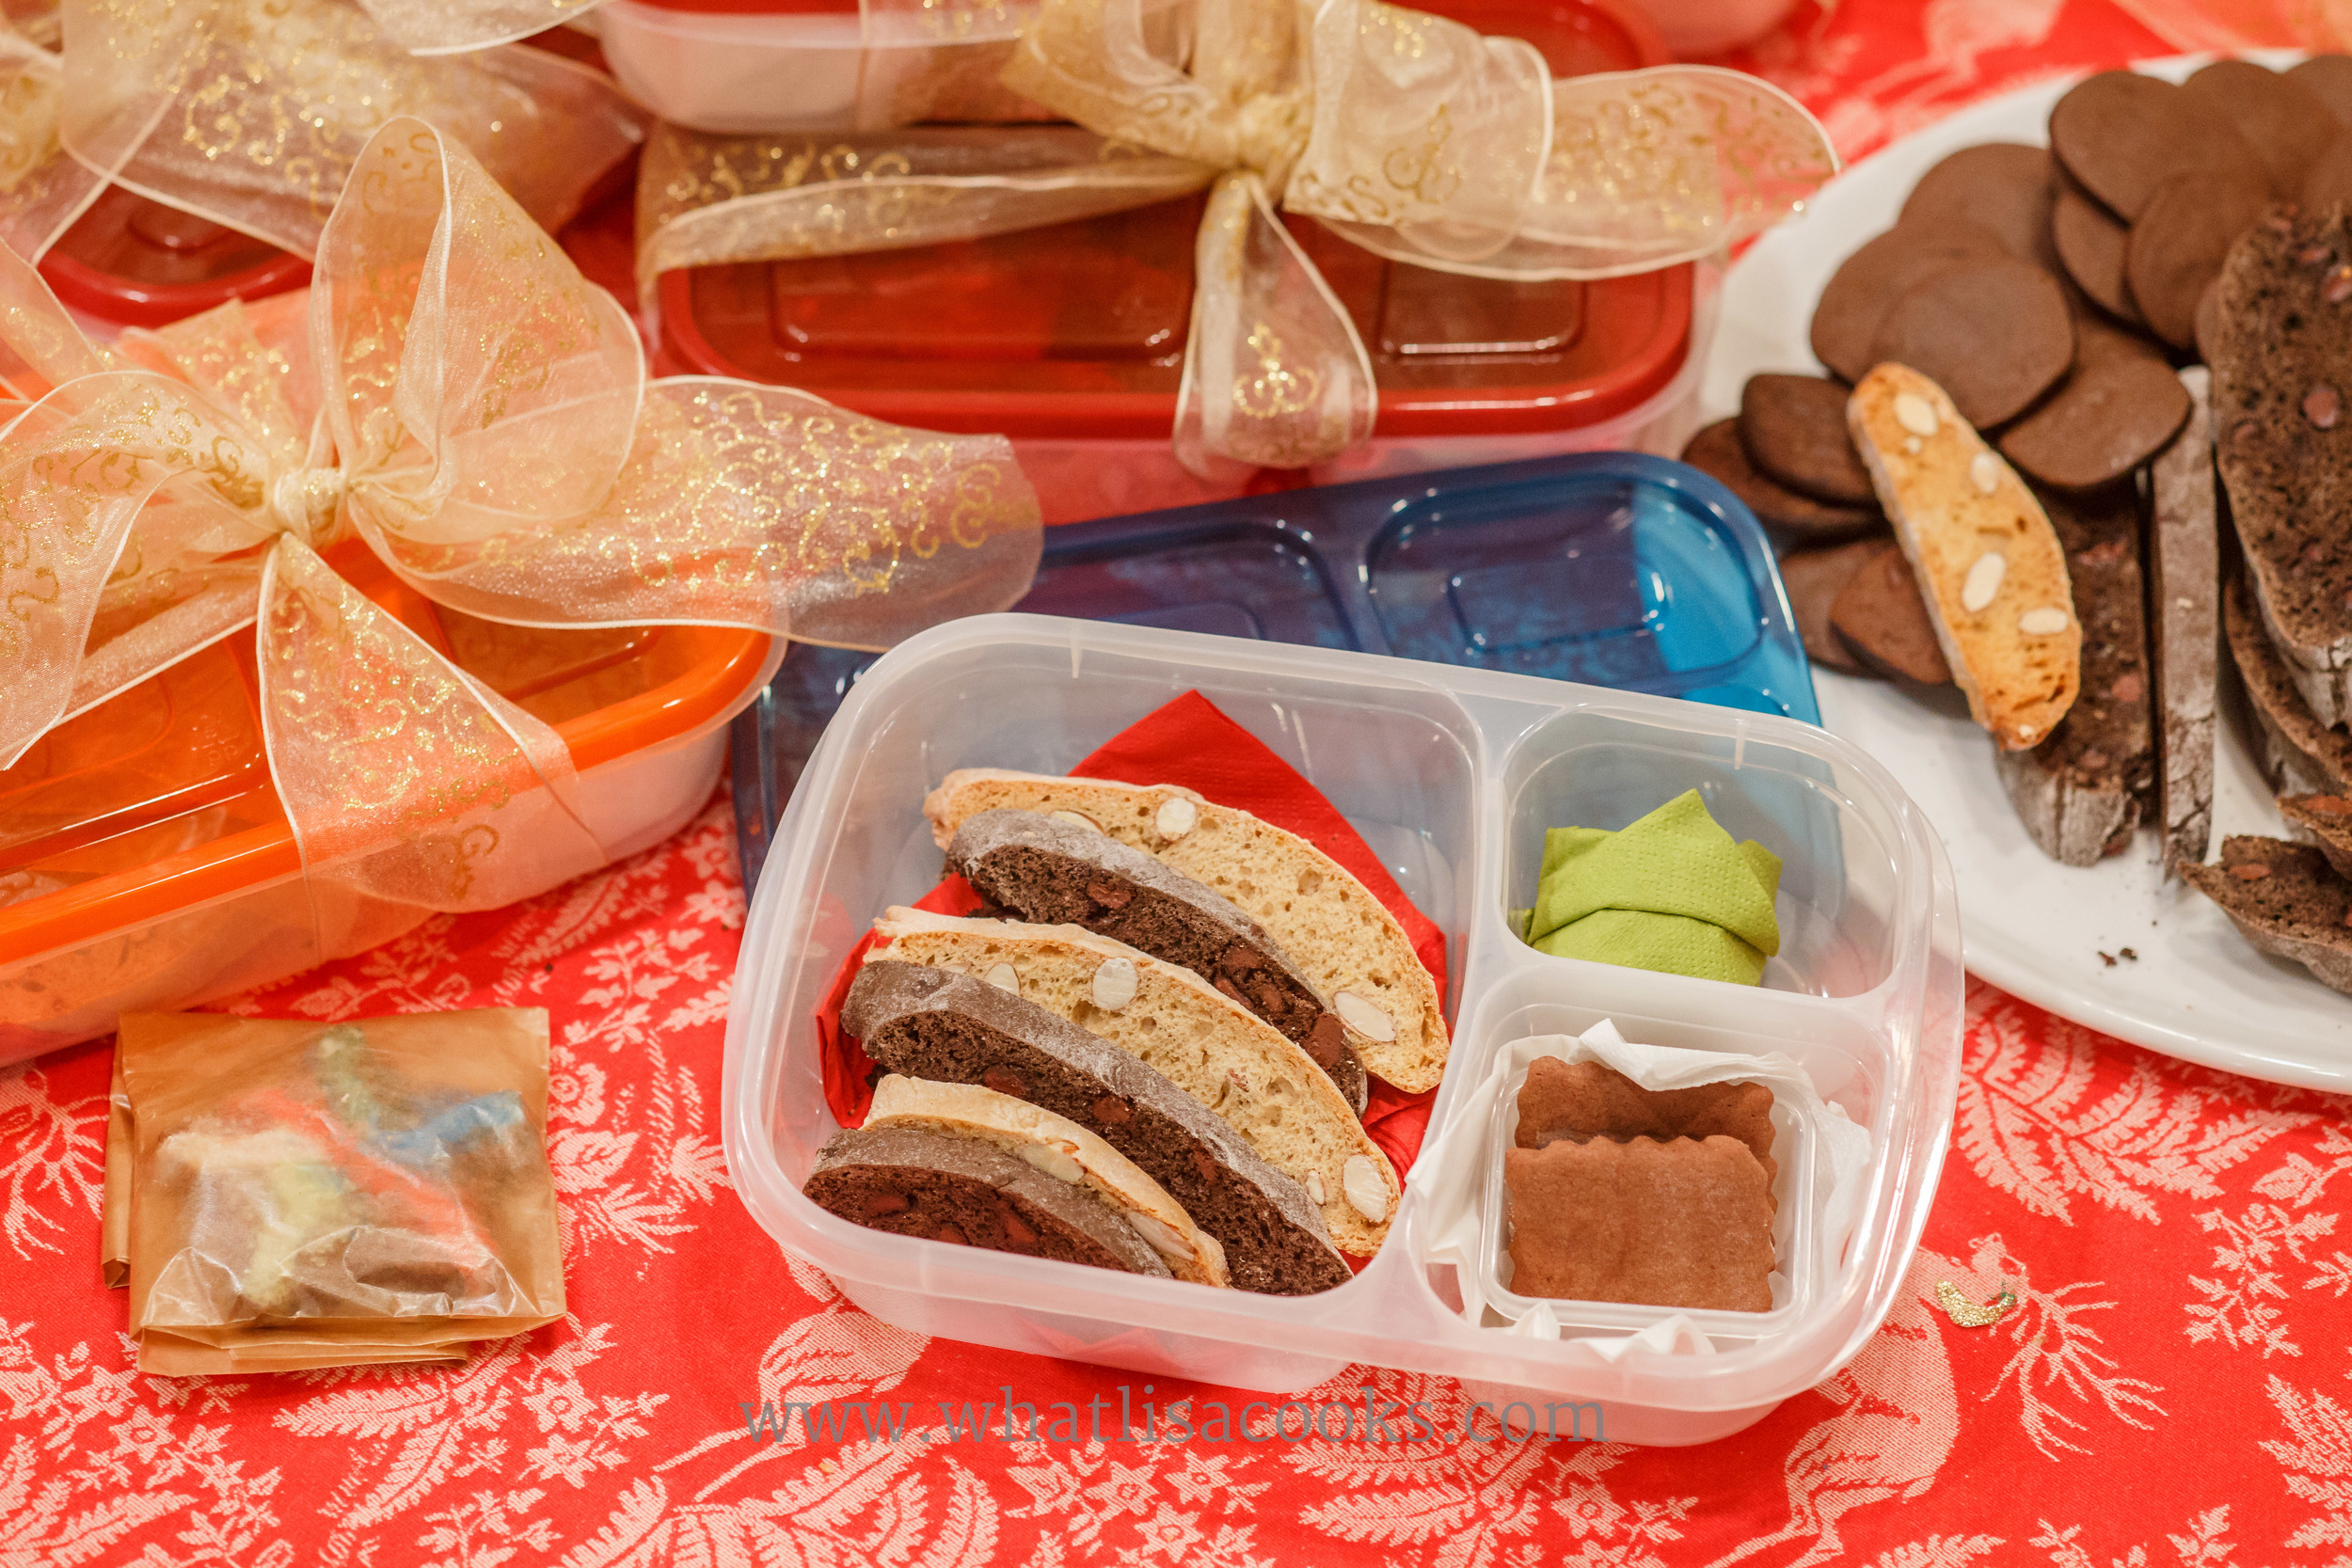
Every year the requests come out to contribute to class gifts for teachers, and I always debate whether to participate in the group gift. I don't doubt that the teacher appreciates these gifts, but they seem so impersonal to me. Our teachers work so hard for us. And especially for our unique little (big!) family I recognize that they may even be working just a little harder sometimes (and well, I know I tend to be a squeaky wheel). I know I can't do much, given budget and free time constraints, but I do feel like making something personal is the very least I can do for these people that give so much of their time for us. Spending a little of my precious time to thank the people that spend so much of their time with my most precious people just feels better than putting some cash in an envelope.
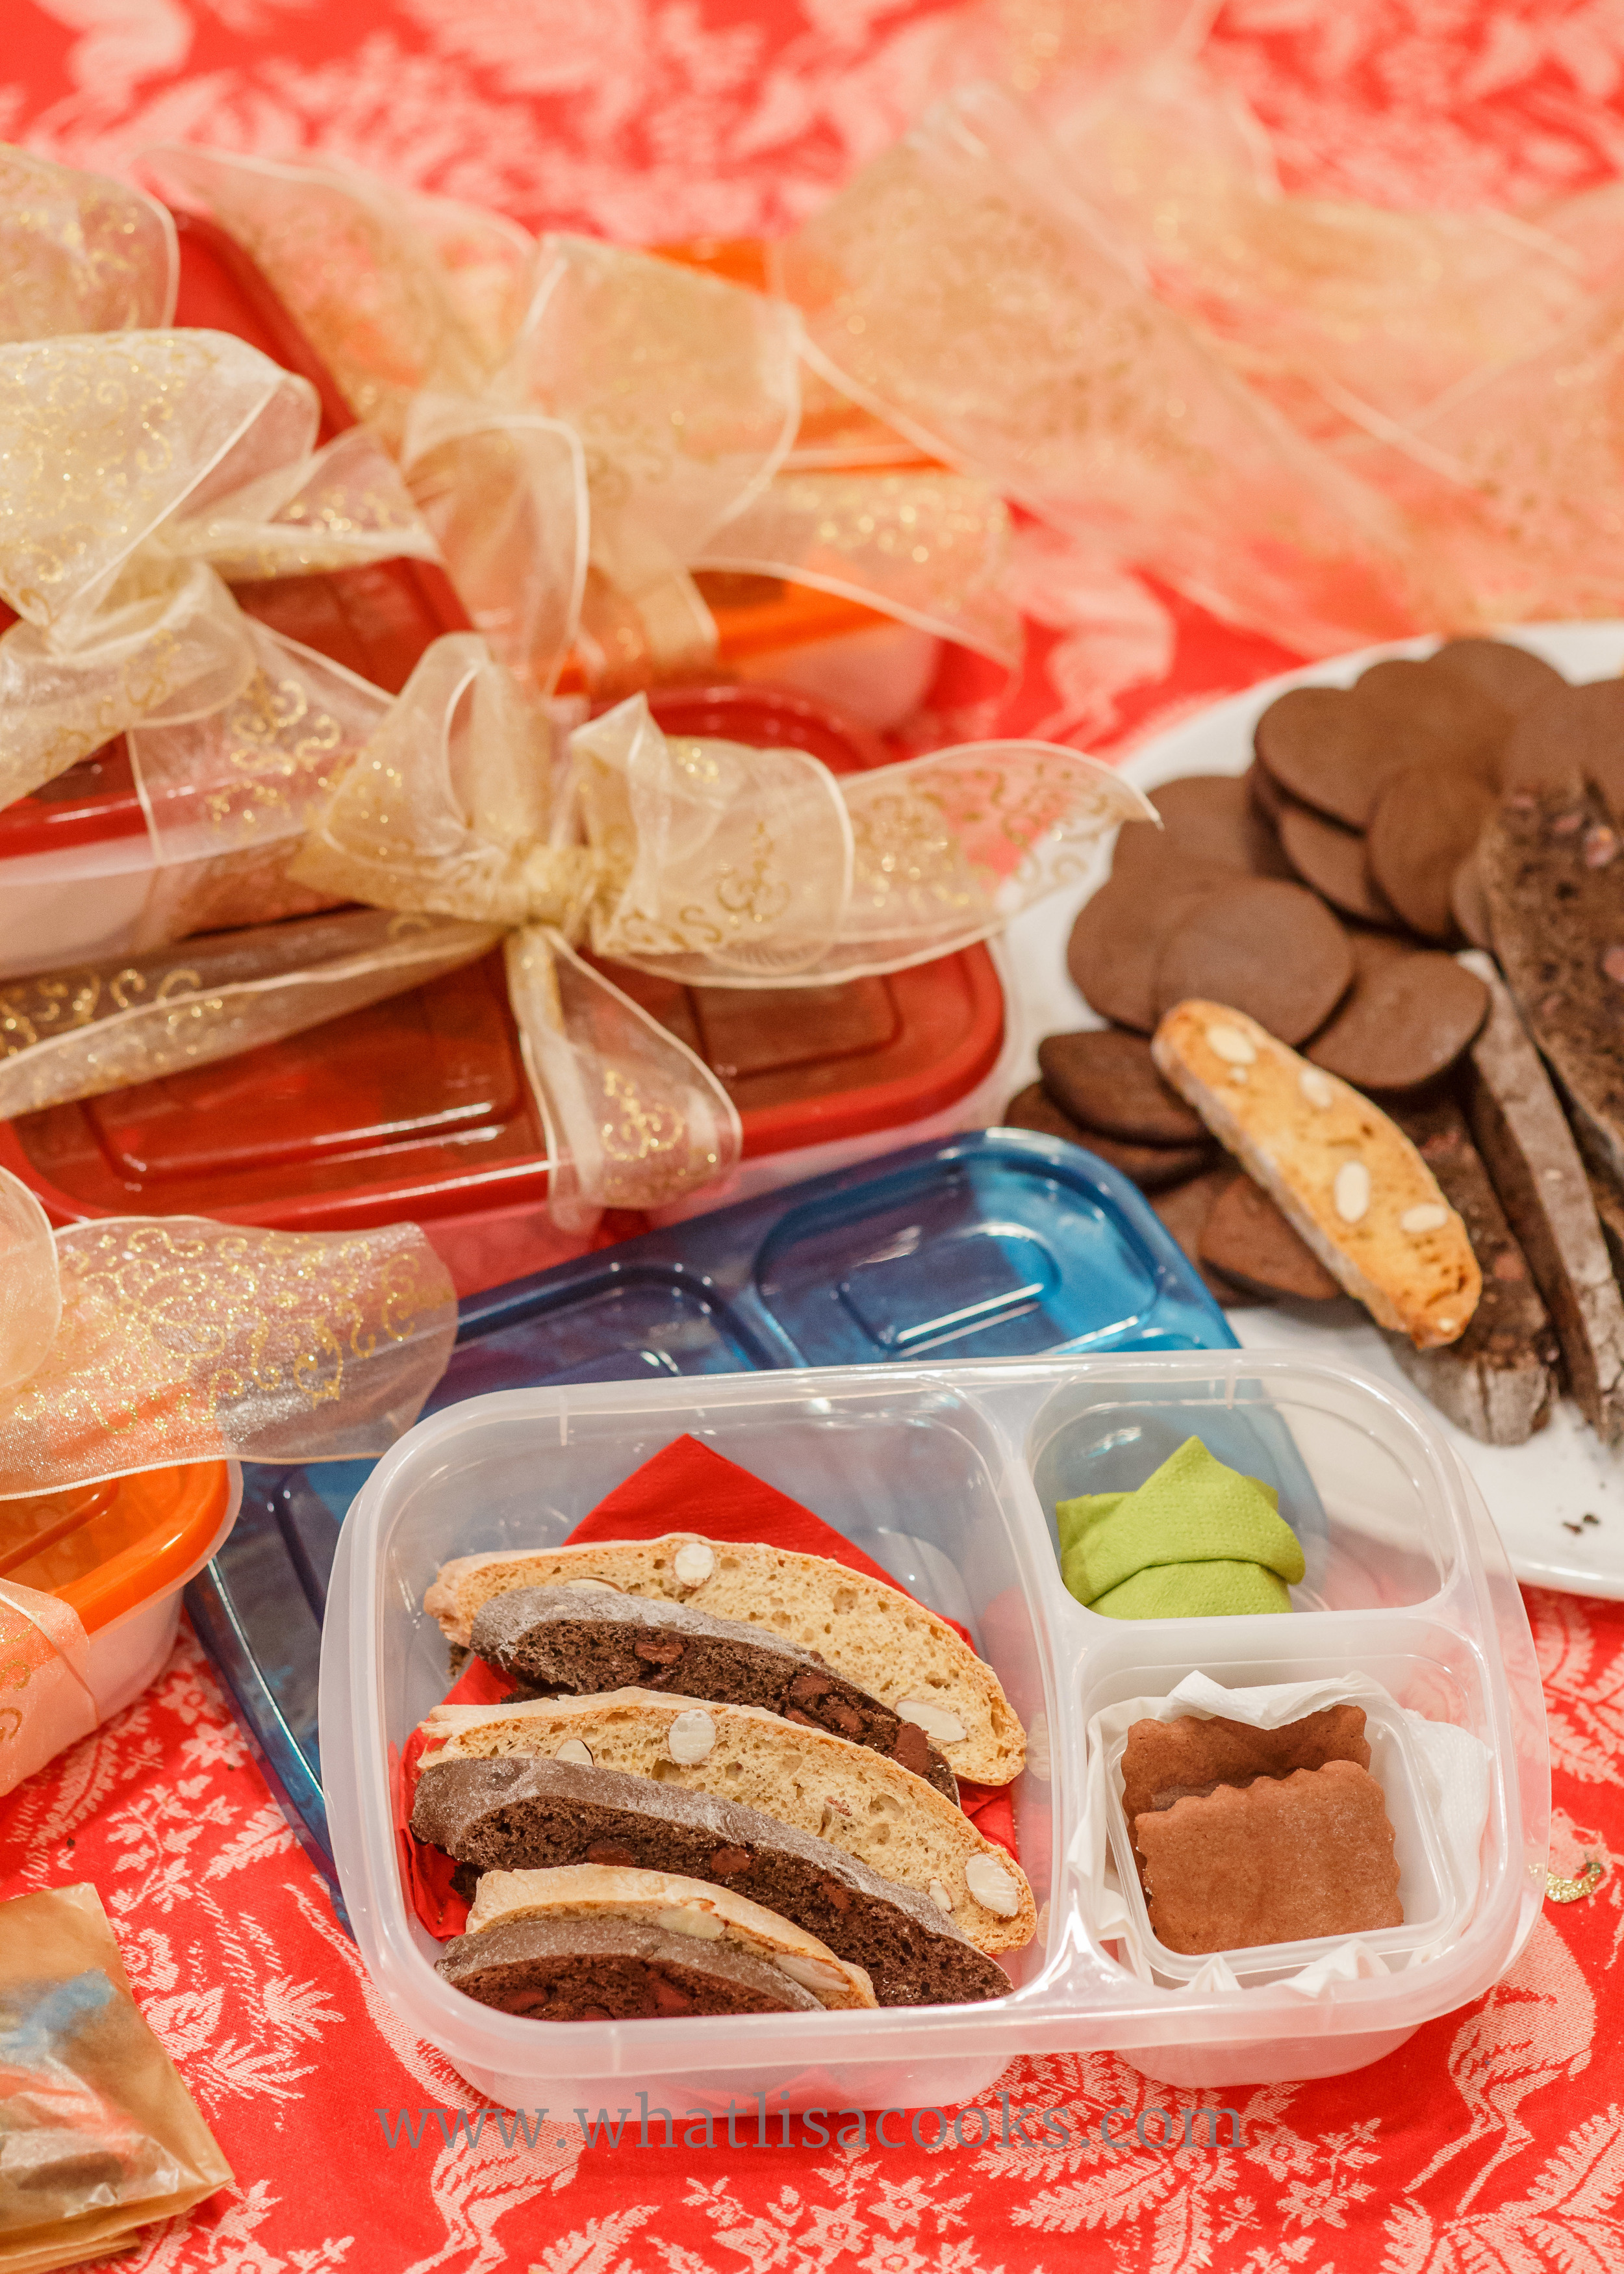
I always make some kind of baked goods for the holidays, and I've given other small things along with them in the past. Since I'm making somewhat of a name for myself around these schools for my lunch making, I figured I'd go slightly with that theme for my teacher gifts this year.
So my super simple and fun little gift idea: pack up my usual holiday cookie gift in one of our favorite lunch containers, EasyLunchboxes. Teachers need lunch too, so I'm hoping they will find this to be something they can actually use, and hopefully remember how much we appreciate them when they use it.
I'm feeling pretty good about this right now - I think I've got something that will put a little smile on their faces, and let them know that we appreciate what they do for us. And for me, it fit in my limited budget and was very easy to do.
I brightened it up a little with a few colors of cocktail napkins that I had picked up recently at Ikea.

The main compartment has two flavors of homemade biscotti - a basic almond biscotti, and a new double chocolate version that I've never done before (I just added 1/2 cup cocoa powder, 1 cup chocolate chips, and skipped the cinnamon and almonds). Those are topped with one cut out chocolate cookie decorated by the kids, in a little parchment bag. (It's nice to have a little of the kids touch to the gift, but let's be honest, most adults don't love those sugary sweet frosted cookies)
One of the small compartments contains one of the EasyLunchboxes mini dipper containers (I've included the lid as well, just under the napkin) with a few easy chocolate cookies I made using this recipe. And in the smallest compartment is a dark chocolate covered salted caramel (not homemade), wrapped in a green napkin like a little present.
Topped with the EasyLunchboxes lid and tied up with a pretty bow. And that's it.


Easy little felt Christmas tree activity
Almost too simple to share - but this is a quick little holiday fun activity you can make with scraps of craft felt.

If you're like me, you see all this amazing crafty holiday stuff all over your favorite pages and maybe let out a little groan. That's nice for people that have that kind of time. But I've got four little kids and not a lot of spare time to prep for elaborate Christmas crafts or activities. So here's one for you that I know you can pull off. Because if I can manage it, anybody can! It takes no artistic talent, you just need to know how to use scissors. And the supplies are very minimal.
Can you cut a triangle? Ok, then you're good.
All you need is a couple pieces of felt. I happened to have a stack of random felt from a project a few years ago, so I was happy to find a use for it. The only part of this that requires a tiny bit of precision is cutting out the tree. I used a ruler and a pencil to get my lines somewhat straight. After that, just randomly cut out shapes. I managed to get a few that look a little like stars, some diamonds, some circles. I cut a few pieces in long wavy shapes for a look of a garland on the tree, and then a lot of just random little snips of a few different colors. That's all.
I got the idea from seeing a bigger, wall sized thing in a catalog. But I wanted to do something smaller. So these are made from just small pieces of felt - the size of a piece of paper. The whole thing folds up and stows nicely in a quart sized ziploc bag - perfect for sticking in a purse for an activity to take along to a restaurant. I originally made them last year before we were going on an airplane flight. I only made two and I should have made four, because my kids of course argued over who got the first turns.


Family Meal Plan #6
A quick and easy meal plan for a busy holiday season.
Oy, it's been a few weeks since I've done this. It's amazing how fast you get out of practice. We're still recovering from our vacation, there's laundry everywhere and just lots of piles of odds and ends. On top of that I am trying to get some Christmasy stuff done with the kids each day. We've been using our 25 days of Christmas calendar, and the kids are loving it, and I love that it gets us in the spirit but keeps it simple for me right now.
With all of that, I'm feeling the need to keep things simple. The great thing about having been doing this for a while is that I can just open up a meal plan from a previous week, make a few changes to it, and not have to work too hard to come up with original ideas. This is not a week for original ideas. This is a week for comforting, nourishing, easy food that I know will keep us going and won't be too much work for me to make.
To get us back in the swing of things, tonight I've got a couple of big organic chickens roasting in the oven, on top of a big pile of veggies. It's my favorite dinner to make at home, and I love getting my week started with it. I'll use those chickens to make some broth for Monday's soup, and I'll use the cooked chicken in the soup and maybe in the tacos on Tuesday, and/or in the pasta Thursday.
So here's the menu, with a few more comments and notes at the end.

click the image to get the full size pdf with the shopping list section.
A few more thoughts about this week:
Breakfasts are designed to quick and easy, but I try to get some protein in. I'm trying to do more smoothies because it's my one sure fire way of getting some good nutrition into my super picky child.
I made up a batch of my homemade instant oatmeal before we love for our holiday, so we'll have that for lunch one day and for breakfast on another day.
Monday dinner will be a simple but hearty soup. I'll have broth from my roasted chickens, and I bought a package of pre-cooked lentils at Trader Joes. They are a great way to make a quick meal. I'll just heat up my broth and throw in the lentils, some chopped frozen kale (from earlier in the summer), maybe a can of tomatoes. That right there is a great meal, and I'll make it even better by adding in some bites of leftover roast chicken near the end.
Tuesday is just simple tacos, I cook the meat and then just put everything out on the table and the family can choose whatever they want. It's always a hit.
Thursday I'm going to use up some of my frozen pasta. Pasta is something I always make extra and freeze. It freezes so well and makes a fantastic quick meal. Reheat it in the microwave or just run under hot water. I think I will just to simple butter and cheese for this one. I'll toss in some bites of chicken if I have any left, or sausage, and probably either some peas or leftover roasted veggies.
Friday we are going to go visit santa, so we'll have dinner downtown after our visit.
Saturday I'm going to do some simple oven baked fish. I made one last month that I really like, so I'll probably do something very similar again.
We'll also be out Sunday for a birthday party, so I won't be cooking my usual big Sunday dinner. But that's ok, I'll do it Monday.
Your new favorite holiday cocktail

I'll keep this one short and sweet, so you can get to drinking. Because this is going to be your new favorite holiday cocktail. Mostly because it tastes so good. But also because it's so easy to make. Just equal parts chocolate milk, eggnog, and Kahlua. You really should use good (real) eggnog - not that 'nog flavored' stuff, and I always recommend you try to get a chocolate milk without high fructose corn syrup.
If you want precise measurements, here's what I've been doing:
- 2 ounces good eggnog
- 2 ounces chocolate milk
- 2 ounces Kahlúa (if you're feeling a little less bold, just 1 ounce)
- 1 ice cube
You can thank me later.


Family Meal Plan #5
A bit of an abbreviated meal plan for a vacation week.
What's on our meal plan this week? Well, not much actually.

Thursday evening we are heading to San Diego to stay with my mom for almost two weeks! We are quite excited, and there are some little children who are going to be having a hard time sleeping later this week. We've got all kinds of big plans, my 7 year old daughter has even made her own list of everything she wants to do.
I think even the cats and my adult stepson who lives with us are looking forward to us leaving, and to having the whole place to themselves for a little while.
I am looking forward to some warmer weather, since we're already seeing temps in the 20's here. And I am very much looking forward to having my mom cook some meals for me! I love cooking for my family, but it does get a little exhausting sometimes, so I am very excited for a break from being the one who does it all, 3-4 meals a day, 7 days a week. I'm sure I'll be doing some cooking at my mom's house, I always do, but not every meal, every day.
Since I'll be spending most of my week working hard to get things packed for 6 people to be gone for 2 weeks, the meals will be pretty simple. First order of business though is a night out for me with a friend, so our kid food night will be Monday. I'll get them all started with some soup and toast before I head out.
This evening for dinner I made a couple of big pork shoulder roasts, with a bunch of veggies and mashed potatoes and gravy - so you know that all of those things will make another appearance. I will use some of the mashed potatoes to make potato pancakes for breakfast one morning. And I will shred up some of the meat and maybe season it up a bit more and we will have pork tacos on Tuesday.
I'm keeping the lunches very simple - leftover pizza, quesadillas, some muffins from the freezer, and PB&J's on the last day - which will probably be packed in something disposable, so I don't have to wash lunch boxes right before we leave for the airport.
And that's it. Not much of a meal plan, but sometimes that's what you do, right?
Have a great week!

Kid Created Table Cover
This was one of our top favorite family activities for many years.
You might have noticed in a lot of my food posts that we have very colorful artwork on our dining table. I've had a few people ask me about this, so I thought I would share it with everyone.
Our dining room is pretty much the center of our house. Everything happens here. Our family dinner every night, along with all our other meals and snacks. Homework and art projects and cooking projects. Play dough and painting. Making cards for loved ones. Sewing up holes in well loved objects. Work and play, seriousness and fun. It's definitely the heart of the home for our family. And so what better to decorate our table than something created by the kids?
This is a project that I love for so many reasons. I love it because I get to look at my kids creative expression every time I sit down to do something. I love it because they love doing it, and they love looking at it and talking about it. I love it because it's easy and cheap. And the bonus feature: with the plastic cover, it's super easy to clean and totally kid meal friendly.
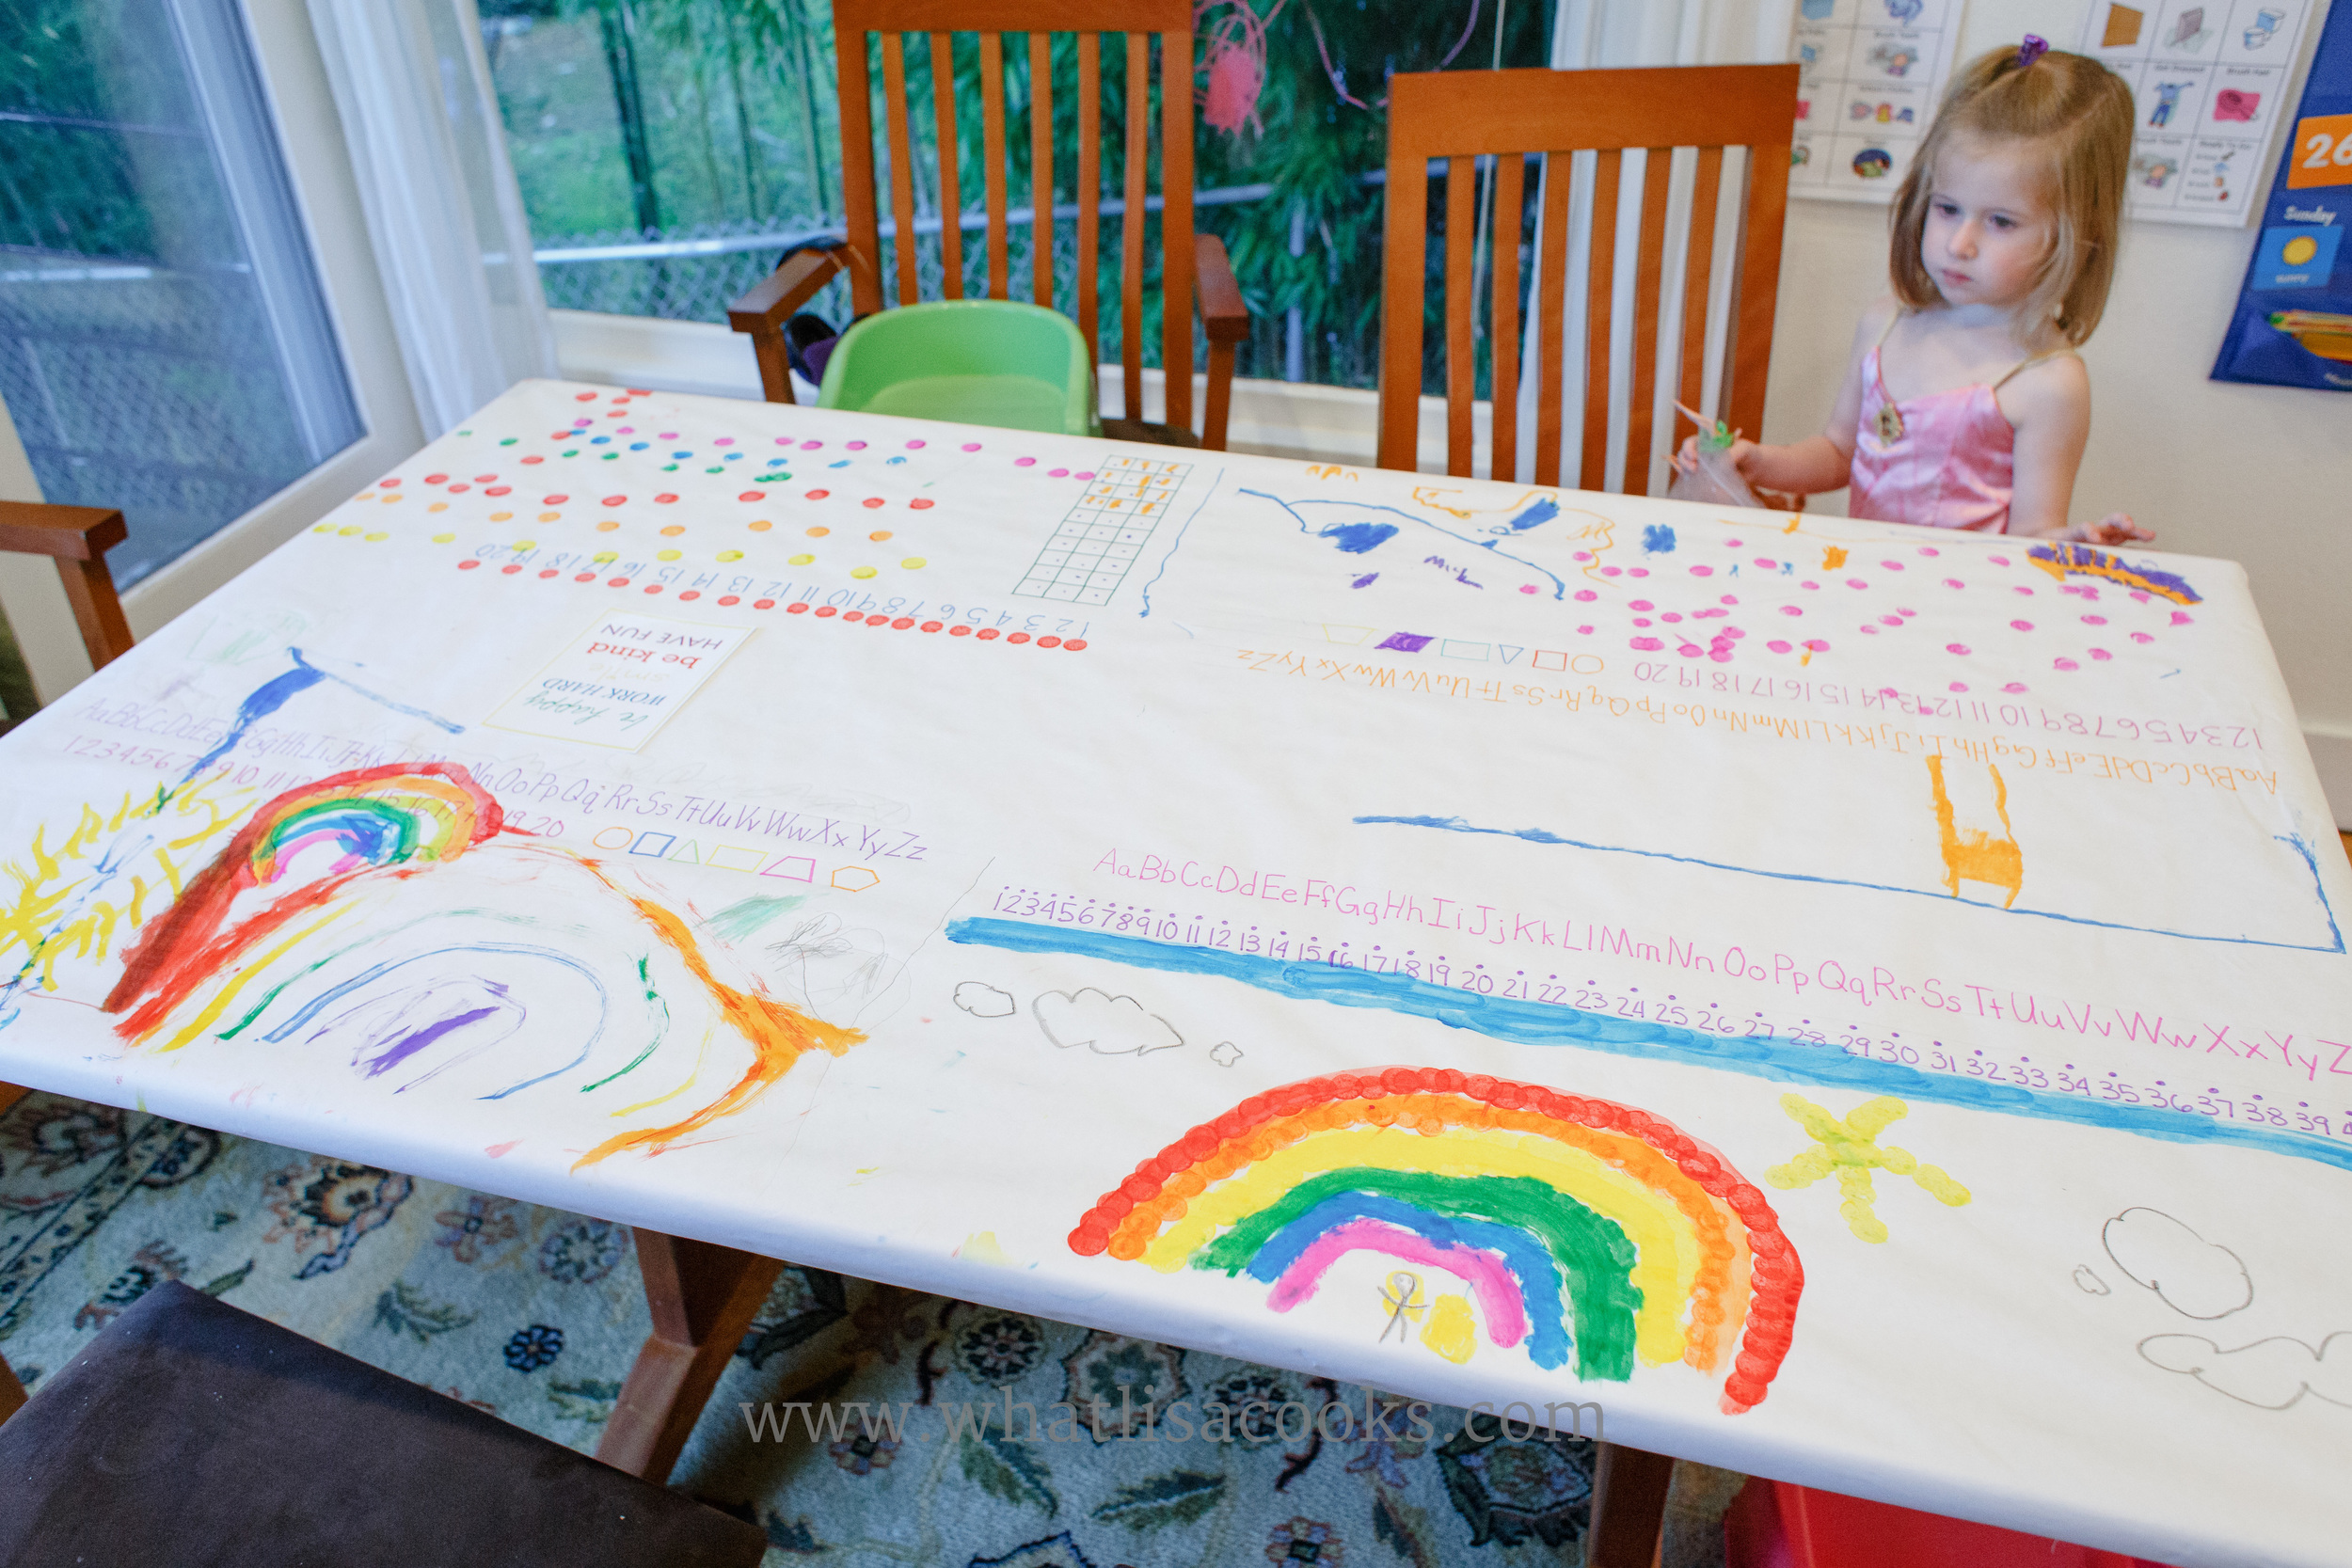
We change our table cover with the seasons. It's a good span of time to be ready to do the project again, and every three months the kids have come up with lots of new ideas.
What you'll need:

- a big roll of white butcher paper. This is the one I have.
- some kind of table pad or protective layer (I have this one)
- art supplies (markets, crayons, paint)
- kids
- some kind of clear plastic cover.
I love having a big roll of white butcher paper. You could probably get less somewhere, but this roll is great for so many things. Make wrapping paper with paint hand prints. Or put it down on the floor to trace big outlines of the kids. Or we draw runways and towns, to play with airplanes and cars. Or just making a huge drawing on the floor is a great rainy day activity. So get the big roll.
I have a really nice cherry wood table (really the only nice piece of furniture in my home). Some day when my kids are old enough to not be destroying it, we'll uncover and enjoy it's beauty. But for now I like to protect it. So I have a padded layer under our art paper to protect the table.

For the plastic cover you can go to your local fabric store and get a length of clear vinyl. It comes in different weights, and I like something a little on the heavy side so it stays in place better. Measure the length of your table and get enough for at least 6-8 inches to hang off either end. Or if you are concerned about the chemicals in the plastic, you can get one of these PVC free clear shower curtain liners and trim the edges off. It won't be as heavy weight as the vinyl, but should still work fine.
The art supplies are limited only by your imagination and your tolerance for clean up. My kids love to paint it. But sometimes I don't want to clean up the paint so we just do markers. Whatever you use, it will be great!
That's all you need - now you're ready to go!
Start by putting your pad down. I wrap mine around the edges of the table and I have it taped underneath to stay on. Then put your paper down over that, also wrapped around the sides and ends and taped underneath, like a package.
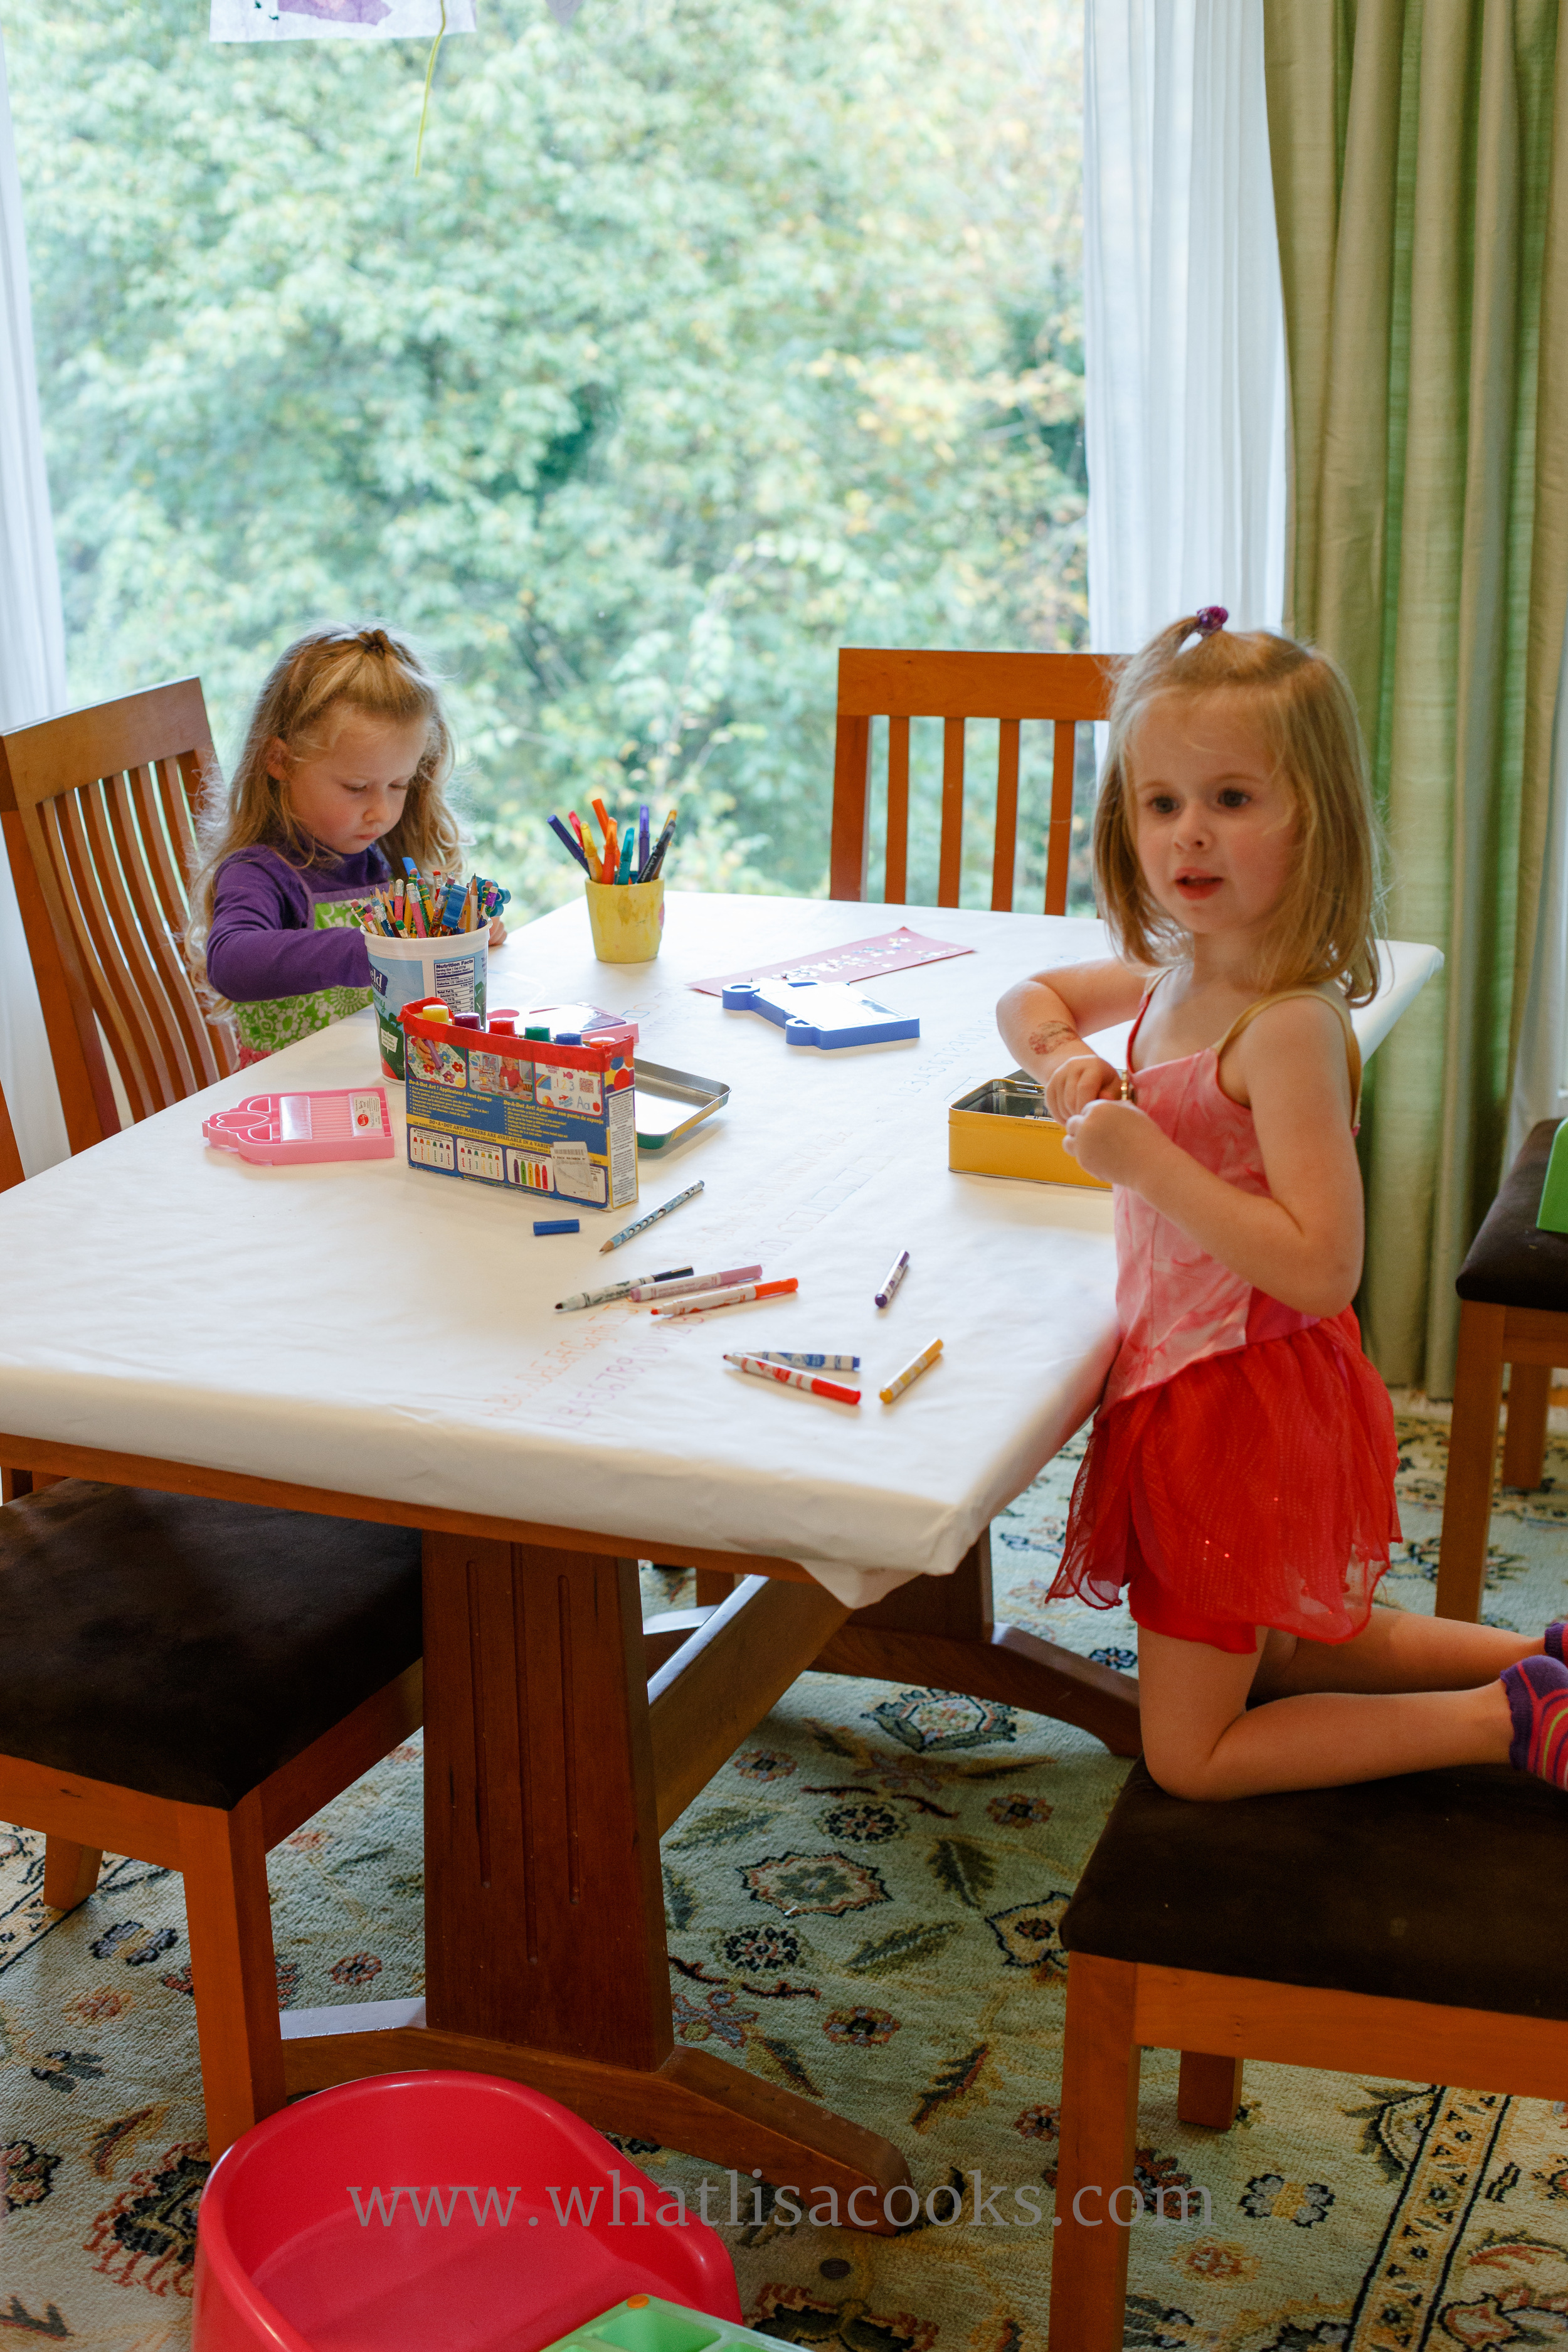
Then let them have at it. Sometimes I just let the kids go for it, sometimes I join in too. This time I joined in and added a few little educational touches.
The younger ones are in pre-k and are working on letters and numbers, so they each have the alphabet and a number line and some shapes. The older ones have number lines and dots for counting, to help with math homework. One also has a 10-frame, and the other requested that I give her the alphabet too. The number lines have come in very handy lately with our math homework.
The kids each decorate their spots, and some extra for mom and dad. I love that you can get so creative with this, or you can use it as an opportunity to help reinforce something you're working on. When we were learning how to properly set the table I drew a place setting at each spot and let the kids color that, and it really helped them learn where to put everything when they set the table (a job that even a two year old can do!). Sometimes I have decorated the kids spots and let them decorate mine - it doesn't get much better than sitting down to dinner with children's love notes under your plate.
Once it's all decorated and dry, put your clear plastic cover over it. When mine were littler and messed with the tablecloth more I used to also tape the cover to the underside of the table. But now I just put it on like a tablecloth and it works just fine.
Now sit down to your family dinner and let the kids tell you all about their creation. They will be so proud.
Give it a try - your whole family will love it!
